01/25/2022 2,559 Alarms
Author: Victor
The instructions for using the Jaguar alarm system with auto start indicate that installation of these systems is only possible on cars with a 12-volt on-board network. Accordingly, on vehicles with a voltage of 9 V or 24 V, the use of the remote engine start function will not be possible.
[Hide]
Description and technical specifications
You can use Jaguar “alarms” of the EZ and TEZ lines on cars with an automatic transmission or a manual one. All modern models of security systems allow operation in alert mode. This means that the user can learn about the vehicle’s security status from the indicators on the key fob display. Jaguar anti-theft systems allow you to start the engine remotely, by command from the remote control or at a certain time configured by the user.
The service manuals for alarms indicate the following technical characteristics:
- radio frequency channels of 433.92 or 868 MHz are used to transmit signals between the control unit and the communicator;
- the range of action of the control panel when sending pulses is 600-1200 meters;
- operating range of the additional key fob is 15 m;
- protection of all power lines that need to be installed and connected to the microprocessor is carried out by safety devices of 7.5-30 A;
- the choice of rating depends on the type of equipment being protected and is indicated in the technical manual;
- when the security mode is on, the alarm current consumption should be no more than 15 mA;
- activation of the protection function is possible with a delay of 5, 30 or 45 seconds after sending the signal;
- vehicle security is provided through power outputs of the ignition system, door limit switches, hood, and additional controllers;
- the total number of communicators that can be connected and configured to work with alarm systems is 3-4 pcs. depending on the model;
- The main key fobs are powered by 1.5 volt AAA batteries, and 6V CR2025 batteries for additional key fobs;
- The anti-theft system can be controlled automatically or through the use of the car owner's call controller.
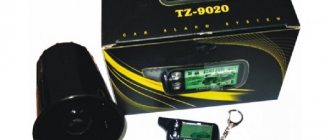
Equipment
List of items included in the delivery set:
- The control unit is made in a black plastic case.
- Service documentation, including electrical diagrams for connection, use, as well as recommendations for installation. The manual describes in detail all the features and provides steps for setting up the system.
- The main communicator, equipped with an LCD display and equipped with a two-way communication option.
- An additional key fob that is not equipped with a screen and has a shorter range.
- A transceiver module equipped with a button to call the car owner from inside the car with a connected cable for connection. By clicking on it, a message about the need to approach the vehicle will be sent to the remote control with a display. The antenna module is equipped with a special sensor, which is used to determine the temperature conditions inside the car.
- A siren belonging to the class of six-tone devices.
- Two-level sensitivity and impact controller.
- LED to indicate alarm status.
- Valet service button.
- Limit switch designed for mounting on the hood.
- A set of cables and blocks for making connections.
- Two power supplies for installation in communicators.
- Stickers - one with the anti-theft system logo, the second - for attaching the transceiver module.
- Warranty card.
The delivery set includes one limit switch; other devices for the doors and trunk are purchased separately.
Photo gallery
Jaguar alarm photo:
Anti-theft control unit
Jaguar EZ-B Scope of Delivery
Disassembled Jaguar alarm communicator
Basic signaling capabilities
List of features and functions of Jaguar anti-theft systems:
- Option to turn on the security mode with or without sound and light accompanying signals. In the latter case, this is a silent protection function.
- Protection of a vehicle from robbery, “Anti-robbery” option. The car's engine will automatically shut down during specific events. For example, if the owner is forced out of the car, the security system will determine this by signals from the controllers on the handbrake or brake pedal. The engine is blocked after a certain time, when the thief drives to a safe distance for the car owner.
- Possibility of selecting alarm signals.
- Availability of seven independent security zones. We are talking about all the car doors, trunk, hood and ignition system.
- Using two-stage security disabling.
- The presence of a driver warning function about unlocked locks.
- Possibility of connecting the steering signal to the siren of the anti-theft system.
- Automatic engine start upon command from the remote control, at a specified time or temperature. When the level of the latter drops to a critical level set by the user, the power unit is started remotely. Allowing the engine to automatically turn on and warm up during the night will help prevent it from freezing in the morning.
- The presence of non-volatile memory of the control unit about events recorded by the alarm. If the microprocessor module is disconnected from the power supply, when it is further connected, information about the operations will remain.
- Possibility of connecting additional digital relays to block the engine.
- Indication of the power source discharge in the main remote control, as well as the voltage level in the vehicle’s on-board network. All information is displayed on the communicator screen.
- Use dynamic encoding to protect signals.
- Availability of energy saving mode. This helps prevent your device's battery from draining quickly.
- Possibility of online programming of options.
- The presence of a button lock function on the communicator.
- Using a personal password to emergency disable the anti-theft system. The PIN code can be used to enter the alarm service mode.
- Possibility of additional connection to the GPS tracker anti-theft system. This will allow you to determine the location of the vehicle.
- Option to monitor the start of the power unit using signals coming from the tachometer or generator device.
- Possibility of turning on the protection mode on a car with the engine running.
- Availability of the “Hands Free” option. This function allows you to automatically turn the vehicle security on and off if the car owner moves away or approaches the car.
- Ability to select the duration and number of door lock control signals.
- The presence of a “Turbo timer” mode, which allows you to prevent rapid wear of engine structural elements. The turbine cooling time is user adjustable. The essence of its action is that after the ignition is turned off, the engine continues to idle for some time.
- Function of automatic return to security mode if the alarm is accidentally turned off.
- Warning the user with light signals about unlocked door locks.
User Alexander Bobrov, in his video review, briefly spoke about the capabilities and features of the Jaguar alarm using the example of the EZ-Four model.
Advantages and disadvantages
Main advantages:
- affordable price;
- extensive functionality;
- effective operation of the autostart option regardless of weather conditions.
Flaws:
- Using dynamic code. Today this type of encoding is not relevant. Manufacturers of anti-theft systems use interactive signal coding as a more reliable protection option. It will be easier for the hijacker to “break” the “dynamics”.
- The communicator comes in a weak case. The device may fail even with a slight fall, and constant use will lead to the buttons on the remote control sticking.
Adding a new ez 6 pager
In order to flash the Jaguar EZ 6 alarm key fob, follow the steps.
- Press the “Jack” service key seven times.
- Turn the ignition key to the “On” position.
- The siren will sound seven times.
- On the remote control, simultaneously press the “Open lock” and “Closed doors” keys until confirmation - one siren signal and the sound of the transmitter.
- Repeat the previous steps with the remaining remote controls. No more than five seconds should pass between programming communicators.
- Pull out the key. The side lights will light up five times.
- When recording new key fobs, do not forget to reprogram the old ones to avoid deleting them from the anti-theft system's memory.
How to install?
In accordance with the instructions for using the Jaguar alarm system with auto start, the installation of the anti-theft system is carried out on a car with the battery disconnected. To do this, the user must first open the hood and disconnect the negative terminal from the clamp.
Installation rules
Installation Guide:
- Before performing a task, the windows of the car are lowered. This will allow the user not to be locked in the car if the alarm is accidentally closed.
- We recommend connecting all Jaguar elements without installing them on the car to check their functionality. The system is connected directly to the battery for testing.
- The alarm control unit is being hidden mounted. It is recommended to place it behind the instrument panel to ensure a minimum length of wires. The unit can be installed behind the glove box or in the free space behind the car radio. The module should be placed on a flat surface with the connector facing down to prevent moisture from getting inside through the wires. To fix the device, double-sided tape, self-tapping screws or plastic ties are used, if the surface design allows.
- The siren is being installed in the engine compartment. Installation should be carried out in a hidden place so that the horn of the device faces down. The wires from the siren should not hang down so that an attacker cannot gain access to them from under the bottom of the car. Do not place the device near sources of moisture or high temperatures as this may cause the device to melt.
- A limit switch is installed on the hood. It must be placed in a place where there is no accumulation of moisture. When the hood is closed, there should be no access to the device. If you purchased additional “limit switches” for the doors and trunk, then they also need to be installed. To do this you will have to remove the plastic lining.
- A transceiver module is installed on the inner surface of the windshield or rear window. Do not install the device near metal parts or electronic devices as this will reduce the range. Double-sided tape or glue is used to fix the antenna module.
- The sensitivity sensor is installed in the central part of the vehicle. It can be placed on an iron partition that separates the car interior from the engine compartment. The device must be installed so that the user has access to its adjustment elements.
- The service button is installed in a hidden manner, but in such a way that the consumer can reach it when sitting in the driver’s seat. You can install the device under the instrument cluster and hide it in one of the wiring harnesses. To disguise the button, you can wrap it with electrical tape of the standard color.
- Laying of electrical circuits is carried out under the decorative cladding of the vehicle. Wires should not be laid in places where there are moving mechanisms. In addition, it is not recommended to lay cables near electronic devices and equipment. If it is necessary to extend conductors, all joints during soldering must be located in the vehicle interior. This will prevent them from oxidizing.
Layout of elements
Maps for connecting the anti-theft system are provided at the link:
| Manuals in Russian for operation and installation of alarm systems | |
| Jaguar alarm wiring diagrams |
EZ 10 activation
You can program up to four pagers in the Jaguar EZ 10 memory. Turn off the security mode and do the following.
- Turn the ignition key to the "On" position.
- Press "Jack" until the siren sounds four times.
- To program the remote control with the screen: hold down the “Trunk Opening” and “AUX” keys. The key fob will emit a short beep. To record a switch without a display: hold down the "Star" and "Trunk Open" keys at the same time. The transmitter signal will follow.
- The siren will make one sound, confirming the registration of the first communicator.
- Repeating the previous steps, write down the codes of the remaining pagers.
- Exit settings mode by turning off the ignition. There will be five flashes of the side lights.
User manual
You can use the alarm after installing power supplies in the communicators. To do this, remove the back cover of the remote control and install the batteries taking into account the polarity.
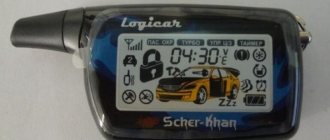
Controlling the system from a key fob
Key designations on the communicator:
Correspondence of buttons on the main and secondary remote control
To control the system, the combinations given in the table are used:
| Button | Option | Note |
| 1 | Description:
| Briefly press and release |
| 1, 1 | Turning off the sensitivity controller warning zone | The key is “clicked” and released twice within 0.5 seconds |
| 1, 1 | Deactivating both sensor zones | The same actions are performed, only after the warning zone is turned off |
| 1, 1 | Enabling the warning and alarm zone of the shock controller | The button is pressed twice when the sensor is turned off |
| 1, 1 | Activating protection mode without sound signals | First, the key is pressed until the key fob emits a melodic signal, and then it “clicks” briefly |
| 1, 2 | Enabling silent security | Button 1 is held until a melodic signal is heard, then press 2 |
| 1+2 | Enabling the Panic feature | Both buttons are pressed simultaneously, the ignition must be turned off |
| 1+2 | Activation of the “Anti-robbery” option | Keys are pressed and held, vehicle ignition is on |
| 2, 2 | Disabling the Anti-Robbery function | First, the button is pressed until a melodic signal is heard, and then it “clicks” briefly |
| 2 | Deactivating security mode and opening door locks | Pressed and released |
| 2 | Unlocking doors after disabling the security function | Brief "click" |
| 2 | Turning off alarms without deactivating protection mode | Press and release |
| 2 | Disabling silent security | The key is pressed until the remote control sounds a melodic signal, then pressed briefly |
| 2, 1 | Activation of the protective function when the engine is running | While the ignition in the car is on, the button is pressed and released twice |
| 2, 2 | Turning off the warning zone of the additional controller | The key is “clicked” briefly twice within 0.5 s |
| 2, 2 | Deactivating the auxiliary sensor | The button is pressed twice after the warning zone is turned off |
| 2, 2 | Enable both zones of the additional controller | If the sensor is deactivated, the key “clicks” twice |
| 3, 1 | Auxiliary Channel 1 Output Control | The third button is pressed until a melodic signal appears, and then you need to briefly press element 1 |
| 3, 2 | Combination to enter the second channel setup menu | The principle of use is similar |
| 3 | Control of the third additional signaling channel | Button 3 is pressed for a long time until there is a signal, and then “clicks” briefly |
| 3 | Diagnostics of the state of the security system, checking the temperature level in the cabin | The press must be short |
| 3 | Activation of the “Search” mode, as well as monitoring the engine temperature level | The button is held until a melodic signal is heard and pressed briefly |
| 3 | Entering the menu for setting the current time, timer and alarm clock | The key is pressed until the melody appears, and then one long and two short pulses |
| 3 | Used to select options using a cursor:
| Control Features:
|
| 1, 3 | Remote start of the power unit | First, key 1 is pressed until a melodic signal is heard, then element 3 is briefly “clicked” |
| 1, 3 | Extending motor operating time | The steps are similar, only with the engine running. |
| 2, 3 | Remote stop of the power unit | Button 2 is pressed until a melodic signal is heard, then the third key “clicks” |
| 1+3 | Activating button lock on your communicator | Simultaneous pressing |
| 2+3 | Disabling the key lock function | Keys “click” simultaneously |
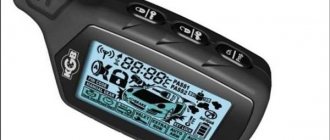
Designation of icons on the keychain
The key fob display shows 24 options necessary to control the alarm.
Description of indicators on the LCD display
Description of indicators on the remote control display:
- Option to automatically start the motor at a user-specified time.
- Remote engine start mode using a timer.
- Automatic start of the power unit based on temperature level.
- Indicator of the brake pedal being depressed or the handbrake not being tightened.
- The anti-theft system service mode is enabled.
- The "Turbo timer" option is activated.
- Indicator of automatic activation of protective mode.
- Engine immobilizer function.
- The option to lock the buttons on the remote control is enabled.
- Indication of battery charge of the communicator.
- Symbol of triggered warning or alarm zones of the main or additional controllers.
- Indication of engine or interior temperature level.
- Anti-robbery mode is enabled.
- Vehicle engine running indicator.
- Icon of an additionally connected GPS module.
- Symbol for bypassing the warning or alarm zone of the shock sensor.
- Indication of the current time.
- The countdown timer is activated.
- The alarm is on.
- Indication of the range of the key fob.
- Symbol of open or closed door locks.
- Indicator of activated security mode with or without accompanying audio signals.
- The function of disabling the alarm using a personal password is enabled.
- Manual transmission mode is activated.
Key fob programming
To bind a new communicator, perform the following steps:
- The ignition in the car is turned on.
- The Valet service key is pressed and held until the system plays four beeps.
- To bind a new remote control, the owner simultaneously presses buttons 1 and 2. If an additional communicator is used, then you need to “click” on buttons 3 and 4. Successful programming will be indicated by 1 siren signal.
- Point 3 is repeated for each key fob that is registered. The time interval between recording devices should be no more than five seconds, otherwise the alarm will leave the binding mode. The number of siren signals depends on the number of the programmed key fob.
- The ignition in the car is turned off. Five signals from the car's headlights will indicate a successful exit from the binding mode.
The Jaguar alarm system allows you to record up to four communicators into the control unit’s memory. When programming new devices, you must also re-register the old ones, otherwise information about them will be deleted.
Security mode
Features of protective function control:
- To turn on security with sound signals, use the first button; press it briefly. The vehicle's ignition must be turned off and all doors locked. When turned on, the display will show indicators in the form of a closed lock and a speaker. Disabling is done using the first button.
- Silent security is activated by moving the cursor to the position of the corresponding indicator on the display. After selection, press button 2. Icons in the form of a lock and a crossed out speaker will appear on the screen. When disabling security, you must move the cursor to the position of the same indicator, and then press the second key.
- Before turning on the vehicle protection with the engine running, the user lifts the parking brake lever. Button 1 is pressed and held until the car's headlights blink three times. An indicator in the form of smoke from a muffler will appear on the communicator screen, and the LED will light continuously. The key is then removed from the ignition and the engine should remain running. Over the next 30 seconds, the user should leave the car and press button 1, this will turn on the security.
- To disable the protection of the machine with the engine running, briefly press the first button. To confirm, the alarm will sound a siren twice and blink its lights twice. The motor will continue to operate and stop after a time set by the user.
In the video, Alexander Shkurevskikh spoke about managing the Jaguar alarm system.
Emergency management
If there is no remote control, you can control the security mode using the service button:
- The car's ignition is turned on.
- The user “clicks” the emergency mode entry key eight times.
- The ignition turns off. The alarm will sound once with the siren and car lights.
- Within 20 seconds, the user must leave the car and lock all door locks with the key. The security will be activated automatically.
- To disable the protection, the user opens the door locks, which will activate the alarm mode.
- The key is inserted into the lock and the ignition is activated. There is no need to start the engine.
- Within 20 seconds the service key must be pressed 4 times.
- The ignition is turned off. The alarm deactivates the protection mode.
Setting up autorun
Before implementing the function, the car must be prepared:
- With the engine running, the gearbox selector is set to the neutral speed position. The handbrake lever is lifted.
- The ignition is turned off and the key is removed from the lock. The motor should remain in working order.
- Over the next 30 seconds, the driver leaves the car and locks all doors, including the hood and luggage compartment. The motor will stop or run for a certain time if the Turbo Timer function is turned on.
- To start the engine on command, press and hold key 1. When a melodic signal appears, you need to release the button and press control number 3.
- The car's headlights will flash three times. If this happens, the engine has started successfully. As confirmation, an indicator in the form of smoke from the exhaust pipe will appear on the display.
By time
Timed triggering is done as follows:
- The user must ensure that the current time on the device is set correctly.
- The alarm is being set. After completing the task, an indicator in the form of a bell will appear on the screen.
- The third key on the key fob is pressed. It is held until two signals are played - melodic and short. The button can then be released.
- Using control 3, the cursor is positioned at the position of the icon labeled “Clock Start”.
- The first button of the key fob is pressed, the option will be enabled. The lighting devices will blink and the communicator will play a melody. The corresponding indicator will light up on its screen.
By temperature
The temperature setting is done as follows:
- Button number 3 is pressed and held. The remote control should play a double beep.
- The control element is released. The icons on the bottom row of the communicator display will flash.
- Using button 3, the cursor on the device display is moved to the position in the form of a thermometer. The temperature at which the car engine should start is selected.
- After setting the parameters, press key 1. The vehicle's headlights should blink, and the thermometer indicator will light on the remote control display.
On the Sigmax69 channel they talked about setting the engine operating time during automatic start.
Additional options
Setting the current time on the communicator display is as follows:
- Button 3 is pressed and held. The key fob should first emit one melodic, then a short and two long signals.
- The key is released. The remote control will enter clock setting mode.
- To increase parameters, use the first key, to decrease - the second. Quick changes in readings are possible by pressing and holding the buttons.
- To go to the menu for changing minute values, use the third key. The steps to decrease or increase parameters are similar.
- Exit from the clock programming menu is carried out by holding down key 3.
The alarm clock is set as follows:
- Button 3 is pressed and held. The communicator should play several beeps.
- The key is released.
- Button 3 is pressed twice. An alarm indicator in the form of a bell will appear on the communicator screen.
- The clock is being set. Increasing the readings is performed by the first key, decreasing - by the second.
- To go to the menu for changing minutes, briefly press the third button. The steps to increase or decrease parameters are the same as in the case of a watch.
- Activation and deactivation of the settings mode is performed by briefly pressing the third button. Then, using keys 1 or 2, the option is turned on or off. To leave the setup menu, the third button is pressed and held until a short beep appears.
Keychain binding Jaguar EZ Three, One
Instructions will help you synchronize your Jaguar EZ One, Free communicator.
- Disarm the car. Pull out the key.
- Turn on the ignition. You have five seconds to do this.
- The siren will sound seven times, indicating that you have entered the setup mode.
- Press the “Closed Lock” and “Open Machine” buttons at the same time.
- The siren will sound.
- By holding down the same buttons, register the remaining transmitters.
- After you have completed all the steps, wait for the hazard lights to flash five times. This is a signal to exit programming mode.
Download alarm installation and operation instructions in PDF format
You can read free service manuals on the use and installation of Jaguar anti-theft systems of different models using the following links:
| Manuals in Russian for operation and installation of alarm systems | |
| Operating and installation instructions for Jaguar EZ-B | |
| Installation and configuration instructions for Jaguar EZ-One | |
| Operating and installation instructions for Jaguar EZ-Four |
What is the price?
Approximate prices for different models are given in this section.
| Name | Price, rub |
| JK-77 | 2300-2600 |
| JX-4000RS | 3900-4200 |
| EZ-One | 3500-3800 |
| EZ-7 | 4000-4300 |
| EZ-8 | 3400-3800 |
| TEZ A | 2900-3400 |
| TEZ B | 3100-3500 |
| Prices are relevant for three regions: Moscow, Chelyabinsk, Krasnodar. | |
Possible faults
Malfunctions that can occur in the operation of Jaguar anti-theft systems:
- The battery in the communicator is low. Such a malfunction will lead to a deterioration in the range of the alarm, as well as poor operation of functions. The user must check the operation of the power supply and replace it if necessary.
- Communicator failure. If the device stops working as a result of a fall or mechanical damage, it will need to be disassembled and diagnosed. Damaged contacts and buttons can be re-soldered, but the procedure for changing the firmware is difficult to perform on your own. If the problem is the effect of moisture on the device, then you need to remove its board and dry it in a warm place. It is not allowed to use a stove or a household hair dryer to remove condensation.
- Damage to wires. The areas of electrical circuits located in the protective corrugations between the doors and the body are most susceptible to wear. To search for damaged cables, you will need a tester; it can be used to ring power lines. The wires must be replaced with products with the same cross-section. For better protection, the cable can be wrapped with electrical tape.
- Failure of limit switches. For this reason, the system may not close all doors. Most often, the contact on the wire through which the sensors are connected to the on-board network wears out. They may oxidize, then to solve the problem you will need to clean the pads.
- Incorrect installation of the transceiver. Because of this, the signal quality will be poor. To fix the problem, the antenna module must be moved to another location.
- Control unit malfunction. Software problems should be resolved by specialists, as firmware changes may be required. If the microprocessor module fails due to exposure to moisture, as is the case with the remote control, you need to remove the board from it and dry it. The contacts on the unit connector may be oxidized or clogged. To fix the problem, you will need to clean the pad.
Differences between “EZ” series alarms
How to set up a Jaguar car alarm key fob? Every owner of this anti-theft system asks this question when they lose or replace their old remote control. Different switch models have their own programming algorithm. Therefore, before carrying out any operations with the transmitter, carefully read the user manual. Up to four remote controls can be used simultaneously.
Video
On the Sigmax69 channel they talked about programming the buttons of the Jaguar alarm control key fob.
Do you have any questions? Specialists and readers of the AUTODVIG website will help you ask a question
Was this article helpful?
Thank you for your opinion!
The article was useful. Please share the information with your friends.
Yes (66.67%)
No (33.33%)
X
Please write what is wrong and leave recommendations on the article
Cancel reply
Rate this article: ( 3 votes, average: 4.67 out of 5)
Discuss the article:
Registration of Jaguar Tez B key fob
The firmware of the Jaguar Tez B transmitter is done as follows.
- Disable vehicle protection mode and turn on the ignition.
- Press and hold the service mode key until the siren sounds four times.
- On the remote control, simultaneously hold down buttons A and B. If you are binding a communicator without a screen, use keys C and D. The siren will sound once.
- Record the remaining alarm remote control switches in the system memory. The time interval between the binding of transmitters should not exceed five seconds.
- Turn off the ignition. The turn signals will blink five times.
What about the configuration?
For these models it does not go beyond standard solutions. What can we find in the box?
- Documentation such as instructions and warranties for equipment.
- Cables for making connections.
- Velet button, service. It is needed to completely disable all security functions. They try to hide it in the most unexpected places.
- Limit type switch.
- LED located on the front panel.
- Temperature sensor for outdoor installation.
- Bell or siren.
- Shock sensor, two-level type.
- Antenna module that receives and transmits information.
- Keychain with LCD screen. Important information is displayed on it.
- Main block. It is also called the security system processor.
There are other components in the Jaguar JX 110 security systems, but they are purchased separately. And they install it themselves if necessary. This also applies to the Smart Key function, which was mentioned earlier.
Learn more about available options
In total, the line includes several dozen models. And each has an autorun function. They are all in the price segment with prices ranging from 2 to 10 thousand rubles. Some models have been discontinued, but even they still delight users who managed to make a purchase.
What can modern security systems from the Jaguar JX 1000 series do?
- Open access to install Smart Key technology.
- Equip the system with high-quality autostart.
- Ensure high alarm response speed. Experts assure that it is equal to 2-3 milliseconds.
- Install a modern transmitter that transmits signals over a distance of up to one and a half thousand meters.
Smart Key is one of the latest developments in the field of security systems. It is needed so that the engine can be started without keys.
And so that the driver has remote access to the cabin.
Such systems work on a simple principle. The sensor sends a signal to the security system unit the moment the owner uses the key fob. All vehicle systems are used according to this principle.
Key Features
The system has a standard set of capabilities. Just a few of them stand out:
- Call the vehicle owner if the alarm goes off.
- Controlling door locks while driving.
- Disabling the alarm even if the standard key fob is lost.
- Wireless engine blocking.
- Enabling silent security mode, transmitting an alarm signal only to the key fob.
The manufacturer also points out a set of additional functions present in the set of equipment in the Jaguar JX 110.
- Self-diagnosis when the security mode is turned on.
- Disabling sensors for individual zones.
- Disarming and arming without additional sounds.
- Engine blocking.
- Panic mode.
- Independent security zones, up to seven.
- System management regardless of where the owner is located. But this function works with the additional installation of a GPS system.
- Fast response, in just 2 milliseconds.
- High-quality protection against radio interference, intelligent operation of the system.
- Reliable protection against interception provided by a double dialogue code.
Synchronizing the EZ-Two Switch
Linking the Jaguar EZ Tu feedback transmitter is carried out according to the instructions.
- Disable car security. Activate the ignition.
- Press the "Jack" button for five seconds. The siren will sound four times and the LED will blink the same number.
- Click the “Trunk Opening” and “Speaker Crossed Out” buttons. The key fob will beep twice.
- Following the steps above, register the remaining transmitters.
- Turn off the ignition. The direction indicators will blink five times to confirm exiting the setup mode.