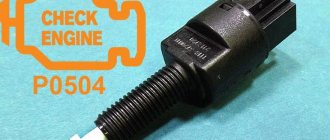
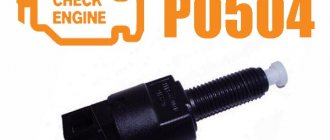
Owners of LADA cars with an electronic gas pedal may encounter error P0504 (mismatch of brake pedal sensors). Along with it, malfunctions in the engine may appear (stalls, speed fluctuates, does not start, etc.). Most often the cause is the brake pedal position sensor (brake light sensor or frog).
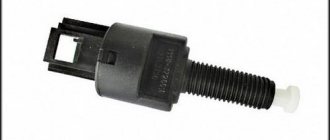
The brake pedal position sensor and brake light switch are mounted in one housing. Most often, the cause of its malfunction is a broken spring. In this case, you can repair the sensor yourself by replacing the spring with a new one. Or replace the sensor with a new one.
Description of the brake pedal sensor
Below we will find out how it works and how to replace it.
Purpose, location and operating principle
The essence of the system is that when you press on the brake, the piston in the cylinder begins to move. After this manipulation, fluid enters the brake system from the intake valve. It passes through the pipelines towards the main wheel mechanism, thus creating a suitable situation for the pads to move towards the wheel discs and drums. As a result, contact and subsequent braking occur. The controller itself turns on the brake lights.
Brake end piece
Typical malfunctions and methods for their elimination
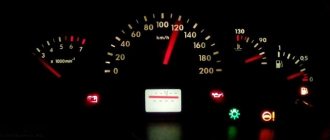
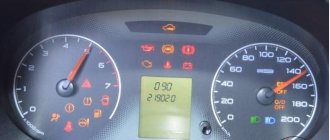
When “communicating” with a car, you can encounter various problems, but there is the most common and annoying problem. This problem is called error P0504, or otherwise “Brake pedal sensor mismatch.”
This malfunction often slows down the car. To solve this issue, you need to release the brake pedal and adjust the gap in the position sensor.
The adjustment is quite simple:
- It is necessary to hang a small but weighty weight in the area of the rubber brake pad.
- Unscrew the sensor nut a little and bring the white part to the brake pedal so that there is a gap of 0.2-0.5 mm between the body thread and the white tip. The sensor must be fixed in this position.
New replacement part
How to adjust the brake light switch on LADA cars
On LADA cars, depending on the model and year of manufacture, AVTOVAZ used different brake light sensors (brake pedal position sensor or “frog”). During operation of the vehicle or when removing/installing the sensor, it must be adjusted. Do you know how to adjust this sensor yourself?
Instructions for replacing the brake controller
- Pump out the liquid.
- Place the vehicle on a support stand and remove the wheel.
- Use a wrench to unscrew the two wheel pins.
- Remove the brake drum.
- Then, using a screwdriver, pull out the hook of the upper tension spring and remove the part. Perform the same manipulation with the lower tension spring.
- Then remove the front pad and spacer bar, while disconnecting the pressure spring and lower the pad.
- Remove the shoe lever from the parking brake hole, straighten the cotter pin and remove it from the parking brake drive.
- Remove the washer and lever.
- Install a new block and assemble the part in the reverse order.
Rear disc brakes on Lada Kalina
Old style sensor
On Lada Granta, Kalina, Priora and Lada 4×4 cars with E-Gas, a brake pedal position sensor with article number 1118-3720010 is used.
- Screw the sensor until the pedal goes down.
- Turn the sensor slightly (counterclockwise 90 degrees) and secure with a lock nut.
As a result, when the brake pedal is released, the switch rod should be completely “recessed”, and when the pedal is pressed, it should completely come out of the switch body. Details in the video:
Description of the clutch pedal sensor
What kind of device is this and how to replace it is below.
Purpose, location and operating principle
The clutch sensor is installed directly on the clutch pedal. It influences engine control with an electronic gas pedal and provides a convenient and flexible control scheme for machine modes. On its own, it looks like a nondescript switch that has on and off modes.
Typical malfunctions and methods for their elimination
If the controller does not detect signals from the clutch, then there is a risk of error 0830. The occurrence of this problem is usually a malfunction of the clutch sensor or a short circuit or open circuit. To correct this state of affairs, it is necessary to identify the reasons. That is, inspect the contacts for breaks or corrosion.
Video “eliminating squeaks”
You can learn how to solve one of the problems associated with the clutch in a car from the video from the author Konstantin Biyanov.
Replacing the Priora clutch sensor
Clutch sensor on Prior
Priora clutch sensor
Clutch sensor or Error P0830 on Lada Granta
Lada Granta - Error p0830 Clutch sensor malfunction
Clutch sensor or Error P0830 on Niva 21214
PRIORA clutch cable
Installing clutch sensor, 6Q0 927 189
CLUTCH PEDAL LIMIT ON NIVA. Repair or replacement #AutoFormula 4x4
Clutch pedal clicking PROBLEM SOLVED
The widespread computerization of cars, adapting to consumer demand, non-stop pushes the best engineering minds to new discoveries. Every year, driving cars becomes more comfortable and safer - and all this thanks to all these innovations. Today we will talk about such an element as the clutch pedal sensor.
There are two versions of the clutch sensor, which are not fundamentally different from each other - one is used in a robotic gearbox, the other in a manual one. What does the clutch sensor do? The answer is quite simple - the electronics send a signal to the control unit so that it, in turn, synchronizes the rotation of the engine crankshaft and the gearbox input shaft.
Sensors on the brake pedal - what do they affect?
In general, I once again connected the computer to the car - I climbed in the “01 engine” section
I found this indicator there - I don’t remember exactly what it’s called - something about brake sensors in the three-zero field - when I press the brake pedal I get this picture: 000 pedal released 010 first 5-10 mm 011 after another 10 mm
The first zero never changes to one. I think I read somewhere that if the brake pedal sensors are not synchronized, then . in general, everything is bad - the car starts working not according to the fact, but according to a pattern, the first “0” is what kind of sensor is it - where is it, how does it change?
Phaeton
Registration 09/03/2007 Address Russia, Moscow, South-Western Administrative District Age 87 Messages 4,901
| Thank you: |
| Received: 116 Sent: 51 |
There is one sensor, for all zeros. Search for “Frog”, there is a detailed description of the replacement. But why change it if you don’t have any errors? My reason for replacement was burnt contacts and, as a result, a sporadic error in the stop sensor.
Added after 10 minutes 33 seconds:
It’s strange, contacts are transferred, but ones are only added? Of course, you may have a sensor from a different system.
Polo
Registration 11/27/2007 Address Russia, Yaroslavl Age 41 Messages 428 Diary entries 1
| Thank you: |
| Received: 0 Sent: 1 |
here is group 006 second field Brake pedal F/F47/F36
I read somewhere about “all trade wind sensors”; it described all the sensors that are on the car and what they affect; I definitely didn’t dream about it; for example, there was a paragraph about the crankshaft sensor and a description of what would happen if.
The brake pedal sensors were described in a similar way - there are three of them, one is a frog - turns on the light and two more - these two should work synchronously - if not, then the computer switched something to emergency mode and worked according to the factory template, and not in fact.
Phaeton
Registration 09/03/2007 Address Russia, Moscow, South-Western Administrative District Age 87 Messages 4,901
| Thank you: |
| Received: 116 Sent: 51 |
Everything is correct, but this is about the accelerator pedal sensor. [-X
Brake light switch VAZ Priora, Kalina
To control the brake signals, Priora and Kalina cars have a brake signal switch (hereinafter referred to as BST). In addition, the BST signal, in systems with electronic throttle control, is used by the ECM. In the event of a violation in the operation of the VST, the controller’s safety system forces the engine into a reduced power mode . On a car with an automatic transmission, activation of this mode can also occur if the brake light bulb burns out.
When the brake pedal is applied, the signal switch analyzes the position of the pedal and closes the contacts, after which the brake signal lamps light up and subsequently turn off. The sensor is used when braking and releasing the brakes of cars. VST is installed on Priors and Kalinas equipped with an electronic gas pedal.
Where is the brake light switch located?
The brake light switch is located on the brake pedal assembly.
Installation location of the VST sensor on Priora and Kalina
What does the brake light switch look like?
Switch design and which one to install
The brake light switch is designed in such a way that it has two groups of contacts. Both groups send their signal to the controller. One group of contacts connects voltage to Cl. 15, and the other with Kl. 30, which supplies power to the brake signal lamps.
On the Priora and Kalina models, a brake signal switch with the original part number 1118-3720010 is installed. Such a switch costs no more than 260 rubles. There is also a good analogue - AVAR (2113720), it is a little cheaper - 190 rubles.
Malfunctions
The most common and initial sign of a faulty VST is a failure to respond to the brake pedal. When you press the pedal, the signal temporarily stops lighting and only after that the “check” light comes on. The malfunction also appears while driving, when the car begins to “stupid”, the traction disappears and it seems as if the car will stall right on the move, and then after 1.5 seconds it immediately starts. It feels like the wrong gear was engaged while driving; there is absolutely not enough traction.
Damaged spring inside the sensor housing
The most common malfunctions of the brake pedal sensor on Kalina and Priora include the following reasons:
- mechanical wear, damage to the pressure spring;
- brake light bulb burns out;
- an error was made in adjusting the gap;
- short circuit or complete open circuit;
- oxides, sticking or burning of sensor contacts;
- loosening of fastenings.
One of the common causes of a faulty sensor is the burnout of a lamp , or several brake signal lamps at once. These lamps have two filaments, one of which lights up when the lights are turned on and continues to burn all the time, and the second turns on only when the brake pedal is pressed. When these filaments in the light bulbs burn out, the ECU analyzes this burnout as simultaneous pressing of the gas and brake pedals while driving.
In cars with automatic transmission (Kalina 2), the control unit immediately reduces the speed and the car cannot accelerate normally. Because the ECU thinks that the driver presses both pedals at the same time (which is strictly prohibited on an automatic transmission). Also, the brake pedal pressure is displayed on the key fob, so the car may not be able to be set to alarm.
An incorrect gap between the switch body and the pusher attachment is also considered a malfunction. This gap must be set in the range from 0.2mm to 0.5mm .
Causes of sensor malfunction and their symptoms
In most cases, the above error occurs because the sensor has not been adjusted properly. It is for this reason that the car owner notes the emergence of such problems as:
- instability of the engine: it starts poorly or stalls immediately;
- instability of speed.
The sensor combines two functions: it is both an element of the brake pedal position and a brake light switch. Most often, the malfunction is caused by the sensor misalignment already mentioned above, or by a broken spring. The problem that has arisen manifests itself by the “check” icon lighting up and error P0504 (implying a mismatch in the operation of this part).
Error P0504 Lada Granta, Kalina 2, pedal limit switch
Code P0504 Brake pedal A/B switches, signal mismatch
Code P0504 is entered if: - the signals of the brake pedal limit switches “14/23” are mismatched for more than 200 seconds with the engine running in idle mode; - or the number of presses on the brake pedal, determined by the signals of two limit switches “14/23”, differs by the value of the diagnostic threshold on a moving vehicle.
The malfunction indicator lights up on the 3rd trip after a permanent malfunction occurs. Description of checks
1 Checks whether code P0504 is active at the time of the request. 2 Electrical circuits are being checked. 3 Adjust the brake pedal switch gap. Diagnostic Information - The scan tool is in 1 Parameters mode; 1 General View" shows the status bit B_BREMS of contacts "23" of the brake pedal switch. — Monitor the state of contacts “14” using the brake light lamps. If a discrepancy between the signals of the “14/23” switches is detected, the engine control system will operate in emergency mode until the end of the current trip.
1 If the brake lights do not light up periodically or constantly when you press the brake pedal, check: — whether the brake pedal switch rod is jammed when you press the brake pedal; — check the presence of on-board voltage on contacts “1” and “4” of the brake pedal switch in the free and pressed state in accordance with the operating principle of the switch; — check the serviceability of the corresponding brake light circuit fuses; — check the condition and reliability of the connection of the contacts in the brake pedal switch block. 2 If, when you press the brake pedal with the side lights, direction indicators, reverse lights, and fog lights on, a faint glow of the brake lights is observed, check the reliability of the ground circuit of the rear lights. 3 Check the presence of on-board voltage on contacts “2” and “3” of the brake pedal switch in the free and pressed state in accordance with the operating principle of the switch.
Brake light wiring diagram for Lada Granta and Kalina 2
stop signal position
The brake light switch is part of the brake pedal assembly and is designed to send appropriate signals to the ECM when the driver presses/releases the brake pedal. In throttle-by-wire (E-throttle) systems, the brake pedal switch signals play an important role because they are used by the safety function of the ECM software. For this reason, it is very important to ensure that the brake light switch is always in working order. In the event of a discrepancy between its functional switching characteristics, for example, when spontaneously changing the adjustment values specified in the instructions (due to vibrations of the brake pedal, wear of the switch and pedal block), the car’s engine may go into emergency mode with forcibly reduced power. The size of the adjustment gap of the switch should be within 0.2...0.5 mm. The brake light switch has two groups of contacts, the first of which switches voltage from Cl. 15, and the second is voltage with Cl. 30, supplied to the brake light lamp. Both of these signals are sent to the ECM. When the brake pedal is released, the contacts of the first group should be normally closed, and the contacts of the second group should be normally open. If the brake light switch malfunctions, the controller stores its code in its memory and turns on the warning light. A fault code is also entered if the gap between the drive pusher attachment and the switch body is incorrectly adjusted
Carrying out pre-installation diagnostics
Before purchasing and installing a new sensor to replace a broken one, it is recommended to diagnose the old sensor and, if there is a breakdown, fix it yourself. There are two nuts on the sensor body, the first of which is located at the bottom, and the second at the top. The nut located at the top should adjust the clearance of the part (sometimes it is set incorrectly). This leads to disruption of the normal functioning of the button, therefore, you will need to set the gap so that there are no obstacles to its normal movement.
After the adjustment, the ECU error is reset, then you need to start the engine and wait about fifteen minutes, since errors are not recorded immediately. If error P0504 is not marked, it means that the cause of the engine malfunction was an incorrect sensor setting. If it appears again, you will need to replace this element with a new one.
About the sensor
The DPT is a conventional “frog with two contacts” for making and breaking. There are no complex electrical circuits in its device.
One of the contacts, which works to close, when you press the brake pedal, lights up the brake lights, which in turn signal the cars behind to brake.
The second contact, which opens when the brake pedal is pressed, opens its contacts and thereby sends a signal to the ECU to remove the load from the engine. This is necessary to reduce the fuel supply during the braking period, that is, when driving at high speeds (above idle) and when you press the brake pedal, the car begins to stop, and at this time the sensor sends a signal to the ECU to reduce the fuel supply through the injectors to reduce the speed and emissions of exhaust gases into the atmosphere.
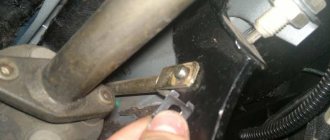
The sensor is located on the pedal assembly under the steering column of the car; it is mounted on a plate with two nuts; they also carry out adjustment and control tightening.
The cost of a sensor in an auto parts store is up to 300 rubles.
Carrying out work on dismantling and repairing the sensor
In most cases, repairing a sensor does not take a significant amount of time and does not require the car owner to have either specific knowledge or the use of complex tools. You can do it yourself without going to a repair shop.
First you need to disconnect the negative terminal from the battery, and then move to the driver’s seat in the car. Move the front seats back as far as possible and remove the interior carpet. The sensor is located next to the brake pedal; to remove it, you will need to disconnect the clamp and the block with wires from its connector.
Carefully loosen the fastening nut and carefully unscrew the body of the part, then disassemble it. This element is a two-piece element, and both parts are held in place with latches.
There is a spring in the inside of the sensor, which is often what causes problems. Replacing a faulty spring with a new one, having the same number of turns and suitable dimensions, most often helps to eliminate the problem.
Having completed the repair, reassemble the element by performing the manipulations you performed to disassemble it in the opposite sequence, and then install it in its original place, and if necessary, adjust it. The part is tightened until the brake pedal goes down, after which it is turned 90 degrees clockwise and secured with a lock nut. As a result, with the brake pedal lowered, the switch rod will be in a recessed position, and when you press it, it will go beyond the boundaries of the switch body.
Next, start the engine and wait at least ten minutes; if the error does not appear, you have correctly identified the cause of the problem. If error P0504 appears again, adjust the sensor; if this error continues to appear, the part will need to be replaced.
Removal and installation
Replacing the brake pedal sensor on Kalina is carried out using an adjustable wrench set to “19”. The sensor itself is located above the brake pedal under the steering column. Conventionally, the removal stages can be divided into 5 steps:
- Before starting electrical work, it is recommended to disconnect the negative wire (terminal) from the battery.
- Then you need to move into the car interior on the driver’s side. For ease of operation, it is advisable to move the driver's seat in the opposite direction from the dashboard.
- Find the location of the sensor. Find a contact chip with wires. Press and hold the 2 plastic fasteners located on both sides of the chip. Pull the connector out of the sensor connector.
- Take the wrench in your hands and loosen the fastening nut. After which the sensor can be unscrewed freely.
- The installation process is similar to the removal procedure, except that you will need to make adjustments (tuning), the process of which is described in detail in the previous section.
Checking the vacuum brake booster
1. We prepare the car for work.
2. With the engine not running, press the brake pedal several times until the hissing noise in the brake booster stops.
3. Press the brake pedal and hold it down.
4. Without releasing the pedal, start the engine.
5. If immediately after starting the engine the pedal moves down a little, the brake booster is working properly.
Otherwise, we check the integrity of the vacuum supply hose to the vacuum booster, the tightness of its connection to the inlet receiver and the booster check valve branch pipe. If the hose is intact and connected tightly, the vacuum booster is faulty.
Checking the parking brake
During the operation of the vehicle, due to wear of the rear brake pads and pulling of the drive cables, it periodically becomes necessary to adjust the travel of the parking brake lever.
The parking brake lever travel should be 2-4 clicks. In this case, the braking system must reliably hold the equipped vehicle on a slope of 23%.
If this is not the case, we check the condition of the parking brake system and, if necessary, adjust it and replace worn or damaged parts, and then repeat the check.