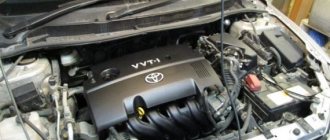
Lada Priora (2013+). Removing the fuel rail and injectors of the VAZ-21126, -21127 engine
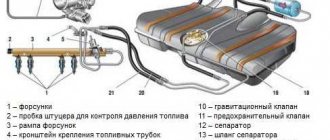
We remove the fuel rail to check the operation of the injectors and replace them.
We show the work on engine 21126; on engine 21127 the operations are similar. Relieve the pressure in the power system (see “Replacing the fuel filter”, page 19).
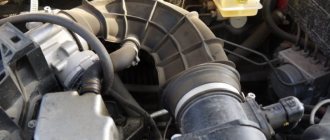
Remove the air filter (see “Removing the air filter”, p. 95).
After releasing the engine control system wiring harness connector,
disconnect it from the injector wiring harness block.
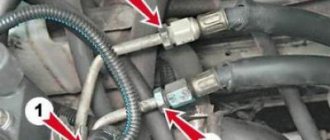
Using a 17 key, unscrew the fitting of the fuel supply tube to the ramp, holding the tip of the ramp tube with a 22 key (on the 21127 engine the tip is held with a 17 key),
Remove the fuel supply tube from the tip of the ramp tube.
We remove the remaining injectors in the same way and replace the injector O-rings with new ones. Before installation, apply a thin layer of engine oil to the injector sealing rings.
We assemble and install the fuel rail with injectors in the reverse order. Tighten the fuel rail mounting screws to a torque of 6-8 Nm.
Video on the topic “Lada Priora (2013+). Removing the fuel rail and injectors of the VAZ-21126, -21127 engine"
Removing injectors on a Priora (Lada 2170, VAZ 2112) How to remove the fuel rail on a Priora without removing the receiver, part 1 Removing injectors on a Lada Priora, etc. VAZ 21126 engine.
Source
Dismantling
Before replacing or cleaning the injectors, they will need to be removed from the fuel rail. To achieve this, the following activities are carried out:
- Make sure the engine has cooled down properly. It is not safe to work on a hot engine;
- Disconnect the power wires from the fuel pump to de-energize the device;
- Try to reduce the pressure in the engine power system as much as possible. To do this, the engine starts, and then you need to wait until it stalls at idle speed;
- Repeat this procedure several times until the car simply stops responding to turns of the ignition key;
- That's it, now our goal is the fuel rail. To remove it, you must first remove the terminals from the battery, turn off the power to the ramp itself, disconnect the fuel supply hoses, and also disconnect all electrical appliances going to it. These are pressure, idle, throttle position sensors;
- If you have an 8-valve engine, then you do not need to remove the receiver. This step is relevant for engines with 16 valves;
- Experts do not recommend removing the intake manifold without dismantling the throttle valve and the hose going to it. It is better to unscrew and disconnect everything at once, which will allow you to continue working more conveniently;
- Cover the exhaust manifold openings with something to protect them from foreign objects;
- Using a hex wrench, you can unscrew a couple of bolts and remove the fuel rail along with the injectors;
- Make sure that there are no distortions when removing the ramp, otherwise problems may arise with the dismantling processes;
- We remove the injectors. To do this, remove the mounting brackets that hold the electrical connector. You also need to remove the bracket that holds the injector in its seat.
After dismantling the elements, be sure to close the seats to prevent debris and other objects from getting in, and place the nozzles themselves on a table or floor, after laying down a dry rag.
Here you can decide whether to change or clean the elements of the fuel system. If replacement is required, install new injectors in place of the old ones and follow the assembly procedure.
Cleaning
Here proceed as follows.
- Remove the rubber rings from the injectors, and when cleaning is finished, replace them with new seals.
- The cleaning process should begin with the nozzles, on which various deposits form as the car is used.
- Be sure to thoroughly clean the funnel-shaped surfaces where tar deposits accumulate.
- The next step is the fuel mixture supply channels.
- To open the solenoid valve to supply fuel, you will have to trick the device with a 5-7 V power supply.
- Some use stabilized voltage sources, phone chargers, or even a car battery. If using a battery, the voltage should be supplied through the light bulb. It will play the role of a current damper. Otherwise you risk burning the winding.
- Electricity is supplied through two wires, in the gap of one of which a button is installed. It will close and open the network. This creates an imitation of the operation of an injector in an engine due to the influence of a pulsed electric charge.
- You can supply the cleaning liquid to clean the injectors through a can of carburetor cleaner. Inexpensive and effective, even better than specialized chemicals.
- Be sure to tightly connect the cylinder and nozzle with a rubber tube, clamps and any other means.
- All is ready? You can then apply electricity to open the injector. At the same time, press the button on the cleaning agent canister.
- Soon the torch of the liquid jet, which will exit through the fuel atomizer of the injector, will change its “clumsy” direction and will begin to uniformly exit the nozzle. This indicates that you have removed all carbon deposits.
Removing the fuel rail
You will need : relieve pressure in the fuel system, remove the engine air filter, prepare a Phillips and flat-head screwdriver, a 22mm open-end wrench, a 17mm wrench, pliers, a 10mm socket, a 13mm socket and a 5mm hex socket. .
Procedure:
- Disconnect the connector from the injector wires and remove it from the bracket.
- Unscrew the screw securing the pressure plate of the fuel supply tube to the ramp using a Phillips screwdriver.
- Unscrew the fitting of the fuel supply tube to the ramp using a 17 wrench, holding the tip of the ramp tube with a 22 wrench. Otherwise, the ramp may be broken.
- Remove the fuel supply tube from the tip of the ramp tube, and remove the rubber sealing ring.
- Loosen the crankcase ventilation hose clamp using a Phillips screwdriver. Remove the hose from the cylinder head cover.
- Unscrew the self-tapping screw securing the guide tube using a Phillips screwdriver.
- Remove the tube with the oil level indicator facing up.
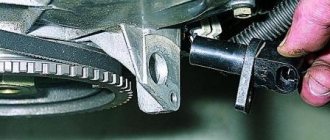
- Remove the brake booster hose from the intake manifold by using pliers to loosen the clamp.
Disconnect the end of the throttle valve drive cable from the drive sector. Move the throttle body away from the intake manifold (see replacing the throttle body). Disconnect the blocks with wires from the ignition coils (from cylinders 1, 2 and 3), and move the wire harness to the side (see replacing spark plugs).
- Unscrew the two nuts from the upper fastening of the intake manifold using a 10 mm socket.
- Then two bolts and three nuts for the lower fastening using a 13mm socket.
- Disconnect the block with wires from the phase sensor. Remove the ignition coils from cylinders 1, 2 and 3. Cover the holes for the ignition coils with a rag.
- Push the intake manifold towards you and lift it up, bringing it out from under the wiring harness.
- Unscrew the two screws securing the fuel rail to the cylinder head using a 5mm hexagon.
- Remove all four injectors from the cylinder head holes by pulling the ramp along the axes of the injectors. Remove the ramp with injectors and wiring harness.
- Fuel rail assembly with injectors and wiring harness.
Signs and malfunctions of the fuel pressure regulator
Welcome to the DIY car repair website. A reliable car is not one that looks beautiful, but one that rarely breaks down. Unfortunately, VAZ cars do not always please their owners, forcing them to pay a lot of attention to repairs or restoration work.
Fuel pressure control
So, one of the weakest links is the fuel pressure regulator. Due to the low quality of gasoline, it often fails, forcing you to check the VAZ fuel pressure regulator and replace it. All that remains is to find out how to diagnose the malfunction and check the functionality of the device.
The purpose of this small device
The car system is designed in such a way that fuel flows through the injectors to the intake manifold
It is very important that the pressure does not change. In turn, the regulator makes an accurate calculation of the volume of gasoline supplied
As a result, the device controls the pressure parameter inside two elements - the intake manifold and the fuel rail. In this case, the regulator’s task is to maintain the pressure difference at the same level. In addition, the regulator controls the pressure parameters at the injector and in the intake manifold.
A decrease in power, malfunctions of the power unit, an increase in consumption - all these are signs of a malfunction of the fuel pressure regulator (we’ll talk about this in more detail below). At the same time, the task of the car owner is to diagnose the problem in time and accurately determine whether the fuel pressure regulator is faulty or the problem lies elsewhere.
The main sign of a problem is the appearance of malfunctions in the car. So, the following symptoms of a malfunctioning fuel pressure regulator can be identified:
- Problems starting the engine. The starter rotates, but the engine does not “support” its efforts;
- power has decreased significantly. As a rule, this is immediately noticeable when accelerating a vehicle or when driving downhill;
- The engine is unstable at idle speed. At the same time, it may stall from time to time (for example, at an intersection);
- fuel consumption increases.
There may be two reasons:
- Valve failure;
- the valve just doesn't hold.
The regulator valve has failed. In this case, excess fuel is not poured into the tank, but an increased pressure of 2.5 kg/cm2 or more is created. This problem invariably affects the amount of fuel injected into the combustion chamber. As a result, fuel consumption increases, and the gasoline itself does not burn completely.
The valve doesn't hold. In this case, there is a constant “staggering” of fuel throughout the system. As a result, the pressure decreases, and with an increase in engine speed, a clear fuel shortage occurs.
In such a situation, the power and throttle response of the power unit drops significantly. In addition, during starting, you need to turn the starter for a long time to create the necessary pressure.
Features of checking the fuel regulator
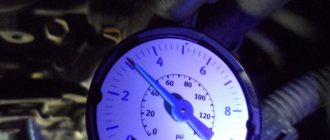
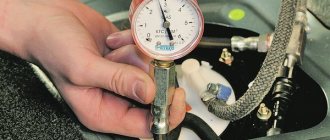
To solve the problem, it is important to know how to check the fuel regulator. This can be done using a regular pressure gauge
Everything is simple here. The device is mounted in the space between the fitting and the fuel pipe. To take measurements, the vacuum hose must be disconnected.
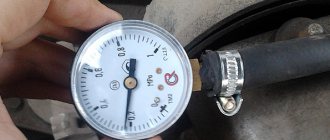
In this case, measurements should be made in four different modes:
- When the ignition is turned on. The nominal parameter is “three” atmospheres;
- when measured at idle – 2.5 atmospheres;
- in case of squeezing of the return flow hose - 7 atmospheres;
- with the hose removed from the pressure regulator - 3.3 atmospheres.
If the measured parameter does not correspond to the specified data or does not increase at all, then the device is faulty. In such a situation, it is enough to figure out how to change the fuel pressure regulator and perform the replacement.
Be attentive to your car, promptly respond to problems that arise, carry out diagnostics and make repairs. This is the only way to extend the life of your VAZ car and protect yourself from high costs in the future. Good luck on the roads and of course no breakdowns.
(5 votes, average: 3.40 out of 5) Loading.
Removing Priora fuel injectors
- Disconnect the block with wires from the injector by pressing the spring clip.
- Remove the bracket by prying it off with a screwdriver.
- Remove the injector from the fuel rail, overcoming the resistance of the sealing ring.
- Remove the injector O-rings using a flat-head screwdriver.
Before installing the injectors, it is necessary to replace the O-rings.
Then apply a thin layer of engine oil to the O-rings. Assembling and installing the fuel rail with injectors is performed in the reverse order. Source
Removing Priora fuel injectors
- Disconnect the block with wires from the injector by pressing the spring clip.
- Remove the bracket by prying it off with a screwdriver.
- Remove the injector from the fuel rail, overcoming the resistance of the sealing ring.
- Remove the injector O-rings using a flat-head screwdriver.
Before installing the injectors, it is necessary to replace the O-rings. Then apply a thin layer of engine oil to the O-rings. Assembling and installing the fuel rail with injectors is performed in the reverse order.
Removing / installing injectors on Lada Priora
Is the engine stalling, not pulling or running rough? The cause may be faulty injectors, which should be checked and cleaned if necessary.
Removing the fuel rail on Lada Priora
— relieve pressure in the fuel system.
— Remove the engine air filter.
- Prepare Phillips and flathead screwdrivers.
1. Disconnect the block from the injector wires and remove it from the bracket.
2. Unscrew the screw securing the pressure plate of the fuel supply tube to the ramp using a Phillips screwdriver.
3. Unscrew the fitting of the fuel supply tube to the ramp using a 17 wrench, holding the tip of the ramp tube with a 22 wrench. Otherwise, the ramp may be broken.
4. Remove the fuel supply tube from the tip of the ramp tube, and remove the rubber sealing ring.
5. Loosen the clamp securing the crankcase ventilation hose using a Phillips screwdriver. Remove the hose from the cylinder head cover.
6. Unscrew the self-tapping screw securing the guide tube using a Phillips screwdriver.
7. Remove the tube with the oil level indicator facing up.
8. Remove the brake booster hose from the intake manifold by loosening the clamp using pliers.
Disconnect the end of the throttle valve drive cable from the drive sector. Move the throttle body away from the intake manifold. Disconnect the blocks with wires from the ignition coils (from cylinders 1, 2 and 3), and move the wire harness to the side.
1. Unscrew the two nuts of the upper fastening of the intake manifold using a 10mm socket.
2. Then two bolts and three nuts for the lower fastening using a 13mm socket.
3. Disconnect the block with wires from the phase sensor. Remove the ignition coils from cylinders 1, 2 and 3. Cover the holes for the ignition coils with a rag.
4. Push the inlet pipe towards you and lift it up, bringing it out from under the wiring harness.
5. Unscrew the two screws securing the fuel rail to the cylinder head using a “5” hexagon.
6. Remove all four injectors from the cylinder head holes by pulling the ramp along the axes of the injectors. Remove the ramp with injectors and wiring harness.
7. Fuel rail assembly with injectors and wiring harness.
Let us remind you that in the previous article we told you how to replace brake discs on a Lada Priora.
Removing fuel injectors on Lada Priora
1. Disconnect the block with wires from the injector by pressing the spring clip.
How to determine why the fuel pump on a Priora does not work and where it is installed
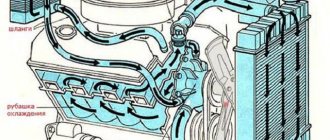
The first step is to answer the question “where is the fuel pump on the Priora”, which is no less popular among car owners than “why doesn’t the gas pump pump”. The electric fuel pump on the Priora is located directly in the gas tank. It is located inside the plastic fuel module. The difference in its location compared to carburetor cars is significant. Below is a diagram showing the fuel pump itself, its location in the gas tank and the main structural elements with the designation of their original codes.
Diagram of the gas tank and designation of Priora structural components
Designation of Priora gas tank components and original part numbers
To get to the fuel pump on a Priora, you need to open the rear door on the passenger side and lift the sofa. Under it there is a plastic cover, by removing which you can gain direct access to the pump installed in the gas tank.
Interesting! The Priora has a submersible fuel pump. This means that gasoline acts as a coolant, eliminating the possibility of overheating of the rotor winding (armature). The pump motor is of a commutator type, and its stator is presented in the form of two magnets. The fuel also acts as a lubricant, increasing the service life of the mechanism. The maximum current consumption of the pump motor is 6A.
The need to search for this device arises when it does not show “signs of life.” A faulty fuel pump will not allow the engine to start, so the first thing you need to do is identify the cause of its failure and, if possible, eliminate it.
The main sign that the fuel pump is faulty is the absence of the characteristic buzzing sound of the device. When you turn the key in the ignition, fuel is pumped into the fuel rail. This is necessary so that when starting the engine, the required ratio of fuel to air is immediately supplied to the cylinders. This eliminates the need for prolonged rotation of the crankshaft by the starter.
If the fuel pump does not show characteristic signs of operation when you turn the key, then it is important to know the following:
- The fuel pump does not pressurize the system if it is present. As a rule, this is not necessary unless 5 minutes have passed since the engine was turned off. During this period, pressure in the fuel system is maintained.
- The reason for the device to not work may be a simple lack of voltage at the contacts. As a rule, the fuse that is responsible for protecting the fuel pump circuit from short circuits and overheating current most often fails. This fuse is located in a niche under the center console. To get to it for inspection, remove the decorative trim on the passenger side. Below are the designations of the electrical devices located in this niche. Among them there is also a blue fuse, which has a rating of 15A (there are 2 15A fuses installed in this niche, but the second one is responsible for protecting the starter circuit, so we carefully look at the photo to determine which of the two devices is responsible for the fuel pump circuit).
- Failure of the switching relay. It is also located next to the fuel pump fuse (shown in the photo above). The relay fails less often than the fuse blows, but if the latter is working properly, you should check the switching device. The easiest way to check it is to install a known-good relay in its place.
Important! On Priors of different years of production, the location of the relays and fuses in the niche under the center console may differ. The diagram below shows that the relay and fuse are already on the left (in the diagram above on the right).
The video below shows where the fuel pump relay and fuse are located on a Priora, and how to eliminate the cause of a non-working device.
If the relay and fuse are working properly, then there is no need to rush to replace the fuel pump. Using a multimeter, we check the presence of voltage at the contacts of the chip that is connected to the fuel module. Below is a pinout diagram for the fuel pump chip, thanks to which you can determine the presence of supply voltage.
To make sure that the fuel pump receives power (thereby eliminating the possibility of damage to the wires), you need to disconnect the chip from the module and attach multimeter probes to the contacts of chips 2 and 3 (middle pins). Ask an assistant to turn on the ignition. At this moment, 12V power should appear on the multimeter, which indicates the serviceability of the fuel pump circuit. By the way, if you do these steps right away, you won’t need to check the fuse and relay.
If there is power, then the problem with the non-working fuel pump is precisely there. You will need to remove the fuel module, remove the fuel pump and, most likely, change it. If there is no power at the chip that connects to the fuel pump module, then you need to check the fuse and relay. If these elements are in good condition, then check the wiring and look for the location of the damage. To check the wiring, an electrical diagram for connecting a fuel pump on a Priora will be useful.
Electrical diagram for connecting the Priora fuel pump
Electrical diagram for relay and fuel pump fuse wiring
Often, Prior car owners cite the fact that the crankshaft sensor may be the cause of a non-working fuel pump. And indeed it is. If one of the crankshaft sensor wires is broken, the wires are short-circuited, or they have high oxidation resistance, the ECU will indicate a fault in the crankshaft sensor circuit. “CHECK” will light up on the instrument panel. As a result, when the ignition is turned on, power will not be supplied to the fuel pump, and therefore there will be no characteristic sound of its operation. The reason is precisely DPKV.
Important! This does not apply to cases where the sensor gives incorrect readings (does not work correctly). In this case, the fuel pump will pump fuel when the ignition is turned on, but the engine either will not start, or will start but will work intermittently.
Often, Prior owners are faced with the problem of the crankshaft sensor wires melting, which ends up on the exhaust manifold. Be sure to inspect the collector, and if you find a wire going to the DPKV on it, inspect it and make appropriate repairs. After repairs by insulating the wires or replacing the chip with wires going to the DPKV, eliminate the possibility that the corresponding consequences will recur. For high-quality repairs, it is necessary to tin the wire connections and use heat shrink as insulation. The tightness of this place determines how effectively the sensor will work. Be sure to pay special attention to this place.
In the video below, the author is referring to the crankshaft position sensor. It was precisely because the wires melted and shorted together that the ECU did not supply power to the fuel pump when the ignition was turned on.
Another reason why the fuel pump on a Priora does not work may be a device such as an immobilizer. The essence of this device is to recognize the key attached to the car. We will not go into details, since there will be a separate article about this device. The essence of the problem is that over time the ignition key is used, the board becomes deformed. Microcracks appear on the chip track, which cause the fuel pump to not be supplied with power and the car will not start.
Interesting! This known problem is solved by loosening the fastening bolt that secures the ignition key housing. It is enough to loosen the tightening by 0.5-1 turn, after which the problem is eliminated, but temporarily.
To determine that the pump is not working due to a “glitch” of the immobilizer, you can use such a sign as the indication on the instrument panel. If, after turning on the ignition, the immobilizer indication (shown above) comes on and lights up, then it is necessary to first loosen the bolt on the key, and then either replace the key or solder the tracks. The photo below shows the problem area, which causes the Priora to not receive power to the fuel pump.
Having first checked all the components that may affect the operation of the fuel pump, you can proceed to directly removing the product and replacing it. We will consider in detail below how to do this correctly.
General principle of operation of Lada Priora injectors
Gasoline is pumped into the fuel rail using a gasoline pump, to which the injectors are connected. Based on a signal from the electronic control unit (ECU), an electric current is supplied to the injector coils, their cores are drawn inward, opening the fuel channels. Gasoline is sprayed into the combustion chambers and ignites under the influence of enormous pressure created by the upward pistons.
The design of Lada Priora injectors is quite complex
Signs of a malfunctioning fuel pressure regulator
There are five main symptoms of a malfunctioning fuel pressure regulator (both types), which can be used to judge the complete or partial failure of this important unit. Moreover, the symptoms indicated below are typical for cars with both gasoline and diesel engines
However, it is worth mentioning that the listed situations may be signs of failure of other engine components (fuel pump, clogged fuel filter), so it is advisable to carry out comprehensive diagnostics in order to accurately determine its performance. So, the signs of a malfunctioning fuel pressure regulator are as follows:
- Difficulty starting the engine. This is usually expressed in a long rotation of the starter with the accelerator pedal depressed. Moreover, this sign is characteristic under any external weather conditions.
- The engine stalls at idle speed. To maintain its operation, the driver must constantly apply gas. Another option is that when the engine is idling, the speed is usually “floating”, unstable, until the engine stops completely.
- Loss of power and dynamics. Simply put, the car “does not pull,” especially when driving uphill and/or when loaded. The dynamic characteristics of the car are also lost, it accelerates poorly, that is, when trying to accelerate, a deep drop in revolutions occurs at their high values.
- Fuel is leaking from the fuel hoses (rail). In this case, replacing hoses (clamps) and other nearby elements does not help.
- Excessive fuel consumption. Its value will depend on both the breakdown factors and the engine power.
Accordingly, if at least one of the above symptoms appears, it is necessary to perform additional diagnostics, including using an electronic error scanner available in the ECU memory.
Fuel pressure regulator error
Diagnostic errors of the fuel pressure regulator
In modern cars, a fuel pressure sensor is installed as a regulator. If it fails partially or completely, one or more errors associated with this unit are formed in the memory of the electronic engine control unit. At the same time, the engine malfunction light is activated on the dashboard.
When there is a DRT malfunction, the driver most often encounters errors numbered p2293 and p0089. The first is called “fuel pressure regulator - mechanical failure”. The second is “the fuel pressure regulator is faulty.” For some car owners, when the corresponding regulator fails, errors are formed in the ECU memory: p0087 “the pressure measured in the fuel rail is too low relative to the required one” or p0191 “fuel pressure regulator or pressure sensor.” The external signs of these errors are the same as the general signs of failure of the fuel pressure regulator.
You can connect to the car control unit via Bluetooth or Wi-Fi. Scan Tool Pro, having a 32-bit chip and easy to connect to, reads and stores all sensor data not only in the engine, but also in the gearbox, transmission, or auxiliary systems ABS, ESP, etc. It can also be used to monitor fuel pressure readings in real time, which it transmits to the vehicle’s ECM while performing a series of checks.
Sorcerer VAZ 2110 price
Injectors installed on Priora
The Lada Priora car is equipped with imported injectors manufactured by the German company BOSCH. These devices are highly reliable. Their service life can reach 160 thousand kilometers. However, car service specialists strongly recommend changing injectors every 120 thousand km.
Almost all Prioras are equipped with German injectors from BOSCH
Injectors for 8 and 16 valve engines
You should know that the injectors of the 8-valve Priora engine are no different in appearance from the injectors of the 16-valve engine. These are all the same devices from BOSCH, consisting of a housing, a coil, a diffuser and a fuel grid. When choosing injectors for a Priora, you need to think not about the number of valves in the engine, but about its volume. Because the markings of injectors for 1.5 liter engines are different from the markings of injectors for 1.6 liter engines. In the first case, the BOSCH injector should be marked 0-280-158-110, in the second - 0-280-158-502. You can clarify the markings in the car’s operating instructions, at the end of which there is a summary table with digital designations of all BOSCH injectors depending on engine size.
Checking Lada Priora injectors
As mentioned above, both the fuel system ECU and the injector itself can fail. To carry out a complete diagnosis of the ECU, special software is required, which the average motorist simply does not have. Therefore, the only option is to diagnose the machine at a service center. The program, connected to special equipment, will quickly detect ECU errors and correct them.
A full check of Priora injectors is possible only on a special stand
And if problems arise in the mechanical part of the injector, then the diagnostic program will be useless. The maximum that it can do is indicate which cylinder is not working correctly. After this, the car owner can only replace the failed injector on the specified cylinder, since these devices cannot be repaired.
In order to clean the injectors in VAZ 2114/2115 cars, it is recommended to read this material: https://vazweb.ru/desyatka/pitanie/zamena-forsunok-vaz-2114.html
Replacing injectors on a Lada Priora car
Before we move on to describing the process of removing the injectors, you need to select everything you need for the job. Here is a list of tools and consumables:
- Phillips screwdriver;
- set of hex keys;
- set of open-end wrenches;
- pliers;
- wrench and set of socket heads;
- flat screwdriver.
Sequence of work
The block with wires on the Priora fuel rail is removed manually
The mounting fuel rail on the Priora can only be unscrewed with a Phillips screwdriver
The Priora fuel fitting should be unscrewed with only two keys
The O-rings from the Priora ramp should be removed so as not to lose them
The Priora ventilation hose can only be removed after loosening the clamp
It is convenient to loosen the Priora brake hose clamp with pliers
The Priora intake pipeline is held on top by only two nuts
After unscrewing the fasteners, you can simply pull the Priora pipeline towards you
Two 5-point screws on the Priora ramp can only be unscrewed with a hexagon
The Priora fuel rail is removed along with injectors and wires
The injector on the Priora can be unscrewed from the ramp manually
Video: removing injectors from Lada Priora
Where is the fuel pressure regulator located?
To find the installation location of the fuel pressure regulator, let’s figure out what it is and what it is needed for. This will help in further searches and diagnostics.
The first thing you need to know is that there are two main types of RDTs - mechanical (old type) and electrical (new type). In the first case, this is a vacuum valve, the task of which is to transfer excess fuel under excessive pressure back into the fuel tank through the corresponding hose. In the second, it is a fuel pressure sensor that transmits relevant information to the ECU.
Typically, the fuel pressure regulator is located directly on the fuel rail. Another option for its placement is the fuel return hose of the power system. Another option is to locate the regulator directly in the fuel tank on the pump module. In such systems there is no fuel return hose as unnecessary. Such an implementation has several advantages, including simplified design (no extra pipeline), excess fuel does not enter the engine compartment, fuel heats up less and does not evaporate as much.
How does the fuel pressure regulator work?
Structurally, the old-style valve (installed on gasoline cars) has its own body, inside which there is a valve, a membrane and a spring. The housing has three fuel outlets. Through two of them, gasoline passes through the pressure regulator, and the third outlet is directly connected to the intake manifold. At low (including idle) engine speeds, the fuel pressure in the system is low and it all goes into the engine. As the speed increases, the corresponding pressure increases in the manifold, that is, at the third terminal of the RTD, a vacuum (vacuum) is created, which, at a certain value, overcomes the resistance force of its spring. This creates the movement of the membrane and the opening of the valve. Accordingly, excess diesel fuel gets access to the second output of the regulator and goes back into the fuel tank through the return hose. Due to the described algorithm, the fuel pressure regulator is often called a check valve.
As for the fuel pressure sensor, it is a little more complicated. So, it consists of two parts - mechanical and electrical. The first part is a metal membrane that bends under the influence of force caused by pressure in the fuel system. The thickness of the membrane depends on the pressure for which the fuel system is designed. The electrical part of the sensor consists of four strain gauges connected according to a “Winston bridge” circuit. Voltage is applied to them, and the more the membrane bends, the greater the output voltage from them will be. And this signal is sent to the ECU. As a result, the electronic control unit sends the appropriate command to the pump so that it supplies only the amount of fuel required at the moment.
Diesel engines have a slightly different fuel pressure regulator design. In particular, they consist of a solenoid (coil) and a rod, which rests against the ball to shut off the reverse flow. This was done for the reason that the diesel engine vibrates very strongly during its operation, which affects the wear of the classic (gasoline) fuel regulator, that is, partial and even complete compensation of hydraulic vibrations occurs. However, its installation location is similar - in the engine fuel rail. Another option is on the fuel pump housing.
Cleaning Priora injectors
There are two options for washing injectors: with and without removing them from the car. The removed injectors are washed on special stands using ultrasound, under the influence of which even the oldest contaminants disappear. Ordinary drivers do not have such stands, so below we will consider a more popular option for washing injectors without removing them from the Priora. Here's what you'll need for this:
- liter of special flushing fluid;
- two automobile nipples;
- automobile fuel filter;
- a pair of metal clamps;
- a meter piece of rubber hose with a diameter of 12 mm;
- drill with 13 mm drill bit;
- electric pump;
- two liter plastic bottle.
Flushing sequence
- The bottom and cap are drilled into the plastic bottle. This is done with a “13” drill. Automotive nipples are inserted into the holes.
Ordinary car nipples are inserted into the holes of a plastic bottle
Priora injectors are washed using a filter and a plastic bottle
The green button is clearly visible on the Priora fuel hose
The main fuel hose of the Priora is connected to the fuel filter for flushing
The device for washing Priora injectors is assembled and ready for use
A car water pump plays an important role in the operation of a car engine. It is possible to recognize its malfunctions using the following article: https://vazweb.ru/desyatka/pitanie/zamena-forsunok-vaz-2114.html