The fleet of cars with carburetor engines is still large, and such an operation as carburetor adjustment (periodically necessary for these cars) continues to be relevant for many car owners. At the same time, the question remains relevant: should you turn to specialists for adjustment or do it yourself?
The complexity of the carburetor adjustment process is supported by many facts: for example, the specialization of carburetor mechanics has been preserved among specialists to this day. However, for car enthusiasts who are not at all unfamiliar with technology, after becoming familiar with the design and basic principles of operation of the carburetor, a number of basic settings and adjustments with their own hands will be quite within their grasp.
We recommend watching detailed video instructions for adjusting the carburetor, which is located at the end of this article.
And so, in order to understand how to properly adjust the carburetor, we suggest first familiarizing yourself with its structure and operating principle.
Purpose, principle of operation and fundamentals of carburetor design
It is known that gasoline does not enter the cylinders of an internal combustion engine in its pure form, but what in technical language is called an air-fuel mixture. The process of preparing such a mixture is called carburetion, and the device for preparing (mixing) it is called a carburetor.
The principle of operation of the carburetor and the basics of its design are shown in the figure below.
The simplest carburetor contains two chambers : a float chamber and a mixing chamber.
The following processes occur in the float chamber:
- Gasoline from the fuel tank is pumped by a gasoline pump through a filter into the float chamber;
- The float rises up and in a certain position, using a needle valve, blocks the flow of fuel;
- After a certain amount of fuel is consumed, the level in the chamber decreases, the float lowers and the same valve opens the flow of a new portion of fuel into the chamber;
- Then the process is repeated.
At the top of the chamber there is a balancing hole , the purpose of which is to maintain atmospheric pressure above the fuel.
As can be seen from the figure above, the float chamber is connected by a pipeline to another carburetor chamber: the mixing chamber, in which the process of forming the air-fuel mixture and supplying it to the working cylinders of the engine takes place.
How is fuel sucked into the mixing chamber and sprayed into it? The fact is that during the intake stroke a vacuum is created in the mixing chamber, which sucks gasoline from the float chamber in the place where the sprayer is located. And so that the process takes place intensively, in this place there is the neck (the narrowest point) of the device with the beautiful name “ Venturi tube ”.
The purpose of a Venturi tube is quite simple: to create a pressure difference in the tapering and outlet parts of the pipeline. Often in technical literature, the tapering part of the chamber is called a diffuser, although strictly speaking, the diffuser is the part of the Venturi tube that expands from the neck.
The change in pressure in a narrowing flow of liquid or gas is a direct consequence of Bernoulli’s law, which relates pressure, flow rate of liquid or gas and pipeline diameters. Simply put, at the point of constriction the pressure drops and the flow rate increases, and the operation of the sprayer in this place is similar to the operation of an aerosol can.
A fundamental point in the operation of a carburetor is the accuracy of dosing the amount of fuel supplied to form the mixture. That is why fuel enters the atomizer through a nozzle - a calibrated (that is, made with high precision) hole at the outlet of the float chamber.
An air damper located in the upper part of the chamber serves to regulate the air supply into the chamber and thus facilitate starting the engine in cold weather (the air content in the mixture decreases, and the gasoline content, on the contrary, increases, compensating for its deficiency formed due to condensation during cooling) .
The throttle valve serves to quantitatively regulate the supply of the air-fuel mixture to the cylinders: the more the valve is open, the more mixture enters the cylinders, increasing the speed, and therefore the power generated by the engine. Usually the throttle valve is connected to the gas pedal (controlled by the driver) by means of a cable pull.
Of course, the described design and operating principle only schematically reflect real processes. In practice, the design of the carburetor (most often containing two mixing chambers) ensures that the engine operates in modes other than stationary (starting, idling, acceleration, increased load modes) and looks much more complex.
So, in idle mode , the throttle valve is closed, and the vacuum in the sprayer area is not enough to form the required fuel mixture. But in the area of the damper itself, the air mass has sufficient speed and a vacuum sufficient to form a mixture is created. This is where the additional idle channel, equipped with fuel and air jets, comes to.
But what happens in acceleration mode . Due to different densities, the reaction to a sharp opening of the throttle valve is different for air masses and fuel: air flows faster. Therefore, additional enrichment of the mixture with fuel is required, which is performed by accelerator pumps that are activated when the gas pedal is pressed sharply.
When the damper is turned sharply, the pump piston moves down through the rod system and closes the check valve, and the discharge valve opens - additional fuel is injected into the mixing chamber.
Also, additional fuel enrichment is required when the dampers are fully open at maximum (or close to it) engine speed. This mode is ensured by a device called an economizer - it consists of an additional channel for enriching the mixture with fuel in the nozzle channel, a nozzle and a valve that opens this additional channel.
In addition, in modern carburetors, starting a cold engine is carried out by a starting device , the main element of which is the air damper. Afterburning of exhaust gases is carried out by a recirculation system, and toxic gases are removed from the crankcase by a ventilation system.
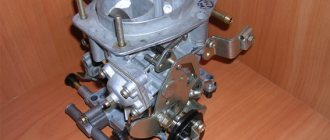
Features of Ozone and Solex carburetors
Before the production of injection engines, almost all Soviet and then Russian cars were equipped with carburetors produced by the Dmitrovograd Automotive Aggregate Plant - DAAZ. For VAZ cars, which form the basis of the domestic car fleet, two-chamber Ozon carburetors have been produced since 1979, and since the mid-80s, two-chamber Solex carburetors.
The main differences between these types of devices:
- The design features of the Ozone float chamber provide for the installation of a carburetor on longitudinal engines (VAZ “classic”);
- Ozone carburetors are less demanding than Solex in terms of fuel quality due to the size of the jets. For the same reason, they have slightly higher fuel consumption and worse acceleration dynamics;
- In the Solex design, simplifications were made justified by the operation of Ozone (for example, replacing the pneumatic throttle valve drive with a mechanical one);
- The Solex design provides an economizer for power modes, which is absent in Ozone.
Both types of carburetors (though Solex to a greater extent) are successfully used today.
Carburetors used on the VAZ-2107, or those whose use is possible
Fundamentally, all these devices can be divided into only two groups.
The former trace their history back to the Weber carburetor modified for the first VAZ cars. This is a structural division of the Italian company Magneti Marelli, which works closely with the FIAT concern. Namely, this is where all the VAZ classics came from. After significant reconstruction, the family received the generic name “Ozone”. They were installed on the VAZ-2107 on the assembly line. The second direction consists of more advanced, yet simple, French Solex devices, produced in Russia by the same factories for the next generations of VAZ cars. The change in the vector of development had an effect, when the first front-wheel drive cars were developed with the participation of German and French companies. As more economical, these carburetors were also adapted to the families of Tolyatti cars with a longitudinal engine. For VAZ-2107 with 1.5 and 1.6 liter model 21053-1107010-20 ; the car will become more economical, although engine output will decrease in some modes. But this is a completely different carburetor; it was not used on production cars, and its adjustment is completely different.
- 2107-1107010 — the carburetor is equipped with a number of parts for working with the electronic forced idle system (EFI). Configured for the operation of a vacuum ignition timing regulator.
- 2107-1107010-10. The same device, but much simpler, does not have a vacuum supply tube to the regulator and is not equipped with a valve and switch for the EPHH system.
- 2107-1107010-20. The most common modification. Controls a vacuum regulator, not intended to work with capricious EPHH.
All these models are structurally very similar, but differ in a number of calibration data; accordingly, the difference in adjustments is mainly numerical in nature.
Why do you need to clean and adjust the carburetor?
The factory settings of Solex/Ozone carburetors are designed for a certain fuel quality and the driver’s average driving style, and are made on a specific engine. And if the car is operated in accordance with the manufacturer’s instructions and on high-quality fuel, then carburetor adjustments can be avoided for quite a long time.
In this case, the parameters of the content of harmful substances in the exhaust gases must be checked during a technical inspection at intervals from two years (if the car is not older than 7 years) to one year (which is more likely for cars with a carburetor engine).
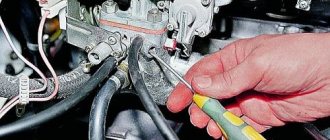
The process of adjusting the carburetor is carried out with two screws and can be done independently (in any case, on a properly working carburetor). We recommend watching the video at the end of the article .
The operations here are simple: by sequentially tightening the quality and quantity screws, stable and smooth operation of the engine is achieved in the range of 800-900 rpm (for winter time, the range of 900-1000 rpm is recommended).
When adjusting the carburetor yourself, you must remember that it is done on a warm engine.
It’s a different matter when malfunctions appear that may be related to the operation of the carburetor. Most often this is an overflow of gasoline in the float chamber and unstable idle speed. In the first case, it is necessary to adjust the position of the float (respectively, the needle valve) or replace chamber parts, and in the second, most often it is not the carburetor that is to blame, but the “sticking” of the gas cable, which must be eliminated.
Sometimes carburetor malfunctions can manifest themselves in dips and jerks when driving or sluggish power delivery. However, similar symptoms can also occur due to malfunctions in the ignition or fuel supply system, so before disassembling the carburetor you need to make sure that these systems are working properly.
The quality of the fuel can also significantly affect the performance of the carburetor, so it is necessary to periodically (at least once every 50 thousand km, and more often with obviously bad fuel) clean it from dirt and deposits. There are quite a lot of cleaning products available now; you just need to remember that the most aggressive of them can cause damage to non-metallic parts (for example, diaphragm material).
To avoid tissue residues getting inside the carburetor, old fuel is usually removed with a rubber bulb.
To clean the jets, it will usually be enough to blow them out with compressed air, and only in advanced cases may it be necessary to clean them with soft copper wire.
Adjusting the carburetor after replacing it
Even with an exact match to the make and model of the car, after replacing the old carburetor with a new one, it will need to be adjusted. The fact is that such engine characteristics, such as the degree of vacuum in the cylinder during the intake stroke, change over time.
What can we say about installing a carburetor on an engine that is not normally intended for use with another model of device. In such cases, in addition to knowledge and experience, special equipment is often required: gas analyzers, stroboscopes, measuring instruments.
The adjustment is made in stages, and the settings are checked at various engine operating modes and can be done more by professionals than by ordinary car enthusiasts.
However, you can try to make a number of adjustments to the standard carburetor that can make fuel consumption more economical and help make the car more powerful in high-load conditions on your own.
In addition to the already mentioned adjustments to the quality and quantity of the fuel mixture and the fuel level in the float chamber, these can be the following operations:
- Adjusting the air damper drive: with the choke handle fully recessed, the damper should be completely open.
- Adjusting the throttle drive: when the gas pedal is pressed all the way, the throttle should be completely open.
- Adjusting the carburetor starting device: setting the normalized gaps between the edges of the air and throttle valves and the walls of the mixing chamber.
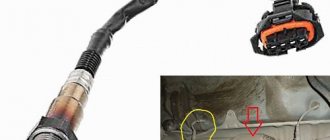
- Correct installation of the electromagnetic valve (EMV): when removing the wires from the EMC (the needle valve locks the idle channel), the engine should stall.
Features of settings and adjustments of carburetors depend on the specific model of the device and the parameters of the car’s engine, therefore, when working independently, you should first of all be guided by the manufacturer’s technical documentation.
How to set idle speed
First, make sure that the ignition system is set correctly, all wires are in order and the engine is warmed up to operating temperature.
For this:
- Turn the “mixture quality” screw (counterclockwise) to maximum speed, this will enrich the mixture with fuel;
- Turn the “amount” counterclockwise, while the speed should still increase.
- Perform a quality check to see if you can still increase the speed.
The meaning of this operation is to tighten the “quality” screw with the “quantity” screw unscrewed to 850-900 rpm.
You can determine the revolutions by the tachometer on the dashboard, and if you are skilled, by ear.