All devices have the same ISO and mini-ISO connectors on the back.
The amplifier can have two groups of inputs:
- linear
- high level input
We make the connection according to any of the schemes proposed below.
There are three options for connecting a subwoofer to a standard radio: output a linear output from it, use a separate high-level converter, or connect to the high-level inputs of the amplifier. Let's look at them below.
First option
In the first option, a procedure is performed that is called “ unsolder the rulers .” In this case, the head unit is removed from the car, disassembled, and linear low-level outputs are output from its board.
They look like two regular RCA connectors. After this operation, you can connect an amplifier to them, and a subwoofer to the amplifier.
A person far from electronics is unlikely to be able to do this on his own. Therefore, it is easier to remove the head unit and take it to people who repair car audio. After the phrase “I need to desolder the rulers,” specialists usually don’t have any questions.
The process of removing the standard radio may be a little difficult. At first it seems like an impossible task. In fact, everything is simple here. You just need to read the instructions, if there are any. Or find a guide on the Internet for removing the GU. Often people post photos or videos that will help you with this.
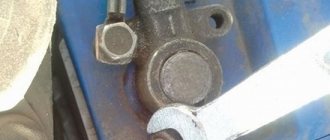
Usually, in order to remove the standard radio, you need to disconnect the adapter frame, if necessary. Then, using two or four knitting needles, which are inserted into small holes on the radio, the latches are snapped off and the control unit is removed. Instead of knitting needles, you can use other available means, for example, thin metal strips or something else, depending on the model of the head unit.
Second option
The second option is even simpler. For an amount that can range from $20 to $100, you purchase a high-level converter , which is a plastic box with wires sticking out of it.
On one side there are “tulips”, on the other there are wires for acoustics. For example:
- Audio Control LC7i,
- Connects 2
- Hollywood HLC 3,
- Helix AFC Competition,
- Helix AAC Active,
- Carpower FGA 22HQ,
- Stinger SG N12 and other similar models.
Then you need to find the wires going to the rear speakers. They can be detected directly at the output of the head unit. To find out what wires you need, look for the pinout for your GU model.
You can also find them in the area of the central pillar, before they pass through the door, this will be even easier. Wires for acoustics are connected to the transducer on one side. And the “tulips” are connected to the linear input of the amplifier using an interconnect cable.
Third option
The third option is to connect the wires going to the rear speakers to the high-level inputs on the amplifier, if available. If the subwoofer is active, that is, with a built-in amplifier, high-level inputs may also be present in it.
You can find the speaker wires that go to the rear speakers in the same way as in the second option. Moreover, cutting them off completely is not necessary. It is enough to remove the insulation and, without cutting the cable, connect the subwoofer amplifier.
Of course, if the speakers are in the rear parcel shelf and the subwoofer is in the trunk, then it is better to choose one or the other. Working together with the subwoofer and rear speakers is not recommended, as the subwoofer will interfere with the bookshelf speakers, worsening their sound.
If the speakers are in the rear doors, you don’t have to turn them off, but listen to them first.
How to connect a subwoofer to a standard radio, without line outputs
There is a desire to listen to your favorite performers while driving, there is a car radio, but, unfortunately, it does not give the desired effect, the music plays, but I would like something more powerful. This is why you need a subwoofer, but connecting a subwoofer is still accompanied by some difficulties. Like any other amplifier, you need to supply power to it, and also connect the cable through which the audio signal will be transmitted.
And here, if you are not an advanced radio amateur, you can reach a dead end, because in the car radio you do not find a single hole where you could connect the desired amplifier. A logical question arises: is it possible at all, and if possible, how to connect amplifier for standard radio?
1) Purchasing a new radio
The first method is good for those who are poorly versed in the radio business, but do not have any special financial restrictions. You just need to go to a car store and buy a new, more modern radio, and it is quite possible that all the issues will be resolved by themselves. This method is really not bad, but it requires some formalities. For example, your car must support the original head unit you purchase. Also, the radio must have a support function so that the connected subwoofer works and gives excellent sound. Well, the last important point is the cost of head units; with the current crisis, their price has jumped to the price of spaceships.
This section has one hidden advantage: by installing a 2DIN radio, you will be able to connect a rear view camera.
2) Contact radio amateurs
So, if you are not a millionaire, and also do not understand wires very well, then your best option would be to seek help from experienced radio amateurs.
You can find them in small workshops. Some specialists literally in a matter of minutes, right before your eyes, will disassemble your radio, solder additional wires and bring them out to RCA connectors. The scheme is simple, but 100% working. You can then connect an amplifier or subwoofer to the output contacts. If the master is good, he will provide you not only with excellent sound, but also complete safety inside the car.
3) Install linear converter
The next option is suitable for those people who themselves are poorly versed in the intricacies of radio engineering, but do not want to turn to others. In this situation, the best solution is to purchase a level converter. It is through it that it will be possible to connect two devices to each other, a head unit without the outputs we need and a subwoofer or amplifier. You can buy this converter at any car audio store. This device itself is simple, and therefore we will not delve into its internal world, but on the outside it has two tulips on one side (the so-called audio connectors - RCA), and on the other there are four wires.
How to install a head unit on a car with basic equipment?
Since the Lada Granta base is not equipped with musical equipment, and only a push-button radio is installed on board, the question justifiably arises: how is the standard radio installed in the cabin? In reality, this is a simpler procedure than it might seem at first. The occurrence of problems during installation is excluded, since a seat is already provided for the standard device on the Lada Granta panel, regardless of the level of equipment.
You can purchase the device in a retail chain or on an Internet site, where you can actually find an improved version, equipped with a navigation system with a detailed map of the Russian Federation. Don't forget to buy an additional luxury panel. Although multimedia will fit into the standard panel without any problems, the appearance will not be so beautiful. The price for this device reaches 2.5 thousand rubles.
Next comes the installation of the radio. The design feature of the landing niche in the Grants panel does not provide for the need for additional wiring.
- The first step is to remove the plastic pocket in the audio system opening. This is done using a flat-profile screwdriver. There is access to several connectors that involve connecting a radio.
- We remove the frame from the head unit and fix it at the location of the pocket.
- Next we move on to the connection. To do this, connect a couple of connectors and install the device in the landing niche.
- After this, you can install the speakers in the front door cards. The procedure involves the need to dismantle door trims with unlocking handles and adjust the position of the glass. Using a special template, we begin cutting out the mounting holes.
We attach the speakers to the cards using self-tapping screws. We insert the cables from the speakers into the input connectors intended for this on the rear panel of the car radio. We install the decorative door panels in their original places and evaluate the sound provided by the standard head unit. Thus, the radio is connected.
How to install a subwoofer in Granta with your own hands
The sound obtained from the standard Granta multimedia system does not suit all car owners. And even if you like the display of the radio visually and functionally, the sound quality usually leaves much to be desired.
Therefore, many are looking for various options on how to properly install the main or additional subwoofer in Granta in order to get a more interesting sound, in accordance with their musical preferences.
The most popular place to install a subwoofer among Granta owners is the trunk or rear parcel shelf. This installation option is preferable because the distance from the listener to the subwoofer should be at least half a meter. Otherwise, the sound breaks and loses its acoustic characteristics.
Types of subwoofers
First of all, subwoofers are divided into active (with a built-in amplifier) and passive (with an external amplifier). There are subwoofers that can be bought completely complete with a box; you can buy just the speakers. Many people make the box themselves, especially since its production does not take much time and they install speakers in it.
Standard size
An important characteristic of a subwoofer is its size. The subwoofer's size is the diameter of its speaker, measured in inches.
Decoding problems
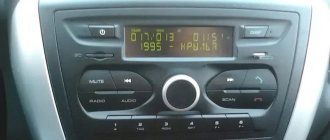
The main pitfall of the described procedure lies in the security code embedded in the memory of most radio tape recorders. The bottom line is this: disconnecting the music center from the external power supply for 10-15 minutes will lead to the fact that the next time you turn on the car radio, it will require you to enter a security code (usually a four-digit one), without which it will not function.
Advice. Removing the device to replace it with a new one is not a problem, unless you plan to use the old player on another machine. In any case, try not to disconnect the battery for a long time.
The device requests a code after connecting to the on-board network
If the card with the code is lost or missing, the issue can be resolved in several ways:
- when it comes to a standard device, for a certain fee they will help you find the code at a dealership that sells cars of your brand;
- there are companies and individual specialists dealing with these problems;
- the free way is to search for code using various programs.
Serial number location
Regardless of the method chosen, you will have to remove the radio from the socket to find out the serial number. It is printed along with a barcode on a tag glued to the side or top of the case. After taking out the device, rewrite these numbers, and then try to calculate the PIN code using them using various online calculators on the Internet. If it was not possible to determine the required code using this method, then remove the music center and take it to specialists in this field and prepare to pay for their services.
Important point. If you do not know the PIN code of the radio, then when searching on your own, do not enter combinations of numbers more than 3 times! Otherwise, the device will be blocked, and in this state, decoding it will cost much more.
The issue of removing a car radio from its socket is not very difficult and will not require much time. But the consequences can be unexpected for an unprepared motorist. Hence the last piece of advice: find the lost pin code before turning off and removing the player in order to save your time and nerves.
The standard multimedia system 2190 on the Lada Granta has many useful functions, but this does not mean that one day you will not need to connect additional equipment to it (rear view camera, etc.) or remove it altogether. For example, to replace with more powerful multimedia systems or, conversely, to install a double-din radio without a touch screen.
In any case, you may need to dismantle the MMC on Grant, which we will talk about now.
- 10-02-2015
- 204 396
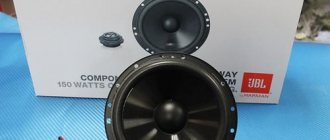
AvtoVAZ equips modern Lada cars (Granta, Kalina, Priora and Vesta) with standard push-button radios, and in the top version (Luxury trim levels) with more modern multimedia systems (MMS) with a touch screen. In this article we will tell you how to connect an amplifier and subwoofer to the standard radio and MMC of Lada cars.
How to install 2 din in grant norm or standard
Everything is more complicated here. Need to:
Installation of Lada Granta car radio
Tools:
- Open-end wrench 10 mm
- Small flat screwdriver
- Knife (if necessary)
- Soldering iron (if necessary)
Parts and consumables:
Notes:
Initially, in this car model, the calculation is made for a 1-DIN radio. If the owner wants to install another type, a newer one, for example 2-DIN, he will need to start sawing the partitions in the console itself. And if the size is not suitable, then a suitable cantilever frame will have to be cut into the panel. This is much more complex than the first type of installation listed. In the second option, it is better to entrust the installation to a specialist, because there is a high risk of damaging the interior trim.
Here is a description of how to install a 1-DIN radio.
1. Remove the negative terminal from the battery.
2. Remove the plastic pocket installed in place of the future radio using a flat-head screwdriver.
- Guide for connecting radios on Toyota models
3. Having taken out the pocket, on the reverse side you will find slots where ISO connectors will be inserted to connect the radio. Disconnect the connectors to completely remove the pocket.
4. Now remove the metal frame from the radio and install it in the place where the plastic pocket was. Unbend the frame's tendrils to lock it securely in place.
Flashing process
The most popular among motorists is the firmware of the Granta head unit. This has no effect on the sound, but adds some features that the standard interface does not have. For example, a convenient touch keyboard appears, called up from a number of programs, and the ability to access the Internet. In order to reflash the media system, you will need an SD card using FAT formatting; you can use the same card, but formatted in exFAT.
First you need to download the firmware, having first carefully searched for it on the Internet. It’s easier to find it on thematic auto forums. After downloading, copy the necessary files to the root directory of the card, having previously written them to a flash drive. Then we install the card in the slot on the radio and reboot it. Once the reboot status bar is full, you can use the expanded interface. It's worth noting that to return to features such as radio and Bluetooth, you need to remove the SD card with the alternative menu and reboot the system again.
Also on car forums you can find craftsmen experimenting with firmware that does not remove the radio and some other modes from the menu. There is information that they have somehow learned to read and decrypt data from a KAN bus suitable for the MMC. The firmware may also require screen calibration before you can work with the alternate menu. Follow the instructions and everything will be quick and easy.
Flaws
- You won't be able to play video files on MMC XRAY.
- It’s a matter of habit – the radio does not have the round volume controls familiar to all generations of domestic car owners. Only the buttons can increase/decrease the sound.
- The volume of the radio can be controlled using the multifunction steering wheel, but you won’t find buttons for switching tracks here; you still have to reach out to the screen.
- USB devices are read quickly, but the flash drive must be in FAT 32 format, and the maximum memory capacity cannot be increased beyond 32Gb.
- The standard IGO navigation program may begin to slow down when driving. Stutters may occur when entering an address. There is no way to change the map scale with your fingers: control only with buttons.
- Navigation map updates are quite expensive, especially since maps in Russia are not of the best quality. Free map updates are performed only once after purchase within three months from the date of device activation.
- The lack of line outputs means that connecting an amplifier and subwoofer in one minute will not be possible. You will have to solder the line outputs or connect the amplifier and subwoofer to the rear speakers.
Of the biggest drawbacks - the inability to play video, there is a decent solution. Firmware will help solve all these problems.
In general, it is clear that the XRAY MMC leaves only pleasant impressions with its functionality; there are shortcomings, but they are not particularly significant. The price of a multimedia system for a domestic car is quite unexpected, but if you compare it with the cost of multimedia in some other foreign cars, it begins to look in a different light.
Check out our group.
Characteristics of the standard radio "Lada Grants Liftback"
The radio for the Lada Granta liftback is supplied as standard equipment. Product in 2-DIM format (100 x 180 mm).
In addition to the classic radio, there is a built-in card reader, Bluetooth, and a USB output for connecting flash drives. The only disadvantage of the audio module is that it is a push-button type. Which is not to the liking of many car enthusiasts, which is why they install more modern modifications.
During the startup of the audio module, a greeting from Lada Kalina 2 is displayed. This is not an error, as many owners think. This type of audio was originally developed for the Lada Kalina 2. Obviously, the manufacturer did not change anything and started production for the Granta. Installation/disassembly of the module is somewhat complicated due to the tight fit, so be prepared for this.
It is based on the Windows operating system, which allows you to connect to the World Wide Web via a 3G modem. There is no such option out of the box; you first need to reflash the device, but more on that later.
Via Bluetooth, it is possible to connect to a phone, and the “hands-free” option is activated. Which is very convenient and practical when driving. The owners were also pleased with the stock radio. At first glance it looks simple, but it turns out not to be so. Available programming function for a specific channel on a given topic.
For example, as soon as a news broadcast comes on, the radio automatically switches to the programmed channel. The audio module reads the following formats: MP3, WMA, WAV, WMV. Control of the standard radio of the Lada Granta liftback is accessible and intuitive, even for an inexperienced owner.
Reviews
| № | Positive |
| 1. | Victor, 39 years old: after buying the car, he did not change the radio, despite the push-button control option. The sound quality is good, the radio reception is excellent, that's enough for me. |
| 2. | Konstantin, 41 years old: bought the car second-hand, second owner. I didn’t change anything, I left the original radio. The functionality is good, the build quality is also good, it reads from a flash drive. |
| 3. | Vasily, 44 years old: I listen to the radio more, the reception in the city is good. True, it causes interference near metal structures, but this is natural. |
| 4. | Kirill, 36 years old: I work as a taxi driver, on wheels all day. The standard tape recorder saves the day, it works properly. My friends recommended replacing it with a touchscreen model from the new Granta, but so far the old one hasn’t failed. |
| Negative | |
| 1. | Victor, 38 years old: the standard audio module, although not bad, seemed to me not enough, so I replaced it with a foreign one and supplemented it with an amplifier. Now the volume is good, the quality is high. |
| 2. | Mikhail, 42 years old: I work as a courier, I drive for the entire shift. I expected more from the standard radio, so I had to replace it with a new one. The volume suits me, I plan to connect an amplifier - a crossover. |
| 3. | Ivan, 33 years old: I bought the car second-hand, immediately replaced the audio module, the reviews are not good. New and high-quality equipment from Trinity, no problems. |
| 4. | Vladlen, 40 years old: friends gave me a gift in the form of a radio with touch control for our anniversary. Before this there was a push-button one. Can't compare, quality, sound, control, functionality at a high level. |
Conclusion The opinions of motorists on the functionality and sound quality of the standard radio are divided, which is obvious. Everyone evaluates according to their own criteria. Some people care about sound, others about functionality, and others about control. Regardless of the type of radio: push-button or touch-sensitive, the workmanship is good. No massive breakdowns or defects were recorded. Maintenance is not expensive, parts and components are available both at official representative offices and on the Internet. Now it will not be difficult for the owner to remove the radio on the Granta liftback with his own hands without contacting a service station.
How to connect a subwoofer without an amplifier
- On the rear panel of the car radio there are two inputs through which the subwoofer and the radio are connected using a linear cable.
- Then the power is connected: the power cable is laid under the interior trim and connected to the “+” terminal of the battery with one edge, and the other is connected to the subwoofer.
- The negative contact is connected to the battery “-” terminal and is grounded to the housing with a bolt connection. For these purposes, the edge of the wire must be stripped in advance. Cleaning is done with a knife and wire cutters.
- Since the power supply to the battery is 12V, the connection is only permissible through a fuse, which is installed on the power cable near the battery.
- Next, the connecting RCA wires are laid from the subwoofer through the interior and connected through the LOW-Input connectors, having previously cleaned the edges. If the connectors in the radio do not have RCA connectors, then you can connect them via the HI-Input connector.
Important! When connecting a device, do not confuse the active with the passive; remember that the active already has a built-in amplifier, while the passive does not, so the connection diagrams are different in both cases.
Subwoofer connection diagrams
Let us remind you that on the website you can find other useful instructions for tuning Lada cars.
Found an error? Select it and press Ctrl+Enter..
Information
Visitors in the Guests
, cannot leave comments on this publication.
Top materials
News
Tuning
Have you contacted the dealer regarding a warranty case for Lada Kalina?
Lada.Online
Lada (“Lada”) is a brand of cars produced by AvtoVAZ JSC. Previously, it was used only for export cars, and for the domestic market, cars were produced under the Zhiguli brand. In 2004, the management of AvtoVAZ announced the transition to the Latin alphabet for the official spelling of the names of all cars produced by the plant: Lada - instead of "VAZ" and "Lada".
Lada.Online is the largest Russian-language automotive resource with a daily audience of thousands, which is dedicated primarily to cars of this brand, the domestic automotive industry and the automotive world in general.
This site is not the official LADA website.
© 2022 Lada.Online. Copying of material is permitted only with a link to the source.
Crib
Instead of a conclusion, let's summarize:
- You can plug in budget sound into the Grant for an amount of 20,000 rubles or more.
- Podiums in the front doors = impossible to open the glove compartment.
- 16 cm speakers in the front doors - cut the metal of the door or prepare spacers with the factory facing of the speakers.
- The acoustic shelf covers the ISOFIX mounts.
- Audio preparation pulls wires only in the doors.
- Article numbers for ordering speaker covers and mounts are in the “Installing speakers in rear doors” section.
Design features of devices
To understand what parameters to use to choose a subwoofer for your car, you need to thoroughly understand how it works. By design, subwoofers are divided into four types:
- Closed, with a sealed housing. The subwoofer is mounted in a box of a given volume. It dampens the closed sound wave behind the speaker. However, devices with a closed design are not the best subwoofers for cars. They are rarely used due to low efficiency. A closed subwoofer box extinguishes a closed sound wave
- Bass reflex. These are closed boxes with a tunnel (bass reflex) of a certain size. Thanks to the tunnel, increased pressure is created on the speaker used, which allows you to raise the sound level at a given frequency in the range from 50 to 120 Hz. The enclosed space increases the pressure exerted on the cone, which reduces the likelihood of sound distortion. The occurrence of mechanical damage to the speaker is also excluded. In this case, the phase inverter corrects the rise in the frequency response (amplitude-frequency characteristic) and relieves the diffuser from excess pressure. All this leads to a significant increase in the efficiency of the subwoofer. Bass reflex box reduces sound distortion
- Stripes. These are subwoofers with speakers tucked inside. The most complex type of device, it requires additional space. This is explained by the need to combine the features inherent in the closed-type design and the bass reflex. The basis for the product is a box with a bass reflex tunnel. A speaker is installed inside, which also acts as a partition. Thanks to this design, there is a closed, sealed space behind the speaker, which adds rigidity to the cone. A volumetric compartment is formed in front of the speaker, which has an output due to the presence of a bass reflex.
Subwoofer bandpass requires additional space - Subwoofers with a passive radiator, having a second passive speaker designed to reduce the resonant frequency. The installation of such systems is practiced in E-class cars (for example, Mercedes-Benz E-class).
Passive subwoofer driver reduces resonant frequency
Important points
In the end, we summarize all the main aspects that need to be observed in order to connect the amplifier correctly and safely:
- Select a power cable of sufficient cross-section, preferably with a margin.
- Select the correct fuse.
- All contacts must be stripped and tightly tightened or crimped (the larger the contact area, the better).
- Knock out quality copper wiring.
- Protect cables from damage with additional insulation.
- Lay acoustic and signal wiring as far as possible from the power supply.
- If you have several amplifiers and the minus is taken from the body, then make contact for all at one point.
- Make all connections on a de-energized system (positive terminal with battery removed).
conclusions
Thus, you can always install a subwoofer in your car and achieve maximum sound quality. The main thing is to approach the organization of the process correctly, take your time and choose the right woofer (but that’s another story). Good luck.
A subwoofer is an acoustic system that reproduces low sound frequencies, the range of which ranges from 20 to 300 Hz. It is intended for use in confined spaces (for example, in a car). A properly configured subwoofer fits harmoniously into the overall playback system, making its sound richer and more saturated. So which subwoofer is better to choose for your car?