During operation, “saffron milk caps” are formed on the paint surface of the car - small pockets of corrosion in the form of bugs. It is advisable to get rid of them as quickly as possible, preventing the spread of rust. This is accessible to every car enthusiast, since materials can be purchased at a reasonable price, and the work itself does not require special skills.
In some cases, the problem can be fixed very easily, so every driver can take care of the paintwork.
Causes and places of rust on a car body
Rust is the oxidation of metal that occurs under the influence of air, water and static electricity. Therefore, the main reason for its occurrence is damage to the paintwork of the car body. Microcracks and physical damage allow air and moisture to reach the iron. The speed of the destructive impact will depend on the degree of protection of the body itself and the aggressiveness of the environment. This is especially true in winter, when many chemicals appear on our roads.
The above factors directly affect the shape, color and depth of corrosion. People call them differently: “saffron milk caps,” “bugs,” or simply “rusty spots,” but their essence is the same (only the degree of neglect varies). A single spot of rust is easier to deal with than many small red spots. The latter usually indicates poor quality metal or unsuccessful body repairs. The total processing area will be larger. Moreover, these points often spread in depth rather than in breadth. Blistering of the paint also signals the need to remove corrosion that has begun to develop under the paintwork.
The most common places for bugs and rust spots (photo)
Thresholds Arches Wings at the arches Trunk
Rust progresses well in places where there is increased exposure to foreign objects: sand, dirt, stones. The hood suffers from small stones from the tires of other cars, the wheel arches from their own “emissions” (by the way, wide non-standard tires or rims contribute to greater damage). The thresholds of the car are also one of the first to rot due to the close proximity to the “aggressive environment”, plus unsuccessful exits from curbs aggravate the situation.
Content
- What is “red disease” and why does it occur?
- How to remove “saffron milk caps” with your own hands Stage 1. Cleaning the body of “saffron milk caps”
- Stage 2. Puttying the car body
- Stage 3. Body painting
Corrosion is dangerous because it violates the integrity of the body. This makes the car less safe and puts the lives of the driver and passengers at risk.
In this material we will tell you what causes the “red” disease, where it most often appears, how to get rid of it and what cars are affected by it.
How to delete: options
We have become acquainted with the causes and places, let's move on to methods of correct elimination. There are two methods that differ in the way they remove rust:
- Mechanical - cleaning, priming, puttying, painting.
- Chemical - rust converters or kits for galvanizing metal.
You cannot do without the first method if the rust is strongly ingrained into the metal. Then it is necessary to completely eliminate traces of corrosion until pure iron (ideally shiny) remains. To do this, you may need additional tools and resources, which we will discuss below in step-by-step instructions. The second option is suitable for hard-to-reach places. These could be curves on the bottom of the car or the inside of the arches, which are difficult to process using mechanical means. Depending on the product, rust after chemical treatment can turn into foam (you need to rinse with water and dry the surface) or harden and become covered with a protective layer suitable for painting. Be sure to read the instructions and recommendations for the use of chemicals before purchasing. Before starting work, try to assess the extent of damage to the body and assess whether you can etch the damage with chemicals alone. For a positive result, it is necessary that “live” iron remains after the initial cleaning. If there are through holes or the final thickness of the metal after processing is too small, then more serious body repairs will be needed, that is, initially all these areas will need to be repaired using welding or putty with fiberglass.
Painting nuances
How to paint over rust on a car is up to everyone to decide for themselves. There are many options. For painting, use a special metal paint of the appropriate tone. Otherwise, it threatens with a large fine from the traffic police.
Paint the entire surface. This can be done manually with a brush. To prevent problem areas from being visible, the vehicle is painted in two or three layers. Experts recommend applying a colorless varnish over the paint.
Reviews of the most popular tools and methods
The ideal option is orthophosphoric acid. Apply a thin layer to the camelina, wait 10–30 seconds, wipe dry with a cotton pad. It eats up rust and forms a phosphate film that is not afraid of water and is inert.
Maxim Leonov
https://avto-flot.ru/blog/kak-udalit-rjavchinu-s-kuzova-avtomobilya-i-ostanovit-ee-rasprostranenie.html
I already tried orthophosphorus - this is still an old-fashioned method, I processed what I cleaned. (As far as I know, all these inhibitors and converters are what it is, only in multi-colored bottles). Indeed, almost cleaned surfaces, this rubbish gets rid of rust residues. But untouched, so to speak, terry thickets of corrosion do not particularly react to it. So, they sizzle a little, darken, turn pale and remain in place.
Saf
https://forums.drom.ru/4×4/t1151267034.html
Nowadays, people no longer burn at the stake for the magic of transforming rust into pure and white metal, but a miraculous transformation does not happen either. And the zealous body workers continue to sand, etch, putty, treat with filler... And that’s why - because you can’t pull it out without difficulty... It’s impossible, you know, to rub it with a cloth and for it to become overgrown - it doesn’t happen. So go ahead, Shura, go ahead...
Zaika 2106
https://forum.auto.ru/chemistry/22048/
We remove rusty bugs from the body in 20 minutes: 2 ways for the lazy 2022
During operation, “saffron milk caps” are formed on the paint surface of the car - small pockets of corrosion in the form of bugs. It is advisable to get rid of them as quickly as possible, preventing the spread of rust. This is accessible to every car enthusiast, since materials can be purchased at a reasonable price, and the work itself does not require special skills.
In some cases, the problem can be fixed very easily, so every driver can take care of the paintwork.
Do-it-yourself chemical way to get rid of corrosion
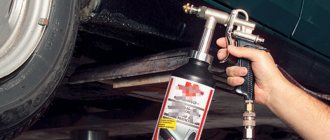
The chemical method differs only in the initial stage - cleaning the part from rust. According to reviews from manufacturers, these substances are able to eradicate rust, stop its further spread and do not damage the iron itself (unlike “sandpaper”). Application is very simple - apply the product to the rusty surface for 30-40 minutes, then wipe with a cloth or rinse with water. But to get a nice, smooth surface you will still have to clean, putty and polish (except for the initial stages of corrosion).
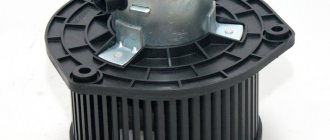
Some funds are available to motorists even with the most modest budget
There are kits on sale that allow you to independently apply a protective layer of zinc to the car body. The kit already contains a solution for removing rust and applying a protective layer, as well as an electrode with a zinc tip. This process is electrochemical, so a connection to a battery is required.
The kit includes liquids and all necessary working tools
Where problems appear
Corrosion appears in places that are affected mechanically. The most common problems that arise are:
- First, rust appears on the surface of the thresholds;
- problems often arise with the hood due to small pebbles from the vehicle in front;
- the car underbody suffers from rust;
- Aggressive chemicals negatively affect the area where arched structures are located under the wheels of a vehicle.
Note!
If rust appears in a timely manner and is eliminated, the car owner can prevent further problematic situations. After this, corrosion does not spread.
To cope with the problem, you need to decide how to paint over rust on a car with your own hands.
How to remove “saffron milk caps” and “bugs”
Many people want to believe that if rust has just appeared and the lesions are small, then they can be eliminated with some miracle remedy. Unfortunately, this is impossible in principle. The rust that appears on the surface of the paintwork is like the tip of an iceberg; the main damage is deep inside.
There are products on sale that will help remove the red color from the body. For example, there is Anti-Rust paste - it removes red spots quite quickly and well. This is the same rust converter that we discussed above. It eliminates the visible signs, but not the source itself. Such manipulations usually last for 2–6 weeks (depending on weather conditions), and they are most often used immediately before selling the car.
Small “bugs” sometimes cause big problems for the car seller!
If you want to get rid of the problem in the long term, then you cannot do without physical intervention. It is necessary to stop the access of air and moisture directly to the metal. Theoretically, you can prolong the effect of the paste if, after treatment, you cover the damaged area of the body with clear varnish. But it will work if the converter has managed to remove all the rust. In most cases, this does not happen, since the depth of penetration of the product is small.
Unfortunately, it will not be possible to hide damage for a long time only with the help of paste.
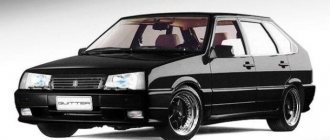
Clear victory over saffron milk caps, “White Pearl”
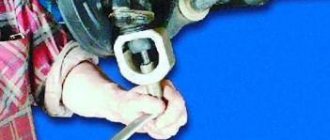
Lifan cars do not suffer from increased corrosion, but they also lack stars from the sky in the fight for the durability of the body. For example, the Lifan Solano's trunk lid, where the saber is, is highly susceptible to corrosion.
Let's list the materials and tools used:
- Dish sponge – 2-3 pcs.;
- Clean cloth for degreasing;
- Solvent or white spirit, but not acetone;
- “Tinting pencil” set (varnish + paint);
- Powder “Komet” or “Pemolux”, 1 package.
The paint in the kit that will be purchased must exactly match the shade of the body parts. In practice, however, this rarely happens. All work must be carried out in a warm and ventilated area. And first of all, the body must be washed:
Result of washing with water
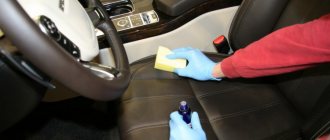
Then, as the reader guesses, they are treated with a cleaning agent:
- You need to take a dish sponge soaked in clean water;
- A small amount of powder is applied to the hard side of the sponge;
- Carefully treat all problem areas. Don’t be afraid to rub off the varnish or cause scratches – the cleaning powder dissolves quickly;
- You can wipe the surface with a dry cloth or dry it with a hairdryer;
- Degreasing is carried out quickly: the enamel is wiped with a cloth soaked in a solvent.
When all the preparatory steps are completed, the surface looks as shown in the figure:
The result of cleaning with a secret special agent
Next comes touch-up painting. All actions must comply with the instructions included with the kit.
Instructions for branded kits
By the way, if the room temperature is below +15 degrees, it is better not to start work at all. Be aware of this.
Subtleties of using “tinting pencils”
The reader has already understood how to remove saffron milk caps - everything unnecessary is removed from the car body, and then touch-up is carried out. Let's see what manufacturers of kits designed specifically for our purposes offer:
- The surface must be cleaned and degreased. If necessary, use sandpaper (not our case);
- Shake the bottle of paint vigorously for 2-3 minutes (required);
- One or more layers of coloring agent are applied. Each next layer is dried for 30 minutes;
- When repairing metallic coatings, a layer of varnish is finally applied;
- Drying is carried out for at least 3 hours;
- If the work is completed completely, polishing is carried out after 36-48 hours.
Therefore, varnish is used on metallic enamels, and only on them.
Result of tinting on metallic gray
Let us list the tricks and subtleties identified during practice:
- The paint dries in 15 seconds. If something goes wrong, it is better to immediately erase it using a solvent;
- The brush included with the bottle of dye is used as follows: one drop is applied to the center of the area. Then the drop is distributed from the center to the edges, but a toothpick is used;
- Drying with a hairdryer is out of the question - fresh paintwork will bubble up!
Everyone also knows that factory paintwork changes its tone over time. This means that choosing paint for a car older than 3 years is a problem.
How much the shade changes depends on the amount of ultraviolet radiation that reaches the paintwork during use. In general, computer selection is helpful.
Judging by experience, we can say that working with a tinting compound is a long and tedious task. It's easier to use a wax corrector. And the last layer, protecting the wax itself, will be polish. This treatment, as reported in reviews, is carried out once every 2-3 months. And it might be easier to have the part painted. Make a choice.
Putty
If the corrosion was initially high, and after the procedure a decent-sized recess has formed, putty should be used. And if holes appear, it is recommended to also use fiberglass. In some solutions, everything is combined, and that’s exactly what you should use.
Do not forget that before applying a layer of putty, regardless of the volume, you should thoroughly degrease everything. At the moment, most putties come with two main components, so hardening occurs in a matter of minutes. That is why it is recommended to use it immediately before application. After the mixture has completely dried, you need to trim it along the necessary contours. This can be done using a special sandpaper, grade P80-120.
Mechanical stripping
It is necessary to first get rid of loose layered rust. You also need to remove all blistered paint and primer. If the amount of work is not large, you can get by with a small metal brush or special sandpaper. When rust has affected a large area, you should use an angle grinder or a classic drill, but with a special attachment with a brush. Do not use large discs or discs that remove large layers of paint. Otherwise, you can strip the metal so much that holes appear where there is no need to make them. This was the so-called mechanical method, but in addition to it, a chemical one can also be used.
Let's start work
The very first thing you need to do is wash your car thoroughly. Then inspect it for rusty spots on the body. If quite a lot of them have appeared over the winter, then we begin to gradually carry out the work, choosing, for example, one of the wings. Here we select a specific camelina (you can mark the surface to be cleaned with a glass marker).
Using a drill with an attachment or a grinder, we begin to remove rust from the given surface. This procedure must be done until pure metal appears. We clean a little with reserve, taking lightly the surface that is not yet damaged, in order to completely remove corrosion.
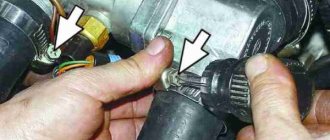
Next stage
– degreasing the surface that has been cleaned. Take a cloth, dip it in the product and scrub thoroughly. Before that, some craftsmen advise to blot the stain to be removed with a liquid rust converter, wait a little (15 minutes), wipe it dry and then degrease it. And some say that such a procedure is practically useless. So it's up to you. In our case, we’ll process it just in case.
The next stage is putty
. You only need a little bit of it - literally smear it on. Don't forget the hardener! Using a small spatula, carefully cover the former saffron milk cap and smooth it out. We apply it quickly enough, with a longitudinal movement, because it begins to dry out.
When the putty is completely dry, you need to tear off all the tape. And glue the new one in the same way as the first time. Using coarse sandpaper, sand the putty, starting from the edges, carefully comparing it with the paint. Next, we use a zero pad soaked in water for final sanding. After leveling the surface, remove the tape.
Wipe the stain dry and degrease.
Paint horizontally with a brush. If you have a spray can, you can blow out the area being restored. The process is carried out in several stages. How to do this, read the article “How to paint a car with your own hands from a spray can.”
As you can see, the problem of how to remove saffron milk caps from a car body with your own hands turned out to be completely solvable. Of course, you will not achieve such an even tone as with service painting, but if you follow the above recommendations, it looks quite decent.
What is needed for the job?
First, you need to purchase sandpaper, coarse and fine. Fine, soaked in water, is used for final sanding. Secondly, a can of putty with a hardener (any car putty, a whole can is enough to get rid of saffron milk caps all over the body).
You will also need a small spatula to apply it to the body. Next is the paint for touching up. It should be matched to the color of the body (help article “What paint to paint a car?”). If your car is an original color, take the gas tank cap and go to the car market and pick it up. You also need masking tape, degreaser, rags, a rust converter (any available one), a drill with a sanding attachment or a small sander.
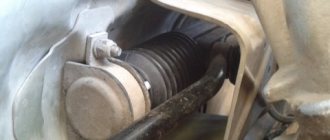
Arch repair
A serious inspection of the damaged paintwork may reveal that restoration is futile and replacement will be required. It is not always possible to do such work with your own hands (there is no experience, the parts sent do not fit in size), but more often putty saves the day. The first step is to thoroughly remove rust and rotten metal - no half measures will save you in this case. When choosing a material, preference should be given to a vibration-resistant putty, and for serious unevenness, choose a putty with fiberglass.
If at the straightening stage there are no cracks (the metal is not stretched anywhere), then the main tool will be sandpaper and a block. Immediately you need to cover a large surface, i.e. work not only with a separate recess, but with the entire repair area at once, covering the area that does not require leveling. The integrity of the putty is important, so the second and subsequent layers must be applied immediately after the previous one has set. For the first leveling, P80 sandpaper is suitable without wetting the surface, but it is recommended to use such a coarse abrasive only for removing the shape.