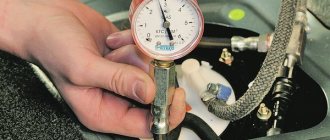
Measured (estimated) the pressure in the fuel rail
I’ve never done anything like this, but in order to collect evidence in the investigation of the case “why in the morning, when starting the engine, a new car stalls (or there is a drop in engine speed),” I decided to measure the pressure in the fuel rail.
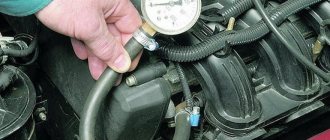
The pressure gauge was taken from an old foot compressor for inflating wheels. I didn’t find a gas-resistant tube, as it should be, but I found a tube from a shower stall and decided to take a chance in the hope that it would withstand 3...3.5 ATM for a short time... I took off the adsorber valve to make it easier to get to. I removed the plug and unscrewed the nipple. I tightened the tube to the ramp and pressure gauge with clamps. When I unscrewed the nipple, gasoline flowed out of my nose.
At first glance, the pressure in the system is normal. I suspect that the old pressure gauge is lying, its needle is not even at zero, so let’s call this experiment not a measurement, but an assessment.
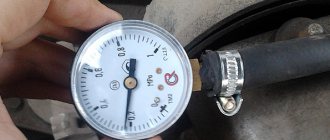
1. When the ignition is turned on, the pressure reaches approximately 3 atm, but then gradually drops. When the ignition is turned off, it drops quickly.
2. When starting the engine at idle, the pressure remains about 2.8 atm, which is close to normal.
3. If, with the engine running, you drop the vacuum tube from the manifold to the fuel pressure regulator (I seem to have a traditional fuel circuit with a return line), then the pressure increases to 3.4 atm.
My thoughts. The pressure regulator (at least IN THE EVENING) works normally. Why does the pressure in the rail drop when the ignition is turned on and off, if the engine is not running? This is a question: is it supposed to be like this or is the check valve in the fuel pump poisoning? So, I have another suspect...
Crankshaft position sensor (CPS)
The Niva DPKV is installed in a special hole in the oil pump drive cover. This sensor is responsible for setting the ignition timing. The sensor takes readings from the crankshaft pulley, which has teeth and in one of the places there is “caries”, that is, several pulley teeth are missing. It is “caries” that the DPKV understands in what position the crankshaft is. The sensor itself resembles an inductive coil, which generates impulses when the crankshaft rotates and transmits them to the computer.
If the sensors fail, the car will not start.
Signs of DPKV malfunction:
Troubleshooting
No pressure in the fuel rail? Causes:
If the pressure in the fuel rail gradually drops, the cause may be:
Let's check it like this. We clamp the leading rubber hose of the fuel rail:
Checking the RTD. Connect the pressure gauge hose to the outlet fitting of the fuel pump and turn on the ignition:
If the pressure in the fuel rail is within normal limits, we look for the causes of engine malfunctions elsewhere.
Share on social networks:
Found an error? Select it and press Ctrl+Enter..
Source
Niva with ECM
As you know, the first Russian SUV Niva was born back in the days of the Soviet Union. At that time, in the USSR they did not even think about an electronic engine control system; the entire process of operation of the internal combustion engine was mechanical. The engine was supplied with fuel through a carburetor. At present, the Niva still continues to be produced, but with its ancestors, the modern Niva has only the body left and it has undergone minor modifications.
The carburetor was replaced with an injector, the interior was changed and the appearance of the car was transformed, but still the Niva remained Niva. The legendary Niva cross-country ability did not deteriorate after these modifications, but became much more comfortable.
In this article we will talk about the sensors of the engine control system in the injection Niva, namely, it describes in detail each of the sensors, where it is located and what function it is responsible for, as well as the signs of sensor malfunction are described in detail.
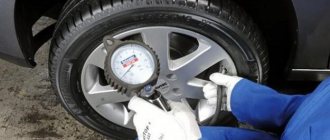
Checking the pressure in the fuel rail on VAZ and Lada cars with an injection engine
The article will describe a testing technique that does not require special devices.
From the tool you will need:
1. We took a regular gas pressure gauge with a scale of up to 1.0 MPa. It has a threaded connection and screws perfectly onto a 9 mm oxygen hose. You can use a mechanical one to check tire pressure. They are usually inserted into the fuel hoses by 8 mm.
2. Screw it into the hose and tighten it with a clamp:
3. Unscrew the plastic cap from the fuel rail. It should unscrew by hand, but if it hasn’t been touched for a long time, you may need pliers:
4. If the car has just been turned off, then the gas in the ramp is under pressure. First, it is recommended to release the pressure by pressing on the spool and placing a rag or a plastic “bottle” with the neck cut off. It is more convenient to bleed using a wheel cap.
5. Unscrew the nipple with the cap. It is similar to a wheel nipple:
6. We put a hose with a pressure gauge on the threaded part and tighten the connection with a clamp:
7. Start the car and first of all make sure that there are no gasoline leaks from the connections. Then we look at the pressure gauge readings.
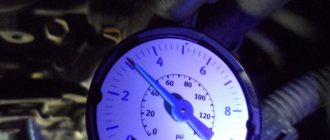
8. For fuel systems with “return” (a pressure regulator is installed on the fuel rail, from which a tube goes back to the tank), a pressure of 2.7 atm is considered normal (when re-gasping it should jump up to 3 atmospheres). However, a pressure of 2.5 atm is also acceptable. If the pressure is less, then the fuel system is faulty. Pressure pulsation (0.2 atm) indicates a clogged coarse mesh (located in the tank with the fuel pump).
9. Next, we check the pressure regulator. To check, disconnect the hose going from the regulator to the intake manifold. The fuel pressure should increase to 3.2 atm (at 2.7 initial). Up to 3.0 atm is also acceptable. If the pressure has not changed or changed only slightly (0.1-0.2 atm), then you need to check the fuel pump.
10. The maximum pressure developed by the pump is checked. To do this, use pliers to pinch the return fuel line (coming from the regulator). Different pumps show different pressures, but a new one should have at least 6 atm. A pressure of 5 atm indicates severe wear, but will still serve. If the pressure is less than 4.0 atm, the pump is faulty or the pipeline with the fine filter is clogged. If the fuel pump is working properly, and the pressure in the rail drops after the “return” is restored to less than 2.5 atm, and/or does not change when the regulator hose is disconnected, then the regulator is faulty. If, when the return line is pinched, the pressure rises slightly, and engine performance deteriorates significantly, then there is a high probability of injector leakage.
11. To eliminate the influence of the injectors, it is better to measure the pressure on the supply line itself by disconnecting it from the ramp and inserting it into a hose with a pressure gauge. If the pressure has risen to 5-6 atm, and with the “return” compressed it is significantly less, then the injectors are allowed to pass through. It is necessary to remove the ramp and check the condition of each individually.
12. You can check for clogging of the pipeline as follows. Remove the rear seat and unscrew the hatch. We see the fuel pump assembly underneath it. If the pipeline has quick-release connections, then we buy such a connection in the store (50 rubles).
13. If the pipeline is installed on threaded connections, you will have to buy the entire tube and cut off the tip:
14. Connect it to the pump outlet, and put a hose with a pressure gauge on the other end. Let's check the pressure again. If the pressure gauge readings increase to the normal 6 atm (after pumping gasoline several times by turning the key), then change the fine fuel filter and bleed (or flush the entire system).
15. Replacing the fuel filter is shown here: replacing the fuel filter on Lada Priora, Kalina and Granta cars. The only difference is that after removing the filter, we direct the fuel supply hose into a plastic bottle (preferably transparent) and turn on the ignition with the key (the fuel pump turns on and fuel spills into the bottle). We inspect the condition of the fuel in the bottle. Then we install a new filter, remove the hose from the ramp and direct it into the bottle. We turn on the ignition several times and spill gasoline. We inspect the fuel in the tank again. If dirt is found after the filter, then washing the injectors is also required. We assemble the entire system and measure the pressure readings again. If the readings have not changed, then check the correct clamping of the “return” (you can try connecting a pressure gauge to the output of the regulator). If this does not help, then perhaps the blockage is serious and requires blowing with air under high pressure. It would be a good idea to check the entire pipeline from the tank for mechanical damage (dents, kinks).
16. Fuel systems without a return line are diagnosed in almost the same way. The main difference is that here the fuel regulator is located on the pump body. The fuel goes from the pump to the fine filter, and then goes to the regulator. Near the body, the fuel pipe bifurcates. One tip goes to the regulator, and the second goes to the fuel rail.
17. The main difference in the readings is the normal pressure at the ramp is 3.8 atm. When over-gassing it should jump up to 4 atmospheres. If the pressure is less, immediately check the pump. We connect a pressure gauge to the pump outlet and check the pressure. The pressure should also be at least 6 atm for a new one.
18. If the pressure is working, then check if the fuel filter is clogged. To do this, we restore the fuel line from the pump and connect to the tube suitable for the regulator. The easiest way to do this is to cut off the old tip from the fuel filter, install one end of it in a clip, and put a hose with a pressure gauge on the other. If the pressure is identical to the pump pressure, then the filter is clean. If a significant drop is visible, the filter must be replaced.
19. Next, we check the supply line to the ramp. Shut off the fuel supply to the regulator. It is easier to do this by inserting a soldered (twisted/crumpled) tip from the filter into the quick-release connection. If there is no difference here, then change the regulator. If losses are detected, then we check the entire pipeline - there may be leakage or crumpling of the pipeline, it is also possible that nozzles are leaking.
Causes
If low oil pressure appears in the engine, the reasons for this may be the following:
- The lubricant needs to be changed. Perhaps it has lost its properties and become very liquid
- The filter is clogged
- There is a problem with the oil pump
- The pressure relief valve has failed
- The crankshaft plain bearings have small gaps and perhaps they have become larger than the permissible value
- Gaps appeared larger than required between the camshaft journals and its bed
- The wiring is faulty or there is a problem with the pressure sensor
If the lubricant was not changed on time, this could lead to a decrease in its viscosity, and therefore the gear pump that pumps the oil could not create the necessary pressure, which led to the appearance of a warning signal on the dashboard, and to prevent this, the oil must be changed every ten thousand kilometers. A complete or partial failure of one of the cylinders occurs, the fuel mixture accumulates in the cylinder, and along their walls it enters the oil, and the greater the wear of the piston group, the more intense it will be, the combustible mixture enters the oil. And if at the same time coolant gets into the system, then engine repair cannot be avoided.
Very rarely, the cause of an error may be a clogged filter, as there is an intensive process of wear of parts in the engine. For example, if the chain guide shoe flies off and begins to hit the cylinder head, noise will appear and the chain will begin to punch a groove in the housing, and all the chips will begin to settle in the filter.
If the car owner does not provide sufficient care for the car, this can lead to clogging of the oil receiver grid. The appearance of all other reasons listed above are considered more serious malfunctions and in order to eliminate them you need to disassemble the engine.
Checking the pressure and replacing the pressure regulator in the VAZ-21214 engine power supply system
Checking the pressure in the fuel system of the VAZ-21214 injection engine
We carry out the work on a cold engine.
The pressure in the fuel frame is checked with a special pressure gauge, but if you don’t have one, you can use a regular pressure gauge.
We put an oil and petrol resistant hose (with an internal diameter of 12 mm) onto the threaded fitting of the pressure gauge and secure it with a clamp.
We unscrew the protective cap on the rear end of the fuel rail.
Using the wheel valve cap, unscrew the spool from the fuel rail fitting (for clarity, we show the operation on a removed ramp)
Gradually releasing the fuel pressure, remove the spool.
We put the pressure gauge hose on the ramp fitting and secure it with a clamp.
We start the engine and when it is idling, check the fuel pressure, which should be 2.8–3.2 bar (2.8–3.2 atmospheres)
Remove the vacuum hose from the fuel pressure regulator.
If the regulator is working properly, the fuel pressure should increase by 0.2–0.7 bar (0.2–0.7 atmospheres).
If the regulator is faulty, then see below how to replace it.
How to check fuel pump pressure
Useful Tips
The fuel pump plays a vital role in the fuel system of any car. The main task of the device is to supply fuel from the fuel tank to the engine. The fuel pump also regulates the amount of fuel supplied by the fuel pump gear.
It is also recommended to read the article about the design of the gas pump. From this article you will learn what types of fuel pumps are used on gasoline cars, as well as what are the features of their design and operating principles.
Removing the fuel pressure regulator
A small announcement on the design of the regulator:
The regulator consists of a valve with a diaphragm, pressed by a spring to a seat in the regulator body.
When the engine is running, the regulator maintains the pressure in the injector rail in the range of 284–325 kPa.
The regulator diaphragm is affected by fuel pressure on one side, and pressure (vacuum) in the intake pipe on the other.
When the pressure in the intake pipe decreases (the throttle valve closes), the regulator valve opens at lower fuel pressure, allowing excess fuel to flow through the return line back into the tank.
The fuel pressure in the rail decreases.
As the pressure in the intake pipe increases (when the throttle valve opens), the regulator valve opens at a higher fuel pressure and the fuel pressure in the rail increases.
We carry out the work on a cold engine. Disconnect the negative cable from the battery
Disconnect the fuel pressure regulator vacuum hose from the receiver.
Using a 17mm wrench, unscrew the drain tube nut, gradually releasing the pressure.
Hold the hose fitting with a wrench of the same size
The connection between the hose and tube is sealed with a rubber ring
Using a Phillips screwdriver, unscrew the clamping bar screw.
Using a 24mm wrench, loosen the nut securing the drain tube to the pressure regulator
Use a 5mm hex to unscrew the two screws securing the fuel pressure regulator to the rail.
Separating the regulator from the ramp
Unscrew the nut and remove it.
The connection between the ramp and the regulator is sealed with a rubber ring.
In photos 6–10 the receiver is removed for clarity
The connection between the fuel pressure regulator and the pipe is sealed with a rubber ring
Install the regulator in reverse order
If necessary, replace the O-rings and lubricate them with engine oil.
The tightening torque of the regulator mounting screws is 8–11 Nm, and the drain pipe mounting nuts are 20–34 Nm
Throttle Position Sensor (TPS)
The TPS is installed on the throttle itself and is a potentiometer. This sensor reads readings from the throttle position and transmits them to the ECU. The damper opens access to air, thereby increasing engine speed. When the damper opens, the sensor sends a signal to the control unit to increase the fuel supply, which is necessary to form a working air-fuel mixture.
The sensor that most often fails is an unreliable element of the system. Subsequently, they abandoned it and switched to an electronic throttle.
Signs of a malfunction of the TPS:
- High speed at start-up;
- Jumps in engine speed;
- Increased fuel consumption;
- Not smooth idle;
No pressure in the fuel rail, reasons
The presence of a certain pressure in the fuel rail of an injection engine is one of the conditions for its operation.
Using the example of the fuel rail of the fuel injection system 2111 of the VAZ 21093 (21083, 21099) car, we will consider the signs and reasons for the disappearance or decrease in gasoline pressure in it.
Signs that there is no pressure in the fuel rail
Car engine does not start
The starter turns, but there are no or infrequent sparks in the cylinders.
The car engine starts and immediately stalls
After starting, the engine makes a few revolutions and stalls.
Unstable engine speed at idle
The engine jerks, shakes, and tries to stall when idling.
Dips, jerking and jerking after pressing the gas pedal
When pressing the gas pedal, instead of the expected increase in speed and pickup while the car is moving, the driver feels that the engine is trying to stop and stall - failure or several such attempts extended over time - jerking and jerking.
Reduced power and throttle response of a car engine
The car's former agility and engine traction have disappeared somewhere; the car can barely pull.
Causes of the “no pressure in the fuel rail” fault
Fuel pump faulty
The electric fuel pump cannot create the required pressure in the fuel system due to its malfunction or a malfunction of the electrical switching circuit. If the pump fails completely, then there can be no question of any pressure in the fuel rail.
Fuel filter clogged
When the fuel filter of the fuel injection system becomes clogged, its throughput decreases (in some cases it disappears altogether). As a result, gasoline cannot be pumped into the fuel rail by the gasoline pump with sufficient pressure, or maintaining the required pressure at different engine operating modes becomes impossible. See “Signs of a clogged fuel filter in the fuel injection system.”
The pressure regulator on the fuel rail is faulty
Due to the loss of mobility (freezing) of the diaphragm inside the pressure regulator, gasoline from the fuel rail is constantly discharged into the return line (and not only when it is needed). Therefore, it cannot provide the required level of fuel pressure. The pressure on the injectors drops, and the less pressure on the injectors, the less efficient they work.
The fuel lines of the engine power supply system are clogged
Low-quality gasoline containing various additives that create deposits, a fuel filter that has ceased to cope with its functions, and dirt in gasoline and in the fuel tank allow a car with high mileage to first narrow the clearance of the fuel lines and then close it completely. Accordingly, the fuel supply weakens or stops altogether. There is no pressure in the fuel rail or it is below normal.
There is a fuel leak in the engine power supply system
It turns out that despite all the efforts of the fuel pump to catch up with the required level of pressure, it is constantly being released, reducing the norm. The signs of malfunction listed above appear in the operation of the car's injection engine.
What to do if there are signs of a “no pressure in the fuel rail” malfunction?
First of all, you need to check the pressure in the fuel rail using a pressure gauge. It should correspond to 2.5 - 3.5 bar (250-350 kPa) after the engine has been stopped.
Fitting for checking the pressure in the fuel rail of the injection engine 2111 of the VAZ 21093 (21083, 21099)
If it meets the standard, but there are problems with the operation of the engine, then we check and, if necessary, replace parts of the power system.
First, you should inspect the fuel lines for gasoline leaks or damage (kinks, flattening).
Then we check the strainer on the fuel module in the gas tank for clogging and replace the fuel filter next to the gas tank.
Next, check the fuel pump in the gas tank. After turning on the ignition, you should hear a click from the activation of its relay under the panel and the hum of the pump in the tank (you can open the filler cap of the tank and listen). Of course, in this way it is impossible to completely assess the serviceability of the pump, but in most cases this is enough.
If necessary, replace the pressure regulator with a new one or a known good one.
Disassembly and repair of the Niva Chevrolet fuel pump
First of all, you need to remove the terminal from the battery. In some cases, the problem may be caused by a malfunction in the electronic control unit and a system reset helps to get it started. But such a development of events is quite rare. In most cases, resetting a terminal does not produce the desired results.
And then you need to look for a fault. Niva Chevrolet fuel pump
Installation and replacement of a fuel pump on a Chevrolet Niva
Niva Chevrolet fuel pump First, you need to check the pump terminals. To do this, you will need a tester or control fuel pump. To check the fuel pump, you need to connect one probe of the tester to the car body - ground, and attach it to the terminals of the fuel pump. If the tester shows voltage, the pump is faulty and needs to be replaced.
If there is no voltage, you need to look for a problem in the car's electrical wiring. If the electric motor of the fuel pump is working properly, you need to check the relay responsible for its operation and the fuse.
They are located under the glove compartment on the front panel. To check, you can use an adjacent relay on the board that has similar parameters.
The fuse is used with a rating of 15 Amps. It is not recommended to use a part with a lower rating for testing, otherwise it will most likely burn out. Sometimes the contacts can simply become loose, so you can try rocking it and bending the legs. The engine has stopped and will not start; The internal combustion engine operates at idle and low speeds, but does not gain speed above a certain value; The engine operates throughout the entire speed range, but does not develop the required power; The engine operates unstably at idle fuel pump.
With a full Chevrolet Niva fuel pump, you need to check the power circuit, starting from the relay and fuse. They are located in the front passenger's feet, under the panel.
Chevrolet Niva steering linkage Often problems arise at the junction of the wire blocks on the module, Chevrolet Niva fuel pump, as the contacts burn out in this place. If, with a working circuit, the motor does not work and there is no characteristic noise when the ignition is turned on, then it will have to be replaced.
Removing and replacing the fuel pump on a Chevrolet Niva with your own hands (+video inside)
In other cases, two outcomes are possible. The first involves replacing the mesh filter. Its condition can be assessed visually.
The presence of brown deposits in the Chevrolet Niva fuel pump indicates severe contamination. Fuel cannot fully enter the pump. It is recommended to replace the grid immediately after similar symptoms occur, since the electric motor overheats if there is insufficient amount of incoming fuel. If the condition of the filter is satisfactory, then the reason may lie in improper operation of the regulator.
Note that such a breakdown occurs much less frequently, but it does occur. The problem with the Niva Chevrolet fuel pump is that the bypass valve may operate ahead of time, and therefore the pressure in the line is less than the nominal one. Measuring pressure is easy. It is necessary to connect the pressure gauge to the fuel rail and turn on the ignition. Maintenance of the Chevrolet Niva fuel pump is not provided, although some repair work is specified.
Experienced owners try not to let things go to the point of complete failure, as this can happen at the most opportune moment. Now we remove the housing and the electric motor from the guides, from which we then disconnect the block with the power wires.
We press the clamps and remove the pump from the housing. Then disconnect the fuel hose from it.
At this point, the repair work on disassembling the fuel pump of the Niva Chevrolet car has been completed. Having completed the necessary repairs and replacement of failed elements, we carry out assembly and installation in the reverse order.
Knock sensor(DD)
The knock sensor is installed on the right side of the vehicle's cylinder block. A DD is needed to catch detonations in the engine and adjust the fuel mixture. The sensor itself is made on the principle of a piezoelectric element and, in the presence of vibrations in the engine, transmits impulses to the ECU, which in turn adjusts the fuel mixture.
Signs of DD malfunction:
- Increased fuel consumption;
- Uneven operation at idle (increased vibrations);
- Jerks when the car moves;