Page 10
User manual
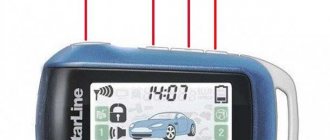
Button 1
• Activating the security mode with sound confirmation (single press) • Activating the security mode without sound confirmation (sequential
pressing) • Disabling / enabling the shock sensor by levels (double pressing) • Locking the door locks with the ignition on (single pressing) Button 2
• Turning off the security mode with sound confirmation (single
pressing) • Turning off the security mode without sound confirmation (sequential
press) • Disable/enable the additional sensor by levels (double press) • Unlock the doors when the ignition is on (single press) • Turn off the anti-theft mode (two single presses) • Interrupt alarm signals (single press) Button 3
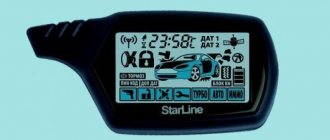
• Monitoring the alarm status and temperature inside the car
(single press) • Activate the “search” mode (double press) • Activate additional channel No. 3 (sequential press) • Activate the cursor selection of the following functions: anti-robbery mode,
2-step engine blocking mode, silent mode
security, service mode, turbo timer mode, automatic
turning on the security mode, immobilizer mode (long press) • Turning on the mode for setting the current time, alarm clock readings, and
timer. Buttons 1 + 2 simultaneously
• Enabling the “panic” mode (long press with the ignition off) • Enabling the anti-robbery mode (long press with the ignition on
ignition) Button 1 + 3 simultaneously
• Turning on the key fob button lock (single press)
Buttons 2 + 3 simultaneously
• Turning off the key fob button lock (single press)
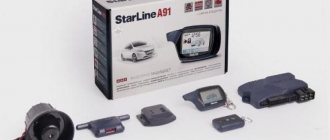
The Starline B6 car security system, equipped with a key fob with a 2-way communication channel, belongs to the category of budget equipment that has been discontinued. The design of the product is designed for installation on vehicles equipped with a manual or automatic transmission. The signaling system supports the installation of additional sensors and a GSM communication unit.
Modes and options
The versatility of the STARLINE alarm system is manifested in a set of programmed modes, namely:
- Alarm immobilizer mode.
- Anti-robbery.
- Self-diagnosis of operating modes of the entire system.
- "Panic".
- Silent security with engine on and off.
- Automatic arming in case of accidental switching off.
- Silent switching on and off of sensors that respond to light or strong impacts on wheels, windows and body.
- Search for a car using GPS monitoring.
- Service mode VALET (emergency call for help).
- The ability to independently program a new key fob (in case of loss) and erase the old encryption code from the memory.
- Automatic wheel locking if a tow truck wants to pick up the car.
Equipment
The Starline B6 alarm system was supplied to customers as part of a kit that included the following elements:
- head unit;
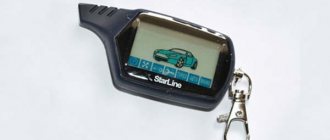
- key fob equipped with a display and supporting feedback;
- control panel with 1-way communication channel;
- signal receiver and transmitter equipped with an antenna;
- driver call button;
- sensor for measuring temperature in the cabin;
- impact force measurement sensor;
- service key;
- patch cables and a set of technical documentation.
Functions
Starline B6 car alarm functions:
- activation of alarm signals when triggered (light and sound);
- sending a message to the key fob indicating the triggered zone;
- immobilizer mode support;
- built-in turbo timer;
- support for 2-stage door unlocking;
- engine blocking memory when power is turned off;
- checking the functionality of sensors with automatic shutdown of faulty devices;
- support for vehicle security with the power unit turned on;
- joint work with the standard central locking unit;
- calling the owner (by sending a signal to the key fob);
- searching for a car in the parking lot;
- support for external GSM unit.
Advantages and disadvantages
Advantages of the B6 car security system:
- additional channels are provided;
- there is a 2-way communication block;
- a large number of auxiliary functions;
- An autostart module is provided.
Alarm disadvantages noted by owners:
- flimsy design of the keys and printed circuit board of the key fob (the cost of a spare remote control for the B 6 in Moscow is up to 3 thousand rubles);
- incorrect display of battery charge level on the display;
- the setup instructions contain errors;
- there are no spare parts due to production discontinuation;
- false alarms and rapid discharge of batteries in remote controls.
Characteristics
Properties of the Starline Dialog Twage B6 car alarm:
- sending and receiving pulses between the central unit and the transmitter is carried out at a frequency of 433.92 MHz;
- the operating range of the remote control when transmitting commands is 600 meters;
- the operating radius of the remote control in the mode of receiving signals to the security system remote control is 1200 meters;
- if the key fob does not have a feedback function, its operating range will be no more than 15 meters;
- the sensitivity controller belongs to the category of piezoelectric devices;
- the temperature range in which the alarm with auto-start can function without failures is from -40 to +85 degrees;
- the voltage value of the on-board network of the car in which the Starline complex is installed ranges from 9 to 18 volts;
- When the security mode is activated, the system will consume no more than 20 mA of current;
- the maximum current consumption at the siren output is 2 amperes;
- The main pager with display is powered by 1.5 volt batteries, and AAA type power components must be used;
- As for the spare pager, in this case the power is supplied from elements of the CR2032 type at 3 volts.
When using this car alarm, it will be useful for the consumer to learn about the security zones of the complex:
- Power unit. The engine is protected from illegal starting through the use of a special relay, which can be digital.
- Door locks, trunk and engine compartment locks. These body components are protected against opening by means of special switches.
- The parking brake lever is protected by the system from being turned off using a push-button switch.
- The car body, windows and doors are protected from physical influences, including blows and jolts. Protection is achieved through the operation of a two-level sensitivity controller.
- The ignition system is protected from activation by using a special voltage control input on the locking device.
Equipment
Complex equipment:
- Service book. If you read the instructions, you can learn step by step how to install and configure the signaling parameters. The manual contains all recommendations regarding the use of the complex.
- Pager equipped with a screen. This device has a feedback function. The kit includes a battery for this pager and a protective case.
- Additional keychain. There is no screen on it.
- Main processing unit.
- Transceiver with antenna adapter.
- Two-level sensitivity controller. Used to determine the impact on the car body and warn the car owner about it.
- Adhesive tape for fixing the antenna adapter on the car glass.
- Wire for connecting the antenna module.
- Wire for connecting the shock controller.
- Button for connecting to the hood of the car.
- Service key. Allows you to call emergency mode, configure the complex and urgently disable security.
- LED indicator of signaling status.
- The main wire, equipped with a 16-pin connector.
- Cable for connecting the central lock. Equipped with a six-pin connector.
- A set of cables for implementing a blocking circuit.
All elements of the Starline set
Advantages and disadvantages
Advantages of the Starline B6 signaling:
- Availability of feedback. This option allows you to look at the key fob pager screen at any time and understand the state of the alarm. With the help of feedback, the car owner learns about the security zones that are most at risk.
- Extensive functionality. In addition to the main options, the system offers consumers many auxiliary functions. For example, these are the options “Anti-robbery”, “Hands-free”, “Auto-start engine”, etc. Because of the last function, this signal model is often chosen by residents of the northern regions. You can set the engine to start periodically using a timer, which will prevent possible problems with starting it, which are typical for morning starts.
- Increased security. When producing the security complex, the developer used the latest technologies. This allowed him to ultimately obtain a high-quality product that effectively protects signals during interception and prevents the system from being hacked.
- Uninterrupted operation in any conditions. Even operating at very low temperatures, the alarm effectively performs its functions. When operating in conditions of strong interference, interruptions in signal transmission and reception may occur.
Having studied consumer reviews, the following disadvantages can be identified:
- Weak battery in the key fob. Judging by the reviews, the battery that is installed in the main pager fails quite quickly. This may be due to the configuration of the complex using the remote control. In alarm control mode, the battery should last a long time.
- Some consumers note that in case of problems, it is almost impossible to get help from company representatives. All problems have to be solved independently or with the help of third-party specialists.
Disadvantages associated with the use of signaling are usually due to incorrect configuration of the complex.
How to install
The installation instructions attached to the Starline B6 alarm system contain recommendations for the placement of the complex components:
- The head unit is mounted deep in the instrument panel, which will reduce the length of switching wires. The unit is secured with screws or plastic clamps.
- The antenna unit is located on the top of the windshield outside the area covered with the metallized layer and at a distance of 50 mm from the edge of the roof panel. A temperature sensor is placed inside the unit; to ensure correct readings, the unit is placed in an area not subject to heating by sunlight.
- The shock sensor, equipped with a sensitivity regulator, is installed inside the car. The programming key is located in a hidden place; the user must have unhindered access to the element. The control diode is located on the instrument panel; it is possible to install a light bulb on the trim of the pillar or the driver's door card.
- The siren is mounted under the hood on the engine shield, the horn is located down. The temperature sensor, responsible for automatically starting the engine, is located on the block or cylinder head.
- Place the limit switches under the hood and trunk lids, and then adjust the position of the contact elements. Install additional relays designed to block engine operation (installed at the request of the machine owner).
- Lay the cables and install the connecting harness blocks in accordance with the connection diagram.
Starline B6: technical characteristics and features of the model
The Starline b6 alarm system held a leading position in the automotive security market for a long time. Despite the fact that now this system is largely outdated, car enthusiasts continue to use it, which speaks not only about the reliability, but also about the durability of this equipment.
What does the B6 system from Starline offer?
- dialog code. Starline b6 uses a constantly changing code to transmit a signal, which provides protection against intelligent hacking;
- keychain with LCD display and durable antenna;
- feedback from the owner. If the system is triggered, the driver will receive an audio alert on the remote control;
- automatic connection check. The signal transmission device checks the communication channel every 5 minutes;
- blocking when the engine is running;
- individual disarming code;
- possibility of using a radio relay to block the motor
- monitoring using GSM and GPS technologies (optional);
- turbo timer mode and much more.
The Starline B6 feature set allows it to be used as a car security system of any complexity.
User manual
The Starline security system kit includes a user manual in Russian. The documentation contains a description of the technical characteristics of the equipment, provides functionality and recommendations for managing the equipment. A separate section is devoted to programming new key fobs and recording radio relay codes (optional). The manual contains tips for installing and connecting devices.
How to turn it on
To activate the security mode, the keys mounted on the key fobs are used. Depending on the algorithm for operating the buttons, the complex turns on with an audible signal or with indication by the car's hazard warning lamps. The display of the remote control with a 2-way communication channel displays an indicator confirming the activity of the security system. Damaged elements are automatically bypassed by the head unit, the screen shows the unprotected area with simultaneous sound and light signals.
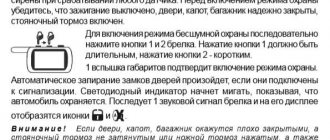
Disabling the security is done by pressing the buttons again. If the Starline Twage B6 key fob is damaged or lost, you can turn on the complex by pressing the setting button 3 times. The procedure is carried out within 20 seconds after unlocking the car door with the key and then turning on the ignition circuit. After pressing the button, you need to remove the key from the lock; if disconnection is successful, the siren will give a double signal. It is also possible to disable the complex using a personal code, which is previously entered into memory.
How to setup
Programming of operating parameters is carried out using buttons located on the control panel. To enter the setup menu, you need to press the service button 5 times and then turn on the ignition system. The user begins to make adjustments after the siren sounds 5 times. The transition between menu subsections is carried out by pressing the settings button; the programming algorithm is given in the operating instructions. If the settings are incorrect, a reset to factory settings is possible.
Before using the equipment to automatically start the power unit, the user can configure the Starline B6 alarm key fob. The remote control is equipped with a built-in clock, which is programmed using buttons located on the body. Additionally, an alarm clock or countdown timer is turned on. Additional adjustments are not provided; the key fob without a display does not provide for setting operating parameters.
Not everyone knows, but the Starline B6 Dialog signaling system can be equipped with autostart. To do this, it has two programmable outputs, the first and the second. A turbo timer relay is usually connected to the third output. The main thing is that all options, including turbo timer and autostart, can be combined. For example, we will connect the “Starline 02” module to the signaling system.
Alarm installation
Before installation, it is recommended to separately assemble all Starline elements and connect them to the battery to make sure the system is working. If after installation the security system refuses to work, the consumer can be sure that the problem is related to the connection.
To install an alarm you need to do the following:
- Disconnect the on-board network in the car.
- Install the main unit.
- Install a siren.
- Install the transceiver.
- Install sensors.
- Install limit switches.
- Install an emergency button.
Step 1: Disable the on-board network in the car
The step-by-step procedure for turning off the power looks like this:
- All electrical equipment in the car is turned off.
- The ignition is turned off.
- The engine compartment opens.
- Using an iron brush, the terminals on the battery are cleaned.
- To loosen the clamps, you need to unscrew the bolts with a wrench.
Step: 2: Install the main unit
Features of installation of the microprocessor module:
- Installation is carried out inside the car. The unit must not be placed in the engine or luggage compartment due to the possibility of exposure of the device to moisture or high temperatures.
- Installation must be carried out in a hidden manner. This will prevent the system from quickly shutting down in the event of a hack, since by disabling the control unit, the criminal will be able to steal the car. The module is installed under or behind the instrument cluster.
- It is necessary to remove the decorative lining of the interior. Fixation is carried out on a flat surface using plastic ties or self-tapping screws. The module must be properly secured to prevent its movement as a result of vibrations during movement.
- The device is fixed with the connector facing down. This is due to the fact that if moisture gets in, drops of liquid should not penetrate inside, flowing down the wires to the block.
- To further protect the control unit from vibration, it can be wrapped with a piece of foam rubber.
Step 3: Install the siren
Installation features:
- The device is placed in the engine compartment, away from sources of high temperatures and moisture. Therefore, it should not be placed near the cylinder head.
- The siren's horn points down or to the side, but not up. This will prevent moisture from accumulating inside the device.
- To mount the siren, special brackets are used, which are included in the package.
- After installation, you need to make sure that there is no access to the device, as well as its electrical circuits, from under the bottom of the car.
Step 4: Install the transceiver
Nuances of antenna adapter placement:
- Installation is carried out inside the car, on the inner surface of the windshield or rear window, in a corner. The installation site must first be washed and degreased.
- It is recommended to mount the device as high as possible to ensure a high-quality signal. Fixing the transceiver is not allowed on the ceiling trim or near metal objects. Their presence will lead to signal deterioration and interference.
- The antenna module is fixed using double-sided tape or glue.
User Alexander Shkurevskikh spoke about diagnosing the Starline B6 alarm transceiver before installation.
Step 5: Install Sensors
Installation features:
- The sensitivity controller is installed inside the car, it is recommended to select the central part of the body;
- it is permissible to install the device on the partition separating the engine compartment from the vehicle interior;
- during installation, the sensor must be fixed as firmly as possible, otherwise its movement will lead to false alarms;
- It is not allowed to place plastic or rubber gaskets between the controller and the working surface.
Step 6: Install the limit switches
Parts installation features:
- Limit switches are installed on all doors, luggage compartment and hood, where special holes must be provided for this. If the vehicle was purchased recently and is still under warranty, then drilling the body yourself is not allowed.
- Limit switches should be installed in places least exposed to moisture.
Step 7: Installation of the emergency button
Installation Features:
- The placement of this element is done in a hidden manner. It is recommended to place the button under the instrument cluster, since the car owner must have access to it when he is in the driver's seat.
- To disguise the key, you can wrap it with electrical tape, but its color must match the standard one.
- After installation, all elements of the anti-theft system are connected to the control unit.
Connection diagrams
Laying of wires should be done secretly in places where there are no moving parts, under the interior trim. To provide more reliable protection, electrical circuits can be wrapped with electrical tape.
Connection diagram of the Starline B6 microprocessor
Connection card for Starline B6 main unit
Functions of the Starline 02 module
The specified module must receive a command from an external device. The role of such a device is the Starline B6 alarm system. The autorun process goes like this:
- A “0 Volt” potential appears at the module input connected to the signaling output;
- After a second, the module begins to autostart, and the potential on the wire should be maintained;
- In the third step, the potential can be removed almost immediately.
It turns out that it takes more than a second to hold the zero potential. In the alarm settings there are the following options: 1 second, 2, 3, etc. You need to select exactly “2 seconds”, then the module will work.
How to connect the alarm itself
The bottom line is that the signaling system should not know that the ignition is turned on when the engine starts automatically. Therefore, an “ignition interlock” is added to the circuit, and the yellow control cord is connected “to the breaking point”:
The upper relay shown in the diagram can be replaced with a built-in one. The main thing is that you need to use normally closed contacts (30 and 87A). This option, according to the instructions, was initially set in the settings.
The ignition support relay may be missing - it is needed for the turbo timer to work. The yellow power wire going to the Starline 02 module is connected according to the diagram. Then the alarm will not block autostart in any case.
For the turbo timer to work, you need to not only connect the relay, but also connect the brake control to the alarm input. And according to the instructions, you need to connect the orange-violet cord. Schemes have already been given - use option “a” or “b”. For cars with automatic transmission, the following can be implemented:
- The brake control is connected to the signaling system according to option “a” (as for manual transmission);
- The control cord of module “02” is connected to the end of the pedal.
All locks, except the one shown above, must be removed. Otherwise, the turbo timer will work, but not autostart. It is also not recommended to use normally open contacts. Happy installation!
Diagnosis and Troubleshooting
Self-diagnosis and repair are allowed only if the alarm warranty period has expired.
Pager failure
If the key fob does not work due to a dead battery, the power source must be replaced. If the problem is due to a hardware or mechanical problem, the device will need to be diagnosed. You need to disassemble the device and carefully inspect the board. The presence of traces of moisture indicates that liquid has entered the device. In this case, the board must be removed and dried. Do not use a stove, radiator or hair dryer for drying. Exposure of the circuit to elevated temperatures will lead to its failure.
If there are swollen capacitors or damaged contacts on the board, these elements must be resoldered. Oxidized contacts must be cleaned. For this purpose, you cannot use harsh means, for example, construction brushes. It is best to use dry wipes or a soft toothbrush.
Damage to electrical circuits
Poor signal transmission, as well as lack of communication between the pager and the control unit, may be due to damaged wiring. With prolonged use, the insulating layer may wear off. Diagnosis will require the assistance of a qualified electrician. If you plan to find the problem yourself, then you will need a tester. Using a multimeter, all wires of the security system are diagnosed. It is best to disconnect the connector from the central unit and ring each contact. Any damaged wires must be replaced.
Damage or incorrect installation of the antenna module
If the transceiver is installed next to metal components and mechanisms, this will reduce the quality of signal transmission. In this case, the antenna adapter simply needs to be installed in another location. If the transceiver fails, it will have to be removed and disassembled to determine the problem. If you visually determine the malfunction by finding damaged contacts, the elements must be replaced and resoldered. In the event of a breakdown, the transceiver is replaced.
Eduard Nikolaevich spoke about how to modernize the signal control pager antenna to increase its operating range.
CPU problems
Malfunctions of the control module can be divided into two categories - software and hardware:
- Software failures can be resolved by flashing the control device. If the alarm is “buggy”, turns on the alarm mode or alarms for no reason, then most likely the problem is of a software nature. Usually appears after long-term operation of the security complex. It is better to entrust the firmware of the control unit to specialists, since errors made during the programming process may affect the functioning of the alarm in the future.
- Hardware faults can be identified through visual diagnostics. First, check the connector connecting the central processor to the on-board network. If there are traces of oxidation on the plug, the connectors must be cleaned. If the module fails as a result of exposure to moisture, it must be dismantled, disassembled and dried. Damaged components on the module board must be resoldered. If mold has formed on the circuit due to prolonged exposure to moisture, most likely it will not be practical to repair the circuit board.
Sensitivity sensor
Problems in the operation of the sensitivity sensor will lead to chaotic alarms. Over time, the controller tends to wear out. Especially if it was installed incorrectly and was subject to vibration during operation of the machine.
There is no point in repairing the sensor; a failed device must be replaced. It’s another matter if its activation is due to incorrect settings. If the sensitivity level is too high, the security system will react to passing cars or running animals. It is necessary to adjust the sensitivity parameter using the operating and installation manual.
Limit switch failure
If the limit switch on the driver's door fails, this is fraught with operational problems. After disabling the security mode by opening the driver's door, the system will not see this action due to a damaged switch. Accordingly, after a certain time interval (usually up to one minute), the protective mode will be activated. In particular, if during this time the car owner does not have time to install the key in the lock and activate the ignition. The contact could have come loose from the limit switch, causing the device to work incorrectly or fail altogether. The wire must be reconnected.
Recommendations for the owner
It was not considered how to activate the turbo timer. Here are excerpts from the instructions:
- Apply the handbrake;
- In 30 seconds you need to remove the key from the lock, leave the cabin and close the doors;
- Then you can press key 1, and the security will be activated.
The instructions clearly state that the shock sensor will turn off while the timer is running.
You can use security without any problems.
All of the above is meaningless if the “TURBO” cursor is not activated on the key fob. Let's look at the instructions again:
- Button 3 is pressed and held until the second melodic signal;
- Short presses select the desired icon;
- Press key 1.
The Starline B6 Dialog system, according to our diagrams, manages the operation of the turbo timer. Of course, the same cannot be said about autostart. It all depends on the behavior of the module.
Note that all of the information listed is suitable for another signal. Its name is Starline Twage B6. Try starting from both the main and additional key fobs. The latter will be equipped with 4 buttons.