Fuel system safety valve
It goes without saying that vehicle fuel systems are quite complex devices, which it is better not to approach without specific knowledge. On the other hand, knowledge of hardware and some experience is already considered as an opportunity to independently repair this or that defect. For example, if a fuel system check valve requires attention.
Where is the fuel check valve located?
Let's find out where the fuel system valve of various cars is located.
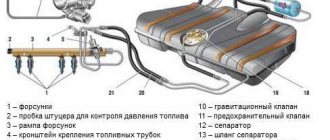
- In power plants with an injector, it can be installed in the gasoline pump housing.
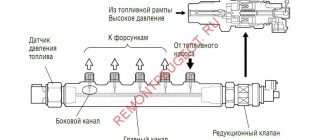
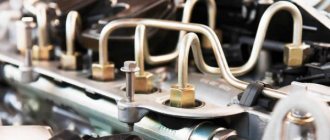
- Mounted on the fuel frame or installed directly in the fuel line. This is the space between the gas tank and the fuel injectors.
On diesel power plants, the mechanical structure is hidden between the fuel injection pump and the low-pressure pump. This arrangement of the product allows you to create a stable pressure at the outlet of the high-pressure pump.
The system has proven itself well:
- on a domestic truck: KAMAZ 740;
- Czech clubfoot Tatra;
- on Mana;
- and Renault Magnum.
In diesel installations where a pre-start heating system is provided, the fuel check valve is located in front of the heating system. A typical example is the same KamAZ or Magirus trucks operating in the Far North.
On domestic passenger cars, such as the VAZ 2110 and 2114 with sixteen valves, the mechanical structure is located in the gasoline pump and on the fuel frame. This is analogous to installing a diesel engine.
Today, old carburetor cars with rear-wheel drive still run on our roads: eights and nines (VAZ 2108 and VAZ 2109). On them, the role of the return device is assigned directly to the gasoline pump.
It stands on the cylinder block and prevents the passage of fuel in the opposite direction: into the fuel tank.
The fuel supply system of automobile gasoline and diesel power units is a technically complex device that should not be approached without knowledge. And even more so, try to carry out technical treatment on your own.
The check valve plays an important role in the regular supply of fuel. Let's focus our attention on its design and installation in the car. Let's look at the problems and characteristic signs of a malfunction. We will also decide on ways to check it.
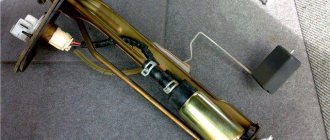
Checking the serviceability of the fuel pump on the injector
When, when you turn the ignition key, you hear a slight buzzing, a slight hum, this is how the fuel pump works, pumping gasoline creates pressure in the system. If, when you try to start, there are no such signs of the fuel pump working, then you can assume a malfunction of the electrics, the pump itself or its individual parts. Therefore, let’s look at how you can check the operation of a gas pump using a step-by-step logical chain. Starting from whether power is supplied to the fuel pump and ending with whether the fuel pump pumps at all, and if so, what pressure is created in the fuel rail.
Step 1: Checking the fuse
Checking the fuel pump fuse involves inspecting the integrity of the conductive plate and, if broken, replacing it. But if there is no new fuse, then wind one strand of copper wire around the fuse contacts. If it burns out again, it means the problem may be in the wiring.
Stage 2: Checking the relay
To check the fuel pump relay, remove it from the socket and connect a 12 volt light bulb according to the diagram. If the light bulb works, the relay itself is also working properly. An alternative is to use a multimeter in ohmmeter mode to measure the resistance of the relay coil winding. One probe is connected to terminal 85, and the other to 86. The device will show a break if the relay has failed.
Make sure that the terminals are not oxidized - this will negatively affect the power supply to the fuel pump engine!
Stage 3. Checking the power supply to the BN
Checking the fuel pump voltage is done using a multimeter . The probes of the measuring device in voltmeter (from 0-20 volts) must be connected to the power terminals of the fuel pump. Turn on the ignition and take readings on the device. 12-12.5 volts is normal operating voltage. If there is voltage, but the pump does not work, check the electric motor.
Stage 4. Checking the fuel pump motor
To prevent damage to the electric motor, we supply 12 volts directly from the battery to the fuel pump terminals. It works - we check its performance, check valve, measure the pressure with a pressure gauge. If it doesn’t work, check the coil for a break.
When voltage is applied to the terminals of the gasoline pump, does it not work? Let's check the stator winding: take a tester (multimeter) and switch it to ohmmeter mode, it should show resistance, otherwise there is a problem with the winding and it needs to be replaced. If there is a resistance reading, the problem may be that there is a short winding on the fuel pump body. The tester probe goes to the positive terminal, the second one goes to the body. If it shorts, there will be no break.
Reference
Many people know that the fuel system valve aggregates:
- With carburetor power units running on gasoline.
- With engines equipped with an injector.
- With power supply systems for power plants, where diesel fuel is used as fuel.
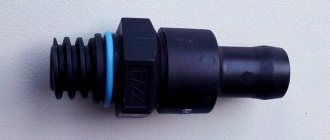
There is nothing complicated about the mechanical design. This is a ball-type device with a seat, which is made of soft metal, with the most accurate balancing. Fuel flows freely through the fuel valve in one direction. The pressure that is created prevents gasoline or diesel fuel from flowing back into the fuel tank, since the non-demountable structure is locked.
Despite its simplicity, the device can cause a lot of trouble for a novice and an experienced driver. Therefore, it is necessary to know its possible vagaries and ways to eliminate breakdowns. But first of all, understand where the mechanical structure is installed.
“The concept of a fuel system check valve should not be confused with a pressure reducing device.”
conclusions
The fuel system check valve is an important component of this system, the failure of which can cause a lot of problems for the driver. This will be especially painful during movement. Therefore, it is worth using only high-quality fuel, and at the slightest sign of a malfunction, which were listed above, diagnosing the fuel system.
After all, the problem may lie not only in the valve, but also in other small parts. Diagnostics at a service station almost always reveals such faults, so do not forget about timely maintenance of the car, even if everything seems to be in good order. Good luck and easy travels!
Draw your attention to.
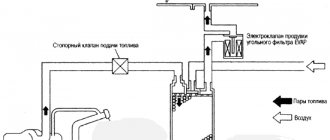
If the fuel check valve loses its seal, gasoline flows back into the tank without permission. In this case, starting the power unit is possible with manual pumping.
If starting the engine was difficult, craftsmen installed (embedded) a mechanical structure into the power system, closer to the carburetor.
This made it possible to easily start the engine even at negative t0. An example is the old Opel (Cadet) and 323 Mazda, which have seen time in their lives.
Installing additional OK
It is recommended as an option for upgrading a system in which the original valve no longer holds (or does not exist at all). You just need to try to choose a high-quality valve, and the cross-sectional dimensions must be suitable. For example, some models of VAZ valves are not suitable for foreign cars. You can install them, but they don't last long. As soon as you accelerate sharply or climb a mountain, the valve slips and the car begins to choke.
It would be better to buy OK from parsing. Find the fuel pump of a specific car model, check the valve, if it works, take it. It does not matter whether the pump itself is running or not. The main thing is to hold the valve.
Fuel system check valve Nexia
All that remains is to embed the valve into the line, in any convenient place. For example, between the fuel pump and the filter. Then check on a hill or when accelerating to see if the car is choking.
Source
Check valve problems
For what reason does the fuel system valve fail? Let's figure it out together. Today there are three obvious reasons for refusal to work.
- Installation of low-quality Chinese goods that quickly fail. Basically, these are fakes for a certain brand.
- The second reason is the natural wear and tear of the product. In this case, either the spring or the membrane fails. Note that the valve itself rarely fails.
- Another problem for a non-removable mechanical structure is low-quality fuel.
Having decided on possible problems, let's move on to the signs indicating a problem.
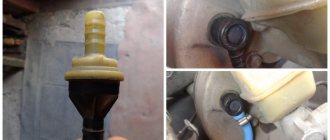
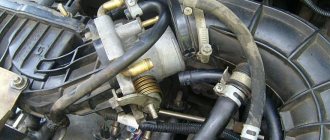
Replacing the RTD
Replacement is carried out in the following order:
- It is necessary to reduce the pressure in the fuel system, then unscrew the nut securing the fuel pipe to the RTD;
- Unscrew the bolt with a 10mm wrench securing the oil level indicator guide tube and remove it;
- Unscrew the bolts securing the RDI to the ramp;
- Remove the fitting from the fuel rail, remove the RTD;
- When installing a new regulator, experienced car owners advise lubricating the O-rings with gasoline.
In the future, do not forget to look at the fuel level sensor. If a large flow rate is detected, you may suspect that the replacement was not carried out entirely correctly, and it needs to be carried out more carefully.
Source
Characteristic symptoms of a check valve malfunction
It could be:
- unexpected change in speed of the power unit at startup or while driving;
- The engine can be started by pressing the accelerator pedal. Although before this the power unit was driven by a starter;
- Unstable engine operation at low or idle speeds;
- loss of fuel that escapes through the supply or return pipes. In this case, the sealing of the fuel hoses is not broken.
In our case, the non-removable mechanical structure can be easily repaired. This is on the one hand. On the other hand, the problem cannot be determined by scanning. Next, let's look at options for checking the device.
Checking the fuel pump of a carburetor car (mechanical)
Mechanical fuel pump - diagram
To check the operation of the fuel pump, you should:
- Remove the fuel hose from the carburetor inlet fitting.
- Immerse the hose in a specially prepared transparent bottle. By actively using the pumping lever manually, we notice how strong and dense the fuel is supplied. Air impurities should not be visually noticeable.
Delayed jet output is not a sign of a breakdown, especially if the car has been parked for a long time. As a rule, diaphragms eight and nine are the main cause of malfunction.
Be that as it may, you need to inspect both the strainer and the inlet/outlet valve.
Even if the gaskets are replaced, fuel may leak. In this case, the problem lies in the tightness of the fuel pump housing due to deformation during repairs.
How can you check a check valve?
You can find out what condition the fuel valve is in as follows.
Using a pressure gauge, check the pressure. It should be within 3 kg per cm2. These are figures for passenger cars.
You can find out how the device works by pinching the “return” fuel hoses. If the permanent mechanical structure is in order, the pressure should increase.
For your information.
This method is only for cars that have rubber hoses installed.
Self-diagnosis can be carried out without using a pressure gauge. This concerns the problem of unstable operation of the internal combustion engine (ICE) and poor acceleration. Having pinched the rubber hose that moves the fuel in the opposite direction, you need to pay attention to the operation of the engine. If the speed increases and the engine cylinders operate as planned, then the check valve is faulty.
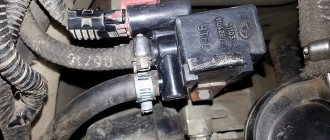
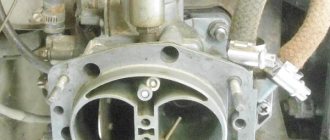
How to check and replace the VAZ 2110 regulator?
To check the operation of the RTD, you will need a 24mm wrench, a 5mm hexagon and a pressure gauge (for example, a tire gauge):
- We unscrew the plug of the pressure control fitting on the end surface of the injector ramp.
- Using the metal tire valve cap, unscrew the spool valve from the fitting.
- We connect the pressure gauge to the fitting through a hose, the ends of which are secured with clamps, and start the engine.
- We check the pressure - disconnect the vacuum hose from the RTD.
The pressure gauge readings should increase by 0.2–0.7 kgf/cm2 (20–70 kPa). Otherwise, the RTD must be replaced.
Replacing the regulator: relieve pressure in the fuel line; unscrew the nut securing the fuel return pipe to the RTD; unscrew the 2 bolts securing the RTD to the injector ramp; carefully remove the RTD fitting from the ramp hole; Having disconnected the fuel pipe from the RTD, remove it; We install the new RTD in the reverse order, first moistening the rubber sealing cuffs with gasoline (we replace inelastic and torn rings).