Ball joints are consumables that are difficult to dismantle without special equipment.
The landing unit is constantly under force pressure, as a result of which the metal parts literally stick to each other. Universal pullers are not always suitable; the design of suspensions on different cars differs from each other.
Even in the same vehicle, different mounting designs may be used on each suspension arm. Buying several sets of equipment is too expensive, so many craftsmen prefer to make a ball joint remover with their own hands.
What are ball joints used for?
The configuration of the car's suspension (especially the front) must ensure a strictly horizontal location of the wheel rotation axis relative to the road. In this case, the hub is a turning unit.
Engineers are faced with a difficult task: the hinge must have freedom of movement of at least 180° in all planes. Ball joints serve precisely to give mobility to the suspension while maintaining strength characteristics.
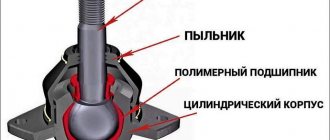
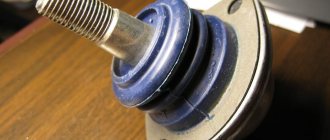
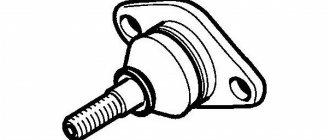
The unit is a threaded steel shank that is attached to the hub knuckle. At the end of the shank there is a hinge in the form of a ball in a spherical shell.
Ball mechanism for Renault Logan: what and how
The ball joint is an important component of the chassis of almost any modern car. Logan's is non-separable, maintenance-free and is officially supplied only with a lever. It consists of a ball pin, which is pressed into a metal body along with a plastic bushing. Designed to connect the steering wheel hub to the main front suspension arm. If you “run” this unit to a critical state, then the front wheel may spontaneously turn to the side, separately from the other. This situation is dangerous, especially at speeds over 30 km/h.
General view of the front suspension structure: 1 — suspension subframe; 2 — suspension arm with silent blocks and ball joint; 3 — steering knuckle with hub and bearing; 4 — shock-absorbing strut; 5 — anti-roll bar
Puller design
In order to press the hinge out of the suspension, serious effort is required. Some car owners simply knock out the shank with a sledgehammer, which risks damaging the threads.
To facilitate dismantling, a ball joint remover has been invented, with which you can create force without shock load. To understand how to make a device with your own hands, consider various options:
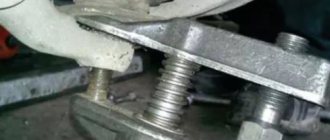
The illustration shows a screw-type ball joint remover.
- The hinge pin (1) is tightly installed in the steering knuckle housing (2).
- The puller bracket (3) is placed on the fist.
- Using the screw stop (4), the necessary pressure is created on the finger.
The advantage of the design is that the puller’s uniform and directed pressure on the ball joint avoids distortions and damage to the unit. Disadvantage - the tool can only be used if there is free space above the fastening nut.
Despite the complexity of the design, such a ball joint remover can be made with your own hands. You will need:
- steel sheet with a thickness of at least 4 mm;
- bolt with a strength class of 9.8 and higher;
- a nut, or a threaded bushing turned on a lathe;
- welding machine, grinder.
The design and dimensions of the puller are developed for a specific ball joint; the device is not universal.
If the installation location of the ball joints is quite compact, you can make a puller from a piece of pipe by welding plugs with holes at the ends. A thrust nut is welded to one of them.
This design is more reliable. Most factory pullers are made according to this scheme.
The next option is a ladder type screw puller. It is made of steel ties, with the help of which the spring earrings are attached. To install into the working position, it is necessary to tighten the threaded rods evenly, and the force is generated using a bolt.
With this puller you can press the hinges out of the seats in the levers. The device becomes universal if you add to it a set of bushings of different diameters (cut from steel pipes). But this puller will not be able to squeeze the ball pin out of the fist.
Wedge type puller (or fork)
The illustration shows the factory version. Working with such a puller requires physical effort. The longer the lever, the easier it is to dismantle the hinge.
The principle of operation is simple: a wedge is driven between the ball body and the suspension arm, then the lever is used to tear off the shank from the seat.
A serious drawback of the device is the possibility of damage to the suspension arm. The ball joint boot also breaks, so it cannot be reused.
Such a puller can be made from a 12-16 mm steel circle. You will need a welding machine and the work of a blacksmith. It is better to give the wedge-shaped “fork” using forging: if you simply grind off the metal, the strength will be lost.
After final processing of a homemade puller, it must be hardened. The steel is heated to a crimson color and immersed in water or oil.
Lever puller
Unlike a screw, the fixture uses both the force of the thread and the lever.
The operating principle is visible in the illustration:
The lever arm relative to the hinge axis increases the force on the thread at least twice. The ball pin breaks off more evenly. Thanks to the offset hexagon, the suspension elements will not interfere with the wrench handle when tightening the bolt.
You can make a lever puller for ball joints yourself, but this will require more materials. The simplest option is two thick steel plates held together with a bolt.
A sleeve is placed in the middle: as a spacer axis of rotation (by analogy with a clothespin). With some care, the device works normally.
If you have a welding machine, it is better to make a design similar to an industrial design. The dimensions are selected in accordance with the design of your pendant.
An old open-end wrench can be useful as a donor (20-30 years ago they didn’t skimp on the quality of the metal for the tool).
Homemade ball joint remover, drawing with dimensions - video
How often should the ball joint be replaced?
The frequency of replacement of joints is determined in the maintenance instructions for any vehicle. However, taking into account the “quality” of roads, supports fail much more often than the established period of 40-60 thousand km.
In addition, if the rubber boot is damaged, moisture and dirt get inside the hinge. If you don’t notice the gust in time, the unit will fail after a few hundred kilometers.
Wear is diagnosed by the presence of play and the characteristic knock of the suspension. It is recommended to regularly check the condition of the joints, especially after driving on broken asphalt or in off-road conditions.
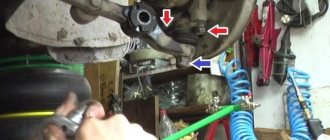
When carrying out repairs to the chassis and steering, there is almost always a need to remove ball joints or tie rod ends.
The peculiarity of these structural elements is that the support pin or tip has a conical shape, with which it fits into the seat.
During operation, the fit density increases so much that the surfaces of this joint practically stick to each other.
Additionally, moisture can get between the finger and the socket, causing pockets of corrosion that further seal the connection.
Therefore, to remove ball joints or tips, special pullers are used that allow you to press out the pin with minimal effort.
Diagnostics
How to remove a ball joint without a puller? This question is asked by people who are faced with replacing a ball joint. Especially in cases of unexpected breakdown. To prevent this from becoming an unpleasant surprise for you, you need to know how to correctly diagnose a breakdown. The first sign of a malfunction is a knocking sound in the suspension when driving over uneven roads. But here you need to take into account that in extreme cold the lubricant can freeze. In this case, knocking noises may be observed when starting to move.
Don't panic, this is completely normal. Also, with severe wear, the car may wander along the road, and increased tire wear is observed.
Do not forget that it is not only ball joints that can knock in the suspension. Therefore, be sure to carefully inspect the suspension. The easiest way to diagnose is to check the play. To do this, you need to jack up the car. After that, they try to shake the wheel; if there is play, the ball must be replaced. At the same time, we determine which support has failed. This is true for machines with two supports on each side. In some models, it is possible to measure the level of wear of the hinge through a hole in the lower part of the support.
Types of pullers
The auto tools market offers a wide selection of such removable mechanisms, which can be divided into two types:
Screw pullers are considered universal and are suitable for working with almost any car.
The force in them is created by screwing the bolt into the puller body. The housing itself is put on the support eye, and when tightened, the bolt rests against the support pin and presses it out of the socket.
Lever removable mechanisms are no less effective, but they are larger in size, so they may not be suitable for every car.
Puller type - WEDGE
The simplest puller is the so-called “wedge”. It does not belong to any type of removable mechanism, but at the same time it is a fairly effective device for pressing out.
To make it, you only need an angle grinder (“grinder”), you can also use a machine with an abrasive wheel.
The blank will be a metal plate the size of a matchbox.
First, it is necessary to give the workpiece a wedge shape, for which we grind the metal with a grinder or machine so that the profile of the plate looks like a triangle. Then, using the same “grinder”, we make a cut in the middle 2/3 of the length of the workpiece from the side of the apex of the triangle, that is, from the thin side of the wedge. The width of the cut should be slightly larger than the thickness of the support pin, that is, you should get a kind of bracket.
If desired, you can weld a metal rod to the bracket, which will make it easier to work with the wedge in the future.
Pressing out a finger with a wedge is very simple. It is installed in the gap between the eye and the support body. And then the wedge is simply driven in with a hammer, which leads to the finger popping out of the socket.
The disadvantage of the wedge is that the boot will be damaged during the pressing process. Therefore, the wedge can only be used when replacing supports or tips.
If the suspension and steering mechanism are being repaired, which does not involve replacing the ball elements, it is better not to use a wedge.
Lever
A lever puller for ball joints is no less effective. However, these instruments are large in size. Therefore, they are not suitable for every car. For example, using a lever tool on a VAZ-2107 you can dismantle the upper ball joint, but removing the lower one will no longer work - the working space is too limited. To do this, it is best to use a special tool.
You don’t have to purchase such a device - it’s easy to make a ball joint remover with your own hands. It is assembled from improvised means. Let's look at other tools that you can either buy or make yourself.
This is the simplest and yet quite effective puller. It cannot be classified as any type of mechanism, but in matters of pressing out it is a good choice. To make it, you only need a grinder or a machine with an abrasive wheel. The blank is a metal plate, the dimensions of which are similar to a box of matches.
Then a rod is welded to this bracket. This will allow you to use a ball joint remover. Working with a wedge is quite simple. It is installed in the gap that exists between the eyelet and the body of the ball pore. Then, using a hammer, the wedge is driven in, which leads to the pin being pressed out.
But there is a significant drawback when working with this tool. During the process of pressing out the support, the boot is damaged. That is why the wedge is used only when replacing tips or supports. It is better to avoid repairs using such a device.
Screw release mechanism
The second type of removable mechanism, which can be made from improvised means, is a screw release mechanism. It is perfect for replacing ball joints of classic VAZ models.
A special feature of the suspension design of these cars is that the upper and lower supports are located symmetrically to each other and the distance between them is not large.
It can be made at home only if you have a drilling machine, or you will have to go to a lathe. This puller consists of only two parts.
To make it, you will need a square or hexagonal rod with 17 or 19 key edges, the length of which is 7 cm. Using a drilling machine, we make a hole in this rod and cut a thread for a bolt of 8. Screw in the bolt and that’s it - the puller is ready.
Let's look at how it works using the VAZ-2107 as an example. To press out the upper support, you need to unscrew the lock nut, but not completely, you do not need to remove it. Then we install the manufactured puller between the pins of the supports with the bolt screwed in until it stops.
To squeeze out the finger, we take two keys - with one we hold the manufactured body, and with the second we unscrew the bolt until the finger falls off the socket. After replacing the upper support, we do the same, but with the lower one.
Replacement nuances
- The main disadvantage of replacing the ball joint separately from the arm is the possibility that it may “pop out” of its seat. In this case, the steering wheel turns 30–40 degrees to the side and the ball joint is guaranteed to fail (at least the boot). If this happens, then in most cases the entire lever needs to be replaced. Some mechanics “tighten” the support to the lever by spot welding in several places. With this method, there is a high probability of damaging the boot (it will burn out), and no one will give a guarantee against “crash”. “Analogues” with a locking ring will prevent possible falling out.
- For Renault Logan, the levers are supplied together with two silent blocks. If they are damaged on your car, then it is easier and cheaper to buy the part assembled, since the difference in the cost of the ball and silent blocks separately will be insignificant. Especially when you consider that the silent blocks also need to be pressed out.
- If you changed the ball joint by removing the entire lever or replaced it as an assembly, then you definitely need to do a wheel alignment of the suspension.
Screw L-shaped
The third type of removable mechanism, which you can make yourself, is also a screw mechanism, but it has shown itself to be excellent and allows you to work on any car.
To make it you will need a round metal rod with a diameter of at least 10 mm and a length of 15-17 cm.
From it you need to make an L-shaped blank with a shoulder length of 5 cm. That is, we take a rod, measure 5 cm on it, clamp it in a vice and use a hammer to bend it 90 degrees.
We cut a thread on the long part of the workpiece and select a nut.
All that remains is to make the thrust bar. It can be made in the likeness of the wedge described above. That is, we take a plate, but 0.5 cm thick. On one side we make a cut for the support pin.
If necessary, you can reduce the thickness of the plate on the cut side by grinding off the metal layer. The main thing is that the plate fits into the gap between the support body and the eye, but it is not too thin, otherwise it will bend during the pressing process.
On the other hand, from the cut we make a hole for the L-shaped workpiece. All that remains is to put the plate on the long part of the rod. If the thread is not long enough to squeeze out the finger, you can place several washers under the nut.
This puller works like this: Unscrew the nut almost completely, install the plate in the gap between the support and the eye, and turn the rod so that the short arm rests against the finger.
Then we simply tighten the nut, while the plate will act as a stop, and the short arm of the rod will squeeze out the finger.
Tool for unscrewing the support
We will consider another type, which is used not for pressing out the finger, but for removing the support itself.
The fact is that on a number of cars (Peugeot, Citroen) the ball joint is screwed into the lever. Over time, the threaded connection sours, and it is quite difficult to unscrew this suspension element without a special tool.
But you can make the necessary puller yourself, rather than spending money on a factory one.
It is made from a 2" thick-walled pipe 8-9 cm long.
At the end of this pipe it is necessary to make 4 spikes with a width of 5 mm and a height of 7 mm, located at an angle of 90 degrees relative to each other.
That is, you should get 4 protrusions at the end of the pipe, evenly distributed around the circumference. This can be done using a hacksaw and a file, or with a grinder.
From the other end we make slits to a depth of 3 cm, dividing the circumference of the pipe into 8 parts.
Then we bend these petals to the center using a hammer, significantly reducing the diameter.
Screw made from angle
Another screw puller can be made from a metal angle and a welding machine.
To do this, take a corner with sides 7-8 cm and the same length, and a thickness of 0.3-0.5 cm.
We make a cut in one of the sides to secure the mechanism to the eye. From sheet metal 0.3 cm thick we cut out two triangles that will act as braces. They need to be welded on the sides to the corner. This will significantly increase the strength of the structure.
We take a 17 nut and a long bolt for it. We weld the nut itself perpendicular to the cut so that its hole faces the cut.
So that in the future the bolt can be easily positioned on the same axis with the pin, before securing the nut by welding, a spacer must first be welded onto the corner.
All that remains is to screw in the bolt and the puller can be used.
These are the simplest types of removable mechanisms that you can make yourself.
In general, there are a lot of options, and with a little imagination and basic knowledge of plumbing, you can easily come up with and make your own puller.
We offer some drawings for viewing.
Alternative method
Finally, we note that it is possible to press out the support pin or tip even if it is not possible to make a removable mechanism. But this method should be used only in extreme cases. To remove the finger you will need a pry bar and a hammer.
The pry bar is used as a lever and must be installed in such a way as to create a force to press the support or tip, for example, place it between the steering rod and the rack eye.
After creating force with the mount, it is necessary to apply powerful blows to the body of the eye with a hammer. If everything is done correctly, then after 2-3 hits the finger will pop out.
The disadvantage of this method is that the eye can be damaged due to shock loads, so it is advisable to use pullers rather than knock out the support.
Knocking and rattling noises coming from the front end, clicks when the car rolls strongly and turns sharply - all this indicates a possible malfunction of the chassis. There is no point in postponing diagnosis until later. The malfunction can be serious and affect traffic safety.
Play in the ball joint is included in the list of such faults. Occurs as a result of the formation of a gap between the body of the part and the element (“ball pin”) attached to the steering knuckle. We’ll look at how to identify and fix the breakdown yourself, saving on service stations.
Table of contents:
Removing the ball
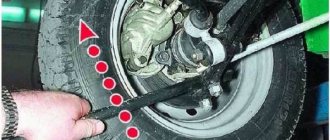
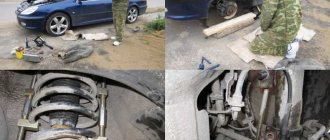
So, you are convinced that the support has come to an end, and now you should change it. By the way, this is done not only in the event of a malfunction of this structural element. When repairing the hub, you will also have to remove the ball joint, otherwise it will not be possible to dismantle the steering knuckle. Before starting work, you need to treat the nut with penetrating lubricant. This will make disassembly much easier. We prepare the car. They put it on the handbrake and install wheel chocks. The car is jacked up and measures are taken to prevent it from falling. Remove the wheel.
To remove the ball without a puller, you will need a wrench, a pry bar and a hammer. This work is done in the following order:
- Loosen the nut securing the support pin. It should be unscrewed to the top edge of the finger. Some models have additional screws that secure the ball joint housing. If there are any, then you need to unscrew them;
- Having thus prepared the support, we proceed to remove it. To do this, we slip a pry bar under the lever and begin to push it slightly (up or down, depending on the location of the support). At the same time, we apply strong blows to the finger. That's what the nut was left for. Usually a few hits are enough.
You can use this method without fear for the remaining elements of the suspension. Even if vibrations occur, they are damped by silent blocks. This method is completely universal; it can be used on all car models with ball joints.
What is the danger of malfunctioning ball joints?
Signs of a bad ball joint
First of all, you need to make sure that it is the ball joint that is faulty. The initial check is very simple. Remove the steering wheel lock - insert the key into the ignition and unlock the steering wheel. With the car not running, swing the steering wheel from side to side. Movements should be short and quite sharp. Pay attention to which side the knock is coming from. If the wear of the ball joint is insignificant, such loads may be insufficient, and there may be no noise. In this case, steering rods and ends may also knock. This method is rather preliminary - it helps to identify the problem area, but does not give precise statements.
Checking for faulty ball joints
We drive the car onto a viewing hole or overpass. Apply the parking brake, engage the gearbox in first gear, and set the steering wheel to neutral. We get out of the car and place wheel chocks under the rear wheels. We jack up the car from the direction of the knocking sounds. Don't forget about insurance - we use stands under the threshold. If they are missing, put on a spare wheel. The resulting gap between the wheel and the ground should be enough for unhindered access to the inside of the wheel.
We rock the wheel, applying force to its top and bottom points vertically. At this moment, it will not hurt to have a partner who can visually determine the presence of play at the junction of the ball joint pin with the steering knuckle. If you hear a knock, but cannot visually determine the presence of a defect, place your hand on the support and repeat the steps. The presence of play can be felt.
When there is no one to help, we use a pry bar or a large wrench or piece of reinforcement. From the side of the inspection hole, we install the assembly between the suspension arm and the steering knuckle, having previously inspected the boot for breaks.
Rocking it smoothly, we observe the presence of play. It is important to distinguish the working stroke of the ball pin from a malfunction. If, when acting on the unit, slight displacements of the suspension arm are visible without extraneous noise or knocking, and the structure does not lose rigidity, this is a working stroke. If under load the distance between the lever and the fist increases, a knock is heard, and vibration is felt through the mount - this is wear in the ball itself. We repeat all the same actions, if necessary, on the other side.
You can watch the video for more information about checking the ball joint:
Restoration of support
There are 2 malfunctions of this design element. Most often, the lubricant present in the housing is used up. In this case, you can easily restore the functionality of the ball joint. For this, a special syringe is used, with its help a new portion of lubricant is added to the body.
Graphite lubricant is best suited for this, but you can use another one with similar performance. But, do not forget that the service life of the restored part is somewhat shorter. If there is a lot of wear, then this method will not help. The part will have to be replaced.
Conclusion
. Domestic roads are not conducive to long suspension life. Therefore, the chassis has to be repaired quite often. Because of this, the question often arises of how to remove a ball joint without a puller. It's actually quite simple. This doesn't require a lot of effort. The tools used are a pry bar and a hammer. Removing the ball without a special tool does not negatively affect the suspension.
What is needed to replace the ball joint
To carry out repair work you will need a set of tools and wrenches, a hammer and a mounting tool. For convenience, it makes sense to acquire a special ball joint remover. It is better to consult the seller before purchasing.
It is also recommended to purchase a metal brush, which can be used to clean the bolts and nuts from adhering sand and dirt. And “Liquid Key” - a penetrating lubricant with a rust converter. We will make it easier to unscrew soured threaded connections and make the bolts less likely to become jammed.
Make or buy?
Ball joint end pullers for domestic cars cost no more than 1000 rubles. You can purchase the device at any store. This means that the instrument is easier and easier to acquire. To make even the simplest tool, you need blanks, special nuts and bolts with a large thread pitch.
It is easier to purchase a ready-made tool because it saves time. You won't have to do unnecessary things. Perhaps purchasing a device will cost a little more, but then there is no need to waste time and effort on making the tool.
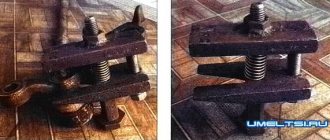
Good day to all!
In this article I would like to share with you a very good homemade product, namely a ball joint and steering wheel end remover. I don’t know if it will fit on other cars, but it will definitely fit on a VAZ!
Not long ago I changed the ball joint using the “old-fashioned” method using a hammer, I’ll tell you it’s not very convenient and fast. After looking on the Internet, I found how to make a puller easily and without cost; on the Internet I looked at prices from 500 rubles and above! This homemade product will take about 30-60 minutes if you have everything you need.
And we need:
- A pipe with an internal diameter of 45-50mm, and a thickness of at least 2 mm, more is possible!
- Two thick washers to fit the diameter of the pipe, or you can cut them out of thick metal.
- Bolt and nut, I used a 24mm wrench bolt, maybe smaller.
We buy spare parts
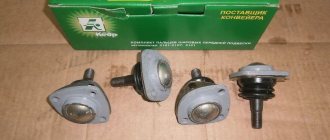
The selection of spare parts is carried out according to the VIN code of your car, which eliminates selection errors. But it wouldn’t hurt to play it safe and pay attention to the ball joint during diagnostics. On some vehicles, the left support is different from the right. When choosing a manufacturer, we listen to the seller’s recommendations. The price-quality ratio must be satisfactory. The ball joint is an important suspension element that affects driving safety, so you should not skimp on it.
Front left and right ball joints on Toyota Corolla EE90
Depending on the manufacturer, a set of new mounting bolts and nuts may be included with the ball joint.
A very important point! Old fasteners quite often “sour”, which causes difficulties during dismantling. Sometimes, you can only unscrew them by deforming them. Cut threads, broken bolts, and torn edges can force you to go to the store in the middle of repair work, leaving the car disassembled. If the kit does not include new hardware, we ask where they can be purchased and whether it is possible to return the product if it is no longer needed.
How to remove a ball joint without a puller? When it's not at hand
Quite often, car enthusiasts are interested in how to remove a ball joint without a puller. This need may arise for various reasons. Most often, the existing puller does not fit the given car model. Although the principle of mounting the support is the same, the overall design of the suspension may be different. Therefore, it turns out that the existing puller simply cannot get to the part. Also, many novice drivers do not have some equipment available. You should not go to a service station due to the lack of a puller; again, you can do without it. In addition, there should not be any negative aspects.
DIY ball joint replacement
Depending on the make of the car, the sequence and types of work may differ. Consider the most common cases:
The support is pressed into the suspension arm or bolted
First of all, don’t forget about safety: handbrake, gear, wheel chocks. Use a wheel wrench to remove the wheel bolts or nuts. We lift the car with a jack. We place the racks or spare wheel under the threshold. Unscrew the wheel fasteners and remove the wheel. Using a metal brush, we clean the fasteners of the ball joint and the bolts of the silent blocks of the suspension arm. We process it with “Liquid Key”. We wait 10-15 minutes.
Treatment of silent block fastenings with “Liquid wrench”
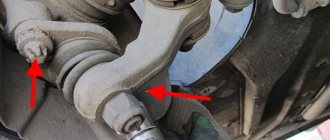
Unscrew the nut securing the ball joint to the steering knuckle. If space allows, we use a head and a wrench. If not, we use the cap side of the key so as not to tear off the edges. The nut is tightened sufficiently tight.
If you have a special puller, remove the ball joint pin from the eye. We place the U-shaped part of the puller under the eye of the fist above the support boot. Use a wrench to tighten the puller nut and press the L-shaped part onto the ball pin.
The process of removing the ball joint along with the suspension arm from the steering knuckle
If there is no puller, use the pry bar as a lever. We insert it between the suspension arm and the axle shaft, pressing down to create tension in the assembly. We knock with a hammer on the place where the ball joint with the steering knuckle is attached. The tension and shock must be strong enough. The finger should pop out.
If it is fixed with a locking bolt, unscrew the nut and remove it. If necessary, we help ourselves with a hammer. In order not to spoil the thread, tighten the nut and knock on it.
Unscrew the bolts securing the suspension arm to the subframe. If the nuts on the reverse side turn, hold them with a wrench. We take out the bolts. The bolt of the longitudinal silent block may rest against the axle shaft. In this case, we use improvised stands for the steering knuckle. We raise it to a height that allows us to reach the bolt. We remove the lever.
The process of removing the suspension arm (together with the ball joint) from the subframe
If the ball joint is attached to the suspension arm with bolts, then unscrew them. The factory support may be attached with rivets. In this case, drill them out. To fasten the new part we use purchased bolts.
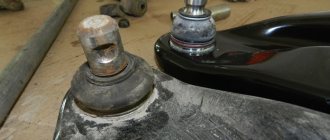
If the ball joint is pressed in, then remove the retaining ring (you can also remove the boot if it gets in the way) from the pin side. It is enough to pry them off with a flat screwdriver.
Removing the retaining ring and boot from the ball joint
Using a special puller, we press out the support. If there is no such thing, we knock it out with a hammer. The heavier the hammer, the easier it is. For convenience, we clamp the lever in a vice, or place it on two bricks so that nothing interferes with the exit of the ball. For accentuated blows with a hammer, we use a ball pin attachment. The ½ extension cord from the tool kit is perfect for these purposes. The ball pin can be cut with a grinder, which will make knocking it out easier. Since the force of the impact will not be absorbed by the unfixed finger, but will be absorbed by the body. If the support does not give in, we try to heat it with a gas burner. The metal will expand, which should help.
Pressing the ball joint out of the lever
Pressing is carried out in the following sequence. We treat the seat with liquid key. After drying, lubricate with soapy water. Don’t forget to lubricate the support for better sliding (unless the new ball is already lubricated by the manufacturer). In the absence of special tool for pressing, select a mandrel suitable for the diameter. This could be a bearing race or a head from a tool kit. When pressing using improvised means, you must not strike the center of the new support . The load should be distributed evenly along the edges of the ball. We avoid distortions. Using light blows in a circle, we drive the part into the seat.
Pressing in the ball joint
On the side of the ball pin, we put on the boot, if we removed it from the new ball, and the retaining ring, helping with a flat screwdriver. It is important to act carefully so as not to tear the boot. An indicator that the retaining ring is in its place is free rotation along the ball. Installation of the lever is carried out in reverse order.
You can watch the video for more information about replacing the ball joint:
The support is pressed into the steering knuckle
With the car assembled, unscrew the central hub nut. This may require a special head and driver that can withstand heavy loads. To make your task easier, you can put a pipe of a suitable diameter on the knob.
Removing the center hub nut
If your car has alloy wheels without a center hole, we start by removing the wheel. We take all precautions. We hang out the problem side and remove the wheel. Unscrew the hub nut. To fix the hub, ask your partner to press the brake pedal. If the brake discs are ventilated, insert a powerful screwdriver into the central air channel and press it against the caliper, thereby locking the hub. This will allow you to perform this operation yourself.
Unscrew the ABS cable mount and the sensor itself from the steering knuckle. Unscrew the brake hose fastener. Unscrew the caliper guide bolts. We insert a flat-head screwdriver into the inspection window of the caliper between the brake disc and the pads, and separate them. We remove the caliper. We tie it with a rope or wire to the spring - do not leave it hanging on the brake hose. The ABS sensor can be hung in the same way.
Disconnecting ABS and caliper
Unscrew the nut securing the upper ball joint with the steering knuckle and the lower support with the suspension arm. Unscrew the nut securing the steering end with the steering knuckle and unscrew it. The cotter pin gives in quite easily; if necessary, we help ourselves with pliers. We remove the pins of the ball joints and the steering end from the eyes using a puller or a hammer, similar to the first case.
The process of knocking out the ball joint rod from the steering knuckle seat
We take out the steering knuckle. We change the support to a new one by analogy with point No. 1. Installation of the steering knuckle is carried out in the reverse order.
Removing the old and pressing in the new ball joint
You can find out more about this option in the video:
How to change it yourself: step-by-step instructions
There are two methods for replacing a ball joint on a Renault Logan - with and without removing the lever. In the first case, it is more convenient to dismantle the faulty ball joint, in the second - there is less assembly and disassembly work. In the instructions we consider both options. Basic steps:
- remove the wheel;
- remove the caliper;
- unscrew and knock out the ball joint;
- remove the lever (with the first method);
- press out the old support;
- press in a new one;
- assemble in reverse order.
Let's take a closer look at each point.
- There shouldn't be any problems removing the wheel. But when removing the caliper, you need to unscrew the two 18mm mounting bolts, and then release the brake pads. This can be done using a screwdriver or a small pry bar. To decompress, rest not against the disc, but against the pad. After dismantling, hang the caliper higher on the suspension spring using wire or rope.
Drive a screwdriver into the slot of the steering knuckle and remove the ball
If the old boot is intact, it is better to keep it
Be careful when working with the ball seat
How to remove and replace ball joints on a Renault Logan: video
Additional Tips
It is recommended to tighten the bolts and nuts with a certain force using a torque wrench. Information about tightening torques can be found on the Internet on thematic sites. If you don’t have such a key and don’t plan to buy it, just be careful. Excessive force can strip threads and loose threaded connections can compromise safety. Use moderation.
If necessary, clean the removed bolts and nuts with a metal brush, treat them with Liquid Wrench, and lubricate them with graphite lubricant. This will prevent souring and make work easier in the future.
After any intervention in the suspension system, it is recommended to have the wheel alignment done at specialized service stations.
| SHARE: |