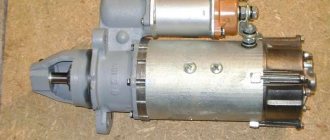
There is no need to remind once again that the starter is one of the important components of the car.
Imagine that you are stuck in a traffic jam for many hours, where you have to start the car every 5 - 10 minutes in order to move 10 - 15 meters, and so on for 2 hours. Is this a familiar story? Definitely familiar to Muscovites.
And now imagine that the starter has stopped working. Definitely an unpleasant situation.
It is difficult to check and repair the device on the road, but in some cases it is possible.
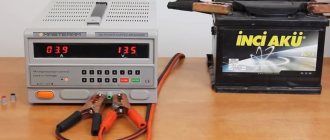
Comprehensive battery health check
Before checking the starter battery, it must be removed. Each car does this differently, so there is no point in describing this procedure. Try to remember which wires go where. This will be needed for diagnostics and reinstallation under the hood .
The main thing is that before any electrical work in the car, you need to remove the “negative” terminal so as not to accidentally short-circuit the wiring.
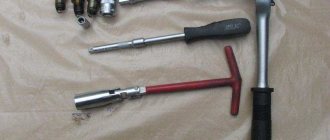
To test the functionality of the starter with a battery, you need three wires with clamps. We connect one of them to the negative terminal of the battery, and its second end to the housing of the removed starter.
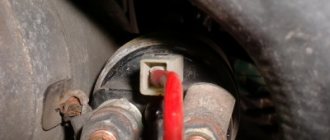
We connect the second wire at one end to the positive terminal of the battery and the free power bolt of the starter. We also connect the third wire to the “plus” of the battery. With its other end we touch the control contact.
At this moment, this is what should happen:
- Click the solenoid relay. This closes the contacts of the power bolts with a movable plate.
- “Shoot” the bendix.
- The electric motor will start.
If this does not happen, then in 90% of cases the power relay is to blame. How to correctly diagnose it and what causes of its failure can be read in the article “Checking the starter retractor relay.” Everything is described there in detail with pictures and explanations of each stage.
If, during the check of the power relay, it was found that it is serviceable, but the electric motor did not start, then proceed to the next step. We will check the electric motor.
I can say from experience. If the starter does not turn on the car, but works perfectly when tested on the table, that is, under load it shows signs of malfunction, but not at idle. So the problem does not lie in the power relay. Most often, the breakdown is in the electric motor or bendix.
Classification of faults
The starter is an electromechanical device, so faults can be classified as electrical or mechanical.
Electrical breakdowns
Such malfunctions often occur due to insufficient power supply. The reasons for inoperability may be:
- Dead battery.
- Damaged wiring.
- Winding short circuit.
- Oxidation and burning of contacts.
To determine this type of breakdown, you need to be able to check the starter using special instruments. Mechanical problems most often appear as a result of prolonged use and mechanical damage.
Mechanical damage may be caused by electrical problems. The parts of the starting device are subject to heavy loads, especially in severe frost, since the device must generate high power and pass high voltage.
The most vulnerable components are:
- Bushing and armature corrector.
- Brushes.
- Heels.
- Fork.
- Gear.
- Solenoid relay.
- Damper spring.
Extraneous noise, unpleasant odor and untimely activation of the starter can be evidence of mechanical failure.
Common Mechanical Failures
- Untimely switching on. The motor rotates, but during start-up a metallic grinding noise is heard. In this case, most likely the damper spring is faulty, the gear or bushings are unusable. The exact cause is determined visually after disassembly.
- The starting device works, but there is no rotation of the crankshaft and there are extraneous sounds. The cause may be a broken bushing.
- The starter does not work when trying to start. You need to tap the back of the starter with a mallet. If operation resumes upon impact, the brushes may be worn.
- After starting the engine, friction and metal grinding can be heard. The engine must be turned off immediately. Most likely the relay is stuck. The exact cause is determined during disassembly.
- The retractor relay clicks are heard, but the mechanism does not work. The battery may not be sufficiently charged. The voltage supplied to the mechanism is weak; there is enough current to operate the relay, but the terminals are not closed by the contact plate. You need to remove the battery and connect the charging unit. If such symptoms occur when the battery is charged, then the heels may burn or the power cable may malfunction.
- When the battery is charged, the starter rotates slowly. The bushings may be worn out or the electric drive may be dirty.
- When you try to start the engine, a burning smell may come from the device. The winding in the traction relay may have burned out. The anchor can also burn out, but this happens less often. In this case, the wires connected to the starter overheat.
- The retractor on the starter does not work. There is a fault in the electrical circuit. It is necessary to check the integrity of the wires and the operation of all components included in the electrical circuit.
How to check the starter motor
To do this, it must be separated from the power relay and checked separately, disassembled into elements. And it consists of:
- Contact brushes that transmit current from the relay to the motor armature.
- A commutator consisting of conductive plates along which brushes move.
- The armature windings and permanent magnets that are glued to the inside of the stator (housing) of the starter.
Let's start with the simplest thing - inspecting the condition of permanent magnets . Let's look inside, the magnets should be securely glued to the body. They should not have cracks, chips or other damage.
Some starter stators have a winding inside them, the two ends of which come out with positive brushes onto the cheek holder. Unlike starters with permanent magnets, the current from the power relay is transmitted to the electric motor not to the brush assembly, but through the braid to the stator windings.
When voltage is applied to them, they begin to work like an electromagnet. And the winding terminals are made in the form of conductive brushes. Which transmit current to the armature collector.
How to check the stator windings
Switch the multimeter to the “Dial” mode. Be sure to check the device by connecting the probes to each other. If you hear a buzzer, the device is working properly.
We touch one brush with one probe, and the second one to the electric motor housing. So we check the starter for a short circuit of its stator windings to the housing . We do the same with the second brush and flexible wire. If the multimeter beeps, there is a short circuit to the housing.
We touch the brushes with the probes of the multimeter. This is how we check for a break in the stator windings. If the device beeps, it means there is no damage, the winding is intact. We leave one probe on the brush, and transfer the second to the flexible wire. Then we transfer the first probe to the second brush. So we consistently ring the stator windings for a break .
In the same way, you can check the starter and its windings with a test lamp. If the lamp lights up, there is a short circuit to the housing. If it doesn’t light up when we diagnose a break in the windings, the wire in its turns is broken.
Causes of starter failure and main types of malfunctions
All causes of malfunctions can be divided into two groups:
- Mechanical. These include breakdowns caused by wear and tear of parts. They wear out over prolonged use or when operating rules are violated. Mechanical damage is also possible due to electrical problems.
- Electrical. Such breakdowns include problems with power supply. To detect electrical problems, you need to check all the wiring, diagnose contacts and turn-to-turn short circuits. You should also check for burning of the closing plates and working surfaces, which are possible due to the passage of excess current through the contacts.
Diagnostics using the battery
Generally speaking, the following breakdowns of the engine starting device are possible:
- When you try to start the starter, the armature does not rotate and the traction relay does not operate. The main reason is insufficient power supply. This can be caused by a discharged battery, oxidation on the positive terminal or poor contact, loose terminals on the battery, electrical breakage, turn-to-turn short circuit and armature sticking.
- When the retractor relay is working properly, the armature rotates heavily when the starter is started. A possible reason is a short circuit between the commutator plates or its burning, freezing, brush wear, poor battery charging, wear of the armature bushings, displacement of the armature plates, winding breakage, interturn short circuit of the starter and armature.
- When the starter is running, the armature rotates, but the crankshaft does not rotate. The reason may be a breakdown of the buffer spring or clutch drive ring, slipping of the clutch's free play, poor movement of the armature, or a malfunction of the lever that disengages the clutch.
- The starter does not turn off after the engine starts - the solenoid relay or lever drive is stuck, the ignition switch return spring is faulty, the relay return springs are broken, the clutch is broken. In any of these cases, you need to turn off the ignition and disconnect the wire going to the relay.
- The appearance of extraneous noise indicates loosening of the device, wear of the bearing bushings, weakening of the starter buffer spring, damage to the flywheel ring or nicks in the drive teeth, and improper adjustment of the gear travel of the device.
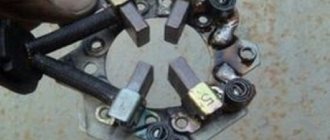
How to check the starter brush assembly
The second step is to check the starter contact brushes. This can be done either with a test lamp and a battery, or with a multimeter.
But first of all, let's inspect the brush assembly. There must be reliable insulation between the positive and negative pads . It can be made of cardboard or plastic. If it is broken, there will be a short circuit between the positive and negative plates. It will damage the solenoid relay and the starter will be inoperative.
If everything is fine with the insulation, then check the brush springs. They must press them securely against the armature commutator. If the springs are broken or have lost their elasticity, there will be no reliable contact. This means that the electric motor will not turn at full power.
Checking the starter brush assembly with a multimeter and a lamp
We turn on the device in the “dialer” mode and check its performance. Remember, two brushes are responsible for the “plus” and are connected by an oblique to the solenoid relay. And the two opposite ones are mass; they are connected to the electric motor housing.
With one multimeter probe we touch the edge of the flexible wire, with the second probe we touch sequentially one brush, then the other. If the device did not make a sound in both cases, it means there is a break in the brush assembly on the “plus” side.
We transfer the probe to the contact of the assembly with the body, and with the second we touch the other two brushes in turn. If there is no squeak from the multimeter, it means there is a break in the negative circuit of the brush assembly. It is not advisable to repair it; it is better to replace it with a new one.
In the same way, you can check with a test lamp if you don’t have a multimeter . We connect the lamp to the battery and repeat the same operations as with the probes of the device. If the light does not light, it means there is a break in the positive or negative part of the brush assembly.
Video “Repairing the starter unit at home”
How to properly repair a device and what nuances need to be taken into account - learn from the video (author - AUTO RES channel).
The ability to start the engine by turning the ignition key from inside the car and without much physical effort can easily be considered one of the most significant achievements of designers in terms of improving the consumer qualities of a car. However, sometimes it happens that you cannot start the car with an electric starter. The reasons for such an unpleasant event are varied, but the list of the most likely among them includes a malfunction of the solenoid relay. A savvy car enthusiast is able to quickly localize and diagnose such a breakdown on his own, after which he can carry out repairs and restore the vehicle to normal operation without contacting a service center and with minimal financial costs. An assistant will be required to perform some of the checks.
How to test armature windings
To check the starter armature, several steps are used:
- Break in the windings.
- Short circuit to the armature shaft and core.
This can be done either with a multimeter or with a test lamp. Since the steps are the same, we’ll tell you about checking with the device.
Turn on the multimeter in dialing mode. We touch the collector lamella with one probe, and the adjacent lamella with the second. If the device beeps, it means there is no break in this winding. So we go through all the contact pads of the collector. They should all “ring”; if not, there is a break in one of the starter armature windings.
The integrity of the windings is also checked with a test lamp. If the light comes on on each of the contact pads, then the winding is intact.
Checking for a short to core or shaft
You can use a “control” or a multimeter in the “diagnosis” mode. One probe touches the shaft, the other touches the collector pads. Moreover, you need to go through all the sites. If the device buzzer does not work or the lamp does not light up, then there is no short circuit to the shaft .
In the same way, we check for a short to the core. One probe is on the core, the second is on the commutator. We also go through all the contact areas. If there is a squeak, it means that the armature windings are shorted to the core .
There is another way - checking the windings with a 220 V lamp
We connect a 100 W lamp into the open circuit of a 220 V lamp. We wind one end of the wire of this circuit to the armature shaft, and touch the second end, which goes to the light bulb, to the contact pads of the commutator. If the lamp lights up, there is a breakdown of the winding and armature turns.
This method is used if the “control” test shows nothing, and the starter does not turn and quickly discharges the battery. This happens if the insulation of the wire turns is not completely destroyed. A voltage of 12 volts is not enough to “break through” it, and the multimeter will not detect this short circuit.
I do not recommend checking the starter using this method. To do this, you need to place the armature in a dielectric, put on dielectric gloves on your hands and have certain skills. In a word, this method is not suitable for diagnosing a starter at home.
You can switch the multimeter to the resistance measurement mode of 200 KΩ or 20 KΩ. And run the test again. If there is any resistance on the device screen other than infinity, then the armature is “broken .
Video on how to check the starter armature windings yourself:
Checking turn-to-turn short circuit
For such diagnostics you need a special device. Ordinary car owners haven't had it for a long time. And for those who are just interested, I’ll tell you. For this you need the Soviet device “E 236” . It is a transformer with a cut off secondary winding.
The armature of the tested starter is placed on the cut of the primary winding and measurement mode “2” is turned on. We take the blade of a hacksaw for metal in our hands and move it along the core, smoothly rotating the armature. If on one of its sections the canvas is magnetized to it and buzzes, then there is an interturn short circuit of the winding.
Testing Bendix
If you are subscribers to my site, then you already know from the starter device that the bendix can only rotate in one direction. If you try to turn it the other way, it will jam. Thanks to this feature, you can check the bendix with the starter removed.
We remove it from the armature shaft and release it from the retractor relay plug. We hold the lower base with one hand and try to turn the gear in one direction. If it rotates freely in both directions, then it is faulty and needs to be replaced. Although there are craftsmen who restore its functionality.
If this test was successful and the bendix only spins in one direction, then we inspect it. Its gear must be intact, each of its teeth must not show signs of damage or deformation. If so, then the part needs to be replaced.
Video on how to check Bendix in a garage:
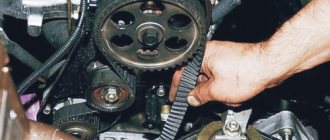
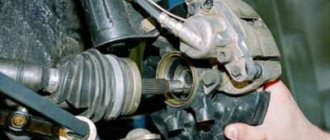
Engine Flywheel Inspection
If you've removed the starter for inspection, this is also a good chance to check the flywheel. The flywheel is the large, heavy wheel between the engine and transmission. This is the wheel that engages the starter gear to start the engine.
- Once you have removed the starter, place the gear in neutral.
- Have a helper turn the crankshaft by turning the center bolt on the crankshaft pulley using a ratchet. You will find this pulley at the front and bottom of the engine block. This pulley rotates the drive or serpentine belt to run the alternator, steering pump, and other components. Depending on your vehicle model, you may need to remove the wheel to access the center pulley bolt.
- Watch the flywheel spin and make sure the teeth are in good condition. Missing or damaged teeth will prevent the starter from starting the engine. Replace flywheel if necessary.
Let's summarize
Using these simple methods, you can independently check the removed starter as a whole and each of its elements separately. As you can see, there is nothing complicated here, no fancy instruments are needed either, except for the E 236, but this is a last resort.
I was able to prove that with such a diagnosis, the most difficult process may be the process of removing the starter from the car? – If not, write your opinion in the comments.
Such performance testing methods are suitable not only for classic automobiles such as VAZ, but they can also be successfully used on foreign cars. In most cases, the design of starters is the same everywhere, so diagnostic methods are similar everywhere.
Thank you all for your attention. If you have any questions, ask them in the comments. I'll be happy to help you.
Recommendations for use
It is not recommended to run the starter for more than 15 seconds. If extraneous noise appears and periodic failure of the mechanism, you must immediately find the cause of the malfunction and eliminate it. In this case, it is necessary to monitor the condition of the contacting parts of the retractor and prevent sparking and overheating of the contact pads. If you take good care of your device, your trip will be comfortable.
Often the car does not start when you need to go somewhere urgently. If the car does not start when you turn the key, the first thing you need to do is check the starter. What are the reasons for a starter malfunction, what breakdowns are there, how to check the functionality of a starter without a stand for testing generators, this is discussed in this article.