The VAZ-2107 steering linkage consists of tips and rods combined into one design. It is necessary in order to turn the front wheels - force is transmitted from the steering wheel to the gearbox, and from the latter to the rods. If the tip or rod fails, this leads not only to inconvenience while driving, but also to an accident - driving the car becomes unsafe.
You can replace the elements of the steering linkage yourself relatively quickly, but it is better to adjust the camber and toe using specialized equipment. And the accuracy of adjustment using “old-fashioned” methods leaves much to be desired.
Signs of malfunction of the VAZ 2107 steering linkage
You can determine that the steering ends of a VAZ 2107 are worn out by the following signs:
- increased steering play;
- knocking in the steering;
- accelerated or uneven tire wear.
The latter can also be caused by bent steering rods. In addition, their deformation leads to the car moving away from the straight path.
Similar phenomena are observed when other elements of the front suspension are worn out and the wheel camber and toe angles are incorrectly adjusted. Therefore, before changing rods and tips, you need to make sure that the reason lies in them. To check the ends and tie rods of the VAZ 2107, it is necessary to provide access to the car from below - lift it on a lift or install it above the inspection hole.
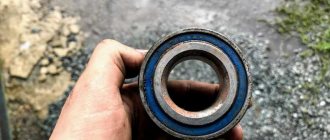
It is better to start your inspection with the steering tips. Check the condition of the anthers, which should not have ruptures or cracks. The permissible play of the tip hinges is 1.5 mm. If you hear a knocking sound when the tip is pulled up and down, it should be replaced.
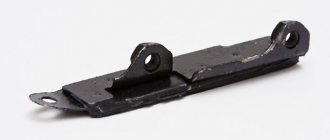
Unlike the tips, tie rods practically do not wear out. They can only bend as a result of an accident or due to strong impacts on the suspension (for example, when a car hits a pothole at high speed).
Auto repair school - Do-it-yourself car repair
May 25, 2016 VAZ 2101, VAZ 2102, VAZ 2105, VAZ 2106, VAZ 2107, Zhiguli, Classic by admin
Failure of the steering tip, tie rod and even the entire steering linkage on VAZ-2101, VAZ-2105, VAZ-2106, VAZ-2107, Classic cars is accompanied by a characteristic knocking sound in the suspension (even on small bumps), loss of directional stability when driving ( the car refuses to go straight, pulls to the side and you have to constantly steer) and uneven tire wear. I think this is familiar to many car enthusiasts and, given the quality of our roads, the question of replacing the rod, tip, or all at once has arisen more than once. And naturally, the same questions come to everyone’s mind: How to determine whether the steering tip or rod ? Is it possible to replace the linkage or steering linkage yourself? What tool will you need for this job? Which steering linkage is best to buy? Are there any pitfalls in this matter? And is it necessary to do a wheel alignment after repair ? Where can I find comprehensive information on replacing tie rods ? Right!? Well, it’s not for nothing that you are reading these lines))). And answering the last question, I will say – Here!. At the very least, I will try to keep it that way. I hope that after reading this material, you will know all the answers to your questions... I screwed it up))) Okay, then let’s just get to the point.
Determining whether it’s time to change traction or not is not difficult. It is enough to drive the car into the pit and shake it with your hands and pull the rods. Checking the axial play in the ball pins. If the axial play exceeds 1 mm or the tip makes a knocking sound when you pull the rod up and down, then it’s time to read on and get ready for work. Since it is difficult to describe the diagnostic process, I decided to post a video in which you will see how to check and how the ball pins of steering rods and ends . Watch the video below.
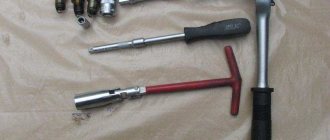
And then, let's immediately decide on the place to carry out the work and the tool that we will need to successfully replace the steering linkage on VAZ-2101, VAZ-2105, VAZ-2106, VAZ-2107, Classic cars . You won’t have to write or read much here, since the work must be carried out on a pit, overpass or lift. Otherwise, you are guaranteed a fun time and injuries too. Regarding the tool, everything is also simple, see photo 1 below.
I think you will have a wrench for 22, 13, 12 (might come in handy), a screwdriver, a hammer and pliers. You are still a serious car enthusiast)). But you will have to buy a puller for steering rods . Look at photo 2. Two options, on the left is a universal puller, on the right is a veteran puller, in common parlance a “corner”, which was probably invented the next year after the release of the first Classic. Both will help you cope with the task. But, I would advise you to choose a universal puller and it will be more convenient to work, and it will unpress your fingers in one go, and it will still work on other brands of cars. Yes, and don’t forget to prepare a tape measure.
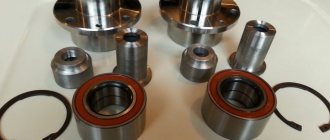
Spare parts... I think that the best option for purchase is steering ends, rods and trapezoids produced by Belebeyevsky. Photo 3. The kit includes: two tie rods, two tie rods, a transverse (middle) rod, six nuts and the same number of cotter pins. Everything seems to be good, but not everything. No, tie rods (adjusting couplings)! Why the manufacturer does not complete their kits with them remains unclear. If I'm not mistaken, only Trek considers it necessary to have steering brackets included in the kit. So, we check everything without leaving the cash register! If there are no squeegees, we will definitely buy them. What they look like and how many of them there are can be seen in photo 4.
And about the main thing. Description with photographs of replacing the steering linkage on VAZ-2101, VAZ-2105, VAZ-2106, VAZ-2107, Classic cars:
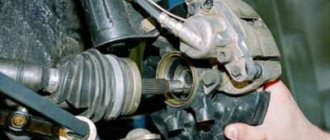
1. First of all, getting under the car, we clean the ball stud nuts from dirt. Using pliers, we pull out the cotter pins, wire, nails, in general, everything that was used to secure the nuts from the fingers. Photo 5
2. Next, use a 22 wrench to unscrew all the nuts one by one. Photo 6.
3. The nuts are twisted, we put the puller into action. Photos 7 and 8.
4. Since the right and left tie rods are different, we try not to confuse them. They removed the right tie rod with the tip and placed it on the right side. But it doesn’t matter if you forget where it is. You can easily find out by turning the rod up with your finger and looking in which direction the tilt goes; on that side it was removed (photo 9), do the same before installation. It’s better to check again than to press the finger out again and risk damaging the boot.
5. After the rods are removed, you can take measurements from them. Using a tape measure, measure the distance between the centering holes of the steering rods. And set the same size on new rods (photo 10). The rods have been twisted, but do not tighten the clamps on the bends yet.
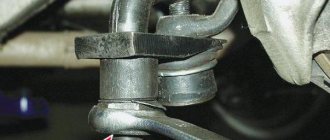
6. If the rods are twisted to the required size, they can be installed on the car. Let me remind you once again, do not confuse the left and right sides. And we install the transverse (middle) link with a bend towards the engine crankcase , that is, the cross member goes around the gearbox casing. Photo 11.
7. When all the pins are tightened and cottered, you can also tighten the clamps. Photo 12. And we are preparing for the trip to the wheel alignment.
Somehow, yes! And yet, if you change one tip or a pair (rod and tip) and set the size correctly, you can avoid a trip to the wheel alignment . But, if you change the steering linkage completely, then you will not be able to avoid this procedure. Since the new transverse link will not allow you to maintain the required size. This has been verified.
When using an article or photographs, an active direct hyperlink to the website www.avtorem.info is required!
Did you like the article? Share it on your page!
Required Tools
To change the steering rods or linkage assembly, you will need the following tools:
- a set of spanners or open-end wrenches;
- pliers;
- puller for steering rods.
The last point is extremely important. Without a puller, dismantling the steering rods is, if not impossible, then extremely difficult. There are several types of pullers that allow you to remove tie rod ends. It is better to purchase a universal puller that allows you to remove steering and ball joints on cars of various brands.
Payment via Yandex Cashier
After selecting payment via Yandex, the Yandex Cashier payment system will launch, where you need to select a convenient payment method (bank card, QIWI, Yandex Money account, etc.)
After specifying payment details and confirming payment, payment for the goods will occur.
If you have a bank card in a currency other than the ruble, then the money will be debited from the card at the rate of the Central Bank of Russia at the time of the purchase.
This payment method is optimal for residents of Russia, Kazakhstan and Belarus.
Replacing steering rods VAZ 2107
Depending on the number of tips and rods to be replaced, you should decide whether to buy and replace parts separately or replace the steering linkage assembly. The assembled VAZ 2107 trapezium is easier to install and costs less than purchasing parts separately.
The work must be carried out by lifting the machine on a lift or placing it on an inspection hole. The thrusts on the left and right sides change approximately equally. The replacement procedure is as follows:
- Raise the car with a jack (if the work is being done on a lift) and remove the front wheel located on the side from which the traction will be replaced.
- Straighten and remove the cotter pin that prevents the steering end nut from unscrewing.
- Using a 22mm wrench, unscrew the nut securing the steering pin.
- Install the steering wheel end remover.
- By turning the nut or bolt of the puller (depending on the design), press the steering tip pin out of the steering knuckle.
- Unscrew and unscrew the nut of the second finger of the tip.
- Using a puller or hammer, press the second pin out of the intermediate joint.
- Remove the steering rod.
- Install a new rod.
- Tighten and cotter the nuts on the rod pins.
Selecting new trapezoid parts
Since the VAZ 2107 car has been discontinued, finding original spare parts is becoming increasingly difficult. On the roads of the CIS countries, steering rods fall into disrepair quite often, so the supply of “original” parts has long been exhausted. In recent years, trapezoid kits have been supplied to the market by several well-known manufacturers:
A special feature of repairing a steering linkage is that worn tips can be replaced one by one. Few Zhiguli owners install complete sets because of one broken ball pin. As a result, the “seven” trapezoid is often assembled from spare parts from different manufacturers.
The quality of steering rods from these manufacturers is approximately the same, as evidenced by reviews from car enthusiasts on the forums. Therefore, choosing a new spare part comes down to following 3 rules:
- Beware of fakes and do not buy parts from dubious outlets.
- Avoid tie rods from unknown brands sold at bargain prices.
- Do not confuse the left long tip with the right one if you are changing part of the trapezoid.
Purpose of the mechanism.
During a maneuver, the radius of the vehicle's trajectory is determined by the angle of rotation of the steered wheels. However, the simplicity of this action is only apparent. When making turns, a problem arises - the wheels describe curves with different radii: for the outer one it is larger, for the inner one it is smaller. Accordingly, in order to eliminate slippage of the internal wheel and deterioration of adhesion to the road surface and loss of control during a maneuver, it is necessary to provide different angles of deflection of the steered wheels: smaller for the external one, and larger for the internal one.
This problem is solved by the design of the steering linkage.
Device and principle of operation.
The mechanism includes:
- Steering bipod;
- Pendulum arm;
- The rods are a long (transverse) central one and two lateral ones, consisting of a long and short tip, for connecting which split couplings with tie clamps are used.
When performing a maneuver, the transverse rod of the steering linkage moves under the influence of the bipod. At the same time, due to its fastening on the pendulum arm, it skews relative to the geometric axis of the bridge and at the same time pulls or pushes the side rods. Due to the skew, the impact on the tips is different, which ensures a difference in the angles of rotation of the wheels.
The adjusting couplings used to connect the ends of the side rods are designed to quickly change their length without disassembling the mechanism. This allows you to set the wheel angles (“wheel alignment”).
Ball joints are used to connect the parts (all of them are of the same type, which simplifies the design and maintenance). This solution makes it possible to ensure normal operation of the drive under any surface condition, even when driving over rough terrain and uneven roads.
The serviceability of the steering gear is the key to vehicle controllability and, accordingly, the safety of the driver and passengers.
INSTALLATION OF PARTS AND ADJUSTMENT
Installation of steering rods on a car of the classic VAZ 2107 model is not particularly difficult and is performed as follows:
- We measure the length of the old assembly using a steel ruler as accurately as possible.
- We adjust the new unit using a threaded connection to the desired size and lock it with locknuts.
- Installing the part in place is carried out by inserting a finger into the seat and screwing the nut with a certain torque.
Timely replacement of faulty components of the VAZ 2107 steering mechanism will allow you to avoid serious troubles and emergency situations on the road.
Signs of malfunctions and diagnosis of trapezoid.
The most common malfunctions of the steering drive are wear and breakage of the rod joints, and destruction of the anthers. The service life of parts and components depends mainly on the driving style and road conditions in which the car is operated.
In case of strong impacts while driving, as well as in the event of an accident, the geometry of the rods may be disrupted, which also threatens the performance of the unit.
The occurrence of malfunctions can be determined by the following signs:
- The appearance of play in the steering wheel or its tight rotation;
- Characteristic knocking noises in the front suspension area on uneven roads;
- Arbitrary movement of a vehicle from a straight path on flat sections of the road;
- The presence of play when the wheel rocks in a horizontal plane;
- Transfer of shocks and vibration to the steering wheel;
- Uneven tire wear (indicates a wheel alignment disorder, which can also be a consequence of a faulty trapezoid, especially if adjusting it becomes difficult).
It is possible to carry out a complete diagnosis if service centers have the appropriate equipment. However, you can draw a conclusion about the need to repair or replace the mechanism yourself. For this:
- The car is driven into a pit or overpass to gain free access to the mechanism parts;
- Conduct a visual inspection, paying special attention to the integrity of the anthers;
- Check the play of the hinges, which in good condition should not exceed 1.5mm;
- The tips are rocked manually (the appearance of a knock indicates wear or damage and the need for replacement).
Since the system parts cannot be repaired, if problems are found, they should be replaced. Car manufacturers and service center specialists advise changing the trapezoid assembly. This will ensure reliability and durability of further operation.
Complete disassembly of the trapezoid
Removing all rods is practiced in two cases - when replacing assembled levers or a complete set of anthers on hinges. The technology for carrying out the work is similar to dismantling the outer tip, but is done in a different order:
- Complete the preparatory stage - place the car in the pit, clean the hinges, apply lubricant and remove the cotter pins. There is no need to turn or remove the wheels.
- Using a 22 mm spanner, unscrew the nuts securing the two side link ball pins; do not touch the clamp bolts.
Don't forget to position the middle section correctly - bending forward. After replacement, it is worth driving out onto a flat section of the road and observing the behavior of the car. If the car pulls to the side, go to a service station to straighten the camber angles of the front wheels.
Price issue.
Manufacturers offer several options for steering linkages for the VAZ 2107. The price of a complete set (with mounting parts) ranges from 1,100 to 2,000 rubles, depending on the manufacturer and seller.
Among the most popular and popular offers, the following products stand out:
- Vazinterservice. An original kit from a well-known manufacturer is offered at a price of 1400-1800 rubles. Supplied in packaging with holographic protection. According to motorists and experts, it provides the optimal quality/price ratio.
- Track. Trademark PA "Trek" from the city of Miass, Chelyabinsk region. Several modifications are produced - “Classic”, “Champion”, “TS”, differing in materials, technologies and, accordingly, reliability. For the most common “Classic” series, prices start from 1,700 rubles. At the same time, it outperforms almost all analogues of competing companies in terms of reliability and provides a service life of more than 100 thousand kilometers.
- Belman. Products of acceptable quality at a relatively low price (from 1400 rubles).
- Cedar. CJSC Kedr is one of the largest manufacturers of auto parts (also located in Miass). Despite the presence of certificates, the kits often cause complaints from car owners. The main advantage is the low price (from 1200 rubles).
Maintenance and repair
The VAZ 2107 car has fairly reliable steering, the system has been tested over years of operation. The diameter of the steering wheel is chosen well; its size allows minimizing the load on the driver when driving. The equipment requires periodic inspection and maintenance:
- During maintenance, the mechanism is carefully inspected for increased play and increased wear of ball joints. The steering wheel, the optimal size, turns from side to side. Lack of reaction from the wheels when the wheel deviates from the initial position by more than 5 degrees indicates significant wear.
- The oil in the worm gear housing is changed every 60 thousand kilometers. The device is checked for no leaks of operating fluid through the seals.
- The pendulum steering lever of a VAZ 2107 car is inspected when the steering wheel is slowly turned from side to side. Movements of parts in the vertical plane are not allowed.
Any steering malfunctions must be immediately corrected: the mechanism and drive are partially dismantled. Defects of parts are carried out, the entire steering system is checked with special care. Units with signs of significant wear must be replaced.
Video.
The VAZ-2107 steering linkage consists of tips and rods combined into one design. It is necessary in order to turn the front wheels - force is transmitted from the steering wheel to the gearbox, and from the latter to the rods. If the tip or rod fails, this leads not only to inconvenience while driving, but also to an accident - driving the car becomes unsafe.
You can replace the elements of the steering linkage yourself relatively quickly, but it is better to adjust the camber and toe using specialized equipment. And the accuracy of adjustment using “old-fashioned” methods leaves much to be desired.
Tools you will need for your work
To replace steering rods on a VAZ 2107 with your own hands, you will need:
- jack;
- a special puller, the work can be done without it, but much longer and more difficult;
- a set of keys, including spanners;
- head;
- screwdrivers;
- pliers;
- lubricant;
- hammer.
The work can also be entrusted to car service specialists; as of October 13, 2020, the price is on average 750 rubles. But independent work will allow you to inspect and evaluate the condition of adjacent parts and mechanisms. But you can start installing new parts yourself only if the car owner has clearly understood the issue of how to repair this unit. More on this later in the text.
Important! Replacing the steering rod trapezium on a VAZ 2107 (rods and tips combined by a single structure) must be done in a timely manner. Otherwise, not only will driving a car be uncomfortable, but driving will become unsafe.
Where is the trapezoid located?
The steering tips and rods are located in the lower part of the engine compartment, in close proximity to the interior partition. You can see them on a lift or overpass, or when turning the steering wheel to its extreme position. The design of the trapezoid consists of the following elements:
- Two lateral rods (left and right short).
- One medium pull.
- Tips – total quantity 6 pieces.
The design also contains a pendulum lever - it is installed on the right side in the engine compartment.
How to determine if a trapezoid is broken?
The main symptoms by which you can understand that the rod ends are out of order:
- Increased free play (play) of the steering wheel.
- There are knocks in the steering system.
- Tire wear is too fast (or uneven).
Rubber wears out quickly if the toe angles of the front wheels are violated. Also, similar symptoms appear when the steering rod itself is deformed. At the same time, the car leaves the trajectory, the camber and toe angles are quite difficult to adjust.
Steering problems
The steering mechanism, like any other vehicle component, wears out and requires repair over time. To simplify the troubleshooting, there are certain signs that allow you to find out the nature of the breakdown and fix it in a short time.
Oil leak
On a classic, the problem of a “wet” steering gear is quite common. There can be many reasons for this:
- oil seal wear;
- leakage from under the gasket;
- loosening of the fasteners that secure the mechanism cover;
- Corrosion of the input shaft.
If the oil seal and gaskets can be replaced and the bolts tightened, then if the shaft is damaged, the part will have to be ground.
Tight steering wheel
Sometimes it happens that to turn the steering wheel it is necessary to apply noticeably more effort than usual. Several reasons can lead to this malfunction:
- incorrect wheel alignment;
- failure of one of the elements in the steering mechanism;
- the gap between the worm and the roller is broken;
- The pendulum axis fasteners are too tight.
Steering play
One of the reasons for free play in the steering mechanism is wear on the shaft crosspieces. In addition to them, play appears in the gearbox itself. If the unit has a high mileage, then it is advisable to disassemble it, inspect the condition of all the elements, replace parts with high wear, and then carry out adjustments.
Knock and vibration
If you feel feedback on the steering wheel while driving, there can be many reasons for this phenomenon. Driving a vehicle in such a technical condition leads to rapid fatigue and reduces the level of safety. Therefore, the steering mechanism needs diagnostics.
Table: causes of vibrations and knocking on the steering wheel and ways to eliminate them
| Cause of steering failure | Troubleshooting method |
| Increased clearance in front wheel hub bearings | Adjust the front wheel hub clearance |
| Loosening the tie rod ball pin nuts | Tighten the tie rod ball stud nuts |
| Increased clearance between the pendulum arm axis and the bushings | Replace the swingarm bushings or bracket assembly |
| The adjusting nut of the pendulum arm axis is loose | Adjust the tightness of the swingarm nut |
| The clearance in the engagement of the roller with the worm or in the worm bearings is broken | Adjust the gap |
| Increased clearance in steering rod ball joints | Replace tie rod ends or tie rods |
| Loosening the bolts securing the steering gear housing or the pendulum arm bracket | Tighten the bolt nuts |
| Loosening the swing arm nuts | Tighten the nuts |
Diagnostics of trapezoid elements
But before you replace the VAZ-2107 steering linkage, you need to make sure that it is faulty. To do this you need to do the following:
- Place the car on a viewing hole or overpass to make access to the steering control elements easier.
- Inspect the tie rod ends. Pay attention to the anthers - there should be no cracks or cuts on them. The play of the hinges should not exceed 1.5 mm.
- Twitch the tips and listen for sounds. If knocking noises are heard, then the tip must be replaced - it is useless to repair it, although such a service is available.
- Steering rods have virtually no wear - they only bend as a result of an accident or driving into large holes.
You should not try to straighten the rod - it is made of very durable metal; to do this, you need to make a huge effort. In addition, the strength of the metal is compromised after such “repairs”.
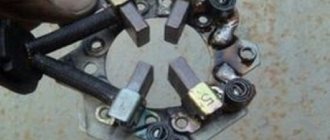
Replacing the contact group of the ignition switch VAZ 2106
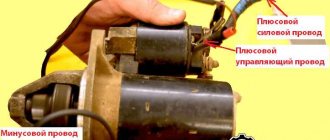
As practice shows, you can remove the contact group for replacement without removing the ignition switch itself, but installing it back is almost impossible. So we carry out all of the above operations and when the lock is in our hands, we remove the locking ring from its back side, take it out, and then replace it with a new contact group.
Video on replacing the contact group of the VAZ ignition switch
How not to buy a fake ignition switch for a VAZ 2106
The quality of spare parts for domestic cars has never been at its best, and if you also take into account the fact that many “basement” companies “throw out” all sorts of counterfeits onto the market, then in order to somehow protect yourself from purchasing low-quality auto parts, we recommend buying spare parts from car dealers or in trusted stores. As for purchasing a high-quality ignition switch for a VAZ 2106, for comparison we would like to give an example of a fake lock and an original one.
Signs of crafts
- The hologram is narrow, you can remove it without damaging it.
- The steering wheel lock tab is dark.
- Molded body with uneven edges.
- The packaging is not tight and neat.
- The key is difficult to get in and out of the lock.
Here's the original castle
Additionally: I am selling VAZ - 21061, manufactured in 1995, ruby color. There is a rear view camera, JVS music, with the car plus I’ll give away a new rear wing + a can of paint for the car lights, 3D rear pro-sport headlamps. Winter tires studded. Of the minuses above, replace the right rear fender, the trunk lock is broken, it can be opened with a screwdriver, but the car is running.
City: Tyukalinsk, Omsk region
Sources
- https://remontauto-vaz.ru/page/zamena-zamka-zazhiganija-vaz-2106
- https://tyukalinsk.drom.ru/lada/2106/20565075.html
Tools for repair
In order to replace the elements of the VAZ-2107 steering linkage, you need to prepare the following tools:
- Socket and open-end wrenches.
- Pliers.
- Tip remover.
It is best to dismantle the VAZ-2107 steering linkage rod using a special device. Be sure to buy a puller - it is not very expensive, but the work will go well with it.
It is very difficult to remove the pins of the tips from the holes - they are conical in shape, and the metal often sticks. You can benefit if you buy a universal puller - you will also need it when repairing the suspension (for removing ball joints).
PROCEDURE FOR PERFORMANCE OF REPAIR WORK
Steering rack knocking how to check and repair
Replacement of a faulty part of the steering mechanism is carried out in the following sequence:
- We clean the assembly from dirt using a brush, and apply a penetrating compound to the threaded connections.
- Using pliers, remove the fixing cotter pins and, using a spanner wrench or a “22” socket, unscrew the nut on the pin.
- The steering rods are detached from the steering knuckle using a special puller. The device is put on the assembly from above and using a bolt, the finger is squeezed out of the eye.
The manufacturer of the VAZ 2107 recommends replacing worn steering rods as a set. The service life of these structural units from one batch installed on a vehicle is usually the same. Replacing only one of them does not fundamentally solve the problem; a little time will pass and the repair process will have to be repeated for the remaining elements of the system.
Carrying out replacement: step-by-step guide
You immediately need to decide how many rods and tips need to be replaced. Based on this, you can understand whether it is worth changing the VAZ-2107 steering linkage assembly, or its individual elements. Sometimes it turns out that completely replacing a trapezoid is much more effective - its service life is much longer than that of a restored one.
To replace you will need to perform the following manipulations:
- Place the car on a viewing hole or overpass. It is imperative to remove the wheel from which the repair will be carried out.
- Straighten and remove the cotter pin, after which you can unscrew the nut from the tip pin. You do this using the key at “22”.
- Install a puller on the tip and turn its bolt, squeezing the pin out of the hole.
It is advisable to treat all threaded connections with WD-40 penetrating lubricant before starting work. The price of the assembled VAZ-2107 steering linkage will be about 2000 rubles. And it is much easier to dismantle it than each rod separately.
After pulling out the first finger, proceed to the second - repeat the manipulations described in points 2 and 3. After this, the traction can be completely removed. To disrupt wheel alignment as little as possible, you will need to measure the length of the old rod and ensure that the new one has the same size. But this does not mean that after repair there is no need to adjust the camber and toe - this procedure is mandatory.
Replacing the outer short tip
Since the outer part of the trapezoid can be approached from the wheel side, disassembly can be performed without an inspection ditch. What tools and materials will be needed:
- ring wrenches size 13 and 22 mm;
- pliers;
- hammer;
- puller - a “glass” type extruder;
- a ruler at least 20 cm long or a tape measure;
- devices for removing the wheel - jack, wheel wrench, wheel chock;
- rags, fabric gloves.
Also, prepare a new cotter pin, WD-40 spray lubricant, and a wire brush in advance to remove any stubborn dirt from the rod before starting work.
Why is it customary to replace tips rather than repair them:
- High-quality factory parts are made non-separable; in a garage it is impossible to remove a worn-out cracker - the hinge cover is tightly pressed into the body.
- Collapsible rods made at home using a lathe are considered unreliable. The reason is the “licked” thread profile inside the housing; under load, the ball pin is able to squeeze out the lid and jump out.
Preparatory stage
Before removing the tip, perform a number of preparatory operations:
- Secure the car on the platform and unscrew the desired wheel. To provide maximum access to the tip, turn the steering wheel to the right or left as far as it will go.
Take this opportunity to examine the condition of the anthers on other tips. If you notice any breakthroughs, disassemble the trapezoid completely and install new silicone covers.
Disassembly instructions
Dismantling the old part and installing a new tip is carried out in the following order:
- Using a 13 mm wrench, loosen one nut of the tie rod, located closer to the wheel. Do not touch the second nut.
Some car enthusiasts, instead of measuring the length, count the revolutions when unscrewing the tip. This method is not suitable - the length of the threaded part on parts from different manufacturers may differ by 2-3 mm. I had to face this problem personally - after the replacement, the car began to pull to the right and “eat up” the edge of the tire. The issue was resolved at a car service - the master adjusted the toe angle of the wheels.
If you are unable to find the puller, try knocking the pin out of the eye by hitting the pin with a hammer. Method two: lower the wheel hub onto the block, screw a nut onto the thread of the pin and hit it with a hammer through a wooden spacer.
Knocking out is not the best way to disassemble a connection. You can accidentally rivet the threads, in addition, shocks are transmitted to the hub bearing. It’s better to buy an inexpensive puller - it will be useful for replacing other hinges.
Video: how to change the tie rod end
Manufacturers of steering linkages
And now a question that interests many motorists - which is the best steering linkage for the VAZ-2107? There are many manufacturers on the market, it is quite difficult to choose a decent one. Here are just a few of the most popular manufacturers:
- "VIS" - have high reliability, their cost is relatively low. According to reviews from motorists, this is one of the high-quality manufacturers of elements.
- "TRACK" - the highest quality elements from this manufacturer. Rubber boots last quite a long time - there are practically no equal ones in terms of service life.
- "BELMAG" - good quality products at a relatively low cost.
- "CEDAR" - low cost and very poor quality.
This is a list of the most popular manufacturers that can be found on the market.
Motorists praise TRACK very much - these are very high-quality VAZ-2107 steering linkages. Its price is approximately 1700-2000 rubles. Its resource is very high, it cannot be compared with KEDR products. Most of them are of very poor quality - it gets to the point that they last 2000-5000 kilometers, after which terrible knocking noises appear. Therefore, it is better to purchase quality products.
Is it possible to make the wipers of the VAZ 21099 faster?
Popular wisdom has developed a way to increase the speed of the wipers on the VAZ 2108-99 by shortening the supply circuits of the gearmotor.
To do this, the wires from contacts “1” and “2” of the wiper connector are cut. A relay is installed in each gap:
For example, the gray wire (No. 1 in the block) is connected to pin 86 of the relay, and pin 85 of the relay is connected to ground (No. 4 in the block). Thus, the relay coil will work when the 1st speed wipers are turned on. All that remains is to stretch the wire from the positive terminal of the battery to terminal 87, and the end of the cut wire going to the gear motor to terminal 30 of the relay.
In a similar way, the relay “crashes” into the 2nd speed brush circuit.