The number of external automotive electronics has grown significantly over the past decade. A video recorder today is considered a must-have item; many drivers also cannot imagine their “iron horse” without a radar detector. And on a long journey you can’t do without a navigator. And although there are combination devices, they are not very popular yet. So, to service this entire high-tech fleet, three car cigarette lighters are required, and sometimes you also need to recharge your phone (or even a couple). And we have not yet touched upon the topic of car refrigerators, FM transmitters, compressors for inflating tires and other accessories that are used less frequently.
Meanwhile, in many cars there are at best two 12 V sockets, or even just one. It turns out that even in everyday use it is difficult to do without a car cigarette lighter splitter, and even on a long journey, when the number of connected devices increases significantly, it becomes one of the most important gadgets. Fortunately, today there is such a variety of splitters on the market that every motorist can choose a model to suit his needs and tastes.
Connector configuration
One of the key parameters of a car cigarette lighter splitter is the number of 12 V sockets: from one to four. Accordingly, the more connectors are provided, the more equipment can be connected. But the more slots, the more massive the device body becomes.
USB ports may also be provided in the splitters. Not all models have them, but many are equipped with one or even two computer connectors. They are useful for charging smartphones, tablets and other mobile equipment. The main convenience of USB ports is that they are more compact than conventional 12-V outlets, and a USB cable usually costs less than a full-fledged car charger.
In most cases, manufacturers install USB ports with weak output parameters - 5 V/0.5 A. In this case, fast charging is out of the question: if you connect a smartphone with the navigation program turned on, you will have to hope that the device will at least not discharged. In some cases, the manufacturer claims a current of 1.5 or even 2.1 A, which is much better, although the actual values depend on many factors.
Regarding tension, there is one more subtle point that you can forget about. If you are going to use a “tee” in a truck with a 24 V on-board network, then you need to make sure that the device can withstand it. In most cases, splitters do not care what voltage they work with (12 or 24 V), but some models are only compatible with 12 V.
Improvement
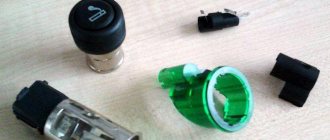
As mentioned above, the cigarette lighter socket is used in many devices today. Therefore, one slot may not be enough. Increase their number with the help of special devices sold in auto stores - melters and lighters.
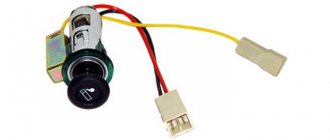
The device is made in the form of a block with two or three (depending on the selected model) sockets. The device is connected to a standard car cigarette lighter using a corresponding plug connected by a wire to the contacts of the T-bar.
The unit can be attached to the car dashboard using double-sided tape or silicone sealant. Thanks to this, the driver has the opportunity to simultaneously connect not one, but several devices operating from the cigarette lighter socket.
In the summer, car owners most often connect only smartphone chargers and DVRs to on-board networks, which consume symbolic electricity. But in the fall and winter, electric heating pads, external heaters, electric mugs, thermal glass scrapers and other car heaters are connected to lighters. All these devices are usually powered by two to five cigarette lighter splitters at the same time, and as a result, many car owners are faced with problems. And everything would be fine if a contact fell out somewhere or a plug melted, but you can burn the car... How not to do this?
Who is guilty?
Physics and electrical engineering make it clear: To carry large currents through plug connections, connectors must have a larger surface area. And the lighter circuit also protects the common OEM fuse in the vehicle's "fuse box."
To change the fork, remove it, remove the fuse and replace the longer spring. The "nose" and flat contact should be carried and connected to you as part of a pair with a soldering iron. On this basis, graphite brushes are made in every electric motor - the wire passes through the spring, becoming a "bypass" for electricity, on which there is no voltage drop and heating. The spring serves only as a contact tip and not as a guide.
This method is quite effective, but whether it is worth getting tired is up for debate. It may be easier to prevent the splitter from being overloaded by using it only to feed low-power gadgets, and powerful receivers like heated seats are connected to a lighter one and alternately.
Additional functions
Most models have built-in short-voltage protection. This precaution will never be superfluous.
A very rare option are switches for individual splitter sockets. They can be useful if the driver periodically needs to deactivate some of the connected devices, but at the same time maintain power to others. The scenario is clearly not the most common, but there are also very few similar models.
A switch for the entire splitter would be more popular. With one click, you can turn off the power to all connected devices, which can be convenient when leaving the car. The vast majority of modern cars are equipped with a CAN bus, which automatically turns off external consumers a few minutes after stopping the engine, so this mechanism is useful mainly for older vehicles.
Among the decorations, one can highlight only the power indicator light. But even in this purely cosmetic function, you can find positive aspects from a practicality point of view: a small light will be useful if the power plug does not sit tightly in the cigarette lighter socket and periodically loses contact. In this case, you can quickly check whether the equipment has turned off (this is true for video recorders with a switchable display and radar detectors with weak backlight: it is sometimes difficult to understand from them whether they are working at a given time).
Device
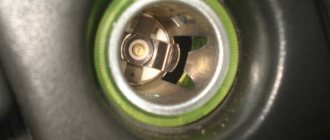
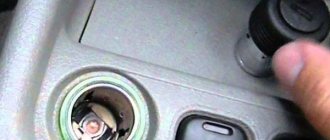
A traditional car lighter consists of two parts - a cartridge and a socket. In the center of the socket there is a metal rod that acts as a positive contact.
The “-” contact is the outer metal shell.
There is a spacer between the positive and negative terminals to prevent them from touching each other. “+” and “-” are connected by a nichrome spiral, which acts as a heating element.
When electrical current is applied, current flows through the coil, heating it to a high temperature. When the cartridge reaches a certain temperature, the electrical current is stopped by a thermal relay located in the plastic holder.
The socket is an elongated recess in the car panel, which contains a metal tube with a central contact. The middle contact outputs “+” from the battery. The side of the socket serves as a permanent “minus”. There is also a backlight on the cigarette lighter body that automatically turns on when the external light bulbs are turned on.
To turn on the heating mode, you need to dig into its socket. It is fixed in the pressed position, the positive contact of the socket is connected to the “+” socket, the “-” socket is connected to the “negative” terminal of the socket.
The heating element will start working. As a rule, 15-20 seconds are enough to warm up the coil, after which the cartridge returns to its original position with a slight click. Warm-up time may be longer if the board voltage is low.
What to choose?
If you are thinking about purchasing a car cigarette lighter splitter, then you probably already have a fleet of in-car electronics that you need to connect. This allows you to roughly imagine the required number of connectors. For example, if you simultaneously use a DVR, navigator and radar detector, then it is logical to look towards models with three 12-V sockets and two USB ports. In this case, the main devices will be occupied by all the car cigarette lighters, and there will be a couple of free USBs left for charging a smartphone or tablet. The maximum possible configuration is four 12-V connectors and two USB ports.
When choosing, you should also pay attention to the cable length. It can reach three meters. If you don’t need extra cords in your car, then you can get by with a model without an extension cord, but in this case it would be wise to choose a splitter with a variable angle. In this case, it will be more convenient to connect devices; besides, in some cars the sockets are hidden in niches: in this case, you cannot do without such a design.
Additional cigarette lighter for the car
Universal tee
Perhaps the easiest way to make several cigarette lighters in a car is to buy a universal tee at a car store. Its cost is low, so every car owner can afford such a purchase.
Can be placed on a shelf
In most cars, the cigarette lighter is located next to the gearshift lever. In this regard, connecting a splitter to its socket makes changing gears difficult. This installation of an additional cigarette lighter is inconvenient and forces you to look for alternative ways to solve this problem.
How to make an additional cigarette lighter for a car?
Two additional cigarette lighters next to the gearbox
It won’t be difficult to install a second cigarette lighter yourself, making everything look as if the additional socket was originally in the car. Its connection can be organized:
- parallel to the standard cigarette lighter;
- using a separate wire running directly from the battery through a 15 A fuse.
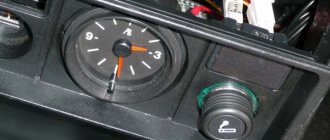
The cigarette lighter socket can be placed in any part of the car interior, everything is limited only by your imagination. Most often, the place under the immobilizer or next to the standard socket is chosen as an option for its placement.
Sometimes it becomes necessary to install a cigarette lighter splitter so that there are several outputs at once for simultaneously connecting two or more devices to the car’s electrical network. In this case, the easiest way is to purchase a ready-made tee, install it, for example, in the glove compartment, under it or above a niche, prematurely soldering the wire coming from it with the wiring of the standard cigarette lighter.
Connecting the cigarette lighter
Never connect the cigarette lighter to the ignition switch. The ignition system will not withstand such a load. Having laid the wire in the engine compartment, bring it to the positive terminal of the battery, connect the fuse and then attach it to the terminal. If for some reason you cannot do this, run a wire with a fuse to the starter and attach it to the positive terminal of the relay. Strip the end of the wire at a distance of 1 cm, place it on the terminal, then crimp it using pliers. Be sure to secure the wire so that it does not dangle anywhere. To attach the wire to the cigarette lighter, use a soldering iron or an appropriate terminal, depending on the device model. Install a fuse and a switch next to the cigarette lighter, this will increase the safety of using this device.
Do not confuse the arrangement of parts of the diagram:
- Battery.
- Fuse.
- Switch.
- Relay.
- Cigarette lighter.
The switch must be designed for a current of 1.5 times the maximum load. If there is no such switch, attach a relay next to it that is suitable for the current. Some drivers place a switch and relay next to the ignition switch. Connect the switch to the control contact of the relay, and the cigarette lighter to the power one. To do this, place heat-shrink tubing on the exposed ends of the wire, then push and crimp the terminals. Adjust the tube so that it completely covers the junction of the terminal and the wire, then heat it with a match or lighter. You can also install a regular cable splitter (220 volts), which is sold in hardware stores. Find the nearest ground connection location (the wire is bolted directly to the body). Unscrew the bolt, clean the contact pads of the terminal and body. Route a piece of wire from the relay and cigarette lighter to the ground hole to determine the length, then cut and strip the ends.
Make a splitter - take a piece of wire of a suitable length, strip both ends. Then solder the ends of the long and short wires to each other so that they both point in the same direction. Protect the connection with heat shrink tubing, then attach the connection terminal to the negative of the cigarette lighter. Position the tube so that it completely covers the contact point. Place heat shrink tubing on the other end of the short wire and attach the terminal. Or use a regular cable splitter, which must be rigidly attached to the body.
Additional cigarette lighter in the trunk
In the trunk
It would be convenient if there was a cigarette lighter socket in the luggage compartment; you can connect a variety of devices to it, which are difficult to do without on vacation, on the road, and in many other situations.
So, if there is such a socket in the trunk, the car owner has the opportunity to quickly connect an electric pump to inflate car tires, without which it is impossible to travel long distances.
It is equally convenient to use the cigarette lighter socket located in the luggage compartment to connect a vacuum cleaner, without which it is quite difficult to clean up the interior of the car.
Cigarette lighter socket
Installing a cigarette lighter socket in the trunk does not take much time and is carried out in the same way as installing a cigarette lighter in the passenger compartment.
Thus, equipping the interior of your car with several cigarette lighter sockets will allow you to connect all the necessary car equipment that you are used to using. Now the navigator will show you the route while your phone is charging, and the DVR records everything that happens along the way on a memory card.
Installation
As a rule, the process of installing a 12V outlet does not cause problems.
In the cabin
It is most convenient to place it on the central tunnel of the car. To do this, you need to remove it, cut a hole (use a utility knife) and secure the socket.
Installation process on video:
In the trunk
The 12 V socket is mounted on the casing. To strengthen it, use a piece of MDF or plywood. We cut the hole with a feather drill.
Installation process on video: