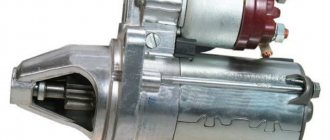
The starter on the VAZ 2115 is used to start the internal combustion engine. It transmits the rotating motion to the crankshaft. If the unit is excessively worn or damaged, it becomes impossible or difficult to start the car.
Therefore, as soon as the first symptoms of a malfunction appear, attention to the unit is urgently required. It is necessary to diagnose the starter and, based on its results, make a decision on further repair or replacement of the unit.
Starter problems and their elimination
In a situation where the starter does not turn, and the traction relays continuously click, the reason why the car does not start is a discharged battery. A low battery charge does not provide sufficient current to the electric motor to crank the crankshaft. To prevent overheating of the electric motor, the traction relay is turned off, which creates a clicking sound.
The appearance of extraneous noise during starter operation, accompanied by a decrease in the intensity of crankshaft rotation, is a consequence of wear or damage to the bushing. To check its condition, it is necessary to disassemble the starter and inspect the contact surface with the shaft for scoring and other damage. If there are any defects, it is recommended to replace the bushing with a new one.
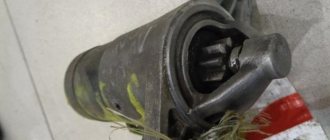
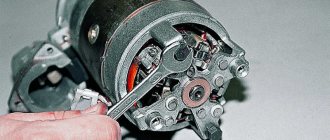
The weak point in the mechanical part is the bendix. Its gear wears out and becomes damaged. The malfunction can be identified by external inspection of the Bendix. Particular attention should be paid to the condition of the gear teeth, which is shown in the photo below.
A common electrical problem is a breakdown to the housing. You can check the insulation using an ohmmeter or multimeter. If the listed devices are not present, then the light bulb connection diagram below will help identify insulation damage.
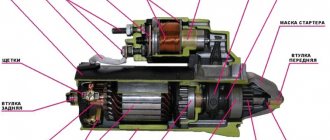
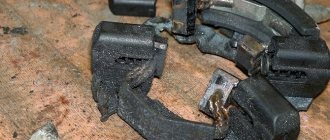
Attention should be paid to the brush assembly. All brushes should move without jamming. The presence of melts and other thermal or mechanical damage to the guides is unacceptable. If defects are present, replacement is recommended.
The brushes transmit a large current to the commutator plates. This leads to melting and other thermal damage on contacting surfaces. Therefore, during troubleshooting, it is most important to inspect the condition of the commutator and brushes.
Starter repair - how to fix it?
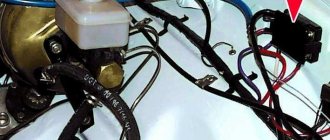
The VAZ 2114 starter itself may also fail. In this case, it will need to be completely replaced or thoroughly repaired. First, disconnect the starter relay from the control unit. It is located inside the cabin, on the left side of the steering column. In the photo or marking diagram you will find which fuses need to be turned off. If possible, you can replace them.
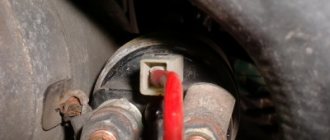
The starter solenoid relay is a device whose operating principle is to transfer current from the battery to the starter. This happens under the influence of an electromagnetic valve. You can see what this part looks like in the photo. It is the solenoid relay that prevents the starter winding from burning out. If it were not there, then a constant current would flow from the battery. The solenoid relay on VAZ 2114 models is located on top of the starter; two wires are connected to it, from the ignition and the battery.
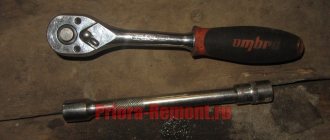
To replace the starter retractor relay, you need a small set of tools, namely several 10 and 8 keys, a flat-head screwdriver and the device itself. The starter relay in the VAZ 2114 is located in such a way that to replace it you do not need to completely remove the entire starter. The starter should be removed only if it is necessary to conduct a full inspection and identify other causes of failure.
The solenoid relay must be removed carefully so that the solenoid core remains inside
Particular attention should be paid to the spring - it is important that it does not remain in the starter, because removing it from there will be very problematic. The new relay kit does not include a core, it is purchased separately, but there is a spring
When trying to start the car, the starter retractor relay may make clicking noises - in this case, you need to replace a device such as bendex. Bendex is responsible for turning the starter and engine gears. It is located inside the starter itself. As the starter revs, the device wears out, and from time to time it needs to be completely replaced.
Article number and approximate price for the original VAZ 2115 starter
The original VAZ 2115 starter has the internal factory marking 423.3708. For the carburetor version of the car on sale, the unit has article number 2108370801006. Its price is 2,500 rubles.
On VAZ 2115 cars that have an injector, an improved starter is used. It has a planetary gear and provides more stable rotation of the crankshaft. The unit goes on retail sale with article number 21130370801000. Its cost starts from 5,500 rubles.
The principle of operation of the VAZ traction relay
The starter coil, which receives power from the battery, creates a magnetic field that acts on the armature. It starts to move, compressing the return spring, which engages the bendix, which connects to the splines of the flywheel crown. The contacts of the elements close, the retracting winding remains without power, but the armature remains inside the coil, as it is held by a strong magnetic field. After the engine starts, the coil loses its power and the armature accordingly returns to its original position. In this case, the bendix itself disengages.
There are several options for checking the relay, which can be used to determine whether it is faulty.
In most VAZ cars, the relays are similar to each other, differing only in the way they are attached to the starter. And unfortunately, breakdowns that specifically affect the relay in 95% of cases end in its replacement. But still, before making this diagnosis, you need to make sure of one more serviceability, namely the functionality of the contacts at the place where the wire and terminal are soldered. Often, due to oxidation, the contact is lost, and by soldering it again, you can get rid of the problem of the starter relay breaking, provided that after this procedure the car is fully operational.
For a VAZ 2115, it is more cost-effective to replace the relay than to repair it to the point where it works properly.
Any service station will help you perform such a replacement, but this pleasure is relatively expensive. A much cheaper way would be to do everything yourself. If the owner of the car knows his ward 2115 inside and out, then such a replacement can be made independently without much effort, knowing the specific sequence of actions.
Before starting work, it is necessary to turn off the power from the battery, because while the electrical circuit is being created, it is prohibited to remove the starter, since you can completely burn out the entire wiring of the car.
- Clean the surface of the starter from dirt and dust;
- Unscrew the nut from the relay bolt and remove its contact;
- Unscrew the screws that secure the relay to the starter body;
- Remove the nuts from the end and divide the starter into 2 parts;
- Remove the old core and put a new one in its place;
- Reassemble all components in reverse order and check serviceability by connecting to the battery;
- Install the starter with the replaced relay on the car engine and check the operation.
Catalog number and cost of starter from third-party manufacturers
According to reviews from car owners, the quality of VAZ 2115 starters does not correspond to their cost. There are a large number of defects among the products. Therefore, experienced drivers recommend purchasing analogues of branded products from third-party manufacturers. The best alternative options for the original starter for the VAZ 2115, which have proven themselves well on the car, are presented in the table below.
Table - Good analogues of the original VAZ 2115 starter
| Manufacturer | vendor code | Approximate cost, ruble |
| Startvolt | LST0115 | 2800-3500 |
| HC Parts | CS332 | 2700-3600 |
| As-pl | S9008 | 1800-2500 |
| Bosch | 986014950 | 7500-10000 |
| Lucas Electrical | LRS00714 | 7200-9000 |
Determining the cause of the malfunction
Do not rush to completely disassemble the VAZ 2109 starter; as always, it is first important to correctly identify the fault. Therefore, you should start by checking:
We disconnect the wiring from the terminal and connect it to the “plus” directly. If the engine is running, this means that the power relay is faulty. If the motor is silent, then the likely reason is wear of the brushes. A simple method will help you identify misalignment or wear of the brushes. Remove the unit from the machine, and we check it, start it, removed from the car. When we check the starter separately from the car, you should pay attention to the functioning of its engine. It often happens that the engine works perfectly in only one position. You just need to turn it to one side, and the contact will immediately disappear. Such a strange phenomenon is easy understandable: When the brushes of the starter have a normal length, they are pressed tightly, by means of the springs of the brush holder. When the brushes wear out heavily, the force of the springs may not be enough, then the brush is pressed only by its own weight. Therefore, when the position of the unit changes, the contact disappears. A similar phenomenon is observed when the brushes “hang”, having a normal length, or when the brushes are skewed
Required Tools
In order to perform replacement and repairs yourself, you will need the tools from the table below.
Table - Tools required to replace the front strut
| Name | Note |
| open-end wrench | "at 8", "at 10", "at 13" |
| Head | "at 13", "at 14", "at 15" |
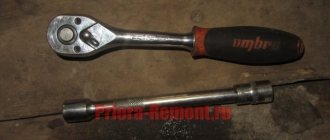
| Ratchet | With extension |
| Silicone Grease | For working with rubber |
| Pliers | Can be replaced with pliers |
| Screwdriver | With cross and flat blade |
| Spanner | "at 13", "at 14", "at 15" |
| Wire brush and rags | To clean dirt |
| Penetrating lubricant | For example, WD-40 |
Starter replacement process
In order to remove and mount the starter on a VAZ 2115, you must follow the instructions presented below.
- Apply the parking brake, securing the vehicle in place.
- Open the hood.
- Remove the negative terminal from the battery. To make work easier, many car owners recommend dismantling the battery. In this case, you will need to disconnect the positive terminal from the battery.
- Disconnect the terminal block of the mass air flow sensor.
- To gain access to the place where the starter is located, you will need to remove the air filter by first disconnecting the air duct.
- Remove the metal corrugation of the air duct from the fasteners.
- Disconnect the connector from the solenoid relay and unscrew the power wire.
- Using a ratchet with an extension, unscrew the starter mountings.
- Remove the starter from the engine compartment.
- Install a new node to replace the old one.
- Reassemble everything in the reverse order of removal.
- Check the functionality of the starter by performing a test run of the internal combustion engine.
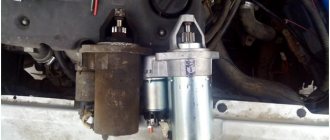
When trying to remove the starter, car owners often encounter sticking of its fasteners. In this case, access from the bottom of the machine will be required. To do this, the VAZ 2115 should be installed on a lift, inspection pit or overpass.
How to remove the Niva Chevrolet starter with your own hands
Has your Chevrolet Niva stopped starting or is running intermittently? The reason for this could be a faulty starter. In such a situation, it should be removed, disassembled and possibly partially replaced. Removing the Niva Chevrolet starter with your own hands will not be any problem.
Preliminary diagnosis
Before dismantling the starter, you must make sure that this device is the cause of the malfunction. This can be done visually or by replacing the battery with a working one.
It is also worth checking whether current passes from the battery to the starter: if current passes, then the cause of the malfunction is the starter, but if current does not pass, then the starter relay should be checked. If the latter malfunctions, it must be replaced.
If everything works, then the next step is to remove the starter.
Step-by-step replacement of the Chevrolet Niva cooling radiator
How to remove the Niva Chevrolet starter
To remove the starter, you need to do the following:
- Disconnect the wires from the battery and starter (you can use a wrench of the required size).
- We unscrew the starter, which is attached with three bolts to the box body. You can remove it through the top or bottom, however, motorists believe that it is more convenient to remove it through the bottom. It's difficult to do this without a pit. Air conditioning can be another obstacle. If it is present, you will also need to remove the warm air intake hose. The clamp that secures it to the engine can be loosened using a flathead screwdriver.
Now you need to determine the cause of the failure. There may be several of them:
- Faulty brushes. If they are worn out and do not reach the anchor, they should be replaced.
- Faulty retractor. In this case, replacement is necessary.
- Knocked out guide bushings also require replacement.
- The cause of the breakdown may be a burnt-out winding or a burnt-out armature. It is difficult to repair such a malfunction at home; it is better to contact a specialist.
The wires leading to the starter need to be cleaned and lubricated, and also checked to see if current is flowing through them. If necessary, it is better to replace the power cord, because it can cause poor operation of the device.
If the cause of the breakdown is identified and eliminated, then the next step is to install the starter. You need to do this in reverse order:
- Connect the wires first, then mount the starter and tighten the three bolts;
- screw back the rod that covered the starter outlet and the engine protection;
- connect the battery and check if everything works.
Recommendations for using the starter
To make your starter last longer, you need to follow a few simple recommendations:
- If you turn on the engine, then this should be done no longer than 15-20 seconds, and repeated no earlier than after 25-30 seconds. If after three times the engine does not start, you need to check the ignition and power system. If such faults are detected, they must be corrected.
- Do not use the starter to move the vehicle. This puts a lot of stress on the trigger mechanism.
- If you have successfully started the engine, turn off the starter, as the overrunning clutch may jam due to frequent rotation of the starter drive gear by the flywheel.
Anyone who has already removed and installed the starter at least once is unlikely to want to do it a second time. Although this work is not difficult, it requires a lot of effort and sometimes money. Follow these simple rules to avoid such breakdowns.
Where is the Niva Chevrolet hydraulic chain tensioner located and its malfunctions