Xenon is an inert gas with the characteristic feature of becoming a powerful source of light radiation when an electric discharge is passed through it. Car head optics equipped with xenon lamps provide bright light, close in spectrum to daylight. High light output allows the driver to see the road well, resulting in less fatigue when traveling in the dark. You can connect xenon yourself.
Have you ever needed the help of a car lawyer?
Not really
More details about connection
The choice of xenon lamps is complicated by the variety of commercially available modifications produced by different manufacturers. It is necessary to understand the principle of operation of these light sources.
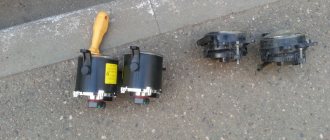
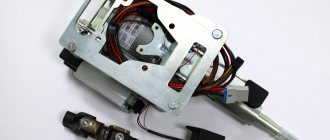
Xenon lamps are equipped with ignition units, fasteners and connecting wires.
The ignition unit is an electronic device that supplies the necessary voltage to light the xenon lamp.
The service life of xenon depends on the quality of manufacture of this element.
The brightness and color of light radiation is determined by its color temperature. It is indicated by a special marking on the product body.
The emission spectrum of a lamp with a color temperature of 5000K, approaching white, is best perceived by human vision. Xenon optics installed by car manufacturers have a color temperature from 4200 to 5000K.
The selection criterion for a specific car brand should not be the highest price of xenon. It is not always justified. The design features of the vehicle should be taken into account.
If the electrical part does not provide the ability to control the voltage of the on-board network, there is no point in buying an ignition unit that takes this function into account.
If you have free space in the engine compartment, you do not need to purchase thin ignition units, which are significantly more expensive than standard ones.
Bi-xenon connection diagram with a common relay for two lamps
Having such a kit, it is advisable to carry out the mechanical part of the installation process for both headlights at once. Electrical work should be carried out in full accordance with the drawings developed for this option.
Analyzing the connection diagram of this bi-xenon kit, it is easy to identify the main element - the common relay. This is where the electrification procedure should begin:
- secure the positive terminal to the battery;
- connect the three-pin connector to one of the standard power sockets for H4 halogen lamps;
- The 12 V voltage supply blocks coming from the relay are connected to the corresponding connectors on the ignition unit.
The following procedures are carried out in relation to each lamp:
- connecting high-voltage contacts coming from the ignition unit;
- connecting the screen position control connector output from the relay;
- securing the negative terminals to ensure the closure of the screen magnet control circuit.
How to connect?
Almost every motorist can install xenon on their own. You just need to follow the instructions and carefully observe safety precautions, since lighting the lamp requires a very high voltage, reaching a value of 23,000 V.
What will you need?
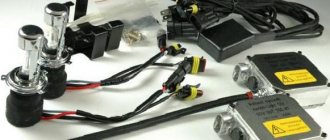
To connect xenon you need:
- ignition blocks and mounting wires included with the lamps;
- screwdrivers with flat and Phillips blades;
- clamps and tape.
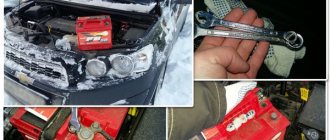
You may also need a cordless drill with a drill, ring or open-end wrenches.
Connection diagram
Xenon installation is carried out according to the diagram shown in the figure:
In a simplified way, the procedure is as follows: in the engine compartment, the ignition unit and light bulbs are mounted in their places, after which they are connected with the supplied cables.
Step by Step Actions
Before starting work, you should turn off the power to the vehicle's on-board network by removing the terminal from the battery. Do not touch the surface of the lamp with your hands.
The area of accidental contact should be wiped with alcohol.
Xenon
To remove the old lamp, remove the cover from the back of the headlight.
The halogen light source is removed after disconnecting the wiring.
To perform this procedure, it is sometimes necessary to release the latch.
The xenon lamp is installed in place, the wiring is passed through the cover. It is better to remove the battery, as it will interfere with operation.
The cable from the power supply is connected to the installed lamp.
The wires coming from the lamps are passed through the holes made in the headlight covers. They are cut into the rubber plugs and drilled out if the lids are made of metal.
Then the ignition unit is installed. To prevent tension on the wiring, it is better to place it close to the headlights in a place where moisture and dirt do not penetrate. For additional protection, this unit should be wrapped with tape or tape.
The block can be secured with screws, clamps, or wide masking tape.
Then the wiring connection is made to prevent error indicated by different colored markings.
The xenon connection in the second headlight is carried out similarly to the described circuit.
If the car is designed with an on-board computer, the ignition unit should be connected via a relay that stabilizes the load on the network during the ignition and glow of the xenon light source.
Otherwise, the monitor will report an error.
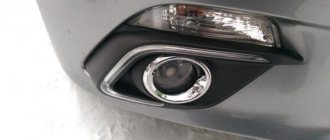
Xenon in PTF
The fog lights are equipped with xenon lamps marked 4300 and 5000K. These color temperature indicators provide good visibility on wet asphalt and in thick fog. To connect xenon to the PTF, you often have to remove the front bumper.
To do this, the fasteners of the wheel arches and bumper are unscrewed.
Xenon light sources installed in the fog lights are connected to the ignition unit and the vehicle’s on-board network.
Bixenon
A design feature of bi-xenon lamps is the presence of an electromagnet. It allows you to form near and far beams of light. In addition to the lamps, ignition unit and connecting wires, the bi-xenon kit includes a controller.
Connected to the lamp, the controller is connected to the battery and ignition unit. Its functional purpose is to stabilize and control the voltage in the vehicle’s on-board network when bi-xenon light sources come on and glow.
The bi-xenon connection diagram is shown in the figure:
The fundamental difference between the installation process of Bixenon and Xenon lamps
For bi-xenon lamps, the connection diagram is a little more complicated due to the presence of an additional high beam mode.
Since the latter is activated not by igniting the second filament, but by moving the metal screen, the lamp control algorithm is slightly adjusted by additional wiring (Note: you can read about the specifics of connecting Xenon lamps here). In a more approximate format, the feature of the scheme is as follows:
- “+” and “–” are sent to the ignition unit when the low beam is turned on;
- When the high beam lighting is activated, “+” is sent to a device that changes the focus of the light.
The connection can be made according to one of two scenarios, the choice of which determines the type of kit:
- with a relay for each lamp or without an electronic key at all;
- with one common relay for two lamps.
Possible difficulties
Headlights designed to operate xenon lamps are marked with the letters DCDR or DCR. If gas-discharge lighting sources are installed in headlights that are not intended for them, difficulties may arise when traffic police officers stop the car.
Such actions are punishable by a fine or even deprivation of a driver's license. You can avoid administrative liability by installing washer nozzles and a light beam direction corrector on the head optics. It is best to install headlights with appropriate markings; in this case, the traffic inspector will not have a reason to draw up a protocol on the violation.
What is bi-xenon
A conventional xenon lamp is a single light source that can work either on high beam or, as is often the case, on low beam. Bi-xenon lamps are universal - they can switch, turning from a high beam source to a low beam source, and vice versa. That is, one lamp replaces two.
How it works
It would seem, what is there to find out? We installed two xenon flasks by analogy with two spirals, like in a halogen lamp, and that’s all. But there is only one bulb in the bi-xenon! Let's take a closer look at the bi-xenon bulb.
How is it different from bi-xenon lenses?
Very often bi-xenon is confused with bi-xenon lenses. These are completely different devices! Let's take a look at the photo of the lens. Which is better - bi-xenon or bilens?
It is difficult to answer this question unequivocally. If we already have a special headlight for xenon, then it’s enough to buy bi-xenon, and the issue is resolved. If there is no headlight, then, of course, a lens is more convenient and cheaper - you can simply embed it into any standard headlight, which will act as a protective casing and nothing more.
If you entrust the connection to professionals
By entrusting the installation of xenon to car service technicians, you can avoid breakdowns of expensive equipment and injuries that are possible due to errors in independent work.
It is permissible to connect xenon to warranty vehicles by certified specialists.
How to find a good service?
Many car service stations charge higher fees for xenon installation. To prevent financial losses, you need to analyze the prices for the corresponding installation work of car services in your region. Reviews of car owners who have installed xenon in a certain workshop will help you find a good service.
Estimated cost of work
Installation of xenon on various car models takes from 40 minutes to 2 hours, and the price varies accordingly.
It depends on the design features of the vehicle.
The estimated cost of installing xenon in head lighting and fog lights in some cities is shown in the tables:
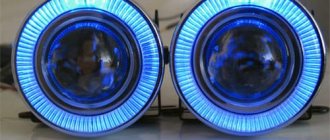
Why are lenses needed in automotive optics?
It is no secret for car owners that standard lighting quite often does not cope with the task, the headlights shine dimly, and the light beam scatters and blinds oncoming cars more than it shines on the road. It is especially difficult to illuminate the path when entering turns, but in lenses the light is concentrated into a beam, it is more directed.
A lensed headlight is a separate round lamp in the form of a bulb; it has its own housing, reflector and the lens itself. This design is built into a standard headlight; often the optics are equipped with an automatic corrector. But lenses from the factory are rarely used together with halogen lamps; standard light bulbs emit a lot of heat, which causes the lens bulbs to become very hot and deformed.
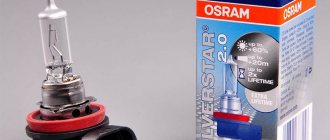
Xenon Manufacturers
Before we tell you how to install xenon in headlights yourself, we offer an overview of manufacturers of pre-start units and gas-discharge lamps:
- The best ignition units are Osram, Hella, Philips. Products from Bosch and Matsushita are almost as good as them, and they are also easier to install. PIAA blocks are of high quality, but are more expensive than others.
- Xenon lamps from Osram and Philips are considered the most reliable (xenon replacement is extremely rare), but the choice of bases from these manufacturers is limited. Korean companies Eagleye, Alpha Optima, ZZX Pro, Berus produce high-quality lamps with any sockets.
Rating of the best H1 xenon kits
Below are descriptions and technical characteristics of the most popular H1 xenon kits.
Xentec xenon kit (H1, 4300k) dc-h1-4k is a popular and affordable set of lighting equipment for cars. It is small in size and easy to install.
Xentec (H1, 4300k) dc-h1-4k
The LEDO PREMIUM H1 6000K xenon kit has a luminous flux increased by 10-20% and has stable electrical characteristics. When turned on, the luminous flux quickly reaches its operating parameters.
LEDO PREMIUM H1 6000K
The SOLAR H1 6000K 35W Ballast xenon kit (Solar 4160) is used in cars equipped with separate optics. The ignition unit is protected against short circuit, connection without load and reverse polarity. Can be installed as low and high beam lamps. Emits bright white light with a blue tint.
The Guarand 55w, 9-16v H1 4300k xenon kit has improved focusing and increased brightness. It is characterized by quick start-up and can operate over a wide range of ambient temperatures (from -50 to +105°C). Protected from moisture and dust, withstands vibrations and other external mechanical influences.
Guarand 55w, 9-16v H1 4300k
The H1 Michi 35W 4300K xenon kit is equipped with high-quality light sources and ignition units, and is ISO-9001 certified. The manufacturer guarantees trouble-free operation of 99% of ignition units and xenon lamps throughout their entire service life. Features reduced electromagnetic radiation.
H1 Michi 35W 4300K
The table shows the technical characteristics of all the lamps considered.
| Name | Base | Supply voltage | Power consumption | Light flow | Glow temperature |
| Xentec (H1, 4300k) dc-h1-4k | H1 | 13.5 V | 35 W | 2600 lm | 4300K |
| LEDO PREMIUM H1 6000K | H1 | 12 V | 35 W | 3200 lm | 6000K |
| SOLAR H1 6000K 35W Ballast (Solar 4160) | H1 | 13.5 V | 35 W | 2800 lm | 6000K |
| Guarand 55w, 9-16v H1 4300k | H1 | from 9 to 16 V | 55 W | 3200 lm | 4300K |
| H1 Michi 35W 4300K | H1 | 12 V | 35 W | 2800 lm | 4300K |
Preparatory stage
A motorist should make changes to standard optics only after obtaining a basic understanding of the operation of lighting fixtures in a vehicle. And first of all, you should get acquainted with the fashionable devices called xenon. The name of modern popular optics comes from the name of an inert gas, which is easily found in the periodic table of Mendeleev. The lamp uses an inert gas called xenon, which begins to emit light when an electric current passes through it. In Russia, installing xenon yourself is not prohibited, unlike most European countries, where there are a number of restrictions on certain types of optics.
Among the special parameters of xenon, the following properties should be noted.
- Xenon is characterized by high lighting efficiency, so after one trip in a car with such optics, the motorist will not want to get behind the wheel of a car with conventional lighting devices.
- The high power of xenon lamps, when installed correctly, does not harm oncoming drivers. Xenon does not blind if the headlight angle corresponds to the factory settings. If you have headlight range control and cleaners with washer, the road will always be well lit.
- The service life of xenon devices is approximately 10 times longer than that of traditional halogen lamps.
Legal requirements
And what color should the glass be? On both headlights 1, such a contact is connected using a wire into a circuit, after which it is connected to ground or to metal parts of the car body by screwing it to the body with a bolt. Such areas can be identified by special plugs installed in the area of the front bumper. Fog lights on a car are designed to improve road illumination during fog, snowfall, and heavy rain.
Naturally, this does not affect the range of light in any way, but fog lights will be useful to get a complete picture of the condition of the road surface. They will simply create a white wall, and the brighter the light, the stronger that wall will be. Here you can see the wires that were installed at the factory; they are connected under a nut that can be opened with a key. To make the adjustment, you will need not only a flat surface, but also a place with a solid fence or wall in front of it. We screw the relay to the car body, under the same bolt we secure its mass, having previously cleared the contact area of paint: We connect the power wires to the fog lights, and also connect the ground next to the fog lamp in a convenient place, ensuring reliable contact with the car body: End result: Secure the fog lights You can do this by drilling a hole in the metal insert next to the bumper mounting bolt.
This way you will significantly increase the service life of your headlights and ensure their high safety when driving on rough terrain. They are laid along the left wing, from under the instrument panel, in the same way as the main wiring is laid.
Tips and recommendations, nuances, secrets
You should not buy a cheap version of xenon bulbs for your car. When driven hard, they begin to become loose and then simply crack. The mechanism is no longer able to hold the light bulb. It’s easy to check whether the mechanism in your car is loose or not; to do this, you need to drive onto an uneven surface and you will immediately see how the xenon behaves. If you are not confident in your abilities to independently replace xenon bulbs in a car, you should contact specialists at a car dealership who will do it efficiently, but not less than 8,000 rubles. It is worth choosing high-quality light bulbs, otherwise you will have to spend money on repairs later.
Changing the technical characteristics of headlights
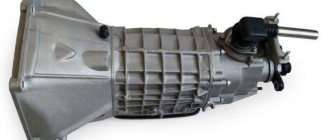
Discharge xenon lamps began to be used in automobile headlights in 1992. They have greater light output and lower energy consumption than halogen and incandescent lamps. However, due to the design features of xenon lamps, they cannot be used in headlights designed to install traditional types of lamps.
Therefore, the current legislation of the Russian Federation provides for administrative liability for the use of external lighting devices that do not meet the requirements for the design of the car.
Depending on the consequences of illegal use of xenon lamps, the car owner may also bear criminal liability.
Correction for reverse polarity
Reverse polarity of the base connection is implemented in many cars. The word “reverse” means that “plus” is applied to the common contact of the lamp (see figure).
The "reverse polarity" option is shown on the right
If the car uses reverse polarity, buy a universal bi-xenon kit:
Kit with two connection options
As you can see, the kit is equipped with an inverting jumper, as well as a control diode. When carrying out installation, follow the recommendations:
- If switching between modes does not work, change the polarity of the diode;
- If the switching does not work correctly, install a jumper.
No further explanation is required here. Happy installation!
General points
A feature of headlights with lenses is that the flow of light is “cut”, due to which the direction is adjusted.
The rays pass only along the horizon and are not transmitted vertically. The design of headlights with lenses consists of separate blocks. This:
- headlight itself;
- reflector;
- xenon lamp.
The lens is used to focus a beam of light directly onto the road, and this is its main function. Vehicle registration certificate? Using headlights without lenses is considered illegal.
To ensure that the beam of light is cut strictly vertically, special magnetic “curtains” are used. It is possible to install automatic headlight adjustment.
Initial data
Drivers resort to such tricks in order to improve the appearance of the car and its performance, or to achieve high-quality lighting.
Pros of using lensed headlights:
- increasing the factory characteristics of the vehicle;
- improving the appearance, “tuning” the car;
- high functionality and durability.
However, it should be noted that there are also disadvantages. Installing lenses with xenon lamps in artisanal conditions is considered illegal.
After the lamps are installed, they need to be adjusted correctly. You should entrust the work of installing headlights and lenses to an experienced car service technician.
Why is it installed?
Drivers resort to installing xenon lamps for several reasons:
| For vehicle tuning | Xenon headlights look beautiful, and when installing lenses you can get the effect of “angel eyes” - a rim of LEDs is installed around the lens. It should be noted that tuning is possible using halogen lamps |
| Improved luminous flux | Lenses can be installed together with xenon lamps. As a rule, installation is carried out at special repair stations that have a certificate. Xenon lamps are supplied complete with lenses |
| Factory settings and lamp replacement | On some car models, lenses with lamps are installed at the factory as standard. As a rule, these car models are very expensive, as is a separate package for them. Headlights in modern cars are separate computer systems that have many functions - turning lights, changing the angle of illumination |
The main reason why drivers resort to installing lamps is tuning and improving the appearance of the car.
However, if only tuning is required, you can install lenses on the car on halogen lamps. The luminous flux in this case does not improve.
Often, drivers install lenses with “angel eyes”. It should be borne in mind that lensed optics are not only a decoration for a car. It is necessary to install lamps with lenses to improve any characteristics.
Car service technicians offer a choice - installing lenses with halogen or xenon. The second option is the most preferable due to the fact that the glow of xenon lamps is stronger, especially if a headlight with a reflector is used.
In addition, factory cars most often have halogen lamps with lenses, which allows the light beams to be focused.
Installing lenses requires serious equipment. In addition to the lenses themselves, the headlight must contain sensors, the operation of which allows you to automatically adjust the angle of light.
This is a safety requirement, and violating it is comparable to violating the law and traffic rules. This equipment is very expensive, so it is used only in cars with the maximum configuration.
What is regulated
A traffic police officer has the right to remove such headlights, and the driver will have problems when passing a technical inspection.
To obtain permission to install headlights, you should contact a certified organization. Please note that you may need permission from the traffic police and a complete replacement of the headlights.
Regulatory acts:
- UNECE Regulation No. 99.
- Code of Administrative Offenses - Federal Law No. 195. Article 12.5.
- GOST standard R.41.99 - 99.
- Explanations of the Department for Road Safety dated February 20, 2010 “On the use of xenon headlights.”
These regulations are applied by both drivers and traffic police officers who check cars and seize headlights.
Installing a new module
To carry out legal installation, it is better to purchase a good legal module and install it. For example, headlights from Hella promise to work well, but they must be of the second generation, they have wide lenses. Their designation is Lens G2, they are installed standard on the BMW E60, that is, the quality is excellent.
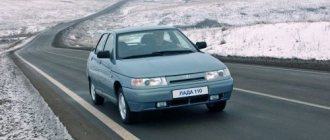
However, there are slight differences with those installed on the VAZ 2110, so they will need to be slightly modified.
You will need 2 pieces:
- Hella lenses;
- Ignitor;
- Ignition unit;
- Bi-xenon lamps.
The price of this kit, provided that used lenses are used, will be about 3,500 rubles.
Finalization and installation process:
- We change the seat intended for the standard Kirzhach module under Hella;
- We connect the wiring of the bi-xenon lamps to the standard one - everything here fits and matches;
- Install a new module;
- We fix the ignition unit in a way that is convenient for you (there is enough space).