Bass attracts not only ordinary people, but also musicians, because its main feature is the sensations received by the whole body. Regular home computer speakers do not reveal the full potential of low-frequency sound. This is why the subwoofer was invented. Today they are quite common: home cinemas, systems embedded in cars, concert venues.
Security measures
Nuances that must be taken into account when installing and connecting the device:
- The use of non-working tools or malfunctioning devices is not allowed.
- When working with piercing and cutting objects, you must follow safety precautions. The wires on power tools must not be damaged. The plug from a drill or jigsaw fits into the socket easily and smoothly.
- Before performing the task, you need to make sure that the car’s battery is disconnected. This will prevent damage to the speaker system.
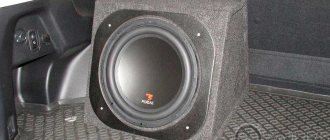
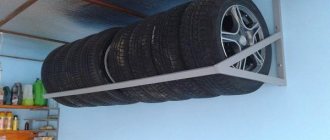
Auto subwoofer
Are you interested in a car subwoofer? Then keep in mind that the choice of location for their implementation is not limited to the trunk or directly next to the driver's seat.
Let's talk about trunk space. There is one caveat: this arrangement takes up quite a bit of free storage space. But if you take into account the location under the driver’s seat, there is a significant risk of damaging the subwoofer with your feet.
It is also worth focusing on one very significant point, namely: you cannot do without the mandatory effect of masking noise in a cramped car interior.
Due to this factor alone, almost every car subwoofer is primarily optimized for bass.
The subwoofer opens the curtain on a whole dimension of the musical world for us! I think you have noticed before how different the sound can be.
For example, remember the thin, weak, melodic sounds from home acoustics. Do you remember? Now, for contrast, imagine the same composition, only if it is played in a concert stadium, where powerful bass rumbles from large speakers, making you feel it in your body!
A good subwoofer setting adds depth to the music being played and emphasizes the beauty of the low frequencies. In this situation, low waves will not dominate, and the person listening to the composition will be immersed in the overall picture.
Making computer calculations
Quite an important part of installing your own subwoofer. You should not rely one hundred percent on the devices and tools that you purchased. To be completely sure and confident that your home theater is working properly, you need to make preliminary computer calculations.
Computer programs do not provide for non-trivial solutions and errors that are typical for humans. This eliminates almost all risks and the possibility of error.
JBL subwoofers often use a computer plugin called JBL SpeakerShop. A fairly high-quality program that has wide functionality and runs smoothly even on the weakest computers and laptops.
Periodically, it is worth installing such software and checking the operation and functioning of all components of speakers and subwoofers.
Filters
Yes, installing filters is not a necessary procedure if you are going to use the subwoofer in a country house, where no one will hear and you will not disturb anyone. In addition, filters prevent certain sound defects caused by excessive bass or too loud sound effects.
Subwoofer filters are a fairly affordable and inexpensive accessory that almost everyone can afford. Similar items are sold in a special themed music equipment store.
If there is no such store in your city, then try to find music filters in an electrical and computer instrument store.
Filters are necessary for the proper functioning of a homemade subwoofer.
: Create the front wall
Once you have stretched the cotton fabric over the back of the hull, you need to add a thick layer of fiberglass to finish the hull. The front is very flimsy at the moment as it is only supported by dowels and glue.
To make the subwoofer strong, you need to coat the cotton with resin. Use a brush and make sure the cotton is completely saturated. There is no need to coat the inside radius of the ring with resin as this will need to be cut out.
Once the cotton is completely dry, you can begin layering the fiberglass as before. Remember to go over the edges of the front and roll along the sides to seal the sides of the case.
I would recommend using the same number of layers as for the back of the case. Use a roller to smooth out bubbles and ripples.
How to make an active subwoofer with your own hands: diagrams and drawings
The design of an active acoustic speaker, in addition to the loudspeaker, includes a ULF. This device allows you to send a weak signal from the linear output of any signal source.
The design of the speaker can be any, but when calculating the volume of the box, it is necessary to take into account not only the space occupied by the speaker, but also the dimensions of the amplifier.
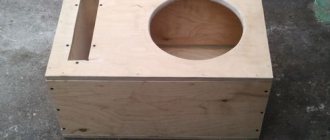
Box
To create a subwoofer manually, you need to: draw a drawing, prepare building materials, and also acquire tools.
The drawing can be either one drawn by hand on paper or constructed in a specialized computer program, with basic dimensional parameters.
The materials you will need are plywood or MDF, a copper wire for connection, a terminal block and self-tapping screws with glue.
The tools will be: jigsaw, compass, pencil, screwdriver or drill.
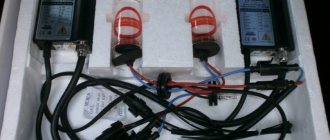
Amplifier
How to choose an amplifier? The Internet is full of conflicting information, for example, it should be less powerful than the loudspeaker, equal to or greater. Having understood the issue, it became clear that a good solution would be to choose an amplifier 1.5-2 times higher than the rated power of the subwoofer.
What about mechanical damage? This can happen, however, if you do not abuse the speaker by abusing maximum volume and “infra-low” tracks, then it will last a long time.
Speaker
When selecting a loudspeaker, it is necessary to approximately estimate the required power of the bass amplifier. The selected power of the head depends on it. In addition, an important characteristic is the resonance frequency (optimal is from 25 to 40 Hz). Speakers for the low frequency channel can have coil resistances of 2, 4 and 8 ohms.
A coil with a resistance of 2 Ohms requires a special amplifier, because All channels of the amplifier (with a bridge connection) will receive 1 Ohm.
The optimal resistance will be 4 ohms, both for home acoustics and for a car low-frequency channel.
Each loudspeaker has its own amplitude-frequency response.
Accurate calculations of the acoustic column eliminate nonlinearities and smooth out waves.
Since any speaker for low-frequency waves generates a wide range of frequencies, a passive LC filter is installed at the input of the speaker system for low frequencies, which greatly limits frequencies that cannot be reproduced with a subwoofer.
Column
A good choice would be medium form factor speakers made in a closed circuit (or with a bass reflex).
When you choose a subwoofer, focus your attention not on volume (after all, even a regular subwoofer has a decent headroom), but on the authenticity of playing the entire low frequency range.
Subwoofer installation
Thanks to the interconnect cable, the subwoofer is connected to the audio signal output point in the car. However, a lot also depends on the car radio.
Some models have a special connector for the low frequency channel. It is marked with the name “SUB”, “SUBOUT” or a similar combination of letters. Under these circumstances, connection is made using a noise-protected cable with “Tulip” connectors.
The second connection method is to use connectors to connect speakers located at the rear of the car. The subwoofer is connected to the car using a bridge circuit.
Often, standard car radios, or home theaters, are equipped with standard connectors. The speakers are connected to connectors “C” and “B”. Here it is possible to connect the subwoofer to the car in several ways. The first option is to use the electrical contacts of connector “B” for speakers located in the rear of the car interior.
The second option is to connect the subwoofer to the “C” connectors, thanks to the “RCA” adapter. If the car subwoofer is located in the trunk, then it is necessary to perform an operation to lengthen the wires.
: First layer
The first layer of resin and fiberglass is one of the most important steps. The first layer forms the shape of the back wall and is the basis for the body. Apply the fiberglass and resin slowly and be careful.
Mix the epoxy resin as directed and apply a thin layer of it to the tape to give the fiberglass something to grab onto. Attach the fiberglass to the surface, then saturate it with resin. You can use a small paint roller to smooth the edges and remove any bubbles. Leave the resin to dry according to the instructions until you have a hard, uniform shell.
Car subwoofers
As already partially mentioned earlier, subwoofers are used not only for home theaters and music studios. Some drivers who lack music and drive install powerful speakers, speakers and subwoofers in their car in order to listen to music loudly.
If you are one of these people, then you should remember that you can only play loud music during daylight hours, so as not to disturb the people around you. You need to remember not only about yourself.
Antiacoustics
This is a very important part when arranging a home theater and a subwoofer in particular. You need to create excellent anti-acoustics, especially if you do not live in your own house, but in an apartment building.
Neighbors may complain about the loud noise, and they have a right. Create high-quality sound isolation and watch TV shows and movies, listen to music as much as you want.
The first thing you need to stock up on to create proper sound insulation is special acoustic foam. This is a fairly popular material that musicians regularly use to decorate their home music studios.
It is characterized by high efficiency and low cost. You can find soundproofing foam on various Internet resources from third-party manufacturers, then the price will be even lower.
You can also upgrade the existing walls in your home so that they add anti-acoustics and sound insulation. There is a special ceiling shape design that cannot be installed at home, but if you spend money and order the design from professionals, you definitely won’t regret it.
Subwoofer design
The subwoofer has different types of devices:
- Closed box. This type is more melodic, because it has rather filigree and calm waves of low frequencies, increasing the frequency range of the home audio system.
- Box with bass reflex. A bass reflex is a hole with a tube leading inside, the dimensions of which are calculated in a special way. It must resonate with the loudspeaker at a certain frequency. This modification increases the efficiency and increases the frequency range. Perfect for rock lovers and for watching movies or TV series.
- Passive emitter. Modification of the bass reflex, only instead of a hole there is a diffuser. Looks like a fusion of the two species described above. At the same time, the melodic and nimble bass produces good results with a medium speaker and in an oversized housing.
- Bandpass. Inside the box there is a partition separating the two areas, and a loudspeaker is embedded in it. It has a high efficiency and protects the loudspeaker from external factors.
- Horn subwoofer. They are used: at concert venues and large theater halls. The horn allows you to purposefully direct the bass wave over a considerable distance.
A very important detail! The cone material plays a very important role in the sound of the subwoofer.
Imagine the sound of a paper diffuser, it is soft and melodic, while a metal or synthetic one has a sharper and more elastic sound!
How to increase the rigidity of the box?
- The first, the simplest and most obvious. This is the thickness of the material, the thicker the material, the greater the rigidity. When making a subwoofer, we recommend using materials of at least 18 mm, this is the golden mean. If your subwoofer has a power of more than 1500w RMS, then it would not be superfluous to choose a material thickness of 20 mm or more. If you have difficulty finding thick-walled materials, you can use the following recommendations.
- An option that will add rigidity to your box is to make a double front wall. That is, the front part in which the speaker is installed. This part of the subwoofer is most subject to stress during operation. Therefore, having a material width of 18 mm, making the front wall double we get 36 mm. This step will significantly add rigidity to the box. You should also do this provided that your subwoofer has an RMS (rated power) of more than 1500w. If you have a subwoofer with a lower power, for example, 700w, the front wall can also be made double. This makes sense, although the effect will not be very large.
- Another tip is to use spacers inside the subwoofer to add extra rigidity. This works especially well when the subwoofer has a large volume. Let's say you have two 12-inch subwoofers (speakers) in a box. In the middle, the rigidity of the box will be the smallest due to the large area. In this case, it would not hurt you to strengthen the structure and install a spacer in this place.
That's all we wanted to tell you about materials for the subwoofer. If this article helped you, please rate it out of five below.
Do you want to try to calculate the box yourself? Our article “Learning to count a subwoofer box” will help you with this.