Against the backdrop of numerous negative statements about the low quality of sound insulation of Russian-made cars, I decided to independently assess whether sound insulation of a VAZ is necessary with my own hands in addition to the standard one, and if so, what needs to be paid special attention to.
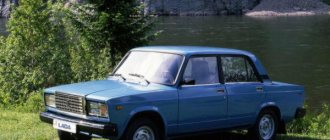
As a “guinea pig” I used my car (production April 2011), which is a VAZ-2131 car, or rather a modification of this car from PSA “Bronto” (production of special cars) - Lynx 2. It should be noted that the base model The Niva in the VAZ family is, by definition, one of the noisiest cars, which is due to its design features.
Let us note the most significant of them:
- Firstly, the car body is two-volume. The first compartment, the engine compartment, is like the rest of the car, but the passenger and cargo compartments are combined, which objectively adds noise.
- Secondly, the 4x4 wheel arrangement (permanent all-wheel drive) requires the use of additional units, such as a transfer case, a reduction gearbox, and the presence of two driveshafts (for each axle), which is also a source of additional noise and vibration.
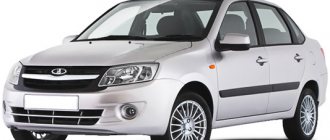
- Thirdly, improvements from PSA “Bronto”, related primarily to the completion of the suspension, its strengthening and lifting, the use of tuning wheels, increased wheel size 235 × 75 R15 (i.e. 29 inches), installation of wheel differential self-blocks in axles — all this also does not help reduce noise levels. Thus, the VAZ 2131 car is the most problematic in terms of noise. Moreover, I think it will be interesting to see what features the Niva’s standard sound insulation has and how they affect operation. A photo of the “experimental” car is presented below.
The first impressions from operation, not only personal, but also from acquaintances and relatives, who for the most part “ride” in foreign cars, are that the car is relatively quiet, and due to the increased size of the wheels, it comfortably “swallows” bumps and potholes. During further operation, the following negative aspects emerged:
- When driving on the highway, even with the windows closed, the wind blows through the cabin, which is not only unpleasant for passengers, but also makes one wonder about the quality of the build.
- When traveling in hot weather, despite the air conditioning, the car interior cools quite slowly, even with a considerable discount.
- The traditional drawback is plastic, or rather, not so much the plastic itself as its poor-quality fastening.
Soundproofing "Niva": let's define the terminology
Taking into account the above, suspicions arose (see paragraphs 1 and 2) that the operation of the car in winter will be similar to summer, but exactly the opposite, the stove will warm up the interior for a long time, and it is not a fact that it will be able to provide comfortable driving conditions. temperature in the cabin. That is, for me personally, the issue of the quality of sound insulation of a car has transformed into the problem of thermal insulation of its interior. Although these things are interconnected.
The soundproofing of the Niva gave me the following considerations:
- Firstly, the “working” noise of a car largely carries useful information about the correct operation of the car’s components and assemblies, operating mode, etc.
- Secondly, useful noise from outside supplements information about the road situation and helps the driver make the right decision (overtaking, honking a horn when approaching an uncontrolled crossing, etc.).
- Thirdly, our psyche is designed in such a way that a person gets used to regular (habitual) noise and does not notice it. But if a new (unusual) noise appears or the one to which he is accustomed changes, this is instantly reflected in perception as a new factor to which an appropriate reaction is required.
The only exception, which is impossible to get used to, is the noise (more precisely, creaking) of plastic panels (rear shelf, door panels, dashboard).
The nature of this perception is due to the fact that at the physiological level the creaking of panels lies in the frequency range that is best perceived by human hearing, and at the psychological level the creaking is almost always random (depending on road conditions, speed, number of passengers, etc.). So it turns out that it is impossible to get used to it, and the sound itself is unpleasant.
Thus, eliminating defects in the installation of plastic parts is a priority when creating comfortable conditions in the cabin. This, or something like this, was my reasoning before the experiment began. Now I’ll go through the order of inspection and execution of work.
How harmful is noise?
Noise surrounds us almost everywhere, most often we simply do not notice it, however, increased levels can be harmful:
- Noise is considered to be any extraneous sounds that reach your ears.
- Increased noise irritates and distracts the driver, causing rapid fatigue
- Fatigue and irritation often lead to accidents
- In addition, the driver’s reaction is reduced, which is associated with great risk on the road.
- Prolonged exposure to increased noise leads to a narrowing of blood vessels throughout the body.
- This can lead to headaches and increased blood pressure, as there is an increased load on the heart.
- Prolonged stress on the heart causes angina and even heart attack
- So noise is not just an annoying interruption to conversation or music, it is harmful to your well-being and health.
Standard soundproofing of the luggage compartment
Almost the entire floor of the luggage compartment, including the back of the rear seat, is covered with finishing material such as carpet. The material is quite durable, easy to clean, and looks good. See photo below.
After dismantling the fastening elements from the back of the rear seat and removing the top layer, the following picture opens:
As you can see in the photo above (left), most of the luggage compartment floor is covered with a sound-proofing mat (felt laminated on top with a protective synthetic material) with a total thickness of approximately 15 mm. The photo on the right shows the inside of the mat. As an owner, this only made me happy. After this layer of sound insulation was removed, it turned out that the entire floor of the luggage compartment was covered with mastic, which was used as vibration insulation. Shown in the photo below.
It should be noted that the layer of mastic is not very large, about 1 - 1.5 mm. It covers the entire trunk floor, including under the overhead parts. The rust on the attachment part is due to my own oversight.
Thus, it can be noted that, in general, the factory sound insulation of the luggage compartment floor is made with high quality, using various vibration and noise insulating materials, and is a fairly solid three-layer “pie” (mastic, felt, carpet).
Taking into account the price range of this car, I think that not all budget foreign cars can boast of such insulation.
Now about what I was not happy with in terms of sound insulation in the luggage compartment. In order of importance:
Complete lack of vibration and noise insulation of arches, one of the main sources of noise. The photo below shows painted metal both on the arch itself and on the sides of the body and rear side members.
From the point of view of the effectiveness of vibration isolation of the trunk floor, the use of only mastic in the specified amount is more likely to be an anticorrosive agent than a vibration protection.
The factory-installed sound insulation (felt mat), although it covers most of the trunk floor area, is still not completely.
Based on what I saw (during operation, there seemed to be no obvious need to improve the sound insulation of the floor) I decided that additional sound insulation of the VAZ was required with my own hands. Below I will describe my procedure.
The following insulating materials were used for the work:
- Vibroplast Gold (StP)
- Vizomat MP (StP)
- Accent 15 LM KS (StP)
- Splen 3004 (StP)
- Stroyizol SD 90
- Adgilin.
In addition, the following tools were useful:
- Construction hair dryer (Professional, heating up to 350 degrees C, V = 3 speeds, P = 2.1 kW, U = 230 V)
- Tape measure, ruler, square
- Installation tools: scissors, knife, mounting tool, awl, screwdrivers, wrenches, etc.
Strengthening vibration and noise insulation of the luggage compartment
For this, I used vibration-absorbing material Vizomat MP, with which I covered the entire surface of the trunk floor, as shown in the photo below.
The operating principle of this noise-absorbing material is as follows: firstly, it further enhances the rigidity and weight of the structure itself, which helps reduce the level of vibrations in general, as well as shifting their range to the lower, low-audible frequency range. In addition, it converts vibration energy into heat, that is, the efficiency of this material should be higher than that of factory mastic. Among the features of using the Vizomat MP material, an important detail should be noted: for installation it is necessary to use a construction hair dryer. It is necessary to heat the material until it becomes flexible and elastic. The adjustment of the material to the topography of the protected surface must be done quickly enough, but not at the expense of quality, since when it cools, the material becomes hard and it will not be possible to ensure a tight fit to the surface. In this case, it is possible to reheat it with a hairdryer directly at the installation site. In order for the material to adhere tightly to the surface over the entire area, it is necessary to use special rolling rollers or improvised means. Installing the material to the surface using only your hands will not provide the required quality. For example, I used a beading tool for motorcycle tires (useful where there are very narrow cavities), as well as a rounded wooden awl handle in a vertical position where the areas are small but the terrain is deep, or in a horizontal position on large areas. The photo below shows the tools I used.
Since it is not always possible to install sheets over a large area with a single sheet, sheets with overlapping laying (15-20 mm) were used. In this case, we simultaneously impart additional rigidity to the protected structure, since the joints of the material have double thickness and serve as additional stiffening ribs. The photo below on the left shows the mating of sheets of material with an overlap. In addition, we must not forget that for the maintenance and repair of a car, you cannot seal up those technological holes, hatches, and parts fastening elements that provide access to these works (see photo on the right).
Additionally, I installed sound insulation under the rear passenger seat, where the gas tank is located. The material used was Vibroplast MP. Next, Accent soundproofing with a thickness of 15 mm was attached to it. Below is shown in the photo on the right. The photo on the left shows a section of the trunk floor, which was additionally reinforced with vibration insulation (bottom layer) and sound insulation (top layer).
Instructions
Soundproofing for Chevrolet Niva
Now let's move on to the actual work process. It is extremely important to prepare well, choose the right materials, and then proceed with the operation.
Operation procedure
Began:
- Remove the usual Shumka from the hood;
- We clean all surfaces from dirt and dry;
- We prepare a material that absorbs vibration, for example Visomat MP;
- We lay the material over the entire area of the flat elements between the stiffeners with the first layer of material;
- Next, we prepare another layer and for this, Splen or other construction insulation, again with a layer of film, is suitable;
- Glue the first layer on top;
- Next, we apply a third layer on top of the second - standard noise insulation for the hood.
Hood
Sound insulation usually begins with insulating the hood. The goal becomes:
- Reduce the audibility of a powerful engine in the cabin (improved acoustic characteristics) and outside;
- Protection of the cabin from external noise;
- Thermal insulation of the engine compartment and protection against cold penetration into the cabin.
Chevrolet Niva soundproofing
Noise insulation of wheel arches
As noted earlier, there is completely no sound insulation on the wheel arches on the interior side. On the outside of the arches there is a “liquid locker” anticorrosive installed, which, incidentally, is good noise protection. But this protection from the manufacturer exists as an additional option and for additional money. I performed noise insulation on the wheel arches on the interior side in two layers. The highlights are shown in the photo below.
Vibration insulation on the rear arched side members, which have technological holes, should be done only after complete installation of vibration and noise insulation of the side walls of the car body (trunk). Otherwise, difficulties will arise with installing materials on the side elements of the body.
The photo below shows the appearance of the arch with installed vibration and noise insulation.
Lockers
It would seem that the sound insulation should end in the interior, but no, we recommend not stopping there and gluing the fender liners. If you don't have them, we recommend purchasing them. They are inexpensive, and they will be more than enough use.
We remove the old fender liners and thoroughly wash them from dirt. Over the years of operation, a lot of it accumulates there. After this, we degrease it in the same way as the hood. Now we apply the remaining sheets to them, measure and cut.
Sound insulation glued to the fender liners gives a very good effect. It’s enough to imagine winter tires that make terrible noise on the highway. 60% of sounds come from winter tires, so soundproofing the fender liner is a very useful thing. The material should be glued to the part that faces the car, not the wheel.
After gluing, we install the fender liners in place. If you don’t want to bother with standard fender liners, you can buy a more prestigious set. Fender liners with good sound insulating properties are made of a special fabric that absorbs sounds and impacts of small stones against it. Such fender liners are usually used on expensive cars, but you can make them yourself.
Sound insulation of body side walls
To soundproof the side walls of the body, a slightly different combination of materials was used. In particular, Vibroplast Gold sheets were used as the first layer of vibration insulation; the appearance of the material is shown in the photo below.
The main difference between this material and the previous one is that it is simpler and more convenient to install (does not require heating with a hairdryer), is easier to cut, and requires less effort when adjusting to the mounting plane. The photo below shows the installation of a vibration isolation layer on the side wall of the car body. The presence of unclosed technological holes on the side members (through which there is access to the side wall of the body) makes it quite convenient to install protective materials.
After installing the vibration-proofing material, we install sound insulation. For this I used Accent sheets 15 mm thick. The material is laminated with foil on the outside and has an adhesive layer on the inside, protected by paper. Easy to cut and install.
Among the features of using Accent sound insulation, the following can be highlighted: the mating surfaces of the sheets are attached end-to-end. There is no need to use an auxiliary tool to press onto the plane. After the vibration and noise insulation is installed, the technological holes in the side members can be closed on the side walls of the body. Shown in the photo below.
Vibration isolation of the rear side members of the body
Among the features, the following can be noted: since structurally the side members are located inside the cabin, the second layer of noise and heat insulation was not used. To give additional rigidity to the side members, I used Vizomat MP, which I used to cover the technological holes. The photo below shows the installation of vibration isolation on the rear side members of the car.
Why did you use Vizomat MP and not Vibroplast Gold? It is denser and more reliable. The essence of protecting the rear side members is to strengthen and give greater rigidity to their structure by “eliminating” technological holes.
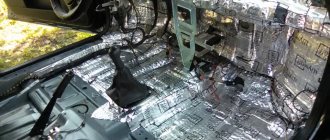
Work in the salon
Soundproofing the Niva in this part is one of the most difficult and crucial moments. It is better to do the work with an assistant. First, unscrew and remove the seats, rugs and floor coverings. Recommendation - it is better to collect the fasteners in one container so as not to lose them, and plug the technological holes to prevent glue from getting into them. Areas with rust are treated appropriately, and the bottom and other areas are carefully washed.
Degrease the surface after it dries. The thickness of the laid vibration absorber is 5-6 mm, the noise material is up to 10 mm. The vibration absorber is laid in a double layer on the wheel arches. They are assembling the interior.
Non-standard approach
After completing all the work on vibration and noise insulation of the floor, body, arches, and rear side members of the luggage compartment, another useful opportunity presented itself when assembling the interior.
Without resorting to special measures, you can easily and simply additionally cover the entire floor of the luggage compartment with a single sheet of building reflective thermal insulation, previously used to insulate the house. Shown in the photo below.
Thermal insulation is simply laid on the trunk floor without the use of glue, in a single sheet cut to the shape and area of the trunk floor. I used reflective building thermal insulation of the Adgilin type with a thickness of 4 mm. The end result is shown in the photo below. If you lift the carpet, under it you can see a layer of thermal insulation, under which there is a layer of “felt mat + Accent”, and under them a layer of vibration insulation Vizomat MP. The design turned out to be compact, dense, multi-layered.
Standard soundproofing of car rear doors
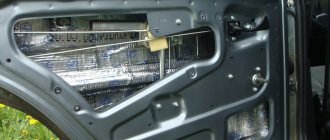
After removing the plastic door trim, you can see what the factory has done in terms of soundproofing the doors.
The photo shows the factory sound insulation of the rear door, or to be precise, its almost complete absence. In detail: the dustproof film (black PE film) is covered in cuts and holes, it is attached to the door with adhesive tape, literally in three places. There is simply no need to talk about quality protection. It immediately became clear why the wind was blowing in the cabin. The vibration protection layer is quite large in area and is applied in the central part of the door. Shown in the photo below.
Conclusion: simple and clear. Sound and heat insulation of car doors is mandatory.
Roof finishing
After dismantling the ceiling cladding, sound insulation of the Niva 21213 and analogues in the roof part is carried out as follows:
- the surface to be treated is cleaned and washed;
- do degreasing;
- stick a vibration absorber, followed by rolling;
- when finishing the roof, it is recommended to use thinner material (2-5 mm) so as not to weigh down the ceiling;
- if you overdo it, the roof of the car may bend into the interior;
- The gluing sequence is similar to the hood treatment.
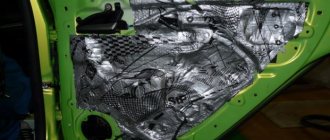
Sound insulation of rear doors
Inside the door along the outer wall you need to install two layers of insulation. For the first layer (vibration insulation) I used Vibroplast Gold material, for the second layer I used Accent noise insulation 15 mm thick in two layers.
Vibroplast Gold does not require heating, is easy to install in cramped conditions, has good protection indicators, but requires the use of a tool to smooth it to the surface. In this regard, it turns out that it’s convenient to use a mounting tool or something similar (pictured below). The main thing is that there are no sharp ends and that it does not damage the material.
Since the doors have a system of rods and drives for locking and lifting the glass, it is necessary to ensure their correct operation during and at the end of installation. Moreover, it is not a fact that if there are no problems when checking manually, then during operation, for example, the doors will also be locked from the alarm. It is imperative to check the operation of the door mechanisms both manually and automatically.
The main stages of the work on soundproofing doors are shown in the photo below.
Of the soundproofing features of the outer wall of the doors, I will note one point. I installed Accent noise insulation with a thickness of 15 mm in two layers, with the second layer covering the joints of the sheets of the first layer. The total thickness of noise and heat insulation was 30 mm.
Next we move on to the inner wall of the door. The main difference between the rear doors and the front doors is that they do not have sound speakers installed. There was no need to take special additional measures to strengthen the speaker seats. We will limit ourselves to only sealing the technological holes in the door (pictured below). The goal is to increase the rigidity of the structure.
Bearing in mind that there was a blow from the doors when moving and not having the desire to return the standard boot to its place, I decided to go the proven route. Previously, when installing a ventilated façade of a house, I had to use Stroyizol SD 90 membrane film as a wind- and moisture-proof material. The thing is quite durable, at least you can’t cut it with a dull knife or tear it with your hands. Since this material was available, I decided to use it as an anther for the door. I made a pattern according to the dimensions of the plastic door panel with a noticeable margin of about 5 cm, with intent. Shown in the photo below.
The installation of wind and moisture protection on the door, unlike the factory one, was done in the following way: I cut holes in the material for self-tapping screws, a door handle, a latch, then coated these places around the perimeter with Energoflex glue for gluing thermal insulation to metal. I installed the windbreak on the door and pressed the material well along all the cut holes. After that, using standard self-tapping screws, I temporarily straightened the protection on the door and coated the entire perimeter with glue. Pressed again. This created an almost windproof door surface.
Before installing the plastic panel on the doors, so that they would rattle less, I weighted them a little with scraps of vibration-isolating materials (Vizomat MP, Vibroplat Gold). Shown in the photo below.
Since I did not find a special material (Anti-creak) at the local car market, the use of a larger windproof film made it possible, when attaching the plastic panel to the door, to ensure its adherence not directly to the metal, but through this film.
After installing the panel, I cut off the excess wind protection protruding along the perimeter and wiped off the glue with an eraser.
Processing procedure
The price of all assembled components is definitely lower than the cost of professional sound insulation services. After all, you still have to pay extra for the work.
By following a certain sequence, following the instructions and adhering to the rules, you will be able to cope with the task yourself.
The procedure can be described as follows:
- Since this is the engine compartment, it also includes the hood. It's better to start with him. First, the structure is removed and cleaned of dust, dirt and rust. Next it is degreased. This needs to be done with all body elements to which Shumka will be glued;
- Surfaces must be as dry as possible. Therefore, do not be lazy to wipe them with a rag, reaching to each cavity;
- Make patterns from cardboard, then cut out pieces of soundproofing material from them;
- First, a vibration-absorbing material is applied to the metal;
- The piece is cut out and applied to the surface, rolling it in parallel using a special roller. You can't just glue it by hand. The quality and effect will be lost;
- Use strictly materials with heat-resistant film, since the engine gets hot, and a product that is not resistant to high temperatures may cause a fire;
- It is definitely recommended to stick a layer of foil. It additionally reflects heat and protects the Shumka from overheating and damage;
- Sound insulation can be glued under the factory Shumka, or completely replaced with madeline;
- When covering the engine compartment, follow the same rules. To remove or not to remove equipment is a purely individual question. It all depends on being able to access the interior panels and bodywork around the engine.
Bimast or Vizomat come first because they act as vibration-isolating materials. You can already use Splen, Madeline or Accent behind them.
If you get too confused, you can even dismantle the engine, tape everything under it, and then put it back in place. But usually this is an unnecessary event that requires additional time and effort. Often it is enough to remove attached and easily dismantled equipment. Since the motor is located in the center, it usually does not interfere with the wrapping.
Have you ever had to carry out soundproofing from the engine compartment yourself and what secrets can you share with us?
Thank you for your attention! Subscribe, leave comments and ask relevant questions!
Subscribe to updates and receive articles by email!
We guarantee: no spam, only new articles once a week!
Niva 21213 is considered one of the noisiest cars of the VAZ family, which is due to its design features.
Sound insulation of the trunk door
The noise and heat insulation of the tailgate was carried out in approximately the same way as in the case of the rear doors. The main stages of the work are shown in the photo below. The first layer was installed with an overlap of vibration insulation, using both Vizomat MP (on open surfaces) and Vibroplast Gold (in door cavities). Shown in the photo below.
Next, based on the installed vibration insulation, I installed Accent noise insulation in two layers, 15 mm each. Shown in the photo below.
Before installing the plastic trim of the trunk door, I covered almost the entire plane of the panel with vibration insulation. This was done because the plastic on the rear door turned out to be very soft compared to the plastic on the rear doors.
As it later turned out, when the car moved over bumps, the layer of vibration material located on the trunk door panel began to come into contact with the same layer installed on the door itself. The sound effect was, to put it mildly, very unpleasant. As a result, in order to eliminate the sound, I had to purchase a thin heat insulator Spleen 3004, since it was no longer possible to install an Accent with a thickness of 15 mm.
As a result, after installing the separation layer, the noise disappeared, and the thermal insulation of the rear door increased slightly. But it was worth the extra cost in both money and time.
Engine insulation
This is the first place to start insulating the Chevrolet Niva. There are several options here.
Available means
Most car owners are trying to save money, so they use various available means, for example, pieces of felt, leftover foam rubber, old blankets, etc. As many years of practice have shown, this method is ineffective.
Special car blankets
They are made from high quality refractory material and are characterized by low cost and fairly high efficiency. In this case, the engine warm-up time is reduced by approximately half.
The most important thing here is the choice of quality products. There have been cases when car blankets began to smoke at elevated temperatures and caught fire. This is basically a cheap Chinese product. High-quality car blankets now cost from 1.5 to 2 thousand rubles.
Professional insulation
Complete sound insulation of the field
Among all materials, they are the most effective. Their main advantage is ease of installation. They are also easy to remove with the onset of spring warmth.
From this group we can highlight several of the most popular materials:
1. "Izolon". It is quite inexpensive and very effective at retaining heat. One square meter of Isolon, depending on the thickness, will cost approximately 50-150 rubles. The quality of this material is kept at the highest level and is often used to trap heat under the hood.
2. "Tiviplen-P". It is classified as a self-adhesive type material. It is based on polyethylene foam. "Tiviplen-P" is a three-layer material. The middle layer is polyethylene foam, and the outer two are the front and adhesive layers. Foil is not used here, since heat is retained perfectly without it. The thickness of the material ranges from 4 to 15 millimeters, and the cost is from 200 rubles per square meter.
Practical observations
Since the back of the “long” Niva is noticeably lighter than the front, the source of noise in the rear of the car always appears a little more noticeably than from the front. Now the situation is completely opposite. How is it shown?
Soundproofing arches (required).
It appears as follows. Previously, when driving through holes and potholes, the sound of the front wheels was first heard (impact). A second later - a similar sound from the rear wheels.
Now, in a similar situation, you can hear noise from the operation of the front suspension, and... silence when driving the rear wheels. Unusual - yes, but clearly and specifically.
Heat and sound insulation of doors (required).
- Differences in door operation. The front ones clap. The rear ones are closed. Additionally, if the windows are not fully closed, the glass of the front doors (when driving over bumps) can rattle, the rear ones stand like a glove, no matter what position they are in.
- The wind protection of the rear doors, in my opinion, couldn’t be better.
- There is practically no creaking from the plastic panels of the rear doors, but the rear plastic shelves cause trouble; they rattled before, but after the work was completed, their sound became simply impossible. The solution was to install plywood shelves, purchased but modified.
General impression. Even partial heat and sound insulation of the cabin significantly improved the comfort and climate in the cabin.
Main conclusions
- Work on noise and heat insulation of cars is justified. In the case of a used car, you can additionally identify and eliminate possible defects (rust, anti-corrosion, etc.).
- These works can be done independently, since no complex or expensive equipment is required (except for a construction hair dryer).
- Independent, step-by-step execution of work allows you to clearly and specifically evaluate the correctness and quality of the work in the process of its implementation and, if necessary, correct, strengthen, or supplement something.
Why is this procedure needed?
The time comes, and most motorists, owners of the VAZ 2121, are thinking about carrying out a Shumka test. There are different things that push you to carry out this particular operation: it could be friends who have carried out noise insulation and shown how effective it is in practice, or the media, television and the Internet, where information about the benefits of such insulation is periodically found.
VAZ 21214 soundproofing yourself
In video reports about this process, the owners actually praise the car for its comfort, explaining this by the sound insulation carried out. There is practically no noise inside the cabin; the music sounds like in a concert hall.
It’s safe to say that a car owner who has soundproofed a VAZ 2121 will receive the following benefits:
- The car will become quieter, if not in the ideal sense of the word, then certainly in a comparative sense;
- The quality of music will increase several times;
- The owner will receive pleasant bonuses in the form of slow cooling in winter and prolonged heating of the interior in summer.
Indeed, the level of noise and knocks is reduced, even when driving over various uneven surfaces. Whether it's a puddle, gravel or railroad tracks, the driver will hardly feel the sound of the wheels.
Soundproofing VAZ 21214 yourself
- How to make a car soundproofing yourself
Having become the owner of an expensive and high-quality acoustic system, the owner of a Niva will no longer be disappointed in the speakers, since he will have the opportunity to “squeeze” everything out of them.
Acoustics in Niva
So, the question – is it worth doing sound insulation – is no longer relevant for many car owners. This is already clear, especially to Niva owners, whose level of standard “noise” is clearly disappointing. The question is: is it worth carrying out this operation on your own?
Putting the car in the hands of a pro is the easiest thing to do in this situation. But where to find them?
The level of repair operations carried out at service stations today, to put it mildly, leaves much to be desired. This will be confirmed by the majority of Russian motorists who have encountered amateurism in repair shops.
But it would be just the right place for the vehicle owner to start upgrading his favorite car. You can wait until you go on vacation or take a few days off and get serious about tuning in your own garage.