Soundproofing Vesta with your own hands is a long process, but its quality can be higher. The factory sound insulation of the Lada Vesta differs from that installed on previous VAZ models - in previous models, drivers did everything with their own hands to get rid of all kinds of crickets and noise. During a quiet drive around the city, noise insulation suppresses extraneous sounds, creating comfort for the Vesta driver. And only when driving outside the city, where the surface coverage is full of surprises and driving speed increases, it becomes obvious that in this part of the Lada Vesta there is still work to be done. The need for sound insulation is recognized by many car owners who often travel in their cars. You can do this work yourself if you know the basic rules - read the article and find out how to make noise in the hood, floor, doors, arches, trunk and panel!
What materials are used to reduce noise
For sound insulation, materials with different properties are used, depending on the place of their application.
Some of them are combined. Conventionally, they can be divided into categories: Sound insulation. This type of material is designed to reduce noise levels. They glue the metal elements of the body: doors, roof, rear fenders. Vibration isolation. Used to dampen vibration coming from the bottom, engine compartment and wheel arches. The base is rubber or bitumen mastic. View gallery
Thermal insulation and noise absorption. These materials are used to insulate engine compartments. Their main property is not only to obstruct the passage of acoustic waves, but also to shield thermal energy
In winter, it is very important to minimize engine cooling time. Each start in cold weather leads to increased wear of the cylinder-piston group, as well as other elements
These materials look like foamed plastic on a foil base. Anti-creak. These materials look like adhesive-based canvas tapes. They are used to glue plastic parts such as shelves, door trims, and instrument panels. Liquid sound insulation. Its use has two purposes: noise elimination and anti-corrosion protection. Used to protect the underbody and arches of cars from the outside. After application, it partially or completely hardens. Sound-absorbing mats. By themselves, they are not able to increase sound comfort, but in combination with other measures they will give results.
Soundproofing the underbody and trunk
Sound insulation of the Lada Vesta trunk and bottom can be done in several ways. The first is when an anti-gravel coating is applied to the outside of the bottom in several layers, which performs the function of noise insulation and anti-corrosion protection - these are polymer substances that are applied with a spray gun. Once cured, they form a thick, porous film and add weight to the car, increasing its stability.
The second option is to apply a thick layer of bitumen mastic from the inside of the body. Bitumen perfectly dampens sound vibrations, increasing the sound insulation of the Lada Vesta. In addition, you can use vibroplast of large thickness - from 5 mm and above.
When gluing the floor, you need to take into account its shape, especially the places where water can accumulate, so the vibroplast needs to be pressed very carefully, without leaving any gaps.
You can use bitumen-based roofing materials. When heated with a hair dryer, they will perfectly take the shape of the bottom without leaving any gaps.
What the reviews say
Lada Vesta SV cross volume.
technical characteristics of Lada Vesta sw cross. clearance of Lada Vesta St. cross Lada Vesta has been in the hands of many journalists who tried to find its advantages and disadvantages. If we talk specifically about sound insulation, one of the first opinions on this matter was expressed by Anton Avtoman in his video review. Even before starting to drive, “playing” with idle speed, he noted the noisy engine and the need to install additional noise.
Autoreview experts checked the sedan more globally. To get an assessment of Vesta's noise insulation, they compared it with competitors: Ford Fiesta, Kia Rio, Renault Logan, Volkswagen Polo. According to test results:
- The Kia Rio and Ford Fiesta received the highest score.
- Volkswagen Polo and Lada Vesta have average noise levels. In terms of acoustic and vibration comfort, both sedans are approximately on the same level, but Vesta’s engine turned out to be a little quieter than that of the German.
- Renault Logan ended up in last position.
Sound insulation measurements by ZaRul magazine.
Up to 110 km/h, the cabin is quieter than in the Ford Fiesta. After installing fender liners with shvi, the noise level becomes at the level of a Skoda Octavia or Ford Focus.
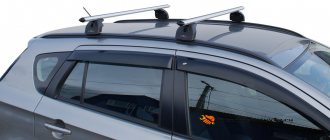
Noise inside the Lada Vesta SW and Lada Vesta SW Cross at a speed of 120 km/h (determined during life tests):
| FORD FOCUS | HYUNDAI CRETA | LADA VESTA SW CROSS | LADA VESTA SW | |
| With box on the roof | 74,4 | 73,95 | 75,7 | 75,6 |
| Without boxing | 69,9 | 69,4 | 71,3 | 71,7 |
| Difference | 4,5 (6,4%) | 4,55 (6,5%) | 4,4 (6,1%) | 3,9 (5,4%) |
Another measurements from ZaRulem magazine (Vesta with CVT):
| Hyundai Solaris | Lada Vesta | Volkswagen Polo | |
| 60 km/h | 64 | 67 | 62 |
| 80 km/h | 67 | 70 | 65 |
| 100 km/h | 71 | 71 | 67 |
| Tires | Kumho EcoWing ES01 | Matador Elite3 | Continental Premium Contact 5 |
Result
Is it worth soundproofing the doors? According to the results of a survey among VKontakte users, about 70% of car enthusiasts noticed a positive effect. About 16% saw little benefit from the intervention, and 14% noticed no difference at all.
The same ratio of votes can be seen in the poll on the website Lada2111.rf.
According to the results of popular research, the effect of soundproofing doors will reduce wheel noise by only 1-2 dB (depending on the car). The only noticeable difference will be in the sound of the acoustics.
To reduce the noise level in the cabin by 2-4 dB (a difference of 1 dB is barely noticeable or unnoticeable at all), it is necessary to approach sound insulation of the car comprehensively, work on all parts of the body (floor, doors, roof, trunk, etc.). ), wheel arches and fender liners. It would also be useful to install additional door seals on LADA cars (instructions for XRAY, Vesta, Granta/Kalina/Priora, Largus and Lada 4x4).
What do you think about the soundproofing of doors on the Lada? Help us also evaluate the standard sound insulation of the Lada Granta or Lada Largus.
Source
Is it worth it to soundproof Vesta yourself?
Brown Angkor Lada Vesta. lada vesta sv cross angkor color
By independently enhancing the original sound insulation, Vesta owners will receive a number of advantages. First of all, get rid of the creaking of all plastic elements. Besides:
- the noise level will decrease under any operating mode;
- it will be possible to drive the car in complete silence and talk to passengers without straining your voice;
- when traveling long distances, fatigue will decrease;
- the sound of the speakers will improve;
- drafts will disappear even at high speeds, due to this the temperature in the cabin will become stable.
The body will also receive additional benefits, since it will be less susceptible to corrosion.
With high-quality insulation, the surfaces are first cleaned, then degreased, and the insulation is properly rolled and a reliable adhesion is achieved that prevents the penetration of air and moisture.
However, self-made shvi also has its disadvantages. Interior elements may be damaged during dismantling and reinstallation. If there is an error with the thickness of the material, some parts will be installed offset. There will be places for condensation to accumulate. Due to moisture, corrosion will quickly begin to develop.
Soundproofing Vesta's interior
High-quality insulation can only be done with experience. It is recommended that the first layer of ShMI—vibration isolation—be ordered from a service center, where the material will be rolled tightly without bubbles or unevenness. It is easier to install the next 2 layers yourself: the soundproofing material is covered with glue. It is enough to clean and degrease the surface, remove the protective layer and press the sheet.
↑ Necessary tools and materials
In order to soundproof any car with your own hands, you need a set of certain tools and materials. The tools that the owner will need mostly include what the average car enthusiast already has.
Before work, the owner of Lada Vesta needs to prepare:
- stationery knife for cutting membrane;
- scissors;
- roulette;
- construction hair dryer;
- stitching roller;
- marker of any color;
- any solvent or degreaser.
As can be seen from this list, improving sound insulation yourself does not require any professional equipment. But the correct choice of materials that make up both the sound and vibration-absorbing layers plays a big role.
Today, there are several largest manufacturers of all kinds of membranes on the market:
- Noise Control - belongs to the middle price segment and is of quite strong quality.
- Deloud is the most expensive manufacturer of sound insulation, whose products for the right price can make a car almost silent.
- Standard-Profi is a fairly common option for inexpensive and high-quality sound insulation.
- Shumoff is the most budget-friendly manufacturer.
- STP is a very common brand of high-quality insulation, costing slightly above average.
The choice between different manufacturers depends on what effect you plan to achieve and what your budget for the work is.
Soundproofing the floor of Lada Vesta
What box is on Vesta Cross 1.8. What gearbox is on the Lada Vesta? how to determine which gearbox is on a Lada Vesta car
If the first two stages could be called light, then soundproofing the Lada Vesta floor will be more difficult. First we need to remove the seats. First we remove the back seat, and then move on to the front. After which you need to remove all the sill trims, the central tunnel with the armrest and other small plastic elements.
After this, we remove the carpet and standard sound insulation. If the factory vibration insulation does not hold up well or peels off, then it is best to remove it. After that, we degrease everything and move directly to the sound insulation itself.
We apply StP Aero Plus material to the metal floor, joint to joint. We will also cover approximately 100% of the area. As usual, we leave the amplifiers open. On top of this material we apply StP Accent Premium 6 mm, also in a continuous layer, or StP Barrier 4 KS. And on top of it all we glue with StP NoiseBlock material 2 mm thick.
At this stage, the wheel arches of the Lada Vesta are immediately soundproofed. Sound insulation is made with Biplast Premium material, which is used instead of StP Aero Plus, and the remaining two layers - Biplast and Premium Accent - are glued in the same order.
After the work has been done, we assemble the interior in the reverse order and move on to the trunk.
Soundproofing and thermal insulation
STP recommends gluing a sound-absorbing material, for example, an accent, on top of the vibration insulation material on the “street” panel (joint to joint, it should cover the maximum area of this surface).
We cover the entire surface area of the door trim, cutting out holes for fasteners and other necessary elements. The recommended material from the Shumoff company is sound-heat-insulating material P4, from STP - Biplast.
The entire soundproofing process is shown in the video:
We cover all wires, rods, places of contact between the door trim and the body with anti-squeak:
Soundproofing of the engine compartment
The factory insulation of the Vesta engine compartment under the hood is quite high quality. If desired, it can be brought to perfection by improving the area on the salon side. Sequence of work:
- First, the dashboards and shields are dismantled, all plastic surfaces are degreased.
- The panel is covered with a 2 mm thick sound absorber. As in other works, it is recommended to heat the sheets (if this is required according to the instructions) and roll them with a rubber roller.
- Next, the area is treated with a sound absorber.
- All removable parts are upholstered in a similar way - the casing, the glove compartment lid.
- It is enough to reinforce the upper part of the air ducts and heater with one layer of sound absorber.
- Panel fastening areas and wire harnesses are treated with anti-creaking.
The procedure will take 10-12 hours.
The price of materials for complete noise reduction will be 15-17 thousand rubles.
It is worth considering that complete sound insulation of a Lada Vesta SV in a car repair shop will cost 7-8 thousand rubles. You can look for a service where some part of the work, for example, the trunk or arches, will be performed as a bonus.
Video of complete noise reduction with your own hands:
Average price for noise protection
The cost consists of the price of materials/work of the craftsman. When you contact a car repair shop, where they will completely insulate the noise of the car, you will spend on average up to 40 thousand rubles. Independent work will require almost half the investment. True, the work will take about five days or more. Some stores sell ready-made sets of materials and tools for work, the purchase of which will completely reduce expenses to 10 thousand rubles. True, in this case it will not be possible to choose better manufacturers, but this option may be suitable for unassuming car enthusiasts.
↑ Procedure
Any work on installing automotive sound and vibration insulation on a car such as the Lada Vesta will include a number of actions that must be performed in a specific order. Usually the work takes no more than two or three days, although auto repairmen sometimes reduce the period to one and a half days.
In order to make sound insulation, you need:
- remove the vehicle trim, providing free access to the metal body;
- metal surfaces are thoroughly degreased using the liquid mentioned above;
- noise and vibration insulation membranes are cut;
- vibration-absorbing material is placed directly on the metal;
- on top of the previous one - a layer of sound insulation;
- for sound insulation - an anti-creaking layer;
- the casing is returned to its place.
Important! The insulation area must be at least 70% of the area of the metal structure of the vehicle. When laying vibration insulation, it must be warmed up well with a hairdryer and the sheets are rolled with a roller so that there are no air pockets and the texture is no longer foil-like
If bubbles still form, they are carefully pierced
When laying vibration insulation, it must be warmed up well with a hairdryer and the sheets are rolled with a roller so that there are no air pockets and the texture is no longer foil-like
If bubbles still form, they are carefully pierced
Unlike vibration isolation, it is important to maintain the integrity of the sound insulation layer. The roll is carefully cut according to the measurements taken
Then the material is sequentially glued, finishing the work by rolling with a roller.
↑ Hood
A special feature of soundproofing work on the hood is that this part of the vehicle does not require large layers of insulators. Just a thin layer of vibration insulation and insulation is enough. Accent material is usually used as the latter.
↑ Roof
Insulating the roof will require first removing the interior sheathing. To do this, you need to unscrew all the parts that are attached to it - these are all kinds of handles and lampshades. Once this is done, the sheathing material can be easily removed.
The main feature of roof sound insulation is the need to use sufficiently dense sound absorbers. The reason for this is that a sound wave “walks” directly under this structural element of the car.
↑ Doors
Doors are one of the noisiest places in any car and Lada Vesta is no exception. Therefore, when soundproofing them, you will have to apply all three layers: protection from vibration, sounds and creaks.
In order to get to the metal frame, the first thing you need to do is unscrew all the handles. As with the ceiling, the interior lining material can then be easily removed. It is worth considering that the door frame is insulated not only by the external metal, but also by the internal rigidity frame.
When gluing insulating material, it is worth considering the need to use solid sheets in places where there are technological holes. The rods, places where the casing is attached and the wires are covered with anti-creaking material. Holes for fasteners are cut out in the sound insulation.
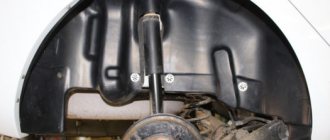
Support bearing knock
Often, car enthusiasts perceive the shock of the shock absorber rod as the knock of the wheel bearing. This can be explained by the design of the rack: two cylinders and a metal rod.
During systematic use, the bypass valves wear out and the strut does not dampen vibrations. With a sharp push, a blow occurs, which is perceived as a knock of the support bearing.
To guarantee that the latter is faulty, it is necessary to conduct a comprehensive diagnosis. It’s not difficult to do this yourself; in the transport position of the car, it’s enough to bleed the strut with a few presses on the car’s fender. After sharp pressure, the car must stabilize on its own, otherwise the shock absorber strut is faulty.
If there are no complaints about the shock absorber, then you are guaranteed to replace the support joint. The process is quite complex and requires minimal knowledge in servicing equipment. Unprofessional intervention does not guarantee full functionality of the mechanisms.
In order to carry out comprehensive diagnostics and replace worn-out equipment, contact a certified service station for help.
Soundproofing of the Lada Vesta is complete.
The car has become truly more comfortable. Both the driver and passengers will be able to appreciate this. Noise insulation at medium and high speeds has changed dramatically, for the better. The car's microclimate has stabilized. The interior will not cool down so quickly in winter and will not heat up so quickly in summer. The sound of the standard audio system has been improved. The outer metal of the doors has become less susceptible to dents from small impacts (it is precisely such impacts from opening the doors of neighboring cars in the parking lot that lead to dents). And so that you can see what a great and meticulous work we have done, we will provide a full photo report.
Sound insulation of Lada Vesta interior
You can make additional sound insulation for your car at a service station, in a specialized company, or do the work yourself. To do this, you will need to purchase a set of appropriate materials. There are a number of manufacturers of such products on the Russian market that have proven themselves well among car enthusiasts:
- STANDARTPLAST, St. Petersburg.
- Standart Group, Miass, Chelyabinsk region.
- Shumoff, Ivanovo.
- Deloud, Miass, Chelyabinsk region.
These companies not only produce soundproofing materials, but also sell kits made according to patterns for each model of domestic cars.
Soundproofing the doors of the Lada Vesta should begin with removing the trim, handles and standard speakers. To dismantle them, you will have to carefully knock out the rivets that secure them to the door partition. After removing the standard insulation, you need to degrease all metal surfaces that will be processed.
List of materials required for noise insulation work, using the example of STANDARTPLAST products:
- vibration damping;
- noise-absorbing, STP Aero, STP Silver;
- preventing creaking of contacting parts, Biplast;
- soundproof, Noise Block;
- sound-diffusing, Crystal Sound;
- mastic STP NoiseLiquidator;
- “Accent” backing.
First, a layer of vibroplast is applied to the inner surface of the door, then STP Aero sound insulator. Rolling the surfaces to be glued with a special tool gives them high adhesion. Finally, plugs from STP Aero are installed on the technological openings of the doors and the removed elements, including the trim, are assembled. All contacting plastic parts are lined with Biplast to prevent squeaking.
The roof is also insulated using vibration-damping vibroplast and STP Aero sound insulator with a thickness of 10 millimeters. First, you need to wash the surfaces on which the insulation will be applied and allow them to dry. Then you should remove the front and rear seats and standard floor mats. After unscrewing the handles, riser covers and lampshades, you need to remove the decorative ceiling. All adhesive materials are rolled with a special tool until they are in full contact with the surfaces to which they are applied.
To soundproof the floor, a three-layer structure is used: Bimast Bomb Premium vibration insulator, Accent underlay, heavy Noise Block insulator. These materials effectively protect the car from external influences in a wide range of sound frequencies.
Disassembling the interior
In order to make soundproofing of the Lada Vesta with your own hands, first disassemble the interior:
- The first thing you need to do is remove the plastic trim on the windshield pillars. To do this, remove the door sealing rubber, then pull the trim with a little force until the three latches snap off.
- The next step is to remove the plastic thresholds. If this is not done, it will be impossible to remove the carpet covering the bottom, as well as remove the plastic lining of the door pillars. First, the door seals on all openings are removed. Then the screws from the plastic thresholds are unscrewed around the perimeter. At the same time, the plastic lining of the rear wheel arch is removed.
- Then there are the plastic door pillar trims. This is necessary for subsequent dismantling of the ceiling cladding. First the seat belt is removed. To do this, unscrew two bolts: one that holds the belt carriage from below, the second that secures the belt eyelet from above. After this, the top trim of the door pillar is dismantled.
- Removing the ceiling trim. It is attached using six clips, sun visors, three passenger handles, and a lampshade. It is removed as follows. First, the six bolts securing the handles are unscrewed. Then the eight screws securing the visors are unscrewed. After this, using a special spatula, the clips are removed: three in the center of the ceiling and three near the rear window. The trim is then removed through the front passenger door.
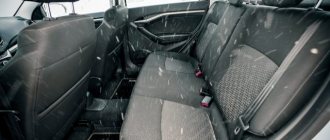
- Removing the front seats. They are secured with four bolts. First you need to move the seats back as far as possible. Then remove the front bolts securing the slide to the floor. After that, move the seats forward and unscrew the rear ones. After this, they can be removed from the interior.
- Removing the rear sofa. The lower seat is attached using two hinges. You just need to lift the sofa by the bottom so that the hinges come out of the lock. The rear backrest is secured at the bottom with four bolts, and at the top with clamps on the sides.
Self-soundproofing Vesta
In auto repair shops, the price of soundproofing a Lada Vesta can be up to 30-40 thousand rubles. By doing everything yourself, you can save almost half of this amount.
We will consider sound insulation of the entire car, but the owners of the Lada Vesta say that it is quite possible to limit it to arches and doors.
Materials and tools
The sound insulation of a car is usually made up of a vibration and sound-absorbing layer. You may also need material to prevent squeaks. Among the best manufacturers the following will be highlighted:
- STP
is one of the market leaders. It has a good assortment and acceptable quality; one drawback is that sometimes you have to overpay for the brand. - STANDARD-Profi
– the quality is no worse than STP, but the prices are more affordable. - Noise Control
– produces inexpensive products with quite satisfactory quality. - Noise
– sound insulation does not always live up to expectations, but the cost is appropriate. We can say that this is the best budget option. - Deloud
is a manufacturer of premium sound-absorbing materials that have the highest performance. But this pleasure does not come cheap.
To carry out the work you will need:
- construction hair dryer;
- stitching roller;
- scissors;
- stationery knife;
- marker;
- roulette;
- degreaser or solvent (you can use regular White Spirit).
General procedure
Do-it-yourself noise insulation of Lada Vesta involves a standard algorithm:
- The casing is removed to provide access to the metal;
- The metal surface is degreased;
- Soundproofing materials are cut;
- The vibration absorber is installed;
- Sound absorber is installed;
- Anti-creaking is installed;
- The casing is being assembled.
If necessary, vibration isolation can be glued in separate pieces. Most of its types require pre-heating with a hair dryer. The vibra should be thoroughly rolled with a roller until the foil texture disappears
If bubbles form underneath, carefully pierce them with a utility knife
The sound insulation layer must be solid. By taking measurements from the surface where the Shumka will be glued, you can mark the roll and carefully cut it. The material is glued sequentially with gradual tearing off of the film. At the end you need to go through the roller thoroughly.
Complete soundproofing of the Lada Vesta may take 1-2 days, depending on your skills.
Hood
It is recommended to install light vibration insulation on the hood cover. It should also be remembered that the insulation of the engine compartment must have heat-saving properties in order to maintain temperature in the winter. Accent material is perfect for these purposes.
Roof sound insulation
Sound insulation of the roof To remove the ceiling lining, unscrew all the ceiling handles, remove the lampshades and racks. As a result, the sheathing should come away freely, and you can work with the metal surface of the roof.
It is better to use a dense sound absorber, which will allow you to fight the sound wave traveling under the casing.
Soundproofing doors
Doors must always be insulated, because this is one of the “noisiest” places not only on Vesta, but also on other cars. Therefore, everything needs to be done with the utmost quality.
Two layers of insulation (vibration, sound) are glued to both the outer metal and the inner frame. Technological openings must be covered with a single sheet. Holes are cut out for tie rods, clamps, etc.
It is recommended to cover all wires, rods and places of contact between the door trim and anti-squeak.
Arches
To carry out the work you will need to remove the wheel and locker. Before degreasing, the surface of the arch is cleaned of dirt.
It is better to use a vibrating layer on a bitumen basis. It will not be very convenient to glue a whole layer, so it is better to cut small pieces. The joints are coated with rubber bitumen mastic. The entire surface is treated with it.
The sound insulation layer is glued to the locker.
Floor and trunk
The seats, carpets, center console and upholstery are removed from the interior. In this case, three layers of materials are usually laid:
- vibration absorber (it is recommended to install more advanced options such as Bimast Bomb on the arches and under the seats);
- sound absorber (8-10 mm);
- soundproofing NoiseBlock.
The video demonstrates all stages of soundproofing Vesta.
What else can be improved when disassembling cards?
Most often, this process is performed to repair electrical wiring, and not to improve the car. But gradually various recommendations appear on how to improve the car and make it more enjoyable to drive. And this is worth using, because otherwise you will face troubles with a gradual deterioration in comfort. Experience in operating a car is gradually accumulating, and you can already find many interesting recommendations.
Some tips for disassembling the card include the following:
- improving the acoustics of the car to get better sounding music - it is under the maps that the main speakers of the car are located, which are not the best from the factory;
- lubricating or modifying the window lift system in the rear, if you have mechanical means installed, this is a rather important point for lovers of the general comfort of car operation;
- improving sound insulation is the most necessary and useful advice, but to complete this task you need to buy high-quality and proven materials, so it’s worth reading reviews;
- tinting - it is much easier to perform high-quality pasting of the film by dismantling the card, this will allow you to gain access to the entire glass in order to evenly stick the lower part;
- sizing with anti-creaking and vibration-proof materials - this will significantly increase comfort in the car; various unpleasant sounds will no longer be heard from the doors.
As you can see, there are quite a few options for improving the car, and each of them deserves attention. But it is worth paying close attention to the question of the appropriateness of using funds. Since you can spend several thousand rubles on one door just to replace the speakers. So the investment in upgrading your car can be quite large. It is worth immediately considering how much such changes are worth the investment.
We invite you to watch a video with the process of dismantling the door card on Vesta:
Soundproofing process for Lada Vesta
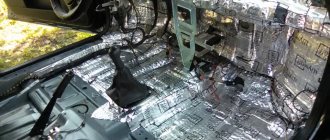
We start by completely disassembling the interior of the car. We remove the door and trunk trim, remove the seats, and remove the factory carpet and headliner. In some cases, you will need to remove the front panel to soundproof the engine shield. But, unfortunately, due to the large amount of work, not everyone dares to do this.
When everything is disassembled, everything needs to be washed, dried and degreased. There is one more question: “Should I remove the factory vibration insulation or not?” There is no definite answer, since there is no such thing as too much sound insulation. But in the case of AvtoVAZ, it is best to remove the factory vibration insulation, since it is not always well glued and can come off over time.
How to plan your work
It will take several working days to complete soundproofing work on the Lada Vesta. The volume is large: you need to disassemble the interior, remove the seats, remove the factory carpet. In addition, the door and ceiling trims are removed. If you completely glue the engine shield, you will need to dismantle the instrument panel and console.
In the engine compartment, the hood protection is removed, and in the luggage compartment, the internal trim must be removed.
For convenience, the work can be divided into four stages. On the first day, carry out all disassembly work. In the second, glue the bottom, arches, and trunk floor. In the third - doors, roof, hood. Spend the fourth day assembling the car.
Sound insulation of front doors Lada Vesta
Before you start soundproofing the Lada Vesta doors, you need to carefully disassemble them.
How to disassemble Lada Vesta doors here.
The factory doors are quite noisy. All technological holes in the external metal are sealed with Shumka.
Vibration insulation is glued to the inside of the metal. Non-woven material is glued to the door card plastic.
Such noise, of course, leaves much to be desired, but for a regular one it’s very good.
First you need to remove the standard Shumka from the outer metal. It is sealed with black and sticky non-hardening sealant.
Vibration insulation is applied to the inside of the door. Moreover, it was glued before the door was painted
and then painted it along with the door. I don't recommend tearing it off.
It will be enough to warm it up with a hairdryer and roll it tightly with a roller, there will be no excess.
After this, wash everything thoroughly and degrease it.
Well, then it’s a matter of technology. We cut out, apply sheets of vibromaterial and carefully roll them.
In this version, Shumoff M3 material was used.
For maximum efficiency, the entire plane of the external metal was also sealed with Shumoff M3 material.
The most important thing is to carefully roll everything with a roller to the metal of the door.
And also correctly mold the material in the lower part under the door card pocket.
Be sure to make cutouts for the holes of the pistons. Otherwise, the casing will not fit tightly later.
Do not try to remove the speaker mesh from the outside of the casing! It can only be opened from the inside.
We also thoroughly degrease the plastic of the door card first.
And carefully, slowly (it’s better to do this together) without stretching the material, we glue
Lada Vesta door plastic.
In this version, 7 mm material Shumoff Germeton 7 was used.
We install the pistons in place and assemble the Lada Vesta doors in the reverse order.
Soundproofing is ready.
Consumption of materials:
Material weight: 3.7 kg per door.
Powered by SEO CMS ver.: Notice: Undefined variable: blog_version in /home/f/freonrbru/sabbas/public_html/catalog/view/theme/newstore/template/agootemplates/record/record.tpl on line 368 (opencartadmin.com)
www.sabbas.ru
We insulate the doors
Soundproofing of Lada Vesta doors is carried out comprehensively. To make it easier to apply vibroplast to the inner surface, the speakers and window lifts are additionally removed. Sheets of sound insulation must be marked in advance and cut according to the pattern. After gluing, they need to be rolled with a roller or pressed firmly against the surface of the door.
The outer frame is also pasted over, but a sound absorber is used here. For example, NoiseBlock or “Biplast”. The material is taken with a thickness of 0.8 cm - it can be glued not to the door frame, but to the plastic door trim on the inside.
↑ Wheel arches
As noted above, wheel arches are considered the noisiest element of the Lada Vesta design. Therefore, when installing additional sound insulation, they often concentrate on eliminating this shortcoming.
Here the work begins with the removal of the wheels and lockers. All working surfaces are cleaned of dirt and then degreased.
Vibration insulation on a bitumen basis is cut into pieces and glued in this form
It is important to coat all joints well with special mastic. The best material is made from bitumen
The same rubber-bitumen mastic is used to treat all insulation to complete the work. Lockers also need to be insulated.
↑ Creak and rattle of dashboard
Various creaks and crickets in the area of the dashboard, which is also called topedo, are a fairly typical phenomenon for cars of most brands. This also applies to the Lada Vesta.
The most problematic area of the panel for this brand is the steering wheel area. Also, extraneous sounds are often observed in the area of the cockpit glass pillar lining. Creaks are also common in the radio area.
To eliminate these shortcomings, problem areas must be glued with anti-squeak.
Sound insulation of the trunk of Lada Vesta (Lada Vesta)
We disassemble the trunk of the Vesta and put everything away on a special rack.
The standard trunk sound insulation on the Prado is practically absent at all, and it also does not adhere well to the body.
We clean and degrease and proceed to installation
To soundproof the trunk of the Lada Vesta, we will use two materials.
We cover the entire bottom of the trunk and fenders with less thick and heavy L3.
We cover the most vibration-loaded area, such as the arches, with multilayer Shumoff Mix F.
This arrangement of materials for the trunk will allow you not to unnecessarily weigh down the body while achieving maximum efficiency.
We cover the entire bottom and arches with waterproof sound absorber Germeton 7L.
We glue the thicker raised sound absorber Germeton A15 onto the wings with a second layer.
We complete the soundproofing of the arches by applying the third layer of the Practik Finish
As a result, we obtain an arrangement of materials with maximum efficiency and the ability to assemble the interior in its original form.
For the trunk lid we use light vibration insulation L2.
We also cover the fifth door trim with Hermeton A15,
and we glue anti-creak along the entire contour.
We are assembling the interior, complete sound insulation of the Lada Vesta is completed.
↑ Recommendations from manufacturers
Today there are many manufacturers of sound insulation systems for cars. Their products differ in quality and price. But, despite all the differences, they give general recommendations for improving protection from unnecessary sounds. They look like this:
- for the ceiling it is worth using modern felt absorbers;
- metal parts should always be degreased;
- external metal is covered with a vibration damper;
- car doors require at least three layers of sound insulation
- wheel arches, trunk and floor are insulated last.
By following these recommendations, the owner of the Lada Vesta will significantly improve the comfort of travel.
Comparison of the noise level of Lada-Vesta with similar models
According to subjective sensations, the noise level in the cabin while driving has decreased compared to the Lada-Granta, which is a budget version of the Russian car. However, these are models of different classes and different price categories, so comparing them is not entirely correct.
Recently, a comparison was made of the noise level of the Lada Vesta with another model produced on the Togliatti assembly line, but under the Japanese brand Nissan Almera.
The measurement took place on the ring road of St. Petersburg. This location was chosen for two reasons. Firstly, here you can accelerate to a decent speed, and secondly, heavy traffic on this highway creates additional noise.
The measurement took place at speeds of 60 and 100 km/h. The result showed better sound insulation for the Lada Vesta.
| 60 km/h | 100 km/h | |
| "Nissan Almera" | 68.6 dB | 78.8 dB |
| “Lada Vesta” | 66.7 dB | 68.7 dB |
Based on the test, it is clear that the company’s engineers have done work to improve the ergonomics of the car. Especially considering that these cars are in the same price range.
Ceiling gluing
When working on soundproofing the car interior, special attention should be paid to the roof. It is a large sheet of metal that creates good acoustics. Vibrations that occur in the roof area are damped only with the help of amplifiers. But it happens that the amplifiers peel off from the metal sheet, and it begins to vibrate in time with the engine.
Light materials are used to cover the roof so as not to create additional load. Vibroplast sheets with a thickness of no more than 2-3 mm are taken. If there is factory felt insulation on the roof, it will need to be removed. Stiffeners should not be pasted over. If they are covered with sound insulation, condensation will accumulate inside, which will lead to corrosion.
You need to glue a layer of sound absorber on top; “Accent 8” with a self-adhesive foil base is suitable, it is light in weight - you don’t have to worry that it will “pull” the roof down.
How to remove the door trim of a Lada-Vesta
The work takes place in several stages:
- Remove the plastic triangle covering the side mirror mounts. To do this, you need to pry it off with a plastic spatula.
- Disconnect the electrical mirror control connector.
- Remove the lighting shade at the bottom of the casing.
- Unscrew the three screws at the bottom. A T 20 sprocket is used.
- At the end of the casing there is a plug under which the screw is hidden. You need to unscrew it.
- Unscrew the screw located inside the handle next to the power window control unit.
- Remove the power window control unit and disconnect the electrical connector.
- There is another screw under the control unit. You need to unscrew it.
- Use a plastic spatula to unclip the fastening clips along the perimeter of the casing.
Removing the console
All that remains in the cabin is the carpet and the insulation underneath. They are held only by the center console, which consists of several parts. To remove the plastic and the closing handbrake, you need to unscrew the two bolts at the edges and remove the plastic plug near the handbrake lever. The back of the console will become free and can be removed.
The front part is more difficult. In front, along the edges of the tunnel, there are two plastic plugs in the area of the driver’s and passenger’s feet. Under these plugs the fasteners for the tunnel linings are hidden, so first the plugs are removed, then the screws that secure the lining are unscrewed. In addition to these fasteners, there are several more screws in the area of the gearshift lever, but to get to them, you need to remove the plastic lining of the console near the lever and simultaneously disconnect the electrical wiring connectors. The last two screws hold the console near the engine shield, unscrew them and remove the console completely.
Now you can remove the carpet, which consists of several parts.