Lada Granta car engine
The first Lada Granta sedan cars had 2 configurations - standard and norm. Under the hood of the grant, an 8-valve engine with a volume of 1.6 liters is installed. There are two modifications of it - 80 hp. and about 90 hp. This power unit accelerates the Grant to 100 km/h in 12 seconds, which is not bad for a budget car. Combined cycle consumption is no more than 7.3 liters per 100 km. In the suburban cycle, consumption drops to 5.5-6 liters. at a cruising speed of 100-110 km/h. With all this, the engine complies with the Euro-4 eco-standard, and work on the development of Euro-5 is gradually beginning. With the appearance of the “Lux” configuration on the Grant, a version of the engine from Renault coupled with an automatic transmission will be available. Such an engine will have a power of 98 hp.
Engine of new modification 21116
Thanks to the efforts of the employees of the scientific and technical center of OJSC AvtoVAZ, a new modification of the 8-valve 1.6-liter engine was released. This is engine 21116. The engineers followed the same path as in the case of engine 21126 for the Priora fret - they lightened the connecting rod and piston group by 39%. Thanks to this, the new engine has increased torque throughout the entire external speed characteristic from 120 Nm to 140 Nm! Power increased from 59.5 to 64 kW. In addition to the power characteristics, there are several other positive aspects - by reducing mechanical losses, it was possible to reduce such negative phenomena as noise and vibration during operation, and the service life was increased by at least 20,000 km. Now let's look a little deeper. Engine 21116 is four-stroke, with distributed fuel injection, overhead camshaft. The connecting rod and piston group is installed by Federal Mogul. Among the innovations are oil nozzles for more intensive cooling of the pistons. The timing drive was also changed somewhat, as a result of which it was necessary to use new spacers on the crankshaft, a new toothed pulley, an automatic belt tensioner and some other parts. The ignition system also did not stand aside - now it does not have ignition coils, although in general it corresponds to that of the 21114 engine. The cooling system has a splash and is under pressure, with forced circulation, no innovations have been identified here.
This power unit is already beginning to be installed on some Lada Kalina and Lada Priora cars.
In the near future, it will be possible to fully appreciate the new engine modernization when the Lada Granta goes on sale.
Source
Evgeny161 › Blog › Installing an air conditioner in a grant
Have a good day everyone!
I would like to share with you a post about installing the original Halla-visteon factory air conditioner (NOT AUGUST OR FROST) in GRANTA.
As it usually happens, either here on the drive, or on VKontakte in my group avtoklimat161, or in the advertisements on Avito, the owner of this grant found me...
The car is like a car and there is no air conditioner... Having told the owner about the options for installing new or used equipment, about the cost (new turnkey 50, used - 35), we agreed that we will install used equipment, especially since this year I have thoroughly stocked up on such equipment, because I think that new ones are sooooo expensive, but used ones, during pre-sale preparation, are no different in either quality or operational efficiency!
In my opinion, the Granta is best suited to be equipped with air conditioning. The installation process is not particularly complicated, a standard “locksmith” - unscrewed - removed - took another - installed - screwed.
But there are things with which there are problems with grants!
1. On cars without air conditioner there is NO belt tensioner mechanism! That is, you need to buy a Kalinovsky generator bracket with an adjusting screw and a roller.
2. The most important thing is that on grants, depending on the ECU model and firmware, you must use either a THREE-CONTACT coolant pressure sensor or a FOUR-PIN! And they are not interchangeable! Apparently, this is why FROST kits do not have a connection to the computer, so as not to worry about what firmware is there and what unit is there. And this is categorically NOT CORRECT! ! THE ECU SHOULD KNOW THAT THE AIR CONDITIONING IS ON. MOREover, IT IS THE ECU THAT TURNES ON THE MAIN FAN AND COMPRESSOR AND CORRECTS THE IDLE SPEED, AND ALSO TURN OFF THE COMPRESSOR WHEN SHARPLY PRESSING THE GAS PEDAL, THUS MAKING IT EASIER FOR THE ENGINE TO GET RPM SHARPLY - IT HELPS VERY WHEN OVERTAKING ESPECIALLY ON TRAIN.
So, if we have a kit with a three-pin sensor, but the computer “does not understand” it, then we need to solder a fitting into the high-pressure pipe to install another, four-pin pressure sensor. The connection diagram in the ECU connector also changes.
Otherwise, everything falls into place without problems.
I make the wiring harness myself so as not to change the factory engine compartment and interior harnesses (the process is the same)
We vacuum, then pump 500 grams of freon and meet the long-awaited degrees)))
For questions regarding the purchase and installation of air conditioners in 2110/Priora/Kalina/Grant/Chevy Niva, write in a personal message here, go to the VKontakte group avtoklimat161, or call 89185412751 or 89896232525. This number also has WhatsApp and Viber.
source
Communities › Lada Priora Club › Blog › The temperature arrow is at the red mark!
Good day to all. Today I was stuck in a traffic jam during the day for about an hour and a half, the air conditioner was working, and I saw that the temperature had exceeded the red zone, and I heard that the car beeped 5-6 times (it sounded like a door was open). The question is: will the machine turn off? Will any sensor work? is there such a thing? Has anyone had this? I forgot! Priora car.)))
The ECU does not focus on the tidy at all, it only shows what it shows. He takes the sensor readings digitally. Comparing with the State readings, the tidy lies up to 40 degrees. Especially at the beginning.
The system has 2 temperature sensors - one for the dash, the second for the ECU.
So what happens?! Can you safely minus 7-10 degrees from the readings on the tidy?)))))
Check the antifreeze level. The tank cap on the Priora is already normal, this is a 10-kilometer problem. In a traffic jam, the temperature rises, this often occurs. Idiot designers set the fan turn-on temperature to 107 degrees. There are two ways - reflash the ECU - it’s fixed there, or as I did - install StateX1 for 700 rubles and set the switching temperature to 95 degrees. I never squeaked in any traffic jams again.
It was such nonsense, I replaced the thermostat and everything went away.
If the antifreeze is more than 3 years old, then it can be changed (
110 rubles kg), and at the same time you can clean the system - I personally was convinced of the sufficient effectiveness of this procedure. My lid valve jammed and the supply pipe burst, I took it to my garage, washed it with water, then systematically stirred citric acid and so on 5 times. Previously, it warmed up to 110 in the city, especially in traffic jams = after flushing the needle, it was mostly about 90,100... very rarely in traffic jams it reaches 110 and the fan turns on. In other words, there is an effect. 146%
Be sure to check the thermostat, fan activation and coolant temperature sensor. In any case, you also need to clean the valve of the expansion tank cap))) otherwise, you know, passengers faint when you go 160 along the highway and suddenly, unexpectedly, BANG and white smoke from under the hood
Today I'll take it for diagnostics, then I'll report back. thanks for the info ;)
If the antifreeze is more than 3 years old, then it can be changed (
110 rubles kg), and at the same time you can clean the system - I personally was convinced of the sufficient effectiveness of this procedure. My lid valve jammed and the supply pipe burst, I took it to my garage, washed it with water, then systematically stirred citric acid and so on 5 times. Previously, it warmed up to 110 in the city, especially in traffic jams = after flushing the needle, it was mostly about 90,100... very rarely in traffic jams it reaches 110 and the fan turns on. In other words, there is an effect. 146%
Be sure to check the thermostat, fan activation and coolant temperature sensor. In any case, you also need to clean the valve of the expansion tank cap))) otherwise, you know, passengers faint when you go 160 along the highway and suddenly, unexpectedly, BANG and white smoke from under the hood
why does your fan come on so late, huh?
If the antifreeze is more than 3 years old, then it can be changed (
110 rubles kg), and at the same time you can clean the system - I personally was convinced of the sufficient effectiveness of this procedure. My lid valve jammed and the supply pipe burst, I took it to my garage, washed it with water, then systematically stirred citric acid and so on 5 times. Previously, it warmed up to 110 in the city, especially in traffic jams = after flushing the needle, it was mostly about 90,100... very rarely in traffic jams it reaches 110 and the fan turns on. In other words, there is an effect. 146%
Be sure to check the thermostat, fan activation and coolant temperature sensor. In any case, you also need to clean the valve of the expansion tank cap))) otherwise, you know, passengers faint when you go 160 along the highway and suddenly, unexpectedly, BANG and white smoke from under the hood
I’m also wondering why the fan at 110 turns on? I also seem to be at 110 on the tidy (the last white line), but according to the diagnostic. the scanner is 100. i.e. temperature scale is broken
Source
Recommendations for the selection of parts and components
The range is represented by domestic manufacturers, originals and high-quality analogues. The final choice is up to the owner of the technical device.
Service center technicians strongly recommend purchasing original parts. The service life and manufacturing quality of factory components are an order of magnitude higher than their analogues.
Before purchasing, carefully check the spare part catalog numbers with the actual data in the instruction manual. If necessary, get free consultations from service station specialists.
New Lada: New Lada Granta 2022
Lately it has become popular to order parts for subsequent installation directly in workshops. There are many advantages of this choice: prompt delivery, professional installation, quality guarantee.
Review of Manufacturer Prices
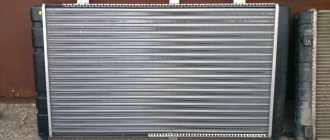
Technical parameters of the main radiator: length 560 x width 306 mm x height 20 mm.
| Name | Price, rub.) |
| Original 21901-1300008-11 | From 5500 |
| 21903-1300008-14 | From 4500 – 4800 |
| 21903-1301010-14 | —/— |
| 150925A2020 | —/— |
| 21900-1301010-14 | —/— |
| 21900130001004 | —/— |
| Lada Granta LUZAR 2190-1301012-01 | From 4600 |
| VAZ-2190 AvtoVAZ OJSC 546532532 | —/— |
| AvtoVAZ 21900-1301012-82 | —/— |
| RSO VAZ-2190 Lada Granta SB with electric fans and AvtoVAZ pipes | From 10100 |
| VAZ-2190,91,92,94 LUZAR universal 25643542 | From 6200 |
| VAZ-2190, 91, 92, 94 LUZAR 48454234 | From 4900 |
*prices are current as of November 19, 2018.
Eliminating air jams
The design of the cooling system in the VAZ-1118 has one unpleasant drawback - the tendency for the circuit to become airy. This can lead to overheating and engine damage. Here we recommend resorting to minor system upgrades. You need to act when the liquid is drained.
- First we replace the thermostat. Instead of a standard product with five holes, we install a component with six such holes.
- We add a refrigerant filter to the circuit.
- We install a shut-off valve on the pipe leading to the stove.
These actions are not capable of radically transforming the system. Experienced owners of LADA Kalina have moved further in this matter. They add steam exhaust pipes, install a forced fan activation button, etc. To install the designated outlet, the diagram looks like this: we cut a tee into the pipe leading to the expansion tank. It is connected through a separate hose to the pipe of the throttle body heating unit. We place the second tee in the return from the radiator of the heating system and connect it with an expansion tank. Now you know how to remove, as well as how to change the radiator, and fix other problems yourself.
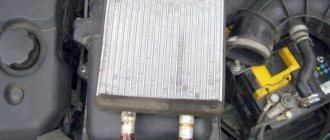
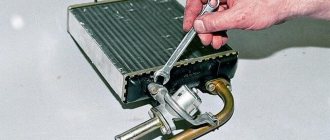
Replacing the Lada Granta heater radiator
If it's cold in the cabin when the heater is on, it means it's time to repair or replace the heater. Among the most typical reasons why you have to change the heater radiator on a Grant:
- clogging of channels due to the formation of scale or dirt;
- the occurrence of cracks or holes in the heating system.
In some cases, it is possible to get by with repair and restoration measures. For example, before changing the radiator, you can try flushing the system with a special liquid. There are means to get rid of scale inside the heating system, both by draining the antifreeze and the coolant inside. Such products, as a rule, do not harm sealants, gaskets, hoses, etc.
In some cases, it is possible to repair the heater radiator of a Lada Granta car without having to replace it
What is needed to replace a stove radiator?
When starting to replace the radiator, you need to prepare:
- set of clamps;
- sealant;
- antifreeze;
- Phillips screwdriver;
- key to 10;
- insulation (foam rubber);
- file.
Of course, you should purchase a new radiator in advance, and a “original” one, since the heat exchanger of other models will not work.
Sequence of steps when replacing a radiator
Work on dismantling the old radiator can begin from the engine compartment. Here, to create access to the elements of the heating system, it is necessary to remove the battery, the air duct pipe between the throttle assembly and the air filter, as well as the air filter itself.
Then you need to empty the system of coolant by draining it into a previously prepared container. Obviously, if a car owner intends to fill in new antifreeze at the end of the work, the old one does not need to be saved.
Before replacing the heater radiator of a Lada Granta car, you must remove the battery and air filter
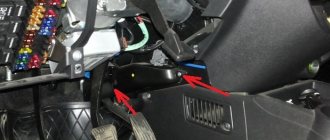
The next stage of work is carried out from the interior. To gain access to the heater radiator, you will first have to remove the gas pedal: without this, it is not possible to remove the heat exchanger. Dismantling the pedal, as a rule, does not cause any difficulties: using a 10mm wrench, unscrew the three fastening nuts and disconnect the brake light limit switch and the connector for the electronic gas pedal. In addition, you need to press the brake pedal and lock it in this position.
Next, the plastic cover covering the radiator is removed, after which access to the heat exchanger opens. After this comes the most crucial moment - sawing off the radiator pipes: you should saw off after bending so that the cut part can be removed through the hole into the engine compartment. After both pipes are removed, you can remove the radiator from the niche into the car interior.
To dismantle the old radiator, you need to saw off its pipes
The pipes on the new radiator should also be sawed off so that later hoses can be put on them and secured with clamps. The cut edges of the pipes should be processed with a file, the holes in the engine compartment are filled with foam rubber to provide additional fixation to the structure and to preserve heat in the cabin.
Akhmed Fazilov
https://grantaremont.ru/content/pechka
It is more convenient to carry out the work of replacing the heater radiator together: one supplies the pipes from under the hood, the second receives them in the cabin. Sealant should be applied to the pipes of the new radiator and, after connecting to the flexible hose, securely secured with clamps. After this, you need to assemble all the removed parts: gas pedal, battery, air filter, then fill the system with antifreeze. At the end, you should check how the new radiator works: you need to start the engine and let it run for a few minutes, then visually make sure that the antifreeze level has not dropped, there are no leaks, and the heat exchanger has warmed up.
There are no fundamental differences in the procedure for replacing the heater radiator on a Lada Granta with and without air conditioning (unlike replacing the cooling radiator).
Video: personal experience of the Lada Granta owner in replacing the heater radiator
Stable and uninterrupted operation of all vehicle systems can be achieved by constant monitoring of their condition. The serviceability of the Lada Granta heater radiator becomes especially important in winter, therefore, in the process of preparing the car for the cold season, it would be useful to check its readiness for the season, especially if the vehicle is expected to operate at a high intensity in winter conditions. Practice shows that with proper operation, a stove radiator can serve properly for many years, but if it still fails, it is quite possible to replace the heat exchanger yourself.
Adviсe
To prevent problems with the heater core, you need to carefully monitor it. For example, from the first days of buying a car, periodically look under the car to see if there are dark spots there. And in the engine compartment it would be a good idea to observe the condition of the cooling system hoses. If you notice traces of antifreeze in any of these places, you need to immediately seek help, or carry out repairs yourself.
If possible, the hoses for connecting the heater radiator should be replaced with new ones, having coated the connection points with sealant. But some do not agree with this opinion. After all, sealant from the hose can get inside the cooling system and cause damage to the pump. As a result, the timing belt will break and the valves will meet the pistons.
Replacement procedure
- After the engine has cooled, unscrew the coolant expansion tank cap. The lid must be opened to equalize the pressure in the system.
Loosen the coolant drain plug on the engine block. The plug is located under the ignition unit.
Place a container to collect the liquid and unscrew the cap completely. Head plug for thirteen.
Press the lock and remove the power connector from the electronic gas pedal.
Unscrew the three nuts securing the gas pedal and remove it. Ten head nuts. Press the latch and disconnect the power connector for the brake light button.
Disconnect the brake pedal from the brake booster. To do this, remove the locking ring using pliers and remove the pin that fits through the hole in the pedal and the VUT bracket.
Unscrew the two screws securing the plastic cover that makes access to the radiator difficult. Phillips head screws.
Unscrew the three nuts securing the gas pedal bracket and remove it. Ten head nuts.
In the engine compartment, disconnect the power connector to the mass air flow sensor. Loosen the clamp on the pipe going to the intake manifold. Next, disconnect the plastic pipe for the air intake and remove the air filter housing assembly. Clamp for a slotted screwdriver or 8mm head.
Loosen the clamp and remove the pipe coming to the thermostat. Also remove the pipe connected to the pump. Head clamps for thirteen.
Each pipe contains a little more coolant. It is best to place the end in a collection container after removing the pipe.
Remove the insulation from the engine shield so that it can be reused.
Cut or saw through the two aluminum tubes that go to the radiator. Cut off the tube that is closest as short as possible.
Remove the radiator from its seat. When dismantling, it is best to place the brake pedal between the radiator tubes.
Glue the seal onto the new radiator, just like it was on the old one. Most often, the seal comes with the radiator.
Cut the pipes on the new radiator as shown in the photo below.
Clean the seat and install the radiator.
Place two clamps on the radiator tubes and lubricate the pipes with a sealing compound. Insert the pipes from the side of the engine compartment. Direct the heads of the clamps towards the radiator so that there are no problems with the plastic cover during installation.
Glue the insulation near the pipes. Mount the gas pedal bracket and secure with three nuts. Install the plastic cover for the radiator pipes and secure with two screws. Connect the brake pedal to the vacuum booster. Connect the brake light button power connector. Install the gas pedal and secure with three screws. Also don't forget to connect the power connector. Cut the pipes to size. Trim the pipes so that they are not strained and there are no kinks. Fill the radiator with coolant.
Lubricate the pipes with a sealing compound and secure them to the thermostat and pump.
Install the air filter housing and connect the mass air flow sensor. Pass coolant through a sieve and pour into the system. Start the engine and check connections for leaks.
You can see the procedure for replacing the Lada Granta heater radiator in this video:
This is interesting: How to change the coolant temperature sensor of a VAZ-2114 (video)
Design and functions of the Lada Priora radiator
The main task of this unit is cooling and maintaining the operating temperature of the coolant. When starting a cold engine, the radiator does not affect the cooling system in any way. Moreover, until the engine warms up, it is not turned on at all, since it is used only when a large circle of the cooling system is opened.
After reaching a certain temperature (on the Lada Priora it is 85–90 degrees), the thermostat opens and antifreeze begins to circulate through the radiator, where it cools. When the engine operates at high speeds (especially when driving at low speeds), the device cannot cope with cooling, and the engine temperature begins to rise again. In this case, the fan for forced cooling of the antifreeze circulating through the radiator is turned on to help.
The standard cooling radiator on the Lada Priora is made of brass parts. And this is a material with excellent thermal conductivity characteristics. The middle part, or core, is a plate structure through which tubes are passed, connected to the plates by soldering. As the coolant passes through the core, it is distributed into a number of separate streams. This allows antifreeze to be cooled more efficiently by significantly increasing the contact area between the antifreeze and the metal walls of the vertical tubes.
The radiator tanks are connected to the cooling system using rubber pipes. A special tap is used on the lower tank to make it easier to drain the coolant. There is also an additional tap on the cylinder block. With its help, you can easily drain the liquid from the engine water jacket. Overall, a simple but effective heat exchanger design.
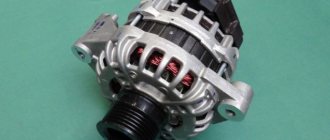
Replacing the generator on the Lada Grant with an 8-valve
Preparatory stage
Tools, materials:
- metal mounting blade;
- set of auto tools;
- rags;
- rust remover WD-40.
Sequencing:
- We place the car within the perimeter of the repair area, provide priority safety measures, and fix the wheel chocks.
- We remove the terminals from the battery to avoid a short circuit in the circuit (key to “10”).
- From under the bottom of the car, unscrew the 8 bolts securing the oil pan protection and remove it.
- Disconnect the block with wires from the converter (generator).
Block with wires
- Remove the rubber cap and terminals from the back of the converter.
- The key is set to “13”, unscrew the top bolt - the generator position lock.
- We move the converter forward until it stops against the radiator.
Moving the converter
- From under the bottom of the car, unscrew the second bolt - the clamp, and remove it.
- Having loosened the fixation of the converter, we remove the belt from the pulleys.
We remove the generator, carry out preventive measures (replace with a new one), and assemble the structure in the reverse order.
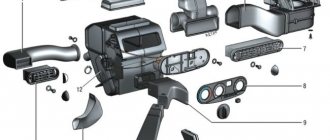
Control unit for heating and ventilation system Lada Granta
The heating, air conditioning and ventilation system of the Lada Granta is a single complex that provides the most comfortable conditions inside the car, regardless of weather conditions and driving conditions.
The system control unit panel is installed on the instrument panel console.
Heating and ventilation system control unit:
1 – air temperature regulator;
2 – fan operating mode switch;
3 – air flow distribution regulator;
4 – air recirculation control lever;
5 – rear window heating switch.
Outside air can enter the car interior through the central and side deflectors of the heating and ventilation system, into the area where the feet and head are located and onto the windshield.
The intensity of air supply into the cabin is regulated by turning the handle of the fan operating mode switch. This turns on one of four fan speeds. Turn the switch handle clockwise to increase the fan speed.
The position of the flow distribution control handle sets the following directions of air flow in the cabin
1. The air flow enters the lower part of the passenger compartment, into the driver’s and passengers’ foot areas, as well as through the air nozzles to the windshield and front door windows of the car;
2. The air flow through the blower nozzles reaches the windshield and windows of the front doors of the car;
3. The air flow through the side and central deflectors enters the upper part of the car interior to blow air over the driver and passengers.
4. The air flow enters the lower part of the cabin, to the driver’s and passenger’s foot areas.
Air temperature regulator
By turning the air temperature control knob, change the temperature of the air entering the cabin.
To increase the air temperature, turn the control knob to the left, to the red sector of the scale, and to decrease the air temperature, turn to the right, to the blue sector. With its help, you can determine where the stove gets air from - from the interior or outside. You need to take it from the interior when there is an unpleasant smell outside, or you need to warm up the car faster.
Recirculation system control lever
To turn on the recirculation mode, move the lever to the extreme right position. When the recirculation mode is turned on, outside air does not enter the cabin, and the air blower fan circulates air inside the cabin. This mode is used to quickly warm up the interior in the cold season, as well as when the surrounding air is dusty and gassy.
To allow outside air to enter the cabin, move the lever to the extreme left position.
The directions and intensity of air flows through the side and central deflectors of the ventilation and heating system are regulated by correspondingly rotating the guide vanes until they are completely open and rotating the deflector body.
Note:
It is not recommended to turn on the recirculation mode for a long time while the car is moving, as this usually leads to fogging of the windows.
Heated rear window switch
The heated rear window is turned on and off by pressing the button when the ignition is on. It is turned on by a button located below the handle.
The principle of operation of the cooling system
The main task of the cooling system is to ensure optimal temperature conditions for the Priora engine. The vehicle is equipped with a system with forced circulation of coolant. Its main element is the cooling jacket through which the liquid circulates.
To maintain the integrity of the shirt, you should constantly monitor:
- quantity
- quality of the liquid (for example, Antifreeze).
If its amount is too low, the system will not be able to properly maintain the thermal regime of the power plant, and it will overheat. Antifreeze heavily diluted with water will not have adequate frost resistance, and in winter the shirt may freeze.
Another important element of the system is the liquid pump. The purpose of the pump is to ensure the circulation of Antifreeze throughout the system. The Priora pump is belt driven from the crankshaft. The condition of the pump also needs to be constantly monitored. If the bearing in it starts to fail, it will jam. The result of wedging will be:
- inability to maintain optimal temperature;
- the likelihood of a timing belt break.
This, in turn, will damage the gas distribution mechanism.
Until the engine reaches the desired temperature, the liquid circulates in a small circle, that is, it moves only along the jacket. When the temperature approaches normal, the liquid will begin to move in a large circle. In addition to the cooling jacket, it also includes a radiator with a fan installed on it. The cooler starts working only when the liquid temperature begins to exceed the permissible limit. For monitoring, a temperature sensor is built into the cooling jacket, also known as a fan switch on sensor.
The thermostat is responsible for which circle the Tosol moves in. Incorrect operation of the thermostat or its jamming will either lead to overheating of the unit or to the fact that it will not be able to reach the optimal thermal conditions.
This system works on a Priora like this: while the power plant is cold, the thermostat is in a position that blocks the channel going to the radiator. The liquid, thanks to the pump, circulates through the cooling jacket. As it warms up, the thermostat begins to open the channel slightly, and liquid begins to flow into the radiator to reduce the temperature of the liquid itself.
In the summer, when idling in a traffic jam, the air flow passing through the radiator is insufficient, and the temperature continues to rise. The fan switch-on sensor monitors this indicator, and if it begins to exceed the permissible limit, it turns on forced cooling of the radiator, which additionally creates an air flow to ensure cooling of the Antifreeze.
Source
Recommendations for the selection of parts and components
The range is represented by domestic manufacturers, originals and high-quality analogues. The final choice is up to the owner of the technical device.
Service center technicians strongly recommend purchasing original parts. The service life and manufacturing quality of factory components are an order of magnitude higher than their analogues.
Before purchasing, carefully check the spare part catalog numbers with the actual data in the instruction manual. If necessary, get free consultations from service station specialists.
Lately it has become popular to order parts for subsequent installation directly in workshops. There are many advantages of this choice: prompt delivery, professional installation, quality guarantee.
Reviews
| № | Positive |
| 1. | Mikhail: I have run over 80,000 km on my car, there are no complaints, the cooling system is working as normal. I follow the manufacturer's instructions - replace antifreeze every 75,000 km. |
| 2. | Vladimir: in two years of active driving, I replaced the thermostat once. I don’t consider this a significant breakdown, since this is a normal occurrence for domestic cars. |
| 3. | Kirill: The car is a year and a half old, I bought it at a dealership. There are no complaints, all mechanisms work as usual. Breakdowns happen, but they are not so significant and can be easily fixed on your own. |
| 4. | Gennady: after buying the car from the dealership, I immediately replaced the antifreeze with a new, imported one. Domestic is of low quality and quickly loses its properties. |
| 5. | Vasily: I am satisfied with the quality of assembly and manufacturing of the Lada Granta (16 valves). As for a domestic manufacturer, this is very good, it cannot be compared with Kalina, Priora. I fix minor damage myself. |
| 6. | Konstantin: within a year and a half of using the car, I replaced two clamps on the cooling system pipe. I don’t consider this a defect; it’s normal for Lada. |
| 7. | Victor: I’ve heard negative reviews about Granta, I think they are unfounded. You should always follow the instructions in the instruction manual, then everything will be fine. |
| Negative | |
| 1. | Alexander: the radiator leaked at 39,000, corrosion formed, luckily I replaced it with a new one under warranty. After 15,000 km. The thermostat has failed. Lots of trouble with the Grant, it’s better to pay a few tens of thousands extra and buy a Renault Logan. |
| 2. | Vladislav: Two years have passed since I bought the car, and I have already had unscheduled repairs at a service station several times. The build quality is crude, many defects are not eliminated from generation to generation. |
| 3. | Igor: many components and assemblies do not maintain their service life and wear out prematurely. |
Replacing the stove radiator on a Lada Granta with your own hands + video
Lada Granta has become a really popular car. And, in many ways, this happened thanks to the affordable price and good components. For example, the stove installed on the Lada Granta is quite good, as it warms up the interior to the required level very quickly. AvtoVAZ engineers did a very good job on this issue, since for our harsh winters the issue of high-quality heating of the interior is very relevant.
| TOP 15 most useful products for Lada Granta - OUR EXPERIENCE! |
- 1 Dismantling the Lada Granta heater radiator 1.1 Installing a new Lada Granta radiator
- 1.2 Selecting a new heater radiator (tested articles)
- Ratchet driver;
- Extension;
- Crosshead screwdriver;
- Cooling system sealant;
- Head for eight, ten, thirteen;
- Slotted screwdriver;
- Pliers;
- Powerful wire cutters or small grinder;
- Pipes for the cooling system with an internal diameter of 16 and 18 mm (length 1 meter);
- Six worm clamps with a grip range of 15-25 mm.
- After the engine has cooled, unscrew the coolant expansion tank cap. The lid must be opened to equalize the pressure in the system.
Loosen the coolant drain plug on the engine block. The plug is located under the ignition unit.
Place a container to collect the liquid and unscrew the cap completely. Head plug for thirteen.
Press the lock and remove the power connector from the electronic gas pedal.
Unscrew the three nuts securing the gas pedal and remove it. Ten head nuts. Press the latch and disconnect the power connector for the brake light button.
Disconnect the brake pedal from the brake booster. To do this, remove the locking ring using pliers and remove the pin that fits through the hole in the pedal and the VUT bracket.
Unscrew the two screws securing the plastic cover that makes access to the radiator difficult. Phillips head screws.
Unscrew the three nuts securing the gas pedal bracket and remove it. Ten head nuts.
In the engine compartment, disconnect the power connector to the mass air flow sensor. Loosen the clamp on the pipe going to the intake manifold. Next, disconnect the plastic pipe for the air intake and remove the air filter housing assembly. Clamp for a slotted screwdriver or 8mm head.
Loosen the clamp and remove the pipe coming to the thermostat. Also remove the pipe connected to the pump. Head clamps for thirteen.
Remove the insulation from the engine shield so that it can be reused.
Cut or saw through the two aluminum tubes that go to the radiator. Cut off the tube that is closest as short as possible.
Remove the radiator from its seat. When dismantling, it is best to place the brake pedal between the radiator tubes.
Glue the seal onto the new radiator, just like it was on the old one. Most often, the seal comes with the radiator.
Cut the pipes on the new radiator as shown in the photo below.
Clean the seat and install the radiator.
Place two clamps on the radiator tubes and lubricate the pipes with a sealing compound. Insert the pipes from the side of the engine compartment. Direct the heads of the clamps towards the radiator so that there are no problems with the plastic cover during installation.
Glue the insulation near the pipes. Mount the gas pedal bracket and secure with three nuts. Install the plastic cover for the radiator pipes and secure with two screws. Connect the brake pedal to the vacuum booster. Connect the brake light button power connector. Install the gas pedal and secure with three screws. Also don't forget to connect the power connector. Cut the pipes to size. Trim the pipes so that they are not strained and there are no kinks. Fill the radiator with coolant.
Lubricate the pipes with a sealing compound and secure them to the thermostat and pump.
Install the air filter housing and connect the mass air flow sensor. Pass coolant through a sieve and pour into the system. Start the engine and check connections for leaks.
You can see the procedure for replacing the Lada Granta heater radiator in this video:
Replacing the Lada Granta generator - KZATE with Bosch. Comparative characteristics and disadvantages
| Characteristics | KZATE 115A 2170-10 | Bosch 2170-13 |
| Maximum current (output) at 14.5 V / 6000 rpm | 115 | 110 |
| Voltage setting limits at a speed of 2500 rpm and a current of 5.0 A | 13.6 – 15.2 | 13.6 – 15.2 |
| Gear ratio according to the principle: motor - converter | 1 : 2.4 | 1 : 2.4 |
Due to its smaller height, Bosch 110A is 10 mm lower than its analogue. Despite the minor advantages, BOSCH has one “fat” drawback - there is no possibility of quick (cold) replacement of the diode bridge in the event of its failure.
The electrical contacts are soldered into the bridge; quick replacement of the rectifier on the road will not work. At KZATE it is quite possible and acceptable to replace the rectifier on the road.
Addresses of companies providing generator replacement services (Moscow, St. Petersburg, Kyiv regions)
| № | Name | Address |
| 1. | "Autopoints" | Moscow, Varshavskoe highway, 33 https://avtotochki.ru/ |
| 2. | "ZenitAuto" | Moscow, metro station Perovo, Kuskovskaya st., 20A (next to the Enthusiasts Highway) https://www.zenitauto.ru/ |
| 3. | "RemZone" | St. Petersburg, Vasilievsky Island, st. Uralskaya, 17A https://www.spb-remzona.ru/ |
| 4. | "Autopoints" | St. Petersburg, Lesnoy Avenue, 78 https://spb.avtotochki.ru |
| 5. | "Dzigora Complex" | m. Darnitsa, st. City Shalet 1A https://dzigoracomplex.kiev.ua/ |
| 6. | "VseSTO" | Kyiv, st. Kikvidze 43 https://vse-sto.com.ua/ |
Difference between belts of 16 and 8 valve engines
For Lada Granta models, an alternator belt with the following markings is used:
- 1118-1041020-07: search index 6RK 823, length 823 mm, thickness 3.0 mm;
- 6PK1123 with air conditioning;
- 6PK1113 without air conditioning, with power steering;
- 6PK745 without air conditioning, without power steering.
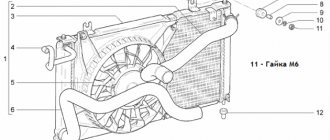
Removing the radiator
Removing the Lada Granta radiator (VAZ 11183, 21116)
We remove the radiator to check it for leaks (if a leak is suspected) or replace it if damaged.
Drain the liquid from the cooling system (see “Replacing the coolant”).
Remove the radiator fan (see “Removing the radiator fan”).
It is more convenient to dismantle the radiator complete with hoses.
Therefore, we disconnect the radiator inlet and outlet hoses from the pipes of the thermostat housing and the pump inlet pipe, respectively, and disconnect the radiator steam exhaust hose from the expansion tank fitting.
Using a 10mm socket, unscrew the two nuts securing the radiator to the upper cross member of the radiator frame. We tilt the radiator towards the engine so that it comes out from under the upper cross member of the radiator frame, lift the radiator...
...and remove it complete with hoses from the engine compartment.
Radiator complete with hoses. To remove the radiator supply hose...
...we use pliers to compress the ends of the clamp and, sliding the clamp along the hose...
...remove the hose from the pipe of the right radiator tank. We disconnect in the same way...
...from the pipe of the left radiator tank there is a radiator outlet hose...
...and from the fitting of the left tank - a steam removal hose (when removing the hose from the fitting, be careful not to break the fitting). When replacing the radiator...
...using a 12mm head we unscrew the two bolts securing the radiator bar to its tanks.
...and remove the bar. Install the radiator in reverse order. If, when removing the radiator, its lower mounting cushions remain in the holes in the lower cross member of the radiator frame, then remove the cushions from the holes...
...and put them on the radiator pins.
Video on the topic “Lada Granta. Removing the radiator"
Replacing the Cooling Radiator on a Lada Kalina. Coolant drain. Removing the Fan
Replacing the Lada Granta radiator. Part 1.
Replacing the radiator of the GRANT stove. Simplified version. Replacing the radiator of the LADA GRANTA stove.
Radiator dismantling in Kalina
To remove the designated assembly and related components, you will need to use the following tools:
- wrench "10" (socket type);
- pliers with thinned grips;
- Phillips screwdriver;
- If the Lada Kalina is equipped with an air conditioning system, then we additionally stock up on a set of Torx (star profile).
- Disconnect the power connector from the system fan.
- Let's dismantle this unit. It is held on the radiator with 4 bolts. To unscrew them, you will need to use a “10” key. Extraction is carried out in the upward direction.
- Next, we move on to removing the pipes from the radiator fittings. We loosen the clamps using pliers or a screwdriver. We use the same wrench to unscrew the two nuts that hold the radiator assembly in the seat.
- Now we tilt the product slightly towards the engine and lift it up.
When dismantling the unit on a Lada Kalina equipped with air conditioning, you will need to resort to removing additional components that are directly attached to the radiator. To carry out this activity, you should stock up on a key with an asterisk profile.
Starter operating rules
According to AvtoVAZ standards, the time between failures is not regulated for starters, therefore, this indicator can be considered infinite. But they still have to be changed, and this is due to car owners violating operating rules. Car enthusiasts often complain about the quality of starters, pointing out that they are not able to last more than 50,000 km on domestically produced cars. But only a few of them know how to use this device correctly and correctly. Following a few simple recommendations will help you protect yourself from a whole list of starter malfunctions:
- When starting the engine, it is necessary to hold the PU for 10 to 15 seconds; restarting is carried out no earlier than half a minute later. Frequent and continuous operation of the PU leads to systematic overheating of the overrunning clutch, thereby provoking its premature wear. Remember - if there are three consecutive unsuccessful attempts to start the engine, the problem should be looked for in the wiring, fuel equipment or ignition system;
- After starting the engine, immediately turn off the starter, for which you will need to release the key in the lock;
- Many experienced car owners do not recommend using PU when temporarily driving a car (this is what novice drivers often do when the battery is discharged or there is damage to the power supply circuit).
The engine temperature does not rise: what should the driver do?
While operating a vehicle, the driver often has to deal with various failures and malfunctions. At the same time, the most serious are rightly considered to be breakdowns directly related to the engine, gearbox, steering, brake system and chassis.
If we talk about the power unit, in addition to knocks and noises, a violation of the operating temperature regime is a rather serious problem. As a rule, drivers are well aware of the dangers of engine overheating.
However, in a number of cases, it also happens that the engine remains cold, the engine temperature does not rise, or the power unit is warmed up, but according to the temperature gauge the temperature arrow does not rise. Let's look at this malfunction in more detail.
Work on removing and installing the radiator yourself
Let us immediately make a reservation that it is better to carry out such work not alone, but together with an assistant. It is also worth noting that there are no differences between replacing the stove radiator on a Grant with and without air conditioning.
First you need to give yourself access to unhindered implementation of this manipulation. To do this, you will need to move to the space under the hood and disconnect the 2 battery terminals. Then the fasteners holding the battery are unscrewed and it is removed out. Afterwards, the air duct pipe is dismantled and the air filter is dismantled. Now you can proceed directly to removing and replacing the radiator.
If you are going to add antifreeze after replacing the unit, drain the coolant from the system before starting work. Then move into the car interior and remove the gas pedal; this is necessary for the smooth removal of the overall radiator housing. The gas pedal is removed using a 10mm wrench, with which you unscrew the three retaining nuts, after which the contact chip with the wires should come off quite easily.
Next, you will need to work with the brake pedal, namely, remove the finger of the specified pedal and press it. In addition, to gain access to the radiator, you will need to unscrew the plastic side cover of the dashboard, which is located to the right of the gas pedal.
After gaining access to the node, proceed to sawing - perhaps the most crucial moment in the whole work. The top tube is cut first at the bend, after which it, together with the pipe, is pulled into the free space under the hood. Next, a similar procedure is performed in relation to the lower tube. After sawing is completed, press the brake pedal and pull the radiator into the passenger compartment.
Now you can begin installing the new unit, the tubes of which should first be covered with foam rubber (for their more reliable fixation). Then you will need to install the radiator in its proper place and put the pipes on the pipes located near the engine. When carrying out this manipulation, you will need outside help - one person will have to be in the car, while the other will be engaged in putting on the pipes from the engine compartment. When carrying out installation and landing, it is recommended to use a sealant, and one additional clamp is installed on each of the tubes.
After the radiator installation is completed, coolant is poured into the system, and the gas and brake pedals, battery and air filter with pipe are returned to their rightful places. Replacement completed successfully.
How to identify a clogged radiator
Checking the radiator is a fairly simple task that anyone can do. To do this, you need to check the circulation of fluid through the radiator. If the circulation is normal, then both radiator tubes will be hot, but if the inlet tube is hot and the outlet tube is cold, this indicates that the radiator is clogged from the inside.
A clogged radiator can be washed or, at best, replaced with a new one.