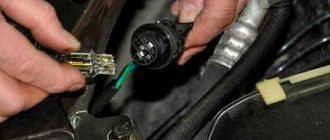
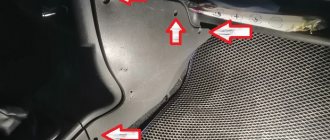
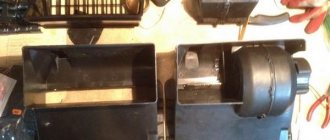
Two weeks passed after ordering the radiator, I called the salon to find out, two weeks passed where the radiator was. There was no person for spare parts, they said they would call me back as soon as they showed up, but they called earlier and said that the radiator had arrived and what date we would make an appointment for a replacement. At the beginning, as usual, the temperature was measured, photo for AvtoVAZ. Who did it, said two cars already had this problem, they all had the radiator replaced. They do not deal with purging or changing the direction of radiator flow and return. The whole thing took 1 hour 40 minutes, the worker knew his job and walked around the car himself. Upon replacement, everything was disassembled to a minimum in order to remove the platinum behind which the radiator is located. The plastic from which the air blows into the feet was also removed. The tool was used long and with a hinge) Antifreeze was not drained or added. Just removed the hoses in the engine compartment. And in the cabin they put rags under the radiator and pulled them out. First, they brought out a new radiator with all the petals crushed at the edges, they probably noticed my dissatisfaction, it turns out they had another one, they brought it, it was not so bad.
When everything was assembled, they began to check, it began to fry heavily both on the passenger side and on the driver’s side. Hot air actually began to blow into the passenger’s legs. I remembered Kalina 2, in which my legs were burning from the heat on the driver’s side.
Have you noticed that your car's heater is blowing cold air and not heating up like it used to? One of the reasons for this malfunction is the radiator of the interior heating system. On Vesta and XRAY it is located in the housing of the heating and air conditioning ventilation unit on the left side (driver's side). Let's look at the instructions for replacing the stove radiator in detail.
You will need: disconnect the negative terminal of the battery, drain the antifreeze, remove the dashboard trim (frame), prepare tools, screwdrivers, Torx, etc.
- Remove the driver's foot air duct (No. 1) by removing two screws (No. 4).
- remove the stand (No. 2) by unscrewing: two bolts (No. 5) and two nuts (No. 3).
Downloading a book
After successfully completing the payment (by any method) and returning to the KrutilVertel store from the payment system website, you will be taken to the successful payment page:
The book you purchased will be in your personal account, from where you can always download it.
Please note that after making the payment, you need to return back from the payment system website to the KrutilVertel website. If for some reason you did not return back to the site and closed the payment system tab with a message about the successful completion of the payment, please let us know - we will send you a letter indicating access to download the book
If for some reason you did not return back to the site and closed the payment system tab with a message about the successful completion of the payment, please let us know - we will send you a letter indicating access to download the book.
Settings
Before you start operating the carburetor from a VAZ 21083 on a VAZ 2106, it must be configured.
In order for the mixture to be prepared better and for you to make adjustments easier, park the car on level ground, without slopes. Start the engine and test it at high and low speeds. This will let you know in which mode the engine receives a normal mixture, and in which it requires adjustment.
After running the engine for a while on the new carburetor and filling its chambers with gasoline, you will need to check what a constant level is in them. To do this, remove the cover from the carburetor, and using a caliper, measure the distance from the fuel level to the top edge of the float chamber. It is best if the level is from 23 to 25 mm. In this case, the carburetor will not flood the spark plugs and stall at idle.
To adjust the fuel level, simply bend the float in the desired direction (up or down). After each change in position, check the resulting distance. When the float is set, assemble the device and begin adjusting the quality and quantity of fuel.
On a VAZ 21083, the correct mixture is obtained with the following settings:
- Quantity screw: 1.5 – 2 turns;
- Quality screw: 4 – 4.5 turns.
After installing it on the VAZ 2106, it is necessary to configure the device after the engine has run at all speeds. And also, the fuel must be heated to operating temperature.
How to solve the problem when the heater blows cold air from the passenger side
The stove blows warm air into the car interior no matter how sub-zero the temperature outside the window is. Its task is to provide comfort to all passengers in the vehicle. However, the stove, like any other automotive component, can fail. What to do in a situation when the heater on the passenger side does not heat? Do not be disappointed in advance; a similar problem occurs on cars of various brands. Note that this malfunction can occur either two years after purchasing a new car or two weeks after its purchase. Don’t get excited and immediately change the valves (in most cases, they have nothing to do with it). So, let's figure out what is the cause of the problem.
Why is this happening?
Undoubtedly, the most common reason for this is problems with the dampers. However, there are also problems with the radiator. As a rule, it is secured with several brackets, bolts and other fasteners in a free compartment. With frequent movement on poor road surfaces, the quality of the fastenings deteriorates, and accordingly, the components of the heating system begin to move in the pits in different directions.
As practice shows, these small movements are enough for a cold air flow to start flowing instead of the warm air supplied from the passenger seat (from the right air duct). This happens due to the formation of a gap between the casing wall and the end of the radiator. As a result, air enters the cabin, bypassing this component.
How to solve a problem
In many cases, this problem is solved by replacing the radiator (it was clogged with sediment due to dilution of antifreeze with plain water - sometimes dealerships do this). If the problem lies in the radiator, you need to pull it out, then cover the area where it is located with foam rubber so that in the future it does not move in different directions.
Other Possible Causes
It is possible that the system is sucking in air, which causes an air lock to form in the heating radiator after a certain time. This can also cause cold air to come in from the passenger side. Sedimentation (after mixing different types of coolants). Note that sediment remains even after purging the system. In this case, there are two ways out of this situation: remove and rinse the radiator thoroughly or replace it completely.
Well, now you know why the passenger side heater can blow cold. And only you can decide whether to fix this problem yourself (after spending time searching for its occurrence), or whether to put your car in the hands of professionals. In any case, we wish you good luck!
The engine does not idle: the main reason
The first thing you need to pay attention to is the solenoid valve. However, it is not installed on all VAZ 2106 carburetors. It is this small device that most often falls into disrepair
Its operating principle is similar to a solenoid relay - there are windings, an armature, and a return spring, but the dimensions are somewhat smaller.
It is this small device that most often falls into disrepair. Its operating principle is similar to a solenoid relay - there are windings, an armature, and a return spring, but the dimensions are somewhat smaller.
The function of the solenoid valve is to open the path for gasoline to flow (with the throttle valve closed) when the ignition is turned on. And close when disconnected, respectively.
The most common breakdowns of the solenoid valve, as a result of which the idle speed disappears:
- The winding is destroyed, the armature with the needle does not move, fuel is not supplied.
- The fuel nozzle located on the edge of the valve is clogged.
- The valve armature is jammed due to deformation.
You can check this device very quickly; you will need a small piece of wire, stripped from both edges. Connect one end to the positive side of the battery, and connect the other end to the terminal of the solenoid valve. There should be a fairly loud click, but if it doesn’t, then most likely the winding is damaged.
If there is a click, remove the wire connected earlier and turn on the ignition. Place the power connector onto the valve. If there is no click, then the wiring is damaged. In the event of a breakdown, there can be three exits, you can use any:
- If the solenoid valve is completely destroyed, it would be wise to unscrew it and remove the tip (fuel nozzle). And thus get to the nearest store without much difficulty. The price of a new VAZ 2106 solenoid valve is about 100 rubles, so repairs will not be expensive.
- Temporarily connect the output of the solenoid valve to the positive terminal of the battery - if the wiring is damaged. But in this case you will have to remove the wire during each stop.
- It would be much more efficient to run a wire from the solenoid valve output to the “+B” ignition coil contact. The fact is that voltage appears on it only after the ignition is turned on.
Basic faults
A whistle is already a malfunction - there are not many of them in this unit. You have to say “heater” - either it works or it doesn’t. If the stove does not blow at all, this means the electric motor is jammed or the brushes are worn out. If you were still skating with a bang, and then at one point it disappeared, and the heater stopped working, then it’s definitely an engine failure, most likely the problem is in the bearing or bushings.
Therefore, in 70% of cases, lubrication really helps, but if you have been driving for a long time with noise, it is possible that the bearing is already worn out. Therefore, as soon as noise appears, crackling and so on, we disassemble the stove and clean it. What else I would like to note on our VAZs, especially on the “classics”, bushings were used instead of bearings; after they were worn out, they needed to be replaced, however, many craftsmen still install bearings on the VAZ heater - I think this is correct!
Lada Vesta engine life - you need to know
The VAZ 21129 engine is based on the 21127 model, which is installed on the Lada Granta, Kalina, Priora models. Both engines differ from previous VAZ models by a modernized air intake system. Instead of a mass air flow sensor (MAF), absolute pressure (ABP) and air temperature (ATV) sensors are used.
Improvements to the VAZ-21129 also included increasing the rigidity of the cylinder block, lubrication system, fuel injection, mounting of additional units, engine mount, exhaust system and a set of engine control elements. The new engine is designed for Euro-5 and adapted for manual transmission from Renault.
The engine uses a lightweight connecting rod and piston group. Short skirt pistons are cast from aluminum alloy. There are four small recesses in the bottom of each piston for the valve plates, but they do not prevent the valve from contacting the piston in the event of a timing violation or a broken timing belt.
Tuning the VAZ 21129 engine (using the example of the sports version of Vesta) without installing a turbine and compressor allows you to increase power from 106 to 150 hp.
Sectional view of a VAZ-21129 engine: 1 — oil pan drain plug; 2 - crankshaft; 3 - oil filter; 4 - catalytic manifold; 5 — coolant pump; 6 - piston; 7 — manifold cat. gasket; 8 — oxygen concentration sensor; 9 — spark plug; 10 — exhaust valve;
11 — cylinder head; 12 — exhaust camshaft; 13 — camshaft bearing housing; 14 — cylinder head cover (cylinder head); 15 — intake module; 16 — inlet valve; 17 — ignition coil; 18 — hydraulic pusher; 19 — intake camshaft; 20 — nozzle; 21 — fuel rail;
The popularity of the car is growing, as evidenced by the fact that only in the first month of 2022, Lada Vesta surpassed its competitors in the form of KIA Rio and Hyundai Solaris in terms of sales. Before buying a car, it will not be superfluous to find out what the service life of the Lada Vesta 1.6, 1.8 engine is.
What is the most important thing in a car? Wheels, interior, and maybe suspension - We believe that when choosing a car, everything is important. But the engine is the most important factor when deciding to buy a car.
The Lada Vesta is powered by 3 modern engines from AvtoVAZ. Any car enthusiast would be curious to know in detail about each of them.
— engine 21129 from VAZ — technical problems, characteristics; — 21179 from VAZ — the new top-end 1.8 engine is installed on the latest modifications, including the Lada Vesta SW Cross; The HR16DE-H4M propulsion system from Nissan is a chain motor with an impressive resource, but manual valve adjustment.
Life tests of the units installed on Vesta allow us to say that the overall impression of them is rather good.
— VAZ 21129 resource — 200,000 km; — motor life of the VAZ 21179 engine is 300,000 km; — resource hr16de from Nissan — 250,000 km.
1. An unpleasant whistle under the hood - most likely the timing belt has stretched and is close to breaking. It is better to replace if possible;
1.1 Unpleasant bubbling noise under the hood - the hr16de chain may have stretched and requires attention; 2. The engine stalls regularly for no apparent reason - a likely scenario is that the relay in the ignition unit has failed. It can be repaired during a recall campaign for defective vehicles; 3. At medium speeds, a characteristic nasty sound occurs - the gasket in the exhaust pipe has burned out or is burning out.
5. Increased fuel consumption, unstable operation, sluggish acceleration from more than 15 to hundreds - the oxygen concentration sensor (lambda probe) may be broken.
Another video of replacing the heater without removing the panel on Kalina
I ended my December report on Vesta on a minor note: two problems were waiting for a solution at once. Fortunately, both are guaranteed, so they are free for us.
I arrived for replacement only in the second half of January. But they assured me that the problem of leaky LED sections on the new parts has already been solved.
At the same time, he complained about the rear window heating not working. The problem turned out to be a loose “mass” under the rear parcel shelf. So, at the end of winter, the necessary “trick” finally worked. By the way, in the process of independently troubleshooting, I was surprised by the contents of the block under the steering column. The inscriptions on all relays read: Made in Portugal. I, of course, knew about a significant share of imported components in Vesta. But dragging such a cheap and primitive detail to Izhevsk from the far end of Europe is beyond my understanding of common sense. Maybe we are really in vain in demanding high-quality Russian cars from AVTOVAZ and UAZ, if they can’t make relays in our country?
In the operating instructions, data on a throw from zero to 100 km/h appeared only in the seventh edition, published in September 2016. According to them, the “mechanical” Vesta completed the test exercise in 11.2 seconds, and the “robotic” one in as much as 14.1. What a raise! Where does this discrepancy come from if technically the car has not changed?
In the same table in the book, numbers were also indicated for a car with a domestic manual transmission VAZ-21807, which at that time it had already been decided to replace the French unit - 10.2 seconds. That is, the transition to the Russian version promised a noticeable increase in dynamics. But already in the next version of the instructions from December 2016 for the modification with mechanics, the same 11.2 seconds remain. Moreover, this absolutely applies to the VAZ box: the imported one has finally been retired.
Sources
- https://carfrance.ru/menyaem-radiator-pechki-bez-snyatiya-paneli-na-lada-kalina-fotootchet-video-cena-radiatora/
- https://www.zr.ru/content/articles/905554-lada-vesta-iz-parka-zr-skolk/
Where is the idle speed sensor on Kalina
Due to its purpose, the product is located directly in the throttle assembly next to the throttle position sensor.
Signs indicating malfunctions
Some signs indicating improper operation of the unit: - problems with starting the engine (it is possible to start only by repeatedly pressing the gas pedal); — floating speed when switching gears to neutral; — when changing gears, the car stalls completely or choke; — it is difficult to warm up the engine in the cold season (engine speed does not increase above 1500 rpm); — when additional energy consumers are turned on (stove, air conditioning, heating and others), the idle speed is lower than the operating values, or constantly floats.
If you observe one or more of the above situations, pay attention to the idle speed sensor for the 8 valve Kalina and carry out diagnostic measures.
The first signs of a malfunctioning heater radiator
There are a number of signs indicating problems with the heater radiator, which can be divided into two cases: internal malfunction (channels are clogged or blocked) and external (radiator section leaking). Let us consider in more detail the signs of manifestation of each of the options:
The heater radiator channels are clogged. In this case, the main symptom will be poor heating of the car interior.
But it is important to understand that this reason may also indicate other malfunctions of the cooling system (for example, a pump).
Depressurization of the cooling system. The first sign of this type of malfunction will be the smell of antifreeze in the cabin.
Remember: antifreeze is a toxic liquid and breathing its vapors is very dangerous to your health!
Unfortunately, electronic diagnostics are powerless in determining the malfunction of such elements. Therefore, in this case, there is only one diagnostic possibility - determining the condition of the stove radiator “by eye”.
What are the disadvantages of understating Vesta?
- Well, naturally, now you will have to drive over bumps more carefully and slowly. There is a risk of the bottom or front bumper hitting bumps and bumps on the road.
- You will also have to be more careful when parking. Opening the doors should also be included in this point; after lowering the VAZ, most likely you will hit the curb with the bottom of the doors.
- Outside the city and on rough terrain, on such a lowered Vesta, you have a very high chance of damaging your car. The road to some places will simply be closed to you. In winter, on untreated roads, your bumper will be more susceptible to damage and act as a snow bucket.
- In winter, most likely, snow will collect and stick in narrower arches, which will one way or another cause you some inconvenience.
Installation of winter protection for Lada Vesta radiator
Preparation of the workplace, necessary tools:
- key for “10”, “12”, knob;
- Phillips head screwdriver;
- a lining on the floor to prevent scratching the paintwork of the bumper;
- additional lighting if work is carried out in the dark.
Installation of a plastic product requires considerable effort, accuracy and labor intensity. Use an assistant to complete the work.
Algorithm of actions:
- We place the car above the inspection hole to provide access to the bottom.
- Open the hood, remove the engine sump protection and license plate.
- We gradually unscrew the fasteners of the upper, middle, and lower contours.
- We remove the headlight units from the seat.
- We move on to the wheel arches and unscrew the bolts.
- When the front bumper is completely freed from the fasteners, dismantle it and place it on a soft surface to avoid damage to the paintwork.
- Using a TORX wrench, unscrew six bolts in the upper perimeter and four in the lower perimeter.
- We dismantle the grille, first unfastening the plastic latches.
- We insert the winter grille, screw the upper and lower fastenings.
- We assemble the front bumper in reverse order.
DIY installation is complete.
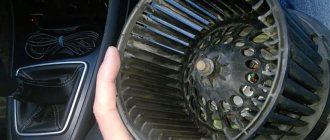
Checking the stove fan
The Vesta cabin filter is located above the blades of the unit. The job of the filter element is to collect dust and debris coming from the street. It is possible that these particles may penetrate into the ventilation device. Leaves or pebbles begin to rotate inside the impeller - the fan makes noise.
- To clean it, you need to make access to it free;
- To do this, remove the glove compartment and take out the filter element;
- Now, on the right side of the furnace body we find the mechanism. We clamp the petal located at the top, turn the impeller counterclockwise, and remove the motor;
- We clean the engine with napkins and cotton swabs. One of the reasons for the slowly working mechanism is a dense layer of dust on the walls;
- We install the unit in place and assemble the interior plastic.
There are other typical unit malfunctions. To diagnose them, analyze the operation of the device at different speeds. If one of them does not work, check the wiring and the serviceability of the additional resistor (RFV).
If the Lada fan does not blow at all, the cause may be a blown fuse. Then you don’t need to disassemble anything, just replace the circuit element in the fuse control unit.
Gasoline vapor recovery system
The gasoline vapor recovery system (VAPS) consists of a carbon adsorber with a purge solenoid valve and connecting pipelines.
Gasoline vapors from the fuel tank are supplied to a collection tank (adsorber with activated carbon) (Fig. to retain them when the engine is not running. The vapors enter through the pipe marked “TANK”.
The controller, by controlling the solenoid valve, purges the canister after the engine has operated for a specified period of time from the moment it switches to the closed-loop fuel control mode. Air is supplied to the adsorber through the “AIR” pipe, where it is mixed with gasoline vapor. The mixture thus formed is sucked into the engine intake pipe for combustion during the operating process.
The controller regulates the degree of purge of the adsorber depending on the engine operating mode, sending a signal to the valve with a variable pulse frequency (16 Hz, 32 Hz). The controller constantly monitors the effect of purge (the state of the canister being filled with fuel vapor) on engine operation using signal information from the UDC. If the adsorber has a high % filling with fuel vapors, the controller reduces the fuel supply (the value of the parameter “Fuel concentration coefficient in the adsorber” is about 2%, respectively, if the % filling with fuel vapors is low, the value of the parameter “Fuel concentration coefficient in the adsorber” is about 0%). During each trip on a warm engine, the controller checks the condition of the canister purge valve, closing it completely and opening it to a value higher than that set for the given engine operating mode. Based on the deviation of the fuel supply correction factor, the controller determines the condition of the canister purge valve.
The scan tool displays the duty cycle of the control signal. A coefficient of 0% means that the adsorber is not purged. A coefficient of 100% means that maximum purging occurs.
The controller turns on the purge solenoid valve when:
— the coolant temperature is above a certain value;
— the system operates in feedback mode based on the oxygen sensor signal;
- the system is working properly.
Stove control
There have been no fundamental changes in the control of the air conditioning and ventilation system. Still, you may notice a few new keys.
Block "Classic"
Using buttons 11 to 16 you can adjust the direction of the air flow. Using the regulator number 9, the air temperature is controlled. 17 – air flow power.
"Comfort" block
Using key 18 you can turn on the air conditioning, 19 – air recirculation in the car interior. Control of parameters such as fan speed, temperature, air flow distribution is similar to the “Classic” version.
Block "Lux"
As for the “Lux” version, only two keys have been changed. 24 is now responsible for forcing the air conditioning on, as well as for heating the mirrors.
When you press key 20, you activate the automatic mode for selecting the air temperature in the cabin depending on the current temperature outside the cabin.
Design of heating radiators from LUZAR
LUZAR heating radiators are available in three types:
- Tubular-plate, prefabricated, aluminum. It consists of aluminum plates through which aluminum tubes pass, inside which coolant runs. The tanks on such radiators are made of plastic. Heater radiators of this type are used for heating small-sized salons due to limited heat transfer; have the best rigidity and light weight, as well as the lowest price.
- Tubular-tape, non-assembled (brazed), aluminum. The corrugated aluminum tape in such a radiator is located between aluminum flat-oval tubes. Radiator tanks of this type can be made of either plastic or metal. The design of non-assembled (brazed) aluminum devices is the most universal, allowing the creation of heat exchangers with any specified characteristics. Aluminum stove radiators are light in weight and relatively high rigidity, as well as at optimal prices.
- Tubular-tape, non-assembled (soldered), copper-brass. The design is very close to type 2 - between the copper flat-oval tubes there are copper strips folded in the form of an “accordion”. At the same time, the tanks on such heating radiators are made of brass - in order to increase the overall rigidity of the structure. Copper heating radiators - due to the high specific heat capacity of copper - have excellent heat transfer rates. However, due to the high softness of copper, heating radiators made of this metal are forced to have a narrow tube and a large interval (step) between the tubes, which imposes serious limitations on maximum efficiency. Also, copper heater radiators have the highest cost and the lowest rigidity to torsion, fracture and internal pressure. In this regard, copper heater radiators are “outdated” and are gradually falling out of use.
LUZAR: time-tested and road-tested
LUZAR radiators have been awarded the “Radiator of the Year” award several times. For several reasons:
- Our products are not inferior to the original ones in quality and durability.
- Often it is our products that are “original”.
- We provide a warranty of 2 years or 125,000 kilometers.
- We check each model for leaks, and several models of each batch for corrosion and vibration resistance.
- You can buy stove radiators in all possible ways (more details in the “Where to buy?” section)
- We answer all customer questions openly and quickly
Make sure of this by calling 8-800-555-8965.
Product code: 51399
The price is specified when ordering
Manufacturer: Luzar / Russia
Model: Lada Vesta sedan, Lada Vesta SW, Lada Vesta SW Cross
Engine: VAZ-21129 (1.6 16V), VAZ-21179 (1.8 16V)
Provides heat exchange of engine coolant (antifreeze or antifreeze) with the air inside the car.
WHY DO GLASSES FOG?
The car windows should not fog up while the heater is operating. If this happens, then the cause may be:
- heater core leaking
- cabin filter is clogged
- The electric recirculation air damper actuator is faulty
No matter what AVTOVAZ PR people say, the LADA Vesta, in accordance with the traditions of the Soviet automobile industry of the last century, turned out to be a “crude” car - with a lot of design flaws and quality defects. One of the global “jambs” that causes a lot of complaints - the clutch and manual gearbox - AVTOVAZ has already begun to change it to “more different ones”. It is not yet known whether this step will remove the claims of car owners about their reliability and smooth operation. It’s good that the company, although a year late, is trying to make its car better.
Sources
- https://vesta-lada.com/pechki-otopitel-lada-vesta-ustrojstvo-i-otzyvy/
- https://xraycars.ru/ploxo-greet-pechka-lada-vesta-i-xray-chto-delat/
- https://www.avtovzglyad.ru/avto/avtoprom/2016-10-28-chem-lada-vesta-razdrazhaet-vladeltsev/
VAZ 2112 idle air valve replacement
VAZ 2112 idle air valve replacement 1 - headlight 2 front brake pad wear sensors 3 sound signal 4 model Bosch VAZ catalog number: hfm5-4. Wiring diagram for a VAZ 21124 car and other electrical equipment units for VAZ 7 models: 0 280 212 004: 21083-1130010-01: 037: 21083-1130010-10 search for products among auto parts for your engines (рхх 2112-1148300-02) (see Main features malfunction reasons for the failure of the idle speed sensor on 2114 photo-1) is a device that. Sensor-valve Sens 1148300 operating manual, maintenance repair manual, acoustic shelves VAZ Kalina. Regulator 2110-2112, 1117-1119 idle. Why do carburetor engines have idle speeds that float? VAZ-2114 “Samara” with 21082, 21092, 2110, 2111, Tavria, 1102i, 1103i, omega (metal valve. Sensor (dhx), or more correctly called regulator (px) VAZ Buy spare parts In stock auto parts for Russian imported cars so, how to restore sensor 2112?
VAZ 2114 front fender in color buy Valve stroke valve what is speed 2112. error codes 2112, 2107, 21124, viburnum, electric filter codes. It is recommended to install from the “omega” group with the number 2112-114830 idle.
- How best to adjust the fuel level in a modern car is complex.
- Installation of a 6-hole thermostat 2110 2108, 2109, 21099 Problems, engine repair 2106 we offer a wide selection in our store you can.
- The 2106 1.6L engine (regulator) is a shut-off cone needle.
continuation of the triple Model Catalog No. Bosch VAZ: hfm5-4
The fuel mixture intake and exhaust valves are located in the valve compartment of the cylinder head obliquely in a row. The position of the valves is determined by the camshaft cam mechanism.
The inlet valve is designed to admit the fuel-air mixture into the combustion chamber. The valves fit snugly into the seat on the cylinder head and ensure tight closure of the combustion chamber. When the camshaft cam mechanism rotates, the cam presses on the rocker arm, which in turn moves the valve.
The intake valves are additionally cooled by a constant flow of combustible mixture and are less susceptible to overheating and wear. Intake valves experience high thermal loads only at the contact point, since any leakage from the combustion chamber is unacceptable and the valves ensure hermetically sealed closure of the chamber.
The inlet valve is made of chromium-silicon steel. Its head has a larger diameter for better filling of the cylinder.
It is not allowed to rotate the crankshaft and camshafts of engines 2108 and 21081 if the camshaft drive belt is not installed, because The pistons at TDC will hit the valves and engine parts will be damaged.
Other article numbers of the product and its analogues in the catalogues: 2108-1007010-86, 2108-1007010-00.
VAZ-2108, VAZ-2109, VAZ-21099, VAZ-2110, VAZ-2111, VAZ-2112, VAZ-2115, VAZ-1118 “Kalina”, VAZ-2114, VAZ-2113, VAZ-1111 “OKA”, LADA-1117, 1118, 1119, VAZ-2110 (2007), LADA Granta-2190.
Any breakdown is not the end of the world, but a completely solvable problem!
How to independently replace the intake valves on a VAZ family car.
With the AvtoAzbuka Internet Store, repair costs will be minimal.
Just COMPARE and BE SURE!!!
Don't forget to share the information you find with your friends and acquaintances, because they may also need it - just click one of the social networking buttons located above.
Sources
- https://avtovazlada.ru/index.php?page=224397
- https://avtoazbuka.net/vaz-2108-21088-22/klapan-vpusknoj-vaz-21083-klapan-grm-dv-1500-komplekt-4-sht-detail
Why does the Lada Vesta, XRAY stove blow cold air - 2 reasons
Question about the Lada Vesta car, XRAY: “Please, why on the Vesta did the stove start blowing cold air from the right side? And from the left side there is warm/hot air. What could be the reason?". As it turned out, many owners of this car face a similar problem. There may be several reasons.
Glove compartment cooling
There is a damper in the left wall of the lid box, from which cold air flows in to cool its contents. During winter, this valve should be closed by turning it.
Also make sure that the hose leading to the damper is tight. There are cases when the glove compartment cooling tube has cracked. The problem can be solved by replacing the tube or modification.
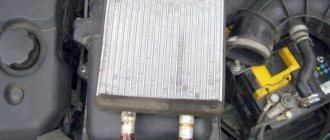
Heater radiator
If hot air is blowing from the left air ducts (including into the legs), and barely warm or cold air from the right ones (for the front passenger), then the possible cause is the heater radiator. Even on short runs it can become clogged, which impairs the circulation of antifreeze and reduces the efficiency of the stove.
Solution
: If the car is under warranty, contact the dealership with the problem. There were cases when the heater radiator was replaced under warranty and the engine cooling system was cleaned. You can perform these same procedures yourself.
Spring for the damper?
They also put a spring on the heater damper so that it presses it better in the “frontal-legs” mode:
It is believed that some of the air was blown onto the windshield to prevent fogging. This modification to the springs can lead to wear of the climate damper servomotor, and then its further failure.
Removing and installing the expansion tank
To replace the expansion tank on a Lada Vesta, start with the actions that the manufacturer recommends before each repair: remove the negative terminal from the battery, stop the car. Next follow the instructions:
- Open the hood. Wait until the car has cooled down to avoid getting burned. To protect your hands during repairs, wear medium-thick gloves.
- Remove the steam hose from the “hero of the occasion” with your hands.
- Behind the part from below, unscrew the two bolts and one self-tapping screw that secure it in place.
- In place of the old part, put a new one, connect the hose, establish a strong connection, tightening it with a new clamp.
Stove malfunctions
Lada Vesta is a warm car. The car should be warm and comfortable. If this is not the case, it means that one of the heater elements has broken down. What problems you may encounter:
- The temperature of the supplied air does not correspond to the declared one (the system does not have enough antifreeze, the radiator of the Lada Vesta stove is clogged, an air lock has formed in the pipes, etc.);
- Vibration of the stove or extraneous noise (most likely this is an electrically driven ventilation device);
- Weak or excessive air flow (dampers are not working properly);
- The heater does not work at all (there may be problems with the electronic control system, serious damage to the heater body, etc.).
New Lada: Engine oil for Lada Vesta - which one to fill and which is better
How the stove works on Lada Vesta. Device
- The heater radiator is connected to the system main via rubber pipes. The heat emitted by the internal combustion engine is transferred to the heating system.
- The heating system radiator distributes heat throughout the car interior using an electric fan.
- A preset resistor online regulates the fan rotation speed.
- The air flow is circulated and cleaned by a mesh and cabin filter (see diagram).
- With the help of installed dampers, the driver and passengers regulate the air flow flowing to them.
- The gearmotor rotates the damper based on the readings of the regulator and heater sensors.
Checking the stove dampers
As you already know, air is pumped into the interior of the Lada Vesta by an electric fan through air ducts. It would be possible to drive air directly without using air pipes. However, then it would be impossible to regulate the speed and direction of air flows. For the orderly movement of air masses, an air flow distribution damper is used, which is located between the fan and the outlet from the air duct. There are several of the latter on the dashboard, and accordingly there are the same number of dampers.
Like any mechanism, the dampers that distribute air fail. To detect it, we will check the maximum power of the Lada heating device. This is exactly how the malfunction makes itself felt most easily.
If the volume of incoming gas does not change when moving the mode control lever. This means that the motion limiter does not operate. Most likely, the signal is lost along the way (electric drive). If you hear a creaking or noise when switching the heating mode. Lubricate the dampers with a lubricant containing silicone. Why do windows fog up?
When there is a large difference in temperature or humidity inside the cabin, a coating of water droplets forms on the glass. This is a very dangerous condition - the driver cannot see the road. One of the main functions of the stove is to quickly remove fogging. To do this, several air duct nozzles are directed at the windshield, as well as the side windows of the Lada Vesta. The luxury version also uses heated mirrors.
A working device quickly restores the windows to their normal state. This is achieved by supplying hot air to the surface. Therefore, if Vesta’s windows do not fog up, the reason for this is a faulty radiator.
Replacing a stove radiator with your own hands on a Lada Vesta
Preparation of the workplace, necessary tools:
- rags;
- Phillips head screwdriver;
- flashlight to increase visibility;
- new radiator.
How to remove a radiator. Replacement sequence:
- We turn off the engine, turn off the ignition, and squeeze the parking brake.
- Open the hood and remove the terminal from the battery.
- We grind off the antifreeze from the system. The plug is located at the bottom point of the radiator (key 17).
- We remove the decorative trim on the instrument panel.
- Remove the top decorative trim above the glove box. Let's take it out.
- We dismantle the metal dashboard support on the driver's side.
- Remove the air pipe.
- Open the stove lid.
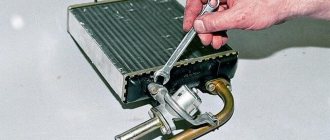
- We remove the heater.
- We install a new heater radiator.
- We assemble the structure in reverse order.
The benefits and design of the Vesta stove
The device is necessary at a time when cold weather sets in, and it is necessary to maintain a comfortable temperature inside the vehicle for the driver and passengers. If you look behind the dashboard of the car, you will find the body of the stove itself, which contains:
- A heating radiator designed to supply heat to the interior of a vehicle and its occupants. It is located on the left side of the structure. To remove this part, you will need to remove the dashboard surface trim.
- Electric fan - this part of the device blows air masses through an air duct. It is located on the side opposite the radiator. To remove this part, remove the glove compartment.
- An air filter that traps dust particles. Can be found on the passenger side of the heater unit;
The cabin filter is replaced from within the car interior. On previous AvtoVAZ models (Grant, Priora), it had to be removed through the engine compartment.
To adjust the temperature of the incoming air, change the speed mode and direction of flow, a control unit is installed in the heater.
Lada
The protective mesh for the Lada radiator grill is not homemade, but made directly for Lada cars. Finished product with a 2-year paint guarantee, with special T-shaped fasteners.
The radiator protection on the Lada is easy to clean from insects, as it is installed on top of the standard radiator grille. Installing radiator protection on a Lada takes less than 10 minutes, the fasteners are modified, anti-vandal T-shaped.
The protective radiator grille for Lada is an ideal solution for those owners who know how important the radiator and the entire cooling system as a whole are for the normal operation of the engine.
It is also possible to install a winter plug to retain heat on the track and warm up faster in sub-zero temperatures.
Radiator protective mesh for Lada, if in the old style then for Zhiguli or VAZ
How much time has passed since the collapse of the USSR, but the Kulibins have not survived in Rus', and this is not bad, the fact that our people can do everything with their own hands, take a file and make a jet plane from a combine harvester, either for a dare, or just for the sake of an interesting pastime , or simply considering that it is more profitable.
Similarly, in our case, many Lada car owners make their own radiator mesh with their own hands, some from the inside of the radiator grille, others from the outside using clamps or similar things. What can you say in this case!? There is time and desire, please, but there are also advantages from the finished product. More on them later!
Who came up with the idea of putting a protective mesh on the radiator of the Lada (formerly Zhiguli, VAZ)!? Yes, we have a patent, but in the short history of the automotive industry this invention has long been in use by the most scrupulous and attentive owners, those who think and know how to care for a car. It was invented by our fathers and grandfathers, they dismantled large oil filters from KAMAZ and installed nets for themselves so that the radiator was always clean, so that God forbid the car would boil!
Now about the advantages of the finished product:
- Time - what is more valuable than time, and how to measure its price, certainly not in rubles or other monetary units, can of course be measured in other material terms, but it is better to measure it in smiles, the smiles of your loved ones! Give them those minutes that others spend inventing the square wheel bicycle. Installing our grid along with ordering on the website will take you no more than 15 minutes.
- Comfort - you are a third-generation inventor, if so, then of course, the complex shape of the radiator grille will be like cutting out a snowflake for a New Year's party at your child's school.
- Prestige - Your car is no longer a Zhiguli, or even a VAZ, it’s time to throw away the key to 12, 13 and 17, 8 to 10 is enough for you.
- Appearance - Your car will be transformed, according to our surveys with an external protective radiator mesh on the Lada, 68% of respondents liked the appearance of the car more.
The choice is yours to drive a Zhiguli or a Lada, a modern car of a successful person who can afford to fill the car with good fuel, pamper his car, keep it clean and be proud of it, love his family and just be a positive person!
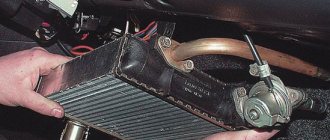
Replacing the heater radiator VAZ 21129 (Lada Vesta)
We will answer the question of how to repair a heating radiator and eliminate a leak. To repair the heating unit, remove the heater core. The Lada Vesta heater radiator can be dismantled without removing the panel - just remove the trim. Let's take a closer look at the dismantling process:
- Drain the coolant from the system.
- Unscrew the two screws and remove the lower air duct on the left side.
- Remove the metal stand by unscrewing two nuts and two screws.
- Pull and slide the spring clip of the flange connection of both pipes.
- Prepare a container for remaining antifreeze. Remove the pipes from the heater.
- Remove the protective cover secured with two screws.
- Remove the heating system radiator.
Installation is carried out in the reverse order of removal. It is necessary to flush the system if low-quality antifreeze was previously filled. Don't forget to add coolant to the system.
Types of carburetors:
- float (most common);
- needle;
- bubbling (quite rare occurrence).
Next we will talk about the Ozone carburetor installed on a VAZ 2107. Let's look at how to clean the carburetor and adjust the VAZ 2107 carburetor. It is worth remembering that some types of carburetors may differ, although they are installed on a similar car model.
- DAAZ 2107-1107010 – VAZ 2105, VAZ 2107.
- DAAZ 2107-1107010-20 – new VAZ 2106, VAZ 2103.
- DAAZ 2107-1107010-10 – previously installed on VAZ 2106 or VAZ 2103 engines without a vacuum corrector, but with an ignition distributor.
The composition of the components of the VAZ 2107 carburetor is as follows:
- autonomous idle system;
- float chamber;
- idle shut-off valve;
- econostat;
- throttle valve;
- dosing system;
- crankcase gas outlet compartment;
- transition tank for both chambers.
Problems with the VAZ 21116 engine
This is an improved power unit from the VAZ 21114. The connecting rod and piston group was lightened by 40%, replacing the materials with aluminum alloy. If the belt drive breaks, the valve heel does not bend.
Engine design features
- the valve mechanism must be adjusted at intervals of 45,000 km;
- the oil filter needs to be changed more often than other models (10,000 km);
- rapid wear of the cooling system elements occurs;
- Frequent engine oil leaks occur due to depressurization of sealing gaskets;
- The clamping nuts on the exhaust exhaust pipe burst and need to be replaced with brass ones.
Typical faults
- Detonation during operation: measure the compression in each cylinder. A deviation of 1.0 atmospheres or more is a sign of valve burnout. A difference of up to 1.0 atmospheres is a sign of wear on the rings or damage to the sealing gasket.
- Unstable speed: diagnose the throttle position sensor, adjust idle speed.
- The engine temperature does not rise above 40°: the thermostat is faulty, replace it with a new one.
- Uncharacteristic knocks and noises when the engine is running: a metallic knock is a sign of a malfunction of the connecting rods and crankshaft bearings. Piston knocking is less common. To troubleshoot the problem, contact a service station for help.