In accordance with the Traffic Rules, operating a car with external lighting devices that do not operate in the prescribed mode or do not meet the design requirements of the vehicle is strictly prohibited, since it contradicts the safety of drivers and pedestrians. Regular monitoring of the condition of light bulbs and their timely replacement will help you avoid fines, reduce costs and preserve your health.
Below is a table of lamps used in Lada Vesta and Lada Xray, as well as recommended manufacturers. We hope that this will help you understand the abundance of light bulbs offered on the auto parts market and make the right choice.
DSC_9678 (Copy)
The turn signal lamp is located higher than the brake and side light lamps.
Shown with trunk trim retracted. The turn signal lamp is located higher than the brake and side light lamps. Shown with trunk trim retracted.
If you need to replace one of the lamps, just open the valve in the upholstery, secured with a Velcro fastener.
Rear fog light
_x000D_
The rear fog light is installed at the bottom of the rear bumper of the car. It uses LEDs as light sources. The design of the lantern is non-demountable. If 2 or more light sources fail, the fog lamp assembly is replaced.
_x000D_
_x000D_
DSC_9672 (Copy)
To replace the brake signal lamp and side light, stick your hand in, feel for the larger socket and, turning it counterclockwise, remove it from the hole in the upholstery.
To replace the brake signal lamp and side light, stick your hand in, feel for the larger socket and, turning it counterclockwise, remove it from the hole in the upholstery.
Further, for clarity, replacing lamps is shown with the trunk upholstery removed.
Characteristics of the Lada X Ray Cross model 2022
The new model line differs from the previous version by the increased diameter of the wheel rims, higher ground clearance and plastic body protection.
New body
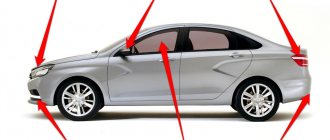
Having carefully studied the photo, you will notice that the model differs from its predecessor in small details. This is a slightly elevated body position and aggressive design style. The small front end appears more massive thanks to the high and wide hood and X-shaped radiator trim.
The car features sporty side diffusers, a set of paired fog lamps and a large metal-plastic body kit. The side reveals dynamic and vibrant details to car enthusiasts:
- wheel arches have protective inserts;
- many elements of graceful stepped relief;
- three-section windows are characterized by a black perimeter and extended mullions;
- the roof line smoothly turning into the stern.
The plastic body kit performs protective and decorative functions. The crossover status is also confirmed by the details in the rear of the car.
The improved Lada can be distinguished by the following features:
- the spoiler visor has an enlarged format;
- The high tailgate features oval glazing;
- the rear optics have a different shape and are mounted on wide stands.
The wide body kit of the new model has three reflectors. In the cutouts of the shaped metal diffuser there is a pair of exhaust pipes, eyes and a towbar bracket.
Salon
Since the car has a budget status, the quality of the interior decoration and decoration leaves much to be desired. This is due to the use of several types of fabrics and inexpensive plastic.
DSC_9706 (Copy)
Pressing the lamp, turn it all the way counterclockwise and remove the lamp from the socket.
Pressing the lamp, turn it all the way counterclockwise and remove the lamp from the socket.
We install the new P21/5W lamp in the reverse order. In this case, two protrusions, located asymmetrically relative to the axis of the lamp, must fit into the corresponding grooves of the socket.
Lada Vesta lamps
Products from the Dustershop77 range on the topic of the article:
| Image | vendor code | Name | Manufacturer | Price | Availability | Add to cart |
| DC348-64210-01B | Lamp for low beam headlights OSRAM H7 55 W 64210-01B | Original | 500 / 400 rub. Discount: 350 rub. | >10 | ||
| DC346-OSRAM2825 | W5W OSRAM lamp for front side lights, license plate lights (Duster, Captur, Logan, Sandero, Largus, Terrano) | Original | 100 / 60 rub. Discount: 50 rub. | >10 | ||
| DC347-1987302201 | Lamp for side lights, rear brake lights, reversing light - BOSCH P21/5W | Original | 100 / 50 rub. Discount: 40 rub. | >10 | ||
| DC1463 | Instrument panel and heater illumination lamp (W1.2W original) | Original | 80 / 50 rub. Discount: 40 rub. | 9 | ||
| DC1860 | Button illumination lamp Logan, Largus, Sandero (1 pc.) | Original | 50 / 30 rub. Discount: 20 rub. | >10 | ||
| DC1574 | Instrument and heater illumination lamp w1.2w baseless with socket | Analogue | 90 / 60 rub. Discount: 50 rub. | >10 | ||
| DC349-64150-01B | Main beam lamp OSRAM H1 55 W 64150-01B | Original | 500 / 400 rub. Discount: 250 rub. | >10 | ||
| DC1571 | Double-filament lamp (dimensions-DRL or dimensions-brake) 21W5W | Analogue | 130 / 70 rub. Discount: 60 rub. | >10 | ||
| DC1283-FORTLUFT2825 | W5W Fortluft lamp for front side lights, license plate lights (Duster, Captur, Logan, Sandero, Largus, Terrano) | Analogue | 50 / 30 rub. Discount: 15 rub. | 3 | ||
| DC1570 | Turn signal lamp front=rear PY21W orange | Analogue | 130 / 70 rub. Discount: 50 rub. | 7 | ||
| DC1929-6025370411 | Illumination lamp for the control unit Largus, Logan, Duster, etc. 6025370411 original | Original | 200 / 150 rub. Discount: 120 rub. | >10 | ||
| DC1573-P21W | Lamp P21W 12V (for foot, fog, reverse, etc.) | Analogue | 100 / 70 rub. Discount: 50 rub. | 8 | ||
| DC1575 | PTF lamp socket H11 (Duster 2011-2015 and analogues) | Analogue | 290 / 250 rub. Discount: 200 rub. | 4 | ||
| DC1572-921NA | Lamp WY16W 12V 16W Osram 921NA | Analogue | 160 / 120 rub. Discount: 100 rub. | 6 | ||
| DC1577 | Additional brake light bulb w16w 12v | Analogue | 90 / 60 rub. Discount: 50 rub. | >10 | ||
| DC1576 | PTF lamp socket H16 (Duster 2015- and analogues) | Analogue | 900 / 700 rub. Discount: 500 rub. | 2 | ||
| DC1528 | BOSCH turn signal lamp WY5W 12V-5W orange glow | Analogue | 200 / 150 rub. Discount: 100 rub. | 9 | ||
| DC2055-7701040849 | Lamp for low beam headlights Duster, etc. H7 55 W halogen original 7701040849 | Original | 900 / 700 rub. Discount: 500 rub. | 3 | ||
| DC2056-7703097176 | Lamp for high beam headlights Duster, etc. H1 55 W halogen 7703097176 | Original | 500 / 400 rub. Discount: 250 rub. | 5 | ||
| DC2057-262923820R | PTF lamp socket H16 (Duster 2015-, 2021-, etc.) original 262923820R | Original | 1900 / 1600 rub. Discount: 1400 rub. | 1 | ||
| DC299 | Set of LED lamps | 1700 / 1000 rub. Discount: 700 rub. | 0 | |||
| DC671 | LED board in a lampshade with three lamps (cold light 5500K) | 1300 / 1000 rub. Discount: 800 rub. | 0 | |||
| DC666 | LED board in a lampshade with one lamp (warm light 4000K) | 1200 / 800 rub. Discount: 700 rub. | 0 | |||
| DC668 | LED board in a lampshade with two lamps (warm light 4000K) | 1300 / 850 rub. Discount: 750 rub. | 0 | |||
| DC669 | LED board in a lampshade with two lamps (cold light 5500K) | 1300 / 850 rub. Discount: 750 rub. | 0 | |||
| DC667 | LED board in a lampshade with one lamp (cold light 5500K) | 1200 / 800 rub. Discount: 700 rub. | 0 | |||
| DC670 | LED board in a lampshade with three lamps (warm light 4000K) | 1300 / 1000 rub. Discount: 800 rub. | 0 |
Front body design
- Front fender aprons (mud flaps) are internal panels that fit around the wheel and protect from dirt. They are partially welded to the side members. Mud flaps also add structural rigidity to the body.
- The upper mudguard reinforcement is a structural element of the front part of the body. The front fenders are screwed onto it.
- Body cups are reinforced body parts that support the top of the suspension struts. They are formed as part of the body mud flaps.
- The radiator frame (radiator support, engine compartment frame) is a structural element located in the front part of the body and holds the cooling system radiator, hood latch and other adjacent elements of the car. The radiator frame is attached to the side members and mudguards. It stiffens the front part of the body as a transverse structural element.
- The engine compartment shield (or front bulkhead) is a panel dividing the front section of the body and the central section of the cabin. The engine compartment shield helps protect the driver and passengers in the event of a fire in the engine compartment. Behind the shield is a power structure that protects the driver and passengers at the time of an accident.
- The front fenders are located next to the front doors and extend to the front bumper. They cover the front suspension and the front mudguards. On modern cars, the fenders are usually bolted to the body.
- The bumper reinforcement is screwed to the front of the side members and is designed to absorb the impact in an accident.
Installation
Disassembly
The process of creating illumination for the rear seating area of the Lada Vesta and X-Ray begins with the dismantling of the rear door panels. In general, there is nothing complicated in this process. You just need to work carefully.
First you need to remove the window handle. To do this, you need a plastic spatula from a special kit for disassembling doors. However, if you don’t have one, you can use a thin screwdriver or a knife, but you must first wrap the tool with cloth so as not to damage the plastic.
Plastic tool for work
Use a spatula to pry the handle from the reverse side, which will allow you to disengage the latch and remove it. All that remains is to remove the handle itself. For Vesta and X Ray, the operating algorithm is the same.
The process of removing the handle is demonstrated in the video
Next, use the same spatula to remove the facing trim on the door handle, behind which 2 fastening bolts are hidden. They need to be unscrewed by 10.
All that remains is to unscrew the screw at the very bottom of the door, and then unclip the door card itself, which is held on by the pistons. According to the experience of owners, sometimes clips break, so you should be prepared to buy new ones.
The X-Ray door trim fastening is slightly different. After removing the handle, you need to unscrew the 3 screws that secure the cover to the metal. One bolt is located in the handle, the second in the central part, and the third at the end. When they are unscrewed, all that remains is to snap off the card with the pistons.
Location of bolts on X-Ray
At this point, the dismantling process during the creation of illumination of the rear seating area of the Lada Vesta and X-Ray is completed.
Seating
They need to be cut at the bottom end of each door card to the shape of the lampshade so that it can be securely fastened. If you purchased lampshades from Priora, the seat dimensions will be 25/61 mm.
Better to use a drill
For work, it is recommended to use a drill, but if you don’t have one, a stationery knife will also work, although working with it is not as convenient, and the process will take much more time.
Ceiling lamps
In the process of creating illumination for the rear passenger seating area of the Lada Vesta and X-Ray, car owners are faced with the lack of plugs on the lampshades. If the door card has to be removed in the future, which is very likely, it is necessary to be able to quickly turn off the backlight.
It is recommended to solder plugs to the lampshades
To do this, connectors are purchased separately and soldered to the lampshade, after which it is recommended to fill the soldering areas with hot-melt adhesive - this will increase strength and guarantee high-quality insulation.
Transmission
The main purpose of the transmission is to transfer torque from the engine crankshaft to the wheels. The elements of which it consists have the following names:
A clutch, which is two friction discs pressed against each other, which connect the engine crankshaft to the gearbox shaft. This connection of the shafts of the two mechanisms is made detachable so that, by pressing the disks, it is possible to break the connection between the engine and the gearbox, to change gears and change the speed of rotation of the wheels.
This is a power transmission that connects the engine with the driving wheels of the car.
- Gearbox (or gearbox). This unit is used to change the speed and direction of movement of the car.
- A cardan transmission, which is a shaft with articulated joints at the ends, serves to transmit torque to the rear drive wheels. It is used only in rear-wheel drive and all-wheel drive vehicles.
- The main gear located on the drive axle of the vehicle. It transmits torque from the driveshaft to the axle shafts, changing the direction of rotation by 90°.
- A differential is a mechanism that serves to provide different rotation speeds of the right and left drive wheels when the car turns.
- Drive shafts or axle shafts are elements that transmit rotation to the wheels.
Steering
The main internal parts of the cabin on the driver's side are the steering wheel and the dashboard - the control and monitoring panel for all automotive systems. The steering is designed to move the car and consists of main spare parts.
- steering wheel (steering wheel) with column;
- steering mechanism:
- drive (side rods, rotary and pendulum lever);
- power steering.
Structurally, power steering, designed to make it easier for the driver to turn the steering wheel, has been transferred to passenger cars from trucks. For example, when turning the steering wheel of a KAMAZ truck without power steering, the driver would have to apply an effort equal to turning a load weighing 400 kg. Depending on the type of reinforcement used, drives are named and classified into hydraulic, mechanical, pneumatic, etc.
The steering system remains the simplest in the vehicle configuration, but one of the most important. The steering linkage connects the steering wheel to the front wheels through the steering gear. The transmission of the rotational movement of the wheel turns into the translational movement of the rack in the horizontal plane.
Chassis
The complex of mechanisms and parts that serve to move the car and dampen the resulting vibrations and vibrations is called the chassis. The chassis includes:
the frame to which all other elements of the chassis are attached (in frameless cars, elements of the car body are used to attach them);
The chassis is a set of devices that interact with each other to move the vehicle along the road.
- wheels consisting of disks and tires;
- front and rear suspension, which serves to dampen vibrations that occur during movement, and can be spring, pneumatic, spring or torsion, depending on the damping elements used;
- axle beams that serve to install axle shafts and differentials; they are only available in cars with dependent suspension.
Reviews
| № | Positive |
| 1. | Nikolay Dmitrievich (drive2.ru): the car is three years old, the original license plate lamp is installed, there are no comments on the work. |
| 2. | Semyon (prom.ua): on the advice of his comrades, I replaced the stock NZ lighting lamps with LED ones. |
| 3. | Sergey (drom.ru): the NC backlight is installed as standard, no comments. Maybe in the future I will install LED backlighting. |
| 4. | Konstantin (rozetka.ua): in three years of operation of the car, I replaced the NC light once; it burned out on the left side. I didn’t contact the service, I managed it on my own. |
| 5. | Vladimir (Auto.ru): after the winter, the glass on the NC backlight began to fog up. Disassembled, cleaned, wiped, installed back. Since then the glass has not sweated. |
| 6. | Nikolay (Auto.Mail.Ru): the current backlight works flawlessly; in four years I replaced the lamp on the right side once. |
| 7. | Kirill (drive2.ru): lighting is just lighting, I can’t say anything special. Maybe I'll install diodes, they are brighter than their stock counterparts. |
| 8. | Sergey (drive2.ru): lighting is similar to Lada Kalina, Granta, Priora. The technology has been copied, even the lamps are identical. |
| Negative | |
| 9. | Vladimirovich (prom.ua): the rear license plate light on the left side systematically burned out. Changed it three times. After carrying out a comprehensive diagnostic at the service station, it turned out that the reason was in the fuse for the license plate illumination. |
| 10. | Alexander (Bibika.ru): loose fixation of the lamp in the base leads to the lighting flickering. I contacted the service for a replacement under warranty - they refused because it was not a warranty issue. Managed it on my own. |
| 11. | Valentin (drive2.ru): the backlight is dim, the light is yellow, in a word, it’s not good. |
| 12. | Semyon (Avtodispatcher.ru): I recently replaced the NC lighting, now the license plate is visible from a distance of at least 50 meters. |
Side light circuit
It's very easy to replace the side light bulb yourself.
In order to save fuel and reduce the load on the generator, daytime running lights are now often included in this circuit, which makes it quite complicated.
The standard wiring option is quite simple and consists of the following elements:
- circuit breakers;
- front and rear position lamps;
- central or key switch;
- Let's take a closer look at the first two elements.
Read more: Liquid for cleaning valves from carbon deposits
Circuit breakers
Sometimes blown fuses are the reason why the side lights do not light up on one side or another.
There are usually two fuses in the circuit, for the left and right sides separately. Since the light bulbs consume little power (4-5 W each), the fuse rating is small, only 5-7.5 A.
Where are the side light fuses located?
In the same place as the others, in a single block. On most modern cars, this block is located under the instrument panel next to the steering column, or, more often, on the lower left, under a plastic trim.
In the latter case, it is enough to remove the cover protecting the unit, mounted on latches. On the back of the cover, as a rule, there is a sticker with information about which circuit this or that fuse protects, indicating its rating.
The biggest inconvenience in this case may be insufficient knowledge of the English language - it is in this language that inscriptions are usually made, even on Korean and Japanese cars.
Choice
First of all, let's look at which low beam lamps on the Priora are installed by the manufacturer. So, if you carefully examine the headlight unit of this car, you will notice that it is divided into several compartments. This indicates that the headlight uses bulbs with a single filament, i.e. separately for high beam and separately for low beam.
As for the base, it complies with the H7 standard. There is a wide range of such lamps on the market. Their main difference lies in the principle of operation. So, in addition to the halogen bulbs that are installed on the Priora as standard, you can also find xenon (gas-discharge) and LED bulbs.
It should be noted that the main parameters of lighting elements, including brightness and durability, depend on the operating principle.
H7 standard halogen bulb
Below is a comparison table with the main characteristics of different low beam bulbs:
| Characteristics | LED | Halogen | Xenon |
| Maximum brightness | Up to 2000 lm | Up to 1550 lm | Up to 3300 lm |
| Durability | Up to 50000 | Up to 1500 hours | Up to 3000 hours |
| Optimal power | 18 W | 45-60 W | 35 W |
| Colorful temperature | Up to 3000K | 4000-7000 K | 4000-8000K |
Note! Experts recommend replacing headlight bulbs in pairs to ensure the headlights glow equally and to avoid the second bulb burning out while driving. At first glance, the choice is obvious, and it is not in favor of halogens. At first glance, the choice is obvious, and it is not in favor of halogens.
At first glance, the choice is obvious, and it is not in favor of halogens.
But, you should not make hasty conclusions, since “xenon” and “LEDs”, in addition to their advantages, also have some disadvantages:
- The price of lamps starts from 30 – 40 USD. The cost of halogen lights is on average 10 USD. for a couple. Domestic lamps are even cheaper;
- The luminous flux of xenon and LED bulbs, for example, for fog lights of the VAZ 2110, has poor penetrating ability, so driving with their light in wet weather (snow, rain or fog) is very difficult;
Xenon bulb H7
- Installation of xenon and LED lamps requires the installation of ignition units, and also contains a number of other features. In particular, LED bulbs require the installation of a large reflector and a cooling system. Therefore, it will not be possible to do the installation yourself;
- The lamp ignites gradually, so the low beam turns on with some delay.
Advice! To avoid problems when driving in bad weather under the light of xenon or LED lamps, you should install fog lights with halogen lighting elements.
For these reasons, the low beam lamp for the Lada Priora is selected individually, depending on the financial capabilities of the car owner, the region and the weather in which the car is most often planned to be used. However, it should be noted that halogen lighting elements are still the most popular.
Removing the casing
The design of the electrical system of the VAZ 2170
The combined ignition switch is designed for switching the main circuits of the VAZ 2170. It consists of a mechanical anti-theft device with a lock and a contact part. With the help of external lighting, the fog light and external lighting switches are combined into a control unit. The following elements are located on the dashboard console trim:
- Hazard switch;
- Rear window heating switch;
- Switch for operating modes of the electric heater fan.
The steering column switch unit consists of a windshield washer, a windshield wiper, turn indicators and headlight switches. High-power electrical consumers are switched on using electromagnetic relays.
If you do not know how to change a low beam lamp on a VAZ 2170, you should familiarize yourself with the step-by-step instructions and, above all, the points that should be taken into account when working.
Things to remember:
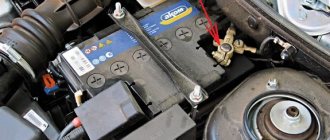
- Any repair of the Lada Priora that concerns the electrical equipment of the car should be carried out only after you disconnect the battery. It can only be connected when the ignition is turned off.
- Do not check the serviceability of the circuits for a spark when checking the circuits of electrical equipment, otherwise the elements of the electrical equipment of the car.
- Do not use fuses that are not designed for use in the vehicle or are rated for too high a current. Also, wire cannot be used instead of fuses.
- When replacing fuses, it is strictly forbidden to use screwdrivers, since a short circuit may occur in the electrical circuits.
- It is strongly recommended not to disconnect the battery while the engine is running, to prevent the voltage regulator from becoming damaged and to prevent damage to electronic equipment.
- The low and high beam lamps in the Lada Priora are halogen, so you cannot touch them, since grease stains cause a certain degree of darkening of the windows.
- It is better to replace LED low beam lamps while wearing clean gloves. Wipe the surface of the lamp with a clean cloth treated with alcohol if you accidentally touch it.
- Over time, the lamp may darken, therefore, the light output will decrease. That is why the low beam lamp must be replaced regularly. Don't wait until it burns out.
Foam filler inside closed monocoque structures
The location of foam filler inside enclosed body structures may vary from vehicle to vehicle. Foam can be located in the sills, body pillars, and side members. Foam filler is used to reduce noise, vibration and increase body strength.
It is not advisable to weld panels near the place where the foam filler is located. If there is such a need, the filler must first be removed and then restored upon completion of the repair.
The foam filler does not melt or burn if you cut the part of the body next to it with a grinder.
It is not recommended to use construction foam to replace the special foam filler.
At first it burned, then it stopped
This is the most common type of breakdown of LED lighting, which, of course, has already been figured out how to fix it (this does not mean simply replacing a damaged light bulb with a new one similar to it). So, having replaced ordinary light bulbs with LEDs in the backlights of your car, you begin to notice over time that these devices begin to blink for no apparent reason. Then they start to shine dimly, or even burn out completely.
What is the main reason?
After all, many car enthusiasts strive to make the replacement themselves, and therefore, they probably blame themselves and their inept actions, like an auto electrician: they say, they screwed up somewhere.
Anything can happen, of course. Maybe something is connected incorrectly. But don’t rush to scold yourself for your crooked hands: if you still have the standard light bulbs (and many drivers with a garage prefer not to throw anything away and are very scrupulous about these things), insert them back into the sockets and look at the car’s reaction. If everything lights up normally without blinking, then the reason is not due to improper connection and wiring.
Bumpers
Damaged bumpers can in some cases be repaired. Since the metal of the bumper is quite thick, strong heating of the straightening area is necessary, which leads to the destruction of the chrome coating. Parts made of corrosion-resistant steel with minor damage can be repaired and polished once their shape is restored. However, these repair operations are rarely profitable, since the cost of straightening quickly reaches the cost of a new part, so replacement is preferable. In addition, the quality of editing of profiled bumpers is not always satisfactory. When repairing composite bumpers, only damaged parts are replaced, resulting in lower repair costs.
Shields
Shields are usually called bumpers made of plastic materials. Today they are increasingly used to protect the car, which explains their name. In addition, they significantly improve the aerodynamic characteristics of the body.
Shield repair
Repairs to fiberglass-reinforced resin shields can be made using resin-coated fiberglass cloth. (This technology will be discussed in more detail below). At the same time, other composite materials from which shields are made, such as polycarbonates, are completely unsuitable for repair. Shields are usually attached to the body with two central and two side bolts. If fog lights or direction indicators are built into the shields, then when removing the shield it is necessary to disconnect the electrical wires.
Messages 21
1 Topic by Axel 2016-02-02 15:24:54 (2016-02-02 15:26:09 edited by Axel)
- Axel
- Participant
- Inactive
- Posts: 973
- Thank you: 139
2 Reply from Axel 2016-02-02 15:27:51
- Axel
- Participant
- Inactive
- Posts: 973
- Thank you: 139
Re: Solving problems with limit switches (the interior lights come on while driving)
I myself think that all this should have been adjusted by the official dealer during pre-sale preparation.
3 Reply from falkon 2016-02-02 19:41:43
- falcon
- Participant
- Inactive
- From: Russia
- Messages: 500
- Thank you: 43
Re: Solving problems with limit switches (the interior lights come on while driving)
It’s hard to adjust here without driving the car. But driving someone else’s is not good. You will be the first to be surprised when they give the car back, and not 10-20 km, but 100-200 have already been driven on it.
4 Reply from Tipipip 2016-02-02 20:06:25
- Typetype
- Participant
- Inactive
- Posts: 41
- Thanks: 10
Re: Solving problems with limit switches (the interior lights come on while driving)
At the first maintenance, the DC workers would probably have fixed everything
5 Reply from falkon 2016-02-02 21:10:31
- falcon
- Participant
- Inactive
- From: Russia
- Messages: 500
- Thank you: 43
Re: Solving problems with limit switches (the interior lights come on while driving)
Type, it’s a long time before maintenance, at the first visit to the service. But it’s not worth it; it’s easier and faster to fix it yourself.
6 Reply from Serg 2016-02-17 19:26:38
- Serg
- New member
- Inactive
- Posts: 1
- Thanks: 4
Re: Solving problems with limit switches (the interior lights come on while driving)
Hi all. In general, I had my first little trouble, in the form of sticky door switches. When opening a door (any door), the open door indicator on the dashboard and, accordingly, the interior lamp did not light up. All you had to do was touch the limit switch a little with your finger, and everything returned to normal. After reading on the Internet about how the owners Grant and Kalin also encounter this, I decided that the problem was in the trailer boot itself. In the end, I decided to remove the boot and try to open the door without it. And lo and behold, everything works smoothly without sticking. Upon closer examination of the anther, a small pimple was discovered in the center. That is, because of this little patch, those same 2mm were not enough for the normal operation of the limit switch. It was decided to cut off this pimply with a knife (photos attached). Bottom line: everything works great. No sticking or any delays. Which I was very happy about. I hope the information will be useful to someone.
Flaws under the hood.
The X-Ray has an electro-hydraulic power steering. The expansion tank assembly with the electric pump was located very inconveniently, under the headlight in front of the front left fender liner. Which makes it difficult to determine the maximum and minimum oil levels, not to mention the topping itself.
Under the hood, near the right headlight, there is a fuel filter x rack, which is quite convenient. Replacing it will not be difficult, unlike Sandero. There it is assembled together with a fuel pump installed in the tank, and for cleaning it is necessary to completely disassemble this unit.
If you need to replace the antifreeze, you will have to remove the pipe at the bottom of the radiator, since there is no drain plug. Partial removal of the left fender liner will help make it easier to access. But the H4Mk engine has an antifreeze drain through a block with a convenient hole location. [lightbox full=”https://ixray.ru/wp-content/uploads/2016/05/2.jpg”]
The manual transmission in Xray is quite easy to service. It has a regular filler and drain plug. The required oil level is determined by the lower edge of the filler hole. The robotic gearbox retains all the mechanical design features. There is a regular drain plug at the bottom. However, changing the oil has become a little more difficult since the dipstick has been replaced with a side hole to monitor the oil level and fill.
The metal crankcase guard has been modernized. To change the oil in the engine and gearbox, it must be removed. It is secured with six bolts around the entire perimeter.
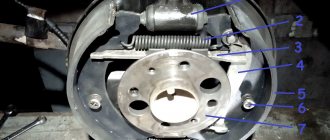
The front calipers in the Lada have a double-guide mount, and drum brakes are installed at the rear. The wear of the pads is monitored through a window with a rubberized plug, which is located on the reverse side of the brake shields. It is very inconvenient to use. The rear and front fittings for replacing brake fluid are located more successfully.[lightbox full=”https://ixray.ru/wp-content/uploads/2016/05/3.jpg”]
Overvoltage and overheating
LED lamps in an apartment burn out due to low-quality drivers, either included in the design of the lamp or made in the form of a remote unit. This does not apply to premium LED lamps. A high-quality power supply is designed for possible overvoltage, which is normal for our electrical network.
As mentioned above, manufacturers, aimed only at increasing sales, artificially increase the supply current of lamps to increase brightness. With the same power, cheap lamps sometimes shine brighter than branded ones, which is not an indicator of quality. This fact in itself reduces the service life, and exceeding the permissible voltage is the third reason why LED lamps burn out.
LEDs in the lamp can burn out due to poor and ill-conceived air circulation, which leads to overheating. In the apartment, try to install LED light bulbs only in open lamps/chandeliers.
Burnout of LEDs in a car
For another reason, the LED lamps in the car burn out. Semiconductors have a strong temperature dependence. Moreover, the junction resistance decreases with increasing heating.
In addition to the wide range of temperatures at which automotive lighting equipment is operated (ambient temperature + heating of the engine compartment), instability of the on-board network voltage and a high level of vibration are added. The headlights, PTF and cornering lamps heat up on the side of the engine, which is located in the same space with them.
High-quality LED lamps are designed for such loads. But when superimposed, all factors lead to premature burnout of any LED lamps, including Eagle Eye DRLs, which are produced in compliance with all technological standards.
DRL Eagle Eye
Remember! If the LEDs in the car do not light up (or burn out very quickly), first of all check the serviceability of the car’s on-board network circuit, namely the faulty contacts. In 99% of cases, they are the problem. Even if the terminals on the lamps are working properly, pulsed noise in the power circuit due to poor contact of powerful consumers can cause the LEDs to burn out.
For reliable operation of LED lighting in a car or a room chandelier, the LED elements must be powered with a stable current so that when the supply voltage changes and the temperature of the crystal changes, the current through the LED does not exceed the permissible value.
Product delivery options
Note! Below are the shipping methods available specifically for this product. Payment options may vary depending on the delivery method.
Detailed information can be found on the “Delivery and Payment” page.
Parcel by Russian Post
Available payment methods:
- Cash on delivery (payment upon receipt)
- Using cards Sberbank, VTB, Post Bank, Tinkoff
- Yandex money
- QIWI
- ROBOKASSA
Shipping throughout Russia. Delivery time is from 5 to 12 days.
Parcel by Russian Post 1st class
Available payment methods:
- Cash on delivery (payment upon receipt)
- Using cards Sberbank, VTB, Post Bank, Tinkoff
- Yandex money
- QIWI
- ROBOKASSA
Shipping throughout Russia. Delivery time is from 2 to 5 days. More expensive than regular delivery by Russian Post, approximately 50%. Parcel weight up to 2.5 kg
Express Parcel EMS
Available payment methods:
- Cash on delivery (payment upon receipt)
- Using cards Sberbank, VTB, Post Bank, Tinkoff
- Yandex money
- QIWI
- ROBOKASSA
Shipping throughout Russia. Delivery time is from 3 to 7 days. More expensive than regular delivery by Russian Post, approximately 100%.
Transport companies
Available payment methods:
- Using cards Sberbank, VTB, Post Bank, Tinkoff
- Yandex money
- QIWI
- ROBOKASSA
Delivery is possible to any locality where there is a representative office of the transport company. Delivery time is from 2 to 10 days. Sending large parcels is approximately 50% more profitable than by Russian Post.
Steering
To move normally in a car, the driver needs to make turns, U-turns or detours, that is, deviate from straight-line movement, or simply control his car so that it does not drift to the side. For this purpose, its design provides steering control. This is one of the simplest mechanisms in a car. Let's look at the names of some of the elements below. The steering system consists of:
steering wheel with steering column, this is the name of the ordinary shaft on which the steering wheel is rigidly mounted;
These devices consist of a steering system that is connected to the front wheels by steering and brakes.
- steering mechanism, consisting of a rack and pinion mounted on the steering column shaft, it converts the rotational movement of the steering wheel into translational movement of the rack in the horizontal plane;
- steering gear, which transmits the influence from the steering rack to the wheels to turn them, and includes side rods, a pendulum lever and wheel turning arms.
Modern cars use an additional element - power steering, which allows the driver to use less force to turn the steering wheel. It comes in the following types:
- mechanical;
- pneumatic booster;
- hydraulic;
- electric;
- combined electric hydraulic booster.