Removing the dashboard, its parts, instrument panel (frame, trim)
The instrument panel frame is the basic part of the instrument panel that carries ergonomic and decorative functions, on which controls and monitoring of vehicle systems and comfort elements are mounted.
The instrument panel frame is installed on the instrument panel cross member and secured to it with screws.
Place the car in the workplace. disconnect the “ground” terminal from the battery (key “10”).
Remove the wind window pillar trim and the front floor tunnel trim (see here).
Remove the steering shaft housings, disconnect the steering shaft from the instrument panel cross member, and lower the shaft to the floor of the cabin (see here).
Unscrew the screws 3, Figure 15-1, securing the dashboard 1 of the instrument panel, remove the shield (Torx T20 head).
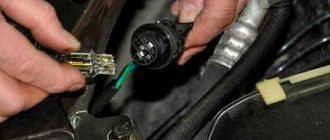
Unscrew screws 4 securing the 2 instrument cluster, remove the instrument cluster by disconnecting the instrument panel wiring harness block from it (Torx head T20, extension).
Figure 15-1 — Fastening the panel and instrument panel combination: 1 — instrument panel panel; 2 — instrument cluster; 3 — screw securing the instrument panel; 4 — screw for securing the instrument cluster
Remove the left side and center trim of the instrument panel by disconnecting the instrument panel wiring harness connector from the hazard warning switch (flat-head screwdriver).
Unscrew screws 2, Figure 15-2, securing the central deflector 1 of the instrument panel (Torx T20 head).
Figure 15-2 — Attaching the central deflector of the instrument panel: 1 — deflector; 2 - screw for securing the multimedia system
Unscrew screws 2, Figure 15-3, securing player 1 of the multimedia system, remove the player from the instrument panel by disconnecting the cables and connectors of the instrument panel wiring harness from the player (Torx T20 head).
Figure 15-3 — Mounting the multimedia system player: 1 — multimedia system player; 2 — screw for securing the player
Open the glove box lid, remove the glove compartment lighting lamp from the mounting hole, disconnect the instrument panel wiring harness block from the lamp lamp (flat-head screwdriver).
Unscrew the five screws 2, Figure 15-4, securing the glove box 1 to the instrument panel 3, remove the glove box (Torx 20 head).
Figure 15-4 — Fastening the glove box: 1 — glove box; 2 — glove box fastening screw; 3 - instrument panel
Remove the right side trim of the instrument panel by disconnecting the instrument panel wiring harness block from the airbag switch located on the trim.
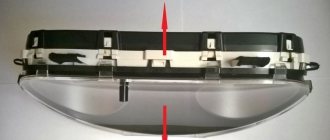
Figure 15-5 — Instrument panel frame: 1 — screw for securing the instrument panel frame (15 pcs.)
Unscrew fifteen screws 1, Figure 15-5, securing the instrument panel frame to the instrument panel cross member, remove the instrument panel frame from the cross member, remove it from the car interior (Torx 20 head).
Install the instrument panel in the reverse order of removal.
Video
Source
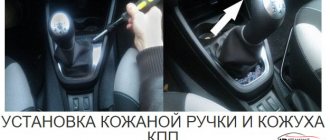
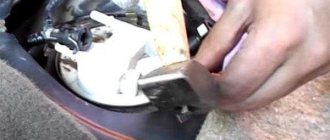
Grant seat heating installation
In the first part
In this article, I described the introduction of a set of heating elements from the Alamara into the Granta seats. In the second part I will try to describe how we can connect them to the car’s on-board network. Let's figure out the connection together. Many connect heating through one or two relays. I had a small diagram included with the wiring harness for connecting the heating. There were no relays marked on it, just as there were no relays in the wiring itself. And the power was taken from the alarm connector. It was also indicated there that it is necessary to replace the original 5 A fuse of this circuit with a more powerful one - 10 A. Let's check if such a connection is safe: After installing the heaters in the chairs, I connected them to a powerful 12 V power supply to check their functionality . At the same time, I decided to understand the connection in more detail and make sure that this circuit is reliable and correct. I connected an ammeter to the circuit and measured the amperage under load. You can see the results in the photo:
As you can see above, with a heating power supply load for one seat, the current consumption is in the range of 2.4-2.5 A. We look at the maximum load current of our heating button - it is equal to 5A (Stamped on the button itself). That is, the current reserve for our button is quite large. The conclusion that follows is that the buttons can be freely used without a relay.
Next, you need to find out the total amperage of heating consumption on two chairs. Turn it on and measure it.
We see that the amperage did not go beyond 5 A. It follows that the recommendation in the wiring diagram is correct. That is, you can take the plus (with the ignition on) from the alarm connector and increase the fuse rating of this circuit by 5A. But I decided not to pull the wires so far, and took the plus from the connector for adjusting the heater blowing speed. There is a wire with a thicker cross-section than on the emergency gang, and there is no need to pull it through the entire panel.
Now after the theoretical part, let's get down to business:
It is most convenient to connect the wiring with the seats removed. First of all, we need to remove the plastic floor tunnel. It is secured with five self-tapping screws. To begin, unscrew two screws on the right and left of the tunnel. Their location can be seen from the photographs:
By choosing the Classic package, the user gives up the pleasant warm options and sound system presented in the next Comfort equipment level. The message is cost-effective: for an additional 50,000 rubles you can equip your Lada Granta with a higher-quality audio system, and spend the remaining money on a set of standard seat heating. We take care of the installation work - we will reduce costs and properly power the circuit.
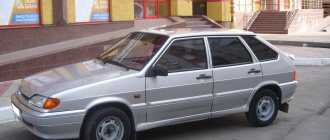
Lada Vesta dashboard - 12 firmware points, how to remove
Automotive Dashboard - allows the driver to receive information about the status of vehicle components. The more complete this information is, the more comfortable it will be to drive the machine. The dashboard of the Lada Vesta car works efficiently - all icons are in plain view of the driver. The entire instrument cluster is harmoniously combined and distinguishes Vesta from its predecessors. The latest cars have a new instrument panel (control), it has undergone improvements and changes - you will find its article number below. The instrument panel of the Lada Vesta sometimes breaks down; in the article you will find a checklist of 11 instrument malfunctions. The price of a standard Vesta car panel is on average 6 times lower than that of analogues, for example ferrum gf-890LV
for Lada Vesta it costs from 32,000 rubles. Sometimes there is a need to remove the instrument panel in order, for example, to install an analogue one; in the article you will find disassembly instructions. On the first Vestas, the panel light turned on only when the headlights and low beams were on; later, dealers began flashing the Vesta panel with new firmware; of course, you can do this yourself. The factory version 1 of the dashboard firmware was numbered 026. Then version 038 came out, which was blinding at night, now there is a normal version 028, which lights up, less brightly, when the low beam is turned on. In the article you will find a checklist for flashing the device.
Lumbar support
AvtoVAZ designers tried to make the Lada Vesta the most comfortable of all VAZ models. So they added adjustable lumbar support. To adjust it, there is another handle on the side back.
She is responsible for a useful and rarely seen setting - lumbar support for the seat. This option can only be found in the Comfort trim level and above. The standard version of Vesta does not have such a setting.
Lift the lever up, changing the shape of the seat back. At the same time, the driver's back support moves forward. This ensures a straight back position, which helps during long trips behind the wheel, preventing pain.
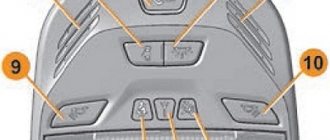
Designation of light bulbs and sensors
The tachometer is located on the left side of the instrument panel. Inside its scale, starting from the top center, there are eight indicators. If you list them from the top clockwise, it will look like this:
- pedal adjustment;
- seat belt indicator, which will light up if the driver or passenger is not fastened;
- airbag icon;
- backup indicator light, connected when installing additional devices and systems;
- brake failure icon;
- battery charge indicator;
- sign of engine malfunction;
- low oil pressure sign.
Behind the tachometer scale there are four indicators:
- turning on ABS;
- low tire pressure, receives data from tire sensors;
- gearbox malfunctions;
- electric power steering controller.
The speedometer is located in the center. Inside its scale, at the top, there are six indicators:
- trunk open icon;
- open hood indicator;
- alarm indicator;
- open door icon;
- cruise control indicator;
- speed limit icon.
Below the speedometer there is a liquid crystal display displaying the main functions and parameters. There are arrows to the right and left above the display that indicate the turn signals are on.
In the right block of the shield, at the top, there is a coolant temperature scale.
Important: It is prohibited to operate the vehicle if the temperature sensor is faulty.
It is also prohibited to drive a car with an overheated engine. When the 115 degree mark is exceeded, the indicator will remain constantly red and the driver will hear an intermittent beep. Below the scale is the immobilizer icon. Just below are two icons indicating whether the electronic stability control system is on/off. At the bottom of this part there is a fuel level scale in the tank. To the left of which there is an indicator for turning on the reserve fuel volume.
On the right, between these scales, from top to bottom are:
- indicator for turning on dimensions;
- low beam icon;
- front PTF turn-on indicator;
- rear PTF activation icon.
Third-party, but factory heating
Okay, but what if there is no standard heating? What to do then? Calm down, you can buy a third-party factory one, now our Russian one is highly praised and is designed for almost any car.
The main thing is to choose the size of the “seats”, it is important to understand that you do not need to heat the entire place, but strictly in the center, the side cushions (not installed for support)
The principle is also simple - we remove the standard seat covers, lay and glue the mats - then we put on the covers and connect them to the electrical system. You can do everything yourself, the kit costs about 2000 - 2500 rubles, for two seats (back + lower part). A short video, let's watch.
Main 11 faults of the Lada Vesta instrument panel
While operating the car, problems may arise with the functioning of the instrument. An approximate list of main faults looks like this:
- Poor contact of the panel with the on-board network due to damage to the connector or its contacts;
- Failure of one or more sensors supplying information to the panel;
- Mechanical damage to the shield due to strong vibrations or strong impact;
- Lack of lighting due to burnt out light bulbs;
- Failure or malfunction of the main motherboard - if the motherboard fails, there is no point in removing or disassembling the instrument panel. You cannot repair this part yourself. It is better to entrust this matter to service station specialists;
- Burnt-out warning lights - There is a simple test to make sure the lights are burnt out. When you turn the ignition key, all devices start and all lamps light up. At this time, the operation of the lamps is checked. Particular attention should be paid to the red lamps, which indicate critical problems with the vehicle;
- The arrow indicators do not work - this may occur due to a failure of either the device or the sensor. Operation is checked with the engine running;
- The tachometer does not work - the reason is in the device itself;
- The speedometer does not work - the speed sensor has failed. This is indicated by the ABS lamp;
- The antifreeze temperature does not change - the reason is a malfunction of the temperature sensor;
- The fuel level is not displayed - the unit with the fuel pump is faulty.
Connection of heating elements for seat heating diagram
Now about the electrical connection. Everything seems simple here. I took a switch of the required current and voltage rating, and connected everything in series. But you would be warned against this option. The whole point is that human essence sometimes manifests itself in forgetfulness. This means that leaving the heated seats on once while the car is parked can completely drain the battery. Here it is best to ensure dependence on turning off the ignition switch. That is, if the ignition switch turns off, then so does the heated seats. This is easy to do using a relay. The winding of which will be triggered by turning on the ignition switch, and from the sequentially installed heating switch button. Such a scheme will have two advantages. The first is, as we have already said, turning off the ignition in the car. Second, independent connection for power currents after the ignition switch. That is, the switching current of the relay will not significantly affect the currents after the ignition switch, and therefore will not cause the fuses to blow in the mounting block.
So, we offer you the following scheme.
Yes, there is a minus here. This means that it is generally better to make the circuit switch off after some time, but this will complicate it. This means that not all car enthusiasts will be able to repeat it. However, what is most important is that, in general, the scheme is quite workable.
If, after all, you are going to make a circuit with a timed shutdown, then this is discussed in the article “Do-it-yourself timer in a car.” And even a video on this topic.
How to remove the dashboard of Lada Vesta
Removing the panel will be necessary if you are sure that its elements are faulty, or for flashing. To do this, you will need a flat and figured screwdriver, and a hex key. This is done like this:
- Disconnect the power terminals from the battery to prevent short circuit;
- Unscrew two screws at the top;
- Pull the top of the shield towards you until the latches snap off;
- Unscrew the two screws that secure the devices. This must be done without touching the wires;
- Pull the part towards you and disconnect the connector with wires from it, remembering the pinout.
Heated seats Lada Priora - breakdowns, installation instructions
In frosty weather, it’s not very pleasant to sit on an icy car seat to start the engine - so heated seats come to the rescue. Inventive owners of the Lada Priora almost immediately began installing heated seats in their Prioras. Of course, the seat does not warm up instantly, but it noticeably saves you from frostbite. While the heater is not heating up (since the engine has not yet warmed up!) is it necessary to sit in complete cold? Factory seat heating is installed only in luxury versions of the Priora car. Installing it is not very difficult, the main thing is to connect everything correctly. Heated seats, like “Emelya”, do not need to be installed, the seat upholstery is not removed, because it is just a cover for the seats - it is inserted into the cigarette lighter - although for some reason, over time, they burn out the cigarette lighter fuse.
You can install heated seats on a Priora yourself; it will cost relatively little (compared to the fact that your health can suffer greatly from warming up a frozen car). The heated seat control unit can be installed in the Priora where it is convenient: the main thing to remember is that this is not the most necessary button when driving a car, it should not interfere with pressing other levers and buttons. Read the article to the end and your car will be warm even at minus 45.
Lada Vesta dashboard firmware
Before installing the firmware, remember that it is quite possible that it will not work correctly. Therefore, it is better to do this from official dealers. If you decide to do it yourself, then you will need a Usbdm OSBDM V4.95 programmer and a computer or laptop.
Here are 12 step-by-step instructions for installing the firmware:
- Install the driver and firmware program on the PC from the disk that comes with the device.
- Remove the instrument panel, peel off the factory warranty seal and open the back cover.
- Open the device and set the switch to 3.3 volts.
- Connect the device to the panel and computer.
- Launch the HCS12 Programmer program on your PC and click on Detected.
- In the Target item, specify the folder in which the firmware is located. Check the Auto Reload box and click Detect Chip. In this case, the chip type is determined automatically.
- On the Security tab, check the Unsecure box.
- On the Advanced tab, check the Enable box.
- Go to the Device Operations section, on the Target tab, select Erase Selective. With this choice, mileage and immobilizer data are saved.
- Click on the Program Flash button to launch the firmware. This will take a few seconds.
- Refuse to connect the panel in the program.
- Now you can turn off the device and install the device in its place.
Important: For flashing, use firmware suitable for this version of the device. You cannot install an older version on a newer socket and vice versa to avoid malfunctions.
Principle of operation
This arrangement of switches will be the most successful from the point of view of ergonomics and comfort. As a result, after painful searches and reflections, I noticed that this board should fit perfectly into the tunnel setup.
When the button is pressed, power is supplied to its winding. Installing heating elements in the rear seats takes about the same time. The power wire was led directly from the battery through the standard hole on the left in the engine compartment into the passenger compartment. The driver's license will have to be removed to put everything back in place. It is enough to install the heating sheet and the relay in their original places. The connection diagram will remain the same, that is, installation will not cause any additional difficulties. I plopped down on the icy seat for a couple of seconds, started the car, pressed the heating button, and within a couple of minutes the seat was already warm.
And here it is, the highest pleasure - to sit in a warm chair when there is frost all around. Cheap DIY steering wheel heating.
See also: Sample estimate for electrical installation work
Removal and installation of the Lada Vesta instrument cluster
The dashboard must be removed in case of repair, tuning, or for dismantling subsequent interior parts. The process is not complicated and will not take you much time. Before starting work, it is recommended to disconnect the ground terminal from the battery.
Unscrew the two fastening screws (No. 1 in Fig.) of the instrument panel using a T20 socket and screwdriver. Pull the instrument panel by the upper part (No. 2) towards you, overcoming the resistance of the latches.
Unscrew the two screws (No. 1) securing the instrument cluster using a T20 socket and screwdriver.
Pull the instrument cluster towards you and disconnect the connector with wires (No. 3) from the reverse side. Remove the instrument cluster.
Installation of the instrument panel is carried out in reverse order. The process is also shown in the video:
Attention!
After replacing the instrument panel, use a diagnostic tool (for example, GradeX) in the “Functions” mode to perform the following procedures:
- recording VIN in the instrument cluster;
- automatic configuration of the instrument cluster.
According to reviews from owners, these procedures are not necessary; the shield will still work.
Have you ever had to dismantle the Vesta dashboard? What difficulties did you experience and were there any special features during the work process? Let us remind you that further instructions for modifying and tuning the instrument panel can be found in this category.
Source
Noise insulation
Do-it-yourself soundproofing of a Lada Vesta dashboard should begin with an assessment of the situation. LADA Vesta has standard insulation at a decent level, especially on the engine panel directly in the cabin. There is thick vibration insulation, complemented by felt, the same as the floor. Taking this into account, sound-absorbing material glued to the top of the heater will suffice.
First, it is better to work directly on the dashboard from the back side, and then proceed to the body. The thickness of the layer will depend on the preferences of the owner and his plans. But there are some general recommendations:
First, the surface must be wiped free of dust.
Before gluing, be sure to degrease the surface with a cloth soaked in anti-silicone.
The first layer on the back side of the dashboard is vibration isolation, but not too thick - a thickness of 2 mm will be quite enough. This solution will make the panel heavier and dampen vibrations. If you work in the summer, in hot weather, you don’t have to heat the material, but simply smooth it with a roller. Otherwise, it is recommended to use a hair dryer to warm the surface. Just be careful; if you overdo it, the hairdryer may even melt the plastic.
On top of the vibration insulation layer, sound insulation of the Lada Vesta dashboard is glued - biplast, etc. material. This guarantees the absence of creaks and crickets that “love” to appear in the depths of the dashboard.
Removable panel components - the glove box and others - are glued in the same way.
Fastening points - it is recommended to glue these areas with madeleine or other material that eliminates squeaking.
In addition, car owners recommend paying attention to the seat for the radio. The compartment is very small, which is why many people either cannot install a new radio at all, or notice that it constantly gets hot. Therefore, it is worth thinking about a slight expansion of the compartment.
Installation occurs in reverse order.
Standard front seats and rear sofa - article number and price
If for any reason you decide to replace the seats, get ready to look for them by catalog numbers:
For your own convenience, you can replace the standard set with an anatomical one if you spend a lot of time behind the wheel. Orthopedic chairs are a rather individual issue, because if you lack the back support that is in the factory version, you will most likely rush to buy the first orthopedic chair you find.
Be patient and take your time: consult a doctor, describe the nature of the problem that worries you, and ask what it should be. Today the market is full of various offers where you can find “your” option.
Connection diagram in the fuse box
Work on connecting the wires should be carried out with the battery disconnected. Install the relay (1119-3747210-10) into the mounting block, connector K11.
The 87th contact of the relay is connected to the red wire of the button block.
The 86th contact of the relay is connected to the body ground.
The 85th contact of the relay is connected to the black-blue wire from the ignition switch.
The 30th pin of the relay is connected to the pink wire of the 30th pin of the high beam relay.
The fuse can be installed between the high beam relay and relay K11 on the pink wire.
As can be seen from the description, the Lada Priora heating connection diagram is very simple.
source
Photo of the interior of the sedan modification
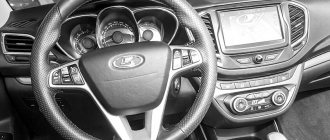
Inside the Lada Vesta car, materials and innovations were used that had not been used on a vase before. This made overall operation more pleasant for people; for the first time on a vase, the steering column could be adjusted for reach and installation angle. The steering wheel can be adjusted for reach by 50 mm and angle by 7 degrees. Vesta now has a multifunction steering wheel, which was not previously available on any VAZ model. The steering wheel has a three-spoke badge in the middle, it looks made with high quality and accuracy! The steering wheel has control buttons for the cruise control radio and telephone.
The instrument panel is interestingly implemented; it is grouped into three wells, all of which resembles a sports car. The quality of the panel material is good. The panel has few lamps, but despite this it looks informative. The torpedo is made of dark plastic. The center console is level with the panel, but protrudes forward a little and this is convenient for use; you don’t need to reach out to press a certain button. The console is divided into two parts, but depending on the configuration, it is located on top (in the expensive configuration there is a multimedia system with a 7-inch screen), and a branded radio in the cheaper basic version. On the second part of the panel there is a climate system separated by a row of buttons. The central tunnel is equipped with two cup holders.
The car has good visibility; the arches do not interfere with the view, as on the previous model 2170. Two airbags are built into the front panel (driver plus passenger). Regarding the interior trim, it looks high quality. The door cards, by the way, use new Soft Look plastic, are visually similar to leather. The plastic is embossed and hard to the touch. Despite the cheap materials, the interior looks quite strict and not childish, and if the car is in the Luxury configuration, the interior is equipped with additional chrome inserts. In general, Vesta’s interior looks a class higher than it is: ergonomic seats with good upholstery, all instruments and elements are arranged thoughtfully. When you get into the car, it’s pleasant to be in, you can see the road, and it’s easy to read the information on the speedometer. The seats have a high depth of adjustment, which allows tall people to feel comfortable behind the wheel. In previous models, there was limited space in the back, which was a big minus. There is ample knee room behind the driver; the distance from the rear sofa to the front seats is 226 mm. In general, it feels like the dimensions inside the car have been thought out. The seats are comfortable, the headrest follows the lines of the body and is friendly with the back of the head when standing in a traffic jam. The distance from the floor to the rear sofa is 345 mm, and from the floor to the top of the front seats is in the range from 276 to 310 mm. The distance from the floor to the steering wheel (since it is adjustable) is from 450 - 528 mm.
Method of installing standard heated seats on Priora
In addition to purchasing a standard set of heating plates, we will need additional materials
- fuse 15 A;
- relay 1119-3747210-10;
- ground terminals;
- corrugated tube with a diameter of 18 mm;
- Double-sided tape.
Now you can proceed directly to installation
- Move the seat forward and unscrew the 3 mounting bolts.
- Move the chair back and unscrew the 4 nuts from the clamps.
- Tilt the chair back and unscrew two more bolts in the middle and remove the seat.
- Remove the trim by bending the metal hooks on the back and the latches on the bottom.
- Bend back the casing and secure the heating elements.
- Lead the wire down under the seat, having previously put on the corrugated pipe, secure it with a clamp, and put on the trim.
- Disconnect the battery and make connections:
- black wire – attached under a bolt near the handbrake (“ground”);
- white – to the cigarette lighter illumination;
- red - stretch along the standard harness under the floor covering under the driver's seat and further along the left threshold to relay contact “87” in the electronic unit.
- Remove the tunnel lining and lay the main harness from the control unit to the armrest, having first put on the corrugated pipe.
- Install the purchased relay into the free slot K11 of the mounting block and make the connections:
- terminal “86” – connect to the body;
- terminal “85” - connect to the blue-black wire from the ignition switch;
- connect terminal “30” to the pink wire from pin “30” of K7.
- Install a fuse between relays K11 and K7.
- Check connections.
Heating elements for heating Priora seats
you need to glue it efficiently and carefully, because a common cause of breakdowns is the “moving out” of the heater.
Lada Priora Hatchback EDM › Logbook › Three-level heated seats from Priora FL
So I finally found a reason to write something about the car, even though I was just lazy. Since the last publication, the car has traveled about 25 thousand kilometers, more than two years have passed. Feels fine. Consumables (liquid filters) are being changed, there were no sudden attacks. I can only remember a problem from last winter - air in the deflectors of different temperatures when the stove was on. From the central left one blows heat, from its neighbor there is warmth, and from the extreme ones there is cold. The matter was resolved by dismantling the heater core and flushing it under pressure. At the same time, the antifreeze was replaced. Now everything is fine. The handbrake somehow stopped holding - due to fatigue and curvature of the lever. Was replaced with a no-name part from the store. It was enough for exactly a month and a half. The splines on the base (not on the lever) were eaten away. The new one has been fine for six months, it seems to be holding up. A couple of weeks ago I replaced the brake discs - the thickness is 18 mm with the outermost 17.8 mm. Along with the discs, I also changed the pads. All original, TIIR in original Ladovian packaging. At the same time, the leaky CV joint boot was replaced. And yes, NIPPON pads are GOVNO! Creaky dogs. Now about the good stuff. I didn’t want to put anything on it at all, simply because these couple of years I’ve been waiting for the purchase of a new car. But for now it’s a little bit difficult - I don’t want to compromise, I want a specific car, so I’d better wait. I bought and installed the vaunted original Jimmy door switches, made in South Korea. The old ones are simply exhausted. The issue price is 100 rubles/piece. We purchased handbrake and gearbox handles in leather.
Price - 800/250 rubles. At the checkpoint the old one was already going bald. Well, at the same time I decided to buy a heated asshole, finally! I was always afraid that the generator wouldn’t handle it (BATE at 90A). But then a used 115 amp generator from KZATE turned up for a thousand, now it has been repaired and almost assembled, we will install it soon. There are plans to replace the cracked windshield with a heated one. Well, I bought the heaters, and when I received the parcel, I immediately rushed to install the device) I took a three-speed Prior from the new ones.
What to add? It’s good for the buttocks and lower back, I recommend it to everyone. If you want, fire it, if you want, warm up the little one. I can’t even imagine how I ever lived without it. And yes, BATE pulls, the drawdown on the bk is a maximum of 0.2 volts for 2 heating at maximum.
source