Articles
- 2 Algorithm for carrying out an operation to “shumka” a VAZ 2114 car
- 3 Useful tips
- 4 Table
How to make sound insulation in a VAZ 2114
Do-it-yourself soundproofing of the VAZ 2114 has the most important goal - to reduce the level of audibility of extraneous sounds in the car interior. Noise comes from the power unit, the wind outside when moving quickly, and other sources.
If you know how to make noise insulation for a VAZ 2114 yourself, you can significantly reduce the noise level and save a lot of money at the same time, since services of this kind in service stations are not cheap.
How to remove the top panel trim of a VAZ 2114
Torpedo is the modern name for the dashboard. Initially it was used for foreign cars, but today this name is used by motorists in the CIS countries. The dashboard in the VAZ 2114 car is a collapsible metal structure that contains plastic elements. It also uses polymer film and polymer foam to cover some of the controls. The instrument panel includes many monitoring instruments and controls.
Tip: a great way to decorate the interior of a VAZ 2114 is to reupholster the dashboard with genuine leather or eco-leather. The costs of such an update are minimal, but with proper design you can achieve high results. Also in the VAZ 2114 they practice covering the visor and roof. Tuning can be done independently, but if you don’t have time, you can contact a car workshop.
Removing the dashboard may be necessary if the owner of a VAZ 2114 wants to change the heater radiator or even the entire stove. To get to these parts, you will certainly have to disassemble the dashboard. Depending on the purpose, the analysis may or may not be complete. For example, dismantling a heater core requires only partial removal of some elements. For some body work, it is necessary to remove the dashboard, as the structure may be damaged during repairs. Disassembly of the structure is also required when the motorist decides to increase sound insulation in the car interior - for this it is necessary to seal the wheel arches, hood, doors and dashboard.
Regardless of the number of dismantled parts, the following tools are required to disassemble the dashboard:
- Several types of screwdrivers (flat and Phillips);
- A set of keys;
- Flashlight;
- An adhesive base, which is required if the panel is planned to be sealed.
Required tools and materials
To achieve good sound insulation, you need to prepare a whole set of tools and materials in advance:
- Stroyizol SD 90 grade.
- Splen marked 3004.
- Accent 15 LM KS.
- Be sure to buy vibroplast type Gold.
- Adgilin.
- Vizomat MP.
- Stock up on a metal ruler.
- A construction tape measure won't hurt.
- Square.
- Hairdryer, preferably a household one.
- Montage.
- Screwdrivers with different tips.
- Awl.
- Keys.
- Sharp scissors.
What is included in the design?
To make it easier to remove the entire dashboard or its individual elements, you need to know what the structure consists of. In a VAZ 2114 car, the dashboard includes 11 main elements, which are shown below:
Dashboard base. It contains controls for interior systems.
- Overlays. This part is needed to securely fasten the base.
- Bracket.
- The sealing element is a plug.
- Ashtray.
- Crossbar, there are two of them. The number “6” shows the right one.
- Right dashboard screen.
- A shield that blocks access to the wiring.
- Central bracket.
- Left screen of the instrument panel.
- Left cross member.
In VAZ cars, you can improve the appearance of the dashboard. To do this, you need to unload the dashboard from the dials. More stylish and modern information devices are usually installed to replace them. The same applies to the backlight; if you wish, you can update it yourself and install modern original LEDs.
By dismantling these elements one by one, you can completely disassemble the dashboard. Below you will find detailed instructions with which the motorist can completely remove the dashboard elements from the car.
Step-by-step instructions for disassembly
- The first step is to remove the left screen. To do this, you need to unscrew 3 screws, as shown in the photo. Once the fasteners are removed, the left dash screen can be removed.
Now the console can be completely removed if replacement is planned. When performing other repair work, it is recommended to navigate by access to the parts of interest. For example, to access the heater stove, it is enough to remove only the lower part of the dashboard.
Many car owners do not know how to remove the dashboard on a VAZ 2114. We will show you how to do it correctly. Usually the instrument panel is removed to replace the heater, remove the instrument cluster, seal the heater nozzles, glue, etc.
Other causes of vibration at idle
Of course, you should not ignore the power system, and first of all, the injectors and throttle. The throttle must completely block the diffuser, and to clean it, aerosol compositions are used, the same as in the case of the EGR sensor.
Cleaning the throttle valve
The performance of the injectors is checked on a stand, and they are cleaned if necessary. In addition, vibrations at idle speed can occur due to excessive wear or failure of the engine mount. The cushion consists of two brackets, one of which is attached to the engine cylinder block, and the second to the body. The brackets are connected to each other by a rubber silent block and a vibration damping cushion. It may crack, crumble, or simply tear. Hence the vibrations at idle.
The engine mount can cause vibrations
Video about the reasons for unstable operation of the VAZ-2114 engine
Removal procedure:
Let's figure out how to remove the dashboard on a VAZ 2114. Using a Phillips-head screwdriver, carefully unscrew the 3 screws (top, middle and bottom) that secure the left console screen.
Next, remove the trim itself and the protrusion located at the bottom, then remove it from the body bracket.
Using a Phillips screwdriver, unscrew the next five screws, which are located in the right panel of the console, then remove the screen itself.
Then disconnect the negative cable terminal from the battery. If a radio is installed in the car, then remove it, also disconnect the connector of its harness with a wire or remove the plug container from the shield. Next, the wiring harness block must be disconnected from the cigarette lighter. You also need to remove the ashtray light bulb socket. Then remove the handle from the levers by carefully prying it off with a narrow screwdriver.
The next step is to remove the heater fan switch handle. To do this, you need to pull it towards you or pry it with a screwdriver.
Using a Phillips screwdriver, unscrew the two self-tapping screws located above the instrument cluster, as well as the two self-tapping screws located under it.
Prying off the plug, remove it and unscrew the self-tapping screw located under it.
Next, unscrew the two screws of the lowermost fastening of the lining.
Then remove the dashboard trim.
Now we mark the order in which the wiring harness blocks are connected to the switches, and disconnect them.
We place the already completely removed instrument panel and unscrew the bolts securing the steering column. Using the same screwdriver, unscrew the two screws, as shown in the photo.
Using an 8 mm wrench, we also unscrew the 2 screws of the lowest mounting of the bracket to the dashboard.
Next, unscrew the self-tapping screw securing the light guide using a Phillips screwdriver and remove the light guide.
Then we unscrew the screws that held the heating control unit, and also remove the lamp sockets from its reverse side.
Then we remove the decorative insert, but only after we have removed all its external parts.
We unscrew the nuts numbered one and two with a wrench or pliers (21 cm).
Then you need to remove the lamp responsible for illuminating the hydraulic corrector.
Carefully unscrew the screws for the lower and upper fastenings of the instrument panel, as well as the fastenings to the left cross member, using a Phillips screwdriver.
Now all that remains is to remove the instrument panel. That's it, now you know how to remove the instrument panel on a VAZ 2114 (VAZ 2115).
Since I see frequently asked questions on this topic, I decided to post information about what I did in this regard. I’ll say right away that I consider silence in the cabin to be one of the most important advantages of a car, but I also think that VAZ is not worthy of large expenses in this regard (including labor and time) - it will not reciprocate. Therefore, in this regard, it is necessary to find a reasonable compromise. So, in order: On the way home from Tolyatti, I immediately noticed that something was ringing in the beard of the torpedo on the bumps. Otherwise, after nine it was just delight - no extraneous sounds. Only the hiss of I-391 cylinders on the hot asphalt. This rattled controller was quickly eliminated by placing a porous material under it, which is a substrate for laminate and is sold in any construction store. Quite a universal material, you can use it in many places and it sticks well instantly. Naturally, having drowned out the most disgusting sound, after driving for a couple of weeks, I began to hear the rest. In the dashboard, doors, pillars, ceiling, etc. Since immediately after the purchase, the first thing I did was install the alarm system, which I traditionally place in the dashboard, I decided at the same time to insulate all the insides. But I’ll say right away that I didn’t find anything particularly creaking or rattling there; I just glued the entire space with a backing and wrapped it around all the bundles of wires. The material itself from which it is made is not as creaky as on the nine. There was more noise from the passenger side. I dismantled the glove compartment and taped the joints, and glued a strip from the door seal to the door of the lower glove compartment. We also glue the top door around the perimeter. However, a small “muttering” on the bumps from the panel remained - I looked for it for a long time, but still found it - in the center of the panel near the windshield there is a bracket on which the panel sits - it did not sit on it and smacked against it on the bumps. There was a decent gap there, which we managed to fill with special foam. I received one material - it looks like an ordinary strip of foam rubber, half a centimeter thick, with an adhesive base, but it has the remarkable property of gradually expanding up to three centimeters, filling the space. After two or three months, when I started using the stove, the panel and the central tunnel creaked slightly. The control method here is very well known - we spray everything with silicone spray. So, for a year now the panel has produced virtually no unpleasant sounds. The only thing is that on bumps you can hear the rustling of wires in the substrate and a slight ringing of the heater grilles, but all this is within reasonable limits. The steering column casing also needs sound insulation; it rattles and is poorly secured. I put thick foam rubber inside so that it pressed the casing and sealed it. The only thing now is that the keys on it sometimes jingle, but it seems that by sorting them on the key fob I achieved silence - I didn’t want to sculpt something on the casing itself - it’s ugly. Another ambush is a piece of vinyl between the casing and the tidy - they stuck it there so that the insides of the column are not visible, and on bumps, if the steering wheel is not raised too much, it smacks against the casing. I glued it with the same foam rubber. Further actions were aimed at dismantling all the plastic on the central pillars and in the area of the rear parcel shelf and gluing them with foam rubber - they also made quite a noise. By the way, I noticed in passing that at VAZ they also began to coat them with something in terms of sound insulation. We also stuff some thread into the handles above the doors under the rubber so that they don’t resonate. Then I noticed that something was ringing on the roof - the lampshade was not screwed on properly and the fastening washers were ringing. Now I hear the wire to the ceiling rattling on the roof - I need to “dress” it with a backing. Then a faint squeaking noise, incomprehensibly coming from somewhere in front and not always, began to bother me. Oh, and it drank blood from me... I didn’t look at everything in the bumper area. And one day I slammed the driver’s door and heard it clearly - then everything was a matter of technique. My wife was closing the door - I was looking for the sound. It turns out that the hood opening limiter was squeaking, it was simply rubbing against the body and making a disgusting sound. One drop of lithol was enough for happiness. The next stage is the doors. Here everything was glued with a backing and all the rods were wrapped in it, but after about a year one rod from the lock handle began to ring; the ringing was removed by twisting the plastic sleeve in which the rod sits one turn. But the rear doors still cause a slight vibration - we still need to figure it out. The door handles (I don’t have an ESP) were also taken out - but I began to notice this after the ringing of the locks when closing calmed down. I placed self-adhesive foam rubber under the thrust washer of the handle. Also, when closing, the mirrors cracked a little - I taped the bracket inside with double-sided tape - at the same time they began to shake less when moving. The next line of defense that I have lost so far is the back seat. Sometimes there is a creaking sound coming from it if no one is sitting behind it. A year ago I completely disassembled and lubricated it, and for quite a long time nothing was heard, but now the disgusting sound occurs again periodically. By adjusting the pins of its fastening it is possible to pacify it a little, but not completely. I filled everything there with lithol - zero. In general, I’m too lazy to get into it right now.
As for non-cabin sounds. The whistling noise in the area of the pillar at speed was eliminated by installing deflectors. In the summer I overcame the squishy rear pads by replacing them and bleeding the brakes. I slightly reduced the noise of the box by filling it with ZIC 75-85, but naturally the problem remained. In winter, the front wheel bearing whistled in the cold - the problem went away on its own. Sometimes on large bumps you can hear the rubber bands of the rear pillar bushings creaking - you need to spray them with silicone.
That's it, I'm tired of writing... Maybe I missed something, but I will say that it is inappropriate to start covering the car with different bitoplasts to reduce the overall road noise without eliminating what I did. The most disgusting sounds will be even more audible. For now I just have to overcome the cracking in the rear doors and the creaking in the rear seat, and then we’ll see…. Maybe it will turn out from a “chisel” based on noise “mits. Karizma” .. Yes, I don’t have music in the car - I’m tired of the balalaika, I like to listen to the engine. Good luck to everyone in this difficult and thankless task and thanks to those who have read this far. AlexVic, Kazan
How to install the dashboard?
If you want to install the instrument panel of a VAZ 2114, then everything must be done in the same way, but in reverse order.
The instrument panel, also known as the “torpedo”, is the most important part of the car’s interior, which largely determines the comfort of both the driver and the front seat passenger.
There are three key requirements for a “torpedo”:
- Functionality - it must include all the necessary control levers, buttons and indicators to monitor the condition of the vehicle;
- Ergonomics - all functional elements of the “torpedo” must be placed so that their use is convenient for people of different heights and builds;
- Design – by the way the instrument panel is made, you can determine the class of the car. In cheap models, as a rule, developers do not pay due attention to the visual appeal and quality of the materials used, while the distinctive feature of all expensive cars is a beautiful, detailed “torpedo”.
COMPONENTS OF THE INSTRUMENT PANEL VAZ 2114
Before proceeding to the practical part, it is necessary to understand what the instrument panel of the fourteenth is.
The VAZ 2114 belongs to the second generation Samara line of cars, which the Tolyatti Automobile Plant has been producing since 2004. All cars of this family are equipped with a “torpedo” of the Europanel type, for the development of which foreign designers were involved.
Europanel is distinguished by a high level of ergonomics - all its components are located in a freely accessible area, their use does not complicate the driver’s process of driving. Considerable attention is also paid to the comfort of the front passenger.
Dashboard tuning
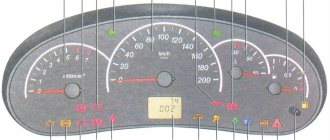
The main information element of the VAZ 2114 “torpedo” is the dashboard of sensors and indicators, which is located directly behind the steering wheel.
This panel includes the following elements:
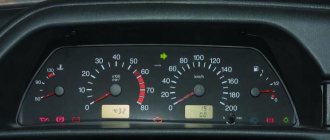
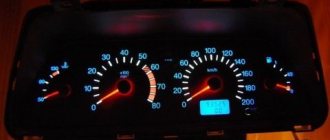
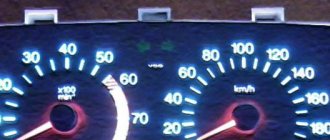
- Pointer instruments – tachometer and speedometer. Through the tachometer, the driver receives information about the engine operating mode - the arrow indicates how many revolutions the power unit produces at a given time. The speedometer displays data on the current speed of the fourteenth. The maximum mark on the speedometer is 200 km;
- Electronic screens are located at the bottom of the tachometer and speedometer needles: the screen under the speedometer displays the total mileage of the car and mileage data from the last control point, which can be set by the driver himself. The screen under the tachometer shows the time and ambient temperature;
- There is a rotation sensor between the dial instruments - when the turn signals are turned on, flashing green arrows are displayed on the dashboard;
- In the center of the dashboard there is a “Check Engine” indicator - which lights up when the on-board computer of the fourteenth detects any malfunction in the engine. Next to it is a brake light indicator;
- On the left side of the instrument panel there is a fluid temperature sensor in the cooling system of the power unit, on the right side of the panel there is a fuel level sensor in the gas tank. When the engine temperature exceeds a critical value or the tank is empty, orange lights above the sensors light up;
- There is also a series of indicators on the dashboard that indicate the following information: oil level, doors not closed, seat belts not fastened, amount of water in the window washer reservoir and brake pad wear.
The VAZ 2114 torpedo also includes the car’s on-board computer screen, which is located in its central part. Using the on-board computer, the driver receives detailed information about the operating modes and problems that arise in the systems and communications of the fourteenth. Also, recommendations on the timing of the next technical inspection are displayed on the BC screen.
In addition to information devices, there are also functional elements on the dashboard: turn signal levers, control buttons for headlights and heater, and window heating system.
The “torpedo” of the fourteenth is not without comfort elements, which are represented by a cigarette lighter, an ashtray, a fairly spacious glove compartment and a niche for storing various small items, located near the gear shift lever.
Electronics and sensors as causes of vibration
Another suspect in the story of engine vibration at idle is the electronic engine control unit. No one will repair it; most often it must be either replaced or re-flashed. For example, in injection engines with a Bosch 7.9.7+ controller, flashing ER19 instead of the standard ER16 often helps, fuel consumption remains within normal limits, and vibration disappears.
In addition to the ECU, the following sensors may be to blame:
- Idle speed regulator. The regulator sensor is mounted on the throttle body, and to check it you need to remove the terminals and use a multimeter in ohmmeter mode to check the resistance between the contacts. The nominal value is 60-80 Ohms. If the sensor does not produce the required resistance, replace it with a new one.
Checking the idle air control
- Mass air flow sensor. If this sensor malfunctions, the pulse it sends to the ECU will have an incorrect value, therefore, the engine may vibrate at idle. The sensor is checked in the same way as the previous one, but the multimeter is set to voltage measurement mode. With the ignition on and the engine off, the voltage between the sensor contacts should be within 0.9-1 V.
Checking the mass air flow sensor
- EGR sensor. It is responsible for the recovery of exhaust gases and is an electromagnetic cone valve. It is this valve that requires periodic cleaning. We carry out cleaning with any spray for washing the carburetor or injectors.