For this I needed: A star screwdriver, a flat screwdriver, a utility knife, scissors, adhesive tape, a wet wipe, No. 240 sandpaper, a table lamp, shopping bags.
1)
Remove the instrument panel from the car
2)
Unscrew all the fastening screws, disassemble the instrument panel
3)
Remove the instrument arrows.
We place a business card or credit card under the arrow (so as not to scratch the instrument panel), and, using a knife to hook it under the base of the arrow, we snap it out of the axis 4)
Remove the instrument panel trim.
But the overlay is located on a plexiglass base. Therefore, we separate the overlay from the plexiglass base 5)
I decided to change the instrument panel backlight from green to white.
Using the blade of a knife, carefully remove the green coating from the back of the pad... I got bored and ended up using #240 sandpaper. 6)
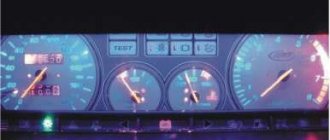
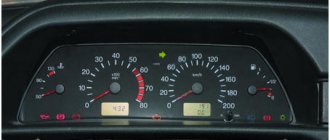
You can see the difference between the green and white backlighting of the instrument panel, some of the symbols have already been cleared of green coating
7)
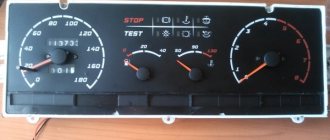
The Priora instrument panel has been completely cleared of green coating
. To change the backlighting of individual elements, a plastic bag with colored inscriptions and drawings is useful. Cut out the required one from the plastic bag a colored piece...which we glue onto the instrument panel trim on the back side
9)
In the same way we make yellow on the speedometer and blue on the temperature scale
10)
As for the backlight, with standard bulbs you won’t get uniform illumination of the instrument panel.
Therefore, it was decided to install diode lamps temporarily, and later I will make a tape. 11)
Next, we disassemble the display, remove the green filter, and put it back together.
Now the display will also glow not green, but white. If you want to backlight the display in a different color, you can install a light filter of any color 12)
I threw off the option with original lamps and diodes.
THERE ARE DESCRIPTIONS UNDER THE PHOTOS. xshpinatx
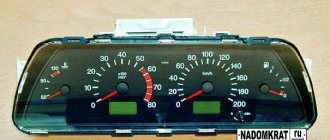
Lada Priora, in comparison with other models of the AvtoVAZ concern, is distinguished by a more attractive and high-quality dashboard, finished with good “Soft Look” plastic and a good instrument cluster. However, the owners of these cars are seeking to change some elements of the dashboard and make the interior brighter and more stylish.
Do-it-yourself technical tuning of the Lada Priora car interior and photos of implemented options
A large field for experiments in the field of individual auto tuning is provided by RGB strips complete with drivers. The bright footlights for the front passenger and driver look good. Due to the control driver, the lighting intensity and color are adjusted. Is there any rational grain in this revision? Without fanaticism, such illumination will help you get out in the dark, but otherwise...
Audio tuning VAZ-2170
The standard VAZ audio system, as our audiophiles assure, does not meet high sound standards. Seriously, this is the case, and it would be nice to increase the diameter and install branded speakers by 16 cm. In some photos of tuning the interior of a Priora car with your own hands, you can see that the seat for the speakers in the doors will have to be cut. It is imperative to perform noise and vibration insulation of the door walls to avoid resonance phenomena in the future.
In addition to wideband speakers, experts also recommend installing tweeters. They are located on the dashboard or at the top of the door card. Broadband speakers are also installed for rear passengers, and to emphasize low frequencies, space for a subwoofer can be arranged in the luggage compartment.
Other technical options
If you are going to start upgrading your audio system, then it is advisable to turn your attention to some kind of full-fledged multimedia center with monitor outputs. This will already be a guarantee of high-quality playback of music tracks.
To all that has been said, it’s a good idea to add a good monitor that will not let you get bored in traffic jams and will allow you to relax in the parking lot during long trips. It wouldn't hurt to take a closer look at the range of on-board computers for Lada Priora.
Analysis of the Priora shield
The panel can be attached in two ways. These can be latches that you just need to press and the panel will simply come out. Or there may be bolts that need to be unscrewed with a screwdriver. However, in general the panels all come out the same way without any effort.
We continue disassembling for subsequent tuning of the Priora instrument panel.
Once you have removed the panel, you need to remove the glass from the front and unscrew the back cover. It is held on by several bolts. Under it you will see a green microcircuit and other internals of the devices.
Visor
After the back cover, you need to remove the visor. It is held on by two latches. The arrows should be positioned at zero. In general, when disassembling the panels, it is better to take a photo of where the arrows point, so as not to get confused later and to align them correctly.
Arrows
The next stage of tuning the Priora dashboard is removing the arrows. This must be done carefully, in no case should you pull them, tear them or apply much force. The arrows are removed by turning counterclockwise and lightly pulling upward. If the arrows are jammed and cannot be removed, you can use a screwdriver and “pick them up” a little. We pry the arrows on both sides and gradually pull up. At some point the arrow will pop out, but be aware that the spring may cause it to fly quite far.
You must try not to touch the coating with your nails, otherwise marks and scratches may remain on the panel. They will be highlighted and spoil the whole picture.
Overlay and light guides
Next, remove the cover. Some Priora instrument panels cannot be disassembled without removing this trim. But in other cases it is better to remove it, since because of it you cannot see what is behind the devices and how the backlight is located. The backlight can be uniform for all sensors or separate for each. Remove the glued overlay with light filters so as not to damage it in any way.
Priora usually has three separate light guides. They are attached with latches and can be removed very easily. Sometimes the light guide may be damaged during removal. There is nothing wrong with this and you can continue to use it.
Removing the screen
To continue disassembling the instrument panel in the Priora for tuning with your own hands, remove the screen. It rests on rubber conductors, so it is also easy to remove. Turn the panel over and unscrew the remaining bolts. We also take out light bulbs that are no longer needed.
Using pliers, release the clamps and take out the screen. Under the screen there is another light guide - a bright light green color; it must be removed.
The panel is almost disassembled, all that remains is to separate the main white part from the green microcircuit. Thus, we have disassembled the entire dashboard and can continue tuning the Priora instrument panel.
Decor of plastic components
The sedan is equipped with a lot of plastic parts in the interior; fortunately, many of them have light colors and can be easily repainted. The process of painting plastic from an aerosol can requires not only a respirator and gloves, but also a degreasing liquid and a primer. During operation, it is important to prevent the formation of drips.
Another way to improve the appearance of plastic elements is to cover them with carbon film. According to many car enthusiasts, this material is durable and looks impressive. The blanks are cut with a margin of 20-25 mm at the edges, after which the film is glued to a degreased surface. Edges and curves are blow-dried to prevent kinks and kinks.
Reworking the backlight
Tuning the instrument panel primarily involves changing the backlight of the scales and the background of the panel.
Cleaning up pollination
To do this, the overlay, which is coated with paint from the inside, must be made completely transparent. We remove all pollination (usually green on the inside where the numbers are) using a sharp, rounded knife. After this, you need to wipe the pad with alcohol - it is better to use a cloth rather than a cotton pad.
In order not to spoil the overlay, it makes sense to first clean off a small part and see how the numbers show through.
Next, let's move on to the lighting itself. It's better not to use 3mm LEDs. They are not very reliable and burn out quickly, but they are best for shooters.
Laying LED strip
If in the future you plan to make a smooth ignition of the light, then already at this stage you need to take all the tapes in the panel of the same type 12-volt, single-color or multi-color. They will need to be cut. Only about 70 cm of such tape will be needed for illumination. Degrease the surface and place the parts of the tape. We seal them (plus to plus, minus to minus). We bring the wires through the hole to the bottom of the panel. We insert the light guide into place and fix it. Place the cover and turn on the power supply. If everything is done correctly, the backlight will shine evenly and as planned.
This is the easiest way to tune the Priora panel.
Error codes on the instrument panel of Lada Priora
For the first generation Priora, the manufacturer left a built-in self-diagnosis system for the dashboard itself and the engine ECU. To enter this mode, you must do the following:
- Hold down the daily mileage reset button and turn on the ignition while continuing to hold the button.
- The arrows will begin to move and all the icons will light up. The panel self-diagnosis mode will turn on. If one of the indicators does not light up and the arrow remains in place, the instrument panel is considered faulty and requires replacement.
- Use the buttons on the steering column switch to cycle through the modes. The inscription “Ver” shows the dashboard firmware version. And numbers in the “-*—” format indicate the error code.
- To exit the diagnostic mode, just turn off the ignition and turn it on again.
The interpretation of error codes is presented in the table below:
| Code | Decoding |
| 2 | High mains voltage |
| 3 | Open circuit in the FLS circuit |
| 4 | Problems with the coolant temperature sensor - open circuit |
| 5 | Violations in the work of DTOZH |
| 6 | Engine overheating |
| 7 | Oil pressure too low |
| 8 | Problems with the braking system |
| 9 | Low battery charge |
| E | EEPROM memory error |
You should not completely trust such a diagnostic system. Her testimony is indirect and often does not correspond to reality.
A good way to diagnose a Priora engine is to use scanners like the ELM327. Only such devices can accurately display error codes.
Required
The Itelma instrument panel with navigation can be of two types (externally they are no different):
- 21700-3801010-50 without CAN bus;
- 21700-3801010-60 from CAN bus.
They are not interchangeable, so before purchasing, you should determine whether your vehicle uses a CAN bus or not.
For Priora:
- until 06.2012, cars were produced without a CAN bus;
- remove the instrument cluster and look at the article number or at the block with wires (see pinout of connectors below).
For Kalina (VAZ 1117, 1118, 1119) - all cars without a CAN bus.
Additionally you will need:
- Right steering column switch with joystick (catalog number: 1118-3709340-20);
- Antenna (for roof installation): 1118-7903074.
You can also buy ready-made kits (device + antenna + switch):
- for Lada Priora - 2170-3801010-55;
- for Lada Kalina 1 - 1118-3801010-55.
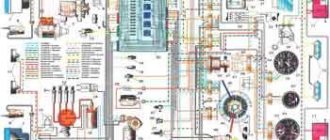
Pinout of the instrument panel of a Priora car
The panel pinout looks quite complicated, but there is a more simplified diagram that will help you figure out the wires connected inside:
The decoding is as follows:
- EUR
- "emergency light"
- Engine oil
- Handbrake
- Immobilizer
- Airbags
- Headlights and dimensions
- Right turn signal
- Left turn signal
- Electronic control unit
- Pad wear sensor
- Seat belts (closing sensor)
- ABS
- Reset button
- Brake system, brake fluid
- ABS
- High beam headlights
- Torpedo shield lighting
- "Weight"
- Thirtieth terminal
- Fifteenth terminal
- Fuel consumption
- Forward key
- Back key
- Ambient temperature sensor (minus)
- Ambient temperature sensor (plus)
- Fuel level
- Speed sensors
- Coolant temperature
- Odometer
- Diagnostics of the shield (service)
- Generator regulator
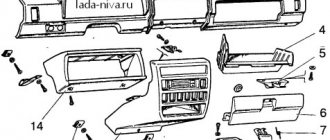
Description of the dashboard
The dashboard contains the following elements:
- Unit for controlling instrument lighting and external lighting.
- Horn switch.
- Switch for turn signals and headlights.
- Instrument cluster for Lada Priora.
- Lever for glass washer and wiper.
There is also an ignition switch on the instrument panel, which is combined with an anti-theft device. On the Lada Priora it has three positions. In addition, the instrument panel contains buttons and mechanisms such as a heated switch on the rear window, a clock, an alarm switch, a glove box lid, a tape recorder socket, an ashtray, a fan control unit, etc.
Tuning for the dashboard (dashboard) can be done with your own hands if you want to change the lighting for the instruments. In this case, the panel must be removed. The answer to the question: “How to remove the panel?” quite simple - using a screwdriver. Then we unscrew the fastening screws, disassemble the panel, remove the hands (you can use a knife, placing a piece of cardboard on the dial), and separate the cover from the plexiglass.
Replacing the dashboard backlight is done by scraping off (with a knife) the coating on the gasket numbers. If you want to leave them white (brighter), then you can put all the elements back together. However, many drivers want to make the instrument panel more informative. To do this, take a not very thick plastic bag with colored designs, from which parts of a certain color are cut out and glued to the back of the instrument panel. This way you can highlight, for example, areas of high speed on the speedometer, or “cold” areas on the temperature scale.
Installation
Replacing the old instrument panel without CAN with a dashboard with navigation without CAN (2170-3801010-50) is carried out without modifications. We remove the old panel and install a new one in its place, insert the connector with wires, connect the antenna (we fix it on the roof) and, if necessary, change the right steering column switch.
If the old instrument cluster without navigation, but with CAN, and instead of it it is planned to install a new dashboard with navigation with CAN (2170-3801010-60), then you need to rearrange contacts 10-11 to 28-29 (if after connecting it still does not work, change 28 and 29 places). See instrument cluster pinout.
After installing the new instrument panel, the mileage will be reset to zero.
Navigation in the instrument panel runs on Windows CE 6.0 along with Navitel software. It is possible to update the software and download navigation maps from a USB card via a special USB input. Operating the car will become much more pleasant, the only drawback is the high price.
Have you ever had to install a new type of instrument panel with navigation on a Priora or Kalina? What difficulties did you encounter during this revision? Let us remind you that on the Lada.online website you can find other instructions on tuning and modifying Lada Priora or Kalina cars, for example, how to adjust the electronic gas pedal or improve the brakes without modifications.
Keywords: instrument panel Lada Priora | dashboard of Lada Kalina | torpedo Lada Priora | Lada Kalina torpedo
0 0 0 0 1 0
Share on social networks: