All modern cars are equipped with this device. Even non-smoking car owners use it. The cigarette lighter socket is used to connect additional devices, i.e. like a 12-volt outlet. Install into the connector:
- charger for mobile phones, tablets, laptop;
- additional fan;
- electric compressor for inflating tires;
- GPS navigator;
- DVR.
Failure of the cigarette lighter is fraught with operational inconvenience. Often the cause of failure is the protective element. You can find out why the fuse for the cigarette lighter blows, how to replace it and find out where it is located, where the mounting block is located.
Cigarette lighter fuse
Car protective elements come in different designs.
- Cylindrical. Out-of-service cars from the Soviet Union era were equipped with fuses, which are called so. The denomination of the product is engraved on a thin metal bridge.
- Strip fuses. They are a metal plate with holes for bolts at the ends. The inconvenience is the complex installation scheme, when it is necessary to tighten each individual element.
- Thermal fuses. Reusable elements that operate on the principle of a circuit breaker located in a household network. When the current exceeds, it simply snaps off. In order to restore the network, you should press the corresponding button.
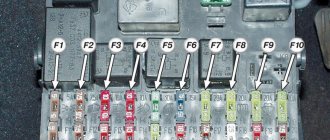
- Knife (see photo). The most common fuses for the cigarette lighter, installed on many Russian VAZ models and foreign cars (Focus, Corolla, etc.). Such elements are used in the vast majority of cars.
There are several standards for the size of blade automotive fuses:
- mini – width 16 mm;
- midi – 19 mm;
- maxi – 34 mm.
The element values differ. Each fuse is painted in a corresponding color. There is a unified system of standards:
| Color | How many amperes |
| Black | 1 |
| Dark grey | 2 |
| Lilac | 3 |
| Pink | 4 |
| Cream | 5 |
| Brown | 7,5 |
| Red | 10 |
| Light blue | 15 |
| Yellow | 20 |
| White | 25 |
| Green | 30 |
| Violet | 35 |
| Orange | 40 |
| Scarlet | 50 |
| Blue | 60 |
| Dark brown | 70 |
| Citric | 80 |
| Dark lilac | 100 |
Why does the fuse blow?
The protective element can fail for various reasons. The most common.
- Network overvoltage. When connecting one or more powerful devices to the cigarette lighter socket, the current strength of this section of the circuit exceeds the maximum permissible values. To protect the wires from burnout and fire, the cigarette lighter fuse simply blows. The maximum power of connected devices should not exceed the value calculated by the formula P=I*U. Here I is the nominal value, and U is the network voltage (12 volts). The fuse rating for the cigarette lighter is usually from 10 to 25 amperes. This means that the total power of the devices fluctuates between 120-300 watts.
- Short circuit. Due to exposed wires, poor contact in the cigarette lighter or other reasons, a short circuit occurs in the network. Because of this, the protective element burns out. If, after replacing the fuse with a new one, a similar breakdown occurs again, then it is worth checking the cables for short circuits.
Common faults
Replacing and disassembling the cigarette lighter fuse on a Ford Focus 2
Like any other electromechanical device, the Priora cigarette lighter tends to break. Sometimes this can be caused by design defects, sometimes by malfunctions in the machine's on-board circuit, and sometimes by the fault of the user himself. Common cigarette lighter malfunctions include:
- sinking of those same bimetallic “ears”;
- burnout of the spiral;
- broken contact in the connector;
- fuse blown.
Malfunctions can also include the burnout of a backlight lamp, however, this is more related to a decrease in the level of comfort than to serious breakdowns. In addition, it does not in any way affect the operation of the device itself and can be easily eliminated by replacing the lamp.
The sinking of the lugs is characterized by the lack of fixation of the cartridge in the pressed position. It can be caused either by the low quality of the metal from which they are made, i.e. defect, or high intensity or long period of use of the cigarette lighter.
The problem is solved by bending the “ears” inward using a thin screwdriver, naturally after de-energizing the on-board circuit. If after a short period of use the problem occurs again, it is better to replace the cigarette lighter.
When the spiral burns out, the cartridge is fixed when pressed, but does not heat up. The fault is diagnosed by ringing it using a car tester. It is not recommended to restore the spiral, as this may lead to a decrease in its resistance, which will make unwanted adjustments to the operation of the on-board circuit. In this case, the cigarette lighter also needs to be replaced.
Contact failure can be easily determined by removing the tunnel lining and checking the condition of the connector. This malfunction is not critical and can be fixed independently in a few minutes.
But as for the fuse, it makes sense to consider this malfunction separately, since its malfunction is most often caused by the human factor.
Replacing the cigarette lighter fuse
Before repairing, you should verify the cause of the breakdown. The fuse responsible for the cigarette lighter is a protective element for other devices. On the Priora it is responsible for the heater fan. In other VAZ models, there is illumination of the glove box or dimensions. If any other devices fail, the protection needs to be replaced.
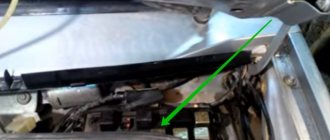
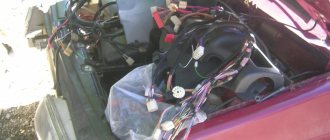
Changing the cigarette lighter fuse is easy - just get to the mounting block. In each car it is located differently, as a rule, its place is in the cabin, behind the decorative panels, to the right or left of the steering column.
- Turn off the engine, open the hood, and remove the negative terminal from the battery. This will open the circuit and prevent a short circuit.
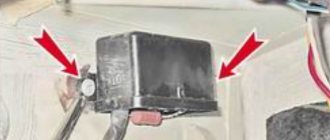
- We remove the facing panel, gaining access to the mounting block with fuses and additional relays.
- There is a diagram on the back of the cover. Let's find out which fuse goes directly to the cigarette lighter.
- We pull it out using tweezers, also located on the mounting block. If you don't have one, you can use small pliers.
- We carry out the replacement by installing a new fuse in the mounting block.
- We connect the negative contact, turn on the ignition and check the functionality of the device.
- We close the mounting block and install the decorative panels back.
How are the blocks separated in the machine?
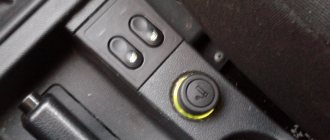
The main type of block is placed in the most convenient place for the driver. In this version of the VAZ it is located on the left side of the body directly at the steering wheel. Easy access to the unit is provided using a built-in button located next to the car's headlight control.
2 backup units with relays are located separately in the right and central parts of the console just behind the dashboard. One of the fuses shown below in the diagram will be located at a distance from the rest of the list - it can be found in a special compartment behind the main fuse block, next to the mounting block. To timely repair electrical equipment on a VAZ-2110, you need to learn how to quickly determine the location of a blown fuse, and also know which elements of the car its failure will affect.
Tip: very often one burnt valve can lead to replacing the vacuum booster on a VAZ-2110
That is why it is important to check not only the general condition of the fuse, but also the parts interacting with it, for example, the injector
Video help on finding the right fuse
The location of the mounting block and the number of the protective element are different on all models. The video will help you find where the fuse for the cigarette lighter is located. Below is a table with common cars and information on where the mounting block is located.
| Model | Block location | Fuse number |
| Kalina | Mounting block to the left of the steering column, behind the headlight control panel. | F20 (15A) |
| Priora | Block on the bottom left. Located at the driver's left foot. To access the block, you need to rotate three locks 90 degrees. | F13 (15A) |
| Niva | Block behind decorative cover. Located near the driver's door. To access the block, unscrew two screws and then slide the cover up. | F6 (15A) |
| Focus | Block under the glove box. It is necessary to pull down the two latches and remove the protective cover. | F38 (20A) |
| Corolla | The block is behind the decorative trim, under the dashboard. | F23 (15A) |
Block under the hood
It is located next to the washer fluid reservoir, under the protective cover.
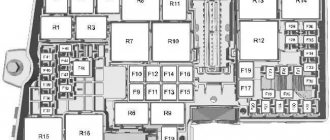
Description
Option 1
| F1 | 10A Emission control system |
| F2 | 15A Emission control system |
| F3 | 15A Emission control system |
| F4 | 10A Emission control system |
| F5 | 30A Diesel combustion products filter evaporator, Glow plug control system |
| F6 | 3A Anti-lock braking system. Maintaining sustainability. Ignition |
| F7 | 7.5A Powertrain control module |
| F8 | 20A Cooling Fan |
| F9 | 30A Left windshield wiper |
| F10 | 30A Right windshield wiper |
| F11 | 10A Air conditioning compressor clutch |
| F12 | 20A Glow plug for the evaporator of the diesel combustion product filter |
| F13 | Reserve |
| F14 | 30A Emission control system - ignition |
| F15 | Not used |
| F16 | Not used |
| F17 | Not used |
| F18 | 40A Anti-lock brakes, stability control pump |
| F19 | 30A Starter Solenoid |
| F20 | 60A Glow plugs |
| F21 | 60A Ignition relay 3 |
| F22 | Reserve |
| F22 | Reserve |
| F23 | Reserve |
| F24 | 7.5A High Pressure Fuel Pump |
| F25 | Reserve |
| F26 | Reserve |
| F27 | Reserve |
| F28 | Reserve |
| F29 | Reserve |
| F30 | 40A Cooling fan 1 |
| F31 | 40A Fan 2 cooling systems |
| F32 | 60A Electric motors (two) windshield wipers |
| F33 | 20A Start-stop auxiliary water pump |
| F34 | Reserve |
| F35 | 15A Power supply for powertrain control system |
| F36 | 15A NOXI 2 sensor |
| F37 | 7.5A Volume control valve |
| F38 | 7.5A Mass air flow sensor |
| F39 | 15A Diesel Pump Fuel Evaporator |
| Relay | |
| R1 | Ignition |
| R2 | Starter |
| R3 | Rear window wiper |
| R4 | Not used |
| R5 | cooling Fan |
| R6 | Windshield wiper - on and off |
| R7 | Windshield wiper - low and high speed |
| R8 | Not used |
| R9 | Not used |
| R10 | Air conditioning compressor clutch |
| R11 | Evaporator system fuel glow plug |
| R12 | High pressure fuel pump |
| R13 | All Wheel Drive Pump |
| R14 | Econetic system |
| R15 | Cooling fans: high speed and low speed |
| R16 | Emission control system |
| R17 | Powertrain Control Module |
| R18 | Cooling fan - high speed |
Option 2
| F1 | 5A Switching off the radio sound |
| F2 | Reserve |
| F3 | Reserve |
| F4 | Reserve |
| F5 | Reserve |
| F6 | 15A Nitrogen oxide sensor |
| F7 | 15A Particulate Sensor |
| F8 | 20A High Speed Cooling Fan |
| F9 | Reserve |
| F10 | Reserve |
| F11 | Reserve |
| F12 | Reserve |
| F13 | Reserve |
| F14 | Reserve |
| F15 | Reserve |
| F16 | Reserve |
| F17 | Reserve |
| F18 | 40A Cooling Fan 2 |
| F19 | 40/60A cooling fan |
| F20 | 40A Emission control system |
| F21 | 40A Glow plug 2 |
| F22 | 40A Glow plug 1 |
| F23 | 10A Air conditioning compressor clutch |
| F24 | Reserve |
| F25 | 15A Right headlights with high intensity discharge lamps |
| F26 | 15A Left headlights with high intensity discharge lamps |
| F27 | Reserve |
| F28 | 5A Heating element for positive crankcase ventilation valve |
| F29 | 7.5/15A Coolant pump |
| F30 | 40/60A Powertrain Control Module Relay |
| F31 | 20A Run-start relay 2 |
| F32 | 20A Fuel fired auxiliary heater |
| F33 | Reserve |
| F34 | Reserve |
| F35 | 20A Powertrain Control Module |
| F36 | 20A Power wire 5 car |
| F37 | 15A Tank with reagent. Exhaust gas recirculation valve |
| F38 | 10A High speed cooling fan. Air conditioning compressor clutch. Low speed cooling fan. High and low speed cooling fan relay. Relay coils R1, R5, R10, and R15 of the engine electrical junction box |
| F39 | Glow plug control system |
| Relay | |
| R1 | High speed cooling fan |
| R2 | Not used |
| R3 | Rear window wiper |
| R4 | Air suspension module |
| R5 | Cooling Fan |
| R6 | Not used |
| R7 | Left headlights with high intensity discharge lamps |
| R8 | Right headlights with high intensity discharge lamps |
| R9 | Starter |
| R10 | Air conditioning compressor clutch |
| R11 | Not used |
| R12 | Not used |
| R13 | Emission control system catalyst |
| R14 | Not used |
| R15 | Low speed cooling fan |
| R16 | Not used |
| R17 | Not used |
| R18 | Powertrain Control Module |
Other causes of cigarette lighter failure
There are other factors besides a blown fuse. Common.
- Burnt out heating coil. Inside the metal cigarette lighter socket there is a nichrome spiral that is exposed to heat. Due to age, she burns out. The breakdown can be corrected by purchasing and installing a new part.
- Bad contacts. As they age, they develop plaque or rust. Because of this, the circuit remains open. Repairs are carried out using a needle file. After disassembling the device, it is necessary to clean all contact points, ridding them of traces of plaque or rust.
- Short circuit. Broken cigarette lighter wires, broken or fallen solders, or burnt insulation can lead to a short circuit and failure. All cables should be inspected for external damage, use a multitester to test the wires.
- Burnt out cigarette lighter light bulb. A light filter is installed around the nest for easy searching in the dark. The bulb inside may burn out with age. In this case, it is necessary to disassemble the device and replace the light bulb with a new one.
Removal and disassembly
The fuse box on a VAZ 2110-2112 car can be changed on your own. The procedure is not difficult; even an inexperienced car owner can do it if desired. Each element of the block is replaceable.
First, remove the block cover. In some fuse boxes, a special button is responsible for removing the panel. The change is carried out by removing the unusable part and installing a new one of the same rating.
Make sure that the circuit of the part being replaced matches the new one, otherwise the new one may also deteriorate and lead to additional elements in the circuit. Before starting work, check the manufacturer's description of the unit to ensure all disassembly is performed correctly.
If the fuse box is completely burnt out or damaged, it can be replaced with a new one. This part is affordable today and can be bought at any spare parts store for VAZ cars.
Repairing the VAZ 2110-2112 fuse box is necessary in some cases, of which there are only two:
- The first most common problem is combustion. If this happened, it means that the fuses were not in order, which subsequently led to damage to the unit. Many inexperienced car enthusiasts, when they discover a burnt fuse, replace it with a non-standard metal object, which can subsequently create an additional defect.
- The second probable reason for changing the unit is a manufacturing defect. In most cases, no problems arise, but in order to save money, drivers often purchase parts from unreliable suppliers at reduced prices and, as a result, end up with a burnt-out power supply system.
You should not purchase a fuse box for a VAZ 2110-2112 made in China; it is better to buy a proven brand, which will most likely pay for itself in terms of service life and trouble-free operation.
The mounting fuse block for the VAZ 2110-2112 is not particularly expensive compared to other important parts. It is better to purchase a high-quality model and install it yourself to be sure of the reliability and performance of the device. In conclusion, I would like to note that the fuse box is one of the main and very important parts for the operation of the car, which is also responsible for the safety of passengers
In conclusion, I would like to note that the fuse box is one of the main and very important parts for the operation of the car, which is also responsible for the safety of passengers.
What fuse goes to the cigarette lighter?
A hint that it is the protective element that has burned out will be the failure of a number of adjacent devices. The cigarette lighter fuse on many models is also responsible for the signal, side light or heater fan. If several devices fail, then the protective element must be replaced.
The instruction manual or the back cover of the mounting block will help you determine which fuse is responsible for the cigarette lighter. There are pictograms here, as well as the value of the element. It is important to purchase and install a fuse rated for the specified amperage. Otherwise, there is a high risk of a short circuit, melting of the wire insulation, and a fire.
Checking burnt elements
Motorists should understand how to check the fuses in their car.
An overload in the electrical network does not always lead to failure of the fuses themselves. They are the easiest to check, so diagnostics usually start from here. When an electrical appliance stops functioning, it is far from certain that the protective element is to blame. Here the most correct and rational solution would be to check the status of the device responsible for the faulty device in the car.
A fuse map will be a very useful tool in the diagnostic process. On all modern cars it is located directly on the cover of the safety block.
There are several main verification methods:
- visual,
- replacement method
- multimeter.
The simplest method is considered to be by replacement. You just need to install a new fuse in place of the potentially faulty device. But it is fair to consider this technique identical to visual inspection. After all, it is easier to determine by external aspects than to change each of the fuses located in the block in a row.
Visual inspection
Let's start with how to understand whether a fuse has blown in a car, based purely on the appearance of the element. This method is considered the most correct, since it is quite easy for many people to visually verify that a breakage of a low-melting component has occurred.
To check, you will need to remove the element, bring it to the light and look at it carefully. It will not be difficult for an experienced motorist to find out and understand whether the fuse in his car has blown or not. Beginners do not understand this right away, which raises several more questions regarding how to get an accurate answer.
A worn fuse is not difficult to identify. This manifests itself in the form of broken wire (low-melting alloy) or burnt marks. Symptoms such as these indicate that the electrical circuit has broken and the fuse needs to be replaced.
A similar testing method is relevant for those fuses that are made from glass or transparent plastic. Most of them are found in passenger cars.
But the method also has a significant drawback. The test is performed by a person, without the use of any instruments. In some cases, especially for beginners, a visual examination does not provide a 100% guarantee of a correct diagnosis. Therefore, it is much more correct and efficient to check fuses using multimeters.
Checking with a multimeter
This is a great way to identify a blown fuse in your car. Anyone can calculate using this method, since there is nothing particularly complicated in the procedure. The only condition is to have a multimeter. You can also check with a regular tester, but a multimeter can later solve a number of other issues. This is a more versatile device. Having a car multimeter in your hands, you should understand in more detail how to independently check a potentially blown fuse.
Using such a device, verification is performed using 2 methods:
- by voltage,
- by resistance.
Let's start with a technique that involves checking the condition by voltage. Here you need to perform the following procedures:
- turn on the measuring device in voltage test mode,
- turn on the electrical circuit of the machine where there are problems,
- check the voltage parameters on one terminal of the protective element, and then on the second,
- if there is no voltage at one of the terminals, the device has burned out and needs to be replaced.
The method is extremely simple, for which it is appreciated by motorists. Just a couple of minutes is enough to verify that the fuse is working or confirm that it has failed.
But in certain situations, checking by voltage is not very easy. This mainly concerns the fuses responsible for the operation of the horn and door lock. This is where an alternative method comes to the rescue.
If for some reason the voltage test is not suitable for you, use the resistance diagnostic method.
- The multimeter switches to Ohm measurement mode. These are units of resistance
- the terminals of the measuring device are connected to the terminals of the fuse,
- if the screen is zero, the element has failed and needs to be replaced.
And there is nothing complicated here, because even a novice motorist who has only recently started operating a vehicle independently can easily cope with the task.
In fact, to check you only need a little free time and a good multimeter with the appropriate measurement modes. It’s not difficult to buy a device, but its capabilities are enormous in terms of self-diagnosis of a car.
Why does the cigarette lighter not work after replacing the fuse?
If the protective element is working, but the device is not functioning, then you should look at other aspects. Initially, you need to check the reliability of the cigarette lighter in the socket, as well as the presence of oxides on the contacts. They should be bent and cleaned.
It is important to check the serviceability and integrity of the cigarette lighter wires. The connection diagram is implemented as follows. There are three wires going to the cigarette lighter.
- Red. Constant plus. Connected via a fuse directly to the battery.
- Yellow. Constant plus. Responsible for the backlight lamp of the device.
- Black. Negative, coming to the body of the product. The second end is the mass going to the car body.
Using a tester, you should check the integrity of all wires.
Other reasons:
- Burnt out spiral. Such a malfunction can be diagnosed with the naked eye. Fixed by replacing the device.
- Short circuit. Measure the battery voltage with the ignition off. Turn it on and try again. If there is a drop of more than 0.5 volts, then you should look for a breakdown using a multitester.
Varieties
First, let's look at the existing types of automotive fuses. They can be classified depending on the materials used and the design itself. Since now everyone knows that these same fuses are needed in a car, it is worth studying their varieties. Now to the question of what types of fuses are used in cars. Let's start with the materials of manufacture. Here the key role is played by what the fusible component is made of. Therefore, the elements are divided into:
- aluminum;
- tin;
- lead;
- alloy (a combination of lead and tin).
The most important characteristic of the product is the speed or response time. That is, the period of time during which the fusible element manages to melt and disconnect the circuit. The faster the insert can melt, the less likely it is that the protected equipment will be damaged. To achieve the desired result, these inserts are made from special alloys and metals that have a low melting point. They are capable of quickly transitioning from solid to liquid state. To increase the response speed, the designs of some fuses additionally provide for a spring-loading system. Structurally, fuses used for cars can be divided into finger and flag fuses.
Finger products have become widespread on classic car models of the domestic automaker represented by AvtoVAZ. These are rods on which a special fusible jumper is placed. At the same time, finger protective structures for cars are divided into plastic and ceramic fuses. Considering some of the features of the safety blocks that Zhiguli cars are equipped with, a ceramic element is considered the most preferable option. It is more resistant to high temperatures, is considered more reliable and does not contribute to false operation if the fuse starts to heat up.
But on modern cars, finger structures have been abandoned. Now the bulk of the fuses are flag protective elements. They are superior to their finger-type analogues in terms of ease of use, and are also superior in terms of reliability. Flag ones are also often called knife ones, since their design provides for a pair of legs necessary for contact when installed in their socket inside the safety block. The name of the flag fuses can be explained by the rectangular or square upper part, where the fusible element or jumper itself is located. The heads on the flags are made of different colors, which directly depend on the denomination. Visually it really resembles a flag, which is where the corresponding name comes from. Flag elements in the safety block are valued for good and strong contact in the seat. But to remove the device you need to use a special device.
Automakers take this into account and place plastic pliers on the inside of the safety block cover. If necessary, such a tool can be easily found in any automotive supply store. If you operate in extreme conditions, or simply don’t have time to look for and buy pliers, you can grab onto the flag using pliers
But here it is extremely important to be careful so as not to accidentally short-circuit the terminals. It’s better to take a specialized device