What is a cigarette lighter for?
A cigarette lighter can be used not only for lighting cigarettes, but also for more useful actions. You can connect a lot of different equipment to the cigarette lighter socket, which, of course, has a voltage of no higher than 12V.
What can be connected to the cigarette lighter:
- Charger for phone, laptop or tablet;
- Automobile compressor;
- DVR, radar detector;
- Car refrigerator;
- Car vacuum cleaner, etc.;
Currently, there are a huge number of car accessories powered by a cigarette lighter; such a connection has made it possible to use these devices with ease.
Connected devices to the Priora cigarette lighter
You can independently calculate exactly what power devices can be connected to the car cigarette lighter. For this purpose, you will certainly need to know the current rating, which is what the fuse is designed for. How to do this yourself? Everything is quite simple: we multiply the current strength of 15A (ampere) by the so-called rated voltage in the cigarette lighter itself, which is 12V (volts).
It follows from this that any existing device connected to the Lada Priora cigarette lighter cannot exceed a power of 180 W (watt). At the same time, the list of devices allowed for connection is quite extensive, we suggest you familiarize yourself with it:
- DVR;
- Compressor/portable refrigerator;
- Ionizer;
- Devices for navigation;
- Massage pillow/special cape;
- Air purifier;
- Lantern/lamp;
- Boiler/electric kettle;
- Splitter;
- Fan;
- Special heating pad on the seat;
- Vacuum cleaner
Let us additionally note that every year various new devices and all kinds of instruments appear. Always be careful about what you connect to the car cigarette lighter, because excessive load can not only cause fuses to fail, but also a short circuit, and worst of all, a fire.
How does a cigarette lighter work?
The cigarette lighter is made in the form of a cylinder into which the heating element or plug of a car accessory is placed. The power supply in it has a constant voltage of 12V, which is protected by a fuse. The cigarette lighter has “+” and “-” through which current flows when a load is connected. The backlight is also powered from the cigarette lighter, which also operates at 12V.
The standard cigarette lighter socket has the form of a cylinder, inside of which there is a nichrome filament, which subsequently heats up to a high temperature.
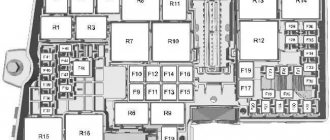
Location of Priora fuses under the hood
- F1 (30 A) – power supply fuse for the electronic engine control system (ECM);
- F2 (60 A) – fuse for the power supply circuit of the engine cooling system fan (power circuit), additional relay (ignition relay), rear window heating, electrical package controller;
- F3 (60 A) – fuse for the power supply circuit of the electric fan of the engine cooling system (relay control circuit), sound signal, alarm signal, ignition switch, instrument cluster, interior lighting, brake light, cigarette lighter;
- F4, F6 (60 A) – generator power circuit fuses;
- F5 (50 A) – fuse for the power supply circuit of the electromechanical power steering
Relay and fuse box for Halla air conditioner
- right electric fan power supply fuse (30 A);
- fuse for the power supply circuit of the left electric fan (30 A).
- right electric fan relay;
- additional relay (sequential activation of left and right electric fans);
- left electric fan relay;
- heater fan power supply fuse (40 A);
- compressor power supply fuse (15 A);
- heater fan relay;
- compressor relay.
Panasonic air conditioner relay and fuse box
- Heater fan maximum speed
- Right fan
- Fan sequential relay (low speed)
- Left fan
- Left fan fuse (low speed)
- Right fan
- Heater fan
- Compressor
- Heater fan
- Compressor
Possible causes of failure
There are quite a few reasons why the cigarette lighter on a Priora may not work, but most often they are of the same type and are associated with improper use of this part or due to its aging.
- Contamination of the contacts inside the cigarette lighter, which makes it impossible to conduct current through them. This problem occurs quite often if the cigarette lighter is used as intended. Remaining ash gets inside the cigarette lighter and contaminates it.
- The cigarette lighter connector, which is connected to it from below, is also susceptible to damage. When using powerful accessories, the contacts may burn.
- The cigarette lighter fuse is one of the most common problems with a non-working cigarette lighter. Fuse blowing occurs due to a possible short circuit or the use of powerful car accessories.
- A malfunction of the cigarette lighter illumination does not lead to its failure, but still, when something in the car does not work, it is not good and requires repair.
The problems that happen with the cigarette lighter are clear, now you need to figure out how to solve them and fix the cigarette lighter.
Serial number and part numbers
Before you begin repairing the cigarette lighter and disassembling the central tunnel, you need to buy a suitable spare part. There are different device options for the Lada Priora on sale, both original and not. Cigarette lighters from the AvtoVAZ factory have article number 21230-3725010-00.
When purchasing, you need to pay attention to the cost of the spare part. A cigarette lighter price that is too low indicates the use of low-quality materials. Such a part may burn out within several weeks after replacement. In addition, the item must be well packaged and have a certificate of conformity.
Cigarette lighter fuse. Where is?
The fuse is responsible for protecting the circuit from short circuit or overload, therefore, if a problem occurs in the cigarette lighter, its fuse blows first. The Priora cigarette lighter fuse is located in the mounting block and is numbered F13 and has a rated current of 15A. If the cigarette lighter breaks, you first need to check its integrity.
If the fuse is intact, proceed to further actions.
What fuses determine the operation of the cigarette lighter in Priora
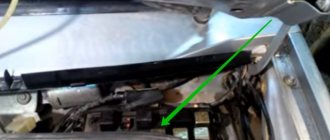
First question: where is it located? When considering a specific car, and in our case it is the Lada Priora, you can safely look for the cigarette lighter fuse we need and will certainly find it in the specialized mounting block, which is where it is installed. When the car owner is sitting in the car, all he needs at this moment is to look down to his left.
The so-called mounting block is located at the bottom of the dashboard, to the left of the steering wheel and is covered with a special protective cover. Just under this cover you will find the entire Priora mounting block with fuses. At the bottom of the block there are 2 rows with all kinds of fuses. The cigarette lighter fuse “settled” in the top row, and its place is on the far right. Factory marking of fuse socket F13. Also an important question: what fuse does it come with? In this case, the current should be 15 amperes.
In all Lada Priora models from the Russian Federation, without exception, the cigarette lighter fuse we are currently considering is also present in the main unit. This element is primarily responsible for the fan located in the cooling system, but also ensures the operation of the cigarette lighter. In the main unit under the hood, its factory marking is F3, and the current limit is 60 amperes, respectively.
It has been verified experimentally that on the Priora, which is popular in the Russian Federation, the safety element we need has to be replaced quite often. The main reason for this problem is that the cigarette lighter is often used incorrectly. Most car owners do not think about the fact that the cigarette lighter is necessarily limited in power and current. You cannot connect a fairly powerful device to the connector; it is also undesirable to use a device that distributes charge to several devices or gadgets. You need to purchase reliable fuses, and high-quality wires for your car will also help keep the overall wiring of the car in proper condition.
Removing the cigarette lighter
To diagnose the Priora cigarette lighter, it must be dismantled. Removal must be done with the fuse removed, so as not to cause an accidental short circuit during operation. We remove fuse F13 from the mounting block and get to work.
- Insert a small flat-head screwdriver into the hole on the cigarette lighter and lightly press on the plastic retainer, as shown in the picture. Then turn the metal part of the cigarette lighter counterclockwise.
- We take out the metal part up and disconnect the connector.
- Use your finger to pry up the green outline of the cigarette lighter illumination and remove it as shown in the picture.
- We perform assembly in reverse order.
Installation location and diagram
Standard fusible elements of the block are plastic plugs, inside of which a fusible thread is installed. The purpose of the latter is to transmit voltage. Each wiring component is connected to the power supply of your Priora. All these elements of the circuit diagram are responsible for the functioning of electrical devices: cigarette lighter, stove, fuel pump, rear window heating device, and so on.
If old VAZ models are equipped with one unit, then the Lada Priora has two. These cars, in addition to the gas pump, cigarette lighter, stove and other components, are equipped with many auxiliary gadgets, as a result of which one unit will not be enough to support the functionality of the entire chain. For example, if in this case a short circuit occurs as a result of a breakdown of the stove, fuel pump or cigarette lighter, then fewer vehicle systems will suffer from this. But the performance of the fuel pump will remain in question.
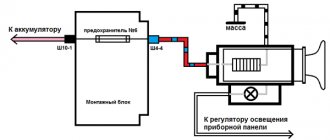
One block is located next to the battery under the hood of the car. Below is a diagram of the Lada Priora power supply and the purpose of the main elements.
Main unit PP assignment table
Many Lad Prior owners are interested in the location of the cigarette lighter fuse. The element responsible for the functioning of the cigarette lighter is located in this power supply unit and can be seen in the diagram.
The second unit is located in the cabin, under the steering wheel of the car, opposite the driver’s seat. Thanks to the layout diagram and table with numbering, you can immediately determine which element has failed.
Photo of the electrical circuit of the interior unit
Fuse numbering table
The cigarette lighter light does not light up
This reason occurs due to the burnout of the backlight lamp or its poor contact with the cigarette lighter body. To check, you need to remove the cigarette lighter and inspect the lamp. If the lamp is intact and has no signs of damage, most likely it does not work due to poor contact.
To ensure reliable contact, it is necessary to bend two contacts on the lamp socket and clean them with sandpaper. It is also a good idea to clean off carbon deposits, if there is any, on the outside of the cigarette lighter, where the lamp contacts come into contact with the cigarette lighter body.
How to remove and replace it yourself?
If everything is clear with the location of the blocks and the diagrams, then we will consider the procedure for dismantling the links. If you are sure that certain components of the electrical wiring have failed as a result of a burnt-out part (for example, one responsible for the light on the dashboard), then the unit needs to be opened, and the burnt-out devices removed and replaced.
In the event that the performance of the Lada Priora devices is not related to the failure of the fuses, then it may be advisable to carry out a continuity test of all components of the circuit according to the diagram. After all, the cause of the breakdown can be both breaks in the electrical wiring and short circuits. Next, you will learn how to remove and change fuses on the Lada Priora on your own.
- From the very beginning you need to prepare your Lada for repairs. It is necessary to remove the negative terminal of the battery and turn off the ignition.
- Depending on where the blown fuses are located, you will need to open the corresponding box. As stated earlier, it can be installed in the engine compartment or under the steering wheel. Press out the latches that secure its protective pad. After removing the cover, you can see a diagram on the back of it. According to this diagram, the parts responsible for the functioning of certain devices are marked. Use it to determine the location of the breakdown.
- Pull back the trim that hides the block. This may require a screwdriver.
Installing a new fuse
Removed protective cover
- The assignment table will help identify a burnt-out PP.
- When the search for the burnt link in the Frets block is completed, take the tweezers, which are used to dismantle the links. As a rule, a failed link can be seen by a burnt thread that passes through its body. However, if there are no obvious damages on it, this does not mean that the part is intact and working.
Failed link
- Now install a new PCB in place of the failed one. Please take into account the fact that the ratings of the replaced devices must match, i.e. if the link is marked 15 amperes, then it needs to be replaced with a similar one.
- If it is necessary to replace the relay, the replacement operation is carried out in a similar way. But you don’t need tweezers for this - you can dismantle the relay with your hands. Having done this, close the plastic cover of the power supply and do not forget to throw back the negative terminal of the battery.
When the procedure is completed, turn on the ignition and check those devices whose sensors have been replaced. If the problem remains, then perhaps it is not related to the performance of the links. There is probably a break in the electrical wiring circuit that needs to be repaired by connecting the wires.