When should I replace the front stabilizer bar bushings?
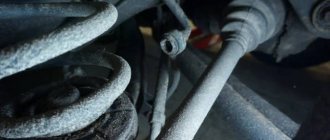
By carrying out a visual inspection of the stabilizer bushings from time to time, you can identify their wear. If there are cracks on the bushing, or the shape has changed (there are large abrasions), then the stabilizer bushings must be replaced.
The service life of stabilizer bushings for most brands and models of cars is 30 thousand km. If only one bushing is worn out, it is recommended to replace the complete set in order to increase the time between overhauls for replacing bushings.
If dirt is visible during visual inspection, it is better to clean them, thereby protecting them from accelerated wear.
Signs when it is necessary to change the stabilizer bushings in a car:
- if there is wheel play when turning;
- if the steering wheel shakes;
- if there are squeaks when the car tilts (roll);
- if the suspension vibrates (there is extraneous noise);
- if when driving straight the car pulls to the left or right;
- and, if at all, there is instability while driving.
These signs, first of all, indicate wear of the stabilizer bushings. The same signs may also be accompanied by wear of silent blocks. Such problems are eliminated by replacing the silent blocks of the front levers and subsequent work on wheel alignment. Therefore, you should check them and carry out repair work with your own or someone else’s hands to replace the stabilizer bushings. Play can also appear if the wheel is severely imbalanced. It disrupts the balancing when hitting a hole, or, for example, when pumping sealant into a tubeless wheel to close a puncture.
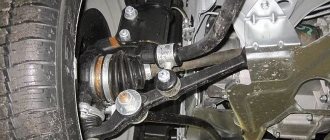
Removing the lever
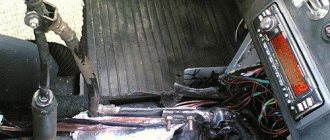
Removing the front suspension arm of a Ford Focus 2 is not difficult, but it will be easier to do this work in the inspection pit.
So, the car is driven into the pit. On the side from which the silent blocks will be removed and replaced, the car is jacked up and the wheel is removed.
Next, work is carried out under the car. To gain access to the lever, you will need to remove the crankcase protection.
We see the detachment of the silent block.
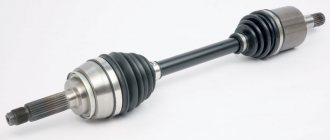
Having removed the protection, you can begin to dismantle the lever. To do this, you need to unscrew the nut securing the ball joint of the lever to the hub.
Then, using a ball joint remover, it is released from its seat in the hub.
Next, the bolted connections securing the lever to the subframe are unscrewed.
There are three such bolted connections.
This is where the silent blocks are located. After removing the mounting bolts, it is removed.
Let's look at the silent block.
And we see that it needs to be changed.
The same picture is on the left lever.
Subsequent work is carried out on the removed lever.
How to change the front stabilizer bushings of a car
Although there are a huge number of brands and models of cars, the principle and procedure for replacing front bushings is practically the same. The main difference is in the tools used.
The correct procedure for replacing the front bushings is:
- Place the car on a lift (if available) or place it above an inspection hole.
- Loosen the front wheel bolts.
- Remove the wheels.
- Then the nuts securing the struts to the stabilizer should be unscrewed.
- Disconnect the struts from the stabilizer.
- Then the rear bracket mounting bolts should be loosened and the front bolts should be unscrewed.
- Clean the bushing installation areas from dirt.
- New bushings should be lubricated on the inside with soapy water or silicone grease.
- Install the bushings and perform the reverse steps to disassembly.
In some car designs, it will be more convenient to replace the front bushings if you first remove the engine crankcase protection.
The rear stabilizer bushings are changed in the same way as the front ones. Usually, the front ones are more difficult to remove than the rear ones. When the rear bushings wear out, a squeak appears.
Replacement instructions
Regardless of the model or age of the car, the technology for replacing the front stabilizer bushing does not change. Some details of the procedure may be added or the set of tools may change. Thanks to the instructions below, even a novice driver can carry out the replacement. So, let's go.
Replacing front stabilizer bushings
Step 1. Prepare the necessary tools for work.
Preparing tools for replacing bushings
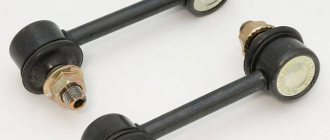
Step 2: Also prepare two front stabilizer bushings. It is strictly not recommended to change them one by one.
A pair of bushings to replace
Step 3. Place the car in the pit to make it easier to perform subsequent steps.
Drive the car into the pit
Step 4. Be sure to put the car on the handbrake.
Putting the car on the handbrake
Step 5: Place some supports under the rear wheels. If there are no wheel chocks, you can put bricks under the wheels.
Installing wheel supports
Step 6. Raise the car with a jack and place reliable supports under it. For safety reasons, the structure must be stationary.
Lifting the car onto supports
Step 7: Remove the front wheels from the vehicle to make replacing the hubs easier.
Removing wheels from a car
Step 8. Check the elements for wear by lightly tugging the stabilizer. As you can see, the parts are quite worn out, as the stabilizer hangs in them.
Diagnostics of the stabilizer by mechanical action
Step 9. Start replacing from the right side, as experienced motorists advise. There is more space here, and the product itself on the right side wears out faster.
It is advisable to start work on the right side
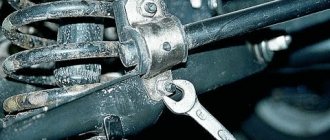
Step 10. Unscrew the bolts securing the stabilizer bushing bracket (there are two in total).
Unscrewing the fastening bolts
Step 11. If you couldn’t unscrew the fasteners with a spanner due to lack of free space, try doing it using a long socket. In this case, a 14mm head was used.
Long head for unscrewing mounting bolts
Step 12. When all the elements have been unscrewed, remove the bushing mounting bracket.
Removing the bushing bracket
Step 13: Remove the bushing from the stabilizer.
Removing the stabilizer bushing
Step 14. Before installing a new part, be sure to clean dirt from both the stabilizer itself and the space under the bushing on the subframe.
Cleaning the surface of the stabilizer
Step 15. Install the stabilizer bushing. The new part should be in exactly the same position as the old one (with the slot facing backwards).
Installing the stabilizer bushing
Step 16. Install the mounting bracket. If there were traces of rust or dirt on its surface, then the part must be cleaned before installation.
Fixing the mounting bracket
Step 17: Install the mounting bolts. This is a fairly complex process, so a long 14mm socket will also be required.
Tightening the mounting bolts
Step 18. If difficulties arise with the first bolt due to lack of space, then the second bolt is tightened quite easily.
Tightening the bolt with a long nozzle
Step 19: Repeat the procedure on the left side of the car.
Replacing the bushing on the left side
Step 20. When everything is ready, put the wheels back in place.
Installing car wheels
Step 21. Don't forget to remove the supports that you previously placed under the wheels. At this point, the procedure for replacing the front stabilizer bushings can be considered complete. You can enjoy the results of your work.
Removing supports from under the wheels of the car
The following types of bushings exist:
1. Spherical (or “iron”) bushing. The design resembles a ball joint;
2. Rubber bushing.
Today, polyurethane type stabilizer bushings are becoming increasingly popular. They are quite easy to replace, which is an important advantage, and they also have good operating characteristics. Experienced drivers can safely say that these are the parts that are most convenient.
If a malfunction occurs in the area of the stabilizer bushing , it must be replaced without fail. Otherwise, this can have a very bad effect on the performance and handling of the vehicle. When the bushing is deformed or cracks appear on it, some noise may appear in the area of the car suspension (mainly when the car hits an obstacle or increases speed). In principle, problems in the suspension area are identified precisely by such noise.
In order to make sure that it is necessary to replace the bushings, periodically it is necessary to carry out diagnostics of the suspension, after which the malfunction will be identified or prevented.
In the event that it is determined that it is necessary to replace the stabilizer bushing, this can be done independently. Moreover, there is nothing complicated about it and the procedure is very simple. First, the bolts with which the clamp is attached are unscrewed. Then the stabilizer is moved to the side and the old parts are removed. Well, for the final action, the new part is installed very carefully.
It is according to this scheme that both the front stabilizer and the rear stabilizer are replaced . After replacing spare parts, driving a car will be much more pleasant and comfortable, and various kinds of road obstacles will be overcome without any difficulties. Among other things, the new elements will maximize the performance of the racks.
- Replacing stabilizer rubber bands
- 1. Where are the rubber bands or stabilizer bushings located?
- 2. What is needed to replace worn car stabilizer bushings?
- 3. How to change stabilizer rubber bands with your own hands?
For the connection and normal operation of various automotive mechanisms, a large number of different bushings and rubber gaskets are installed on them. However, these elements have a very short service life, since under conditions of intensive use they wear out very quickly and backlashes form in them. As a result, the operation of the car becomes unsafe; after wear of the bushings, very serious damage can occur. All this applies to the rubber bushings that are installed on the stabilizer. Therefore, if during operation of the car you hear an elastic knock in the front part of it, you should know that you are in danger of replacing the stabilizer rubber bands. How to do this - read our article.
Where are the rubber bands or stabilizer bushings located?
If the stabilizer rubber bands are worn out and play has formed in them, you will be notified of this by a clearly defined sound that appears during operation of the car engine (or, more precisely, with each revolution of the starter). It is especially noticeable when the car drives one wheel onto a small hill or accidentally falls into a hole. Then the driver can hear a very strong sound from the contact of metal parts, between which there is no rubber gasket.
A typical car stabilizer has four rubber bushings. Finding them on this mechanism is not difficult. Two of them can be found and removed very easily: they are located under the mounting brackets, which form something like a cover or “house” for them. Two more are worth looking for in metal holders.
As a result of wear of the rubber bushings, the stabilizer parts are able to move almost freely. If the body bends a little while driving and there is a lateral displacement, the stabilizer begins to knock. In this case, you will most likely have to replace the easily removable bushings, which are located under the cover of the mounting brackets. These rubber bands most often wear out, which is why there is a need to replace them.
What is needed to replace worn car stabilizer bushings?
You will need very few tools to carry out such work, but you need to prepare them in advance so that they are all at hand during the work. So, you will need:
1. Socket wrench (10 and 13).
2. Socket heads (useful for 13 and 14, but it is best if the 13 head is elongated).
5. Vernier calipers (you can use a regular ruler instead).
But it’s worth noting right away that not in all cases it is possible to get by with only such a simple set of tools. The fact is that in the process of replacing the rubber bushings you will definitely have to unscrew the fixing nuts of the stabilizer struts. Here you may encounter one very unpleasant discovery: the nuts are stuck to the body of the part and cannot be removed with a regular wrench. In such a situation, it may come to the point that you have to use a grinder or a hacksaw. After this, along with replacing the stabilizer rubber bands, you will also need new struts for this part.
And more about why you need a jack. With its help, you will need to lift the car to remove the wheels from it and gain free access to the stabilizer and its bushings. It may also be needed if, during work, the stabilizer bar suddenly moves to the side, and you are unable to return it to the desired position using a crowbar. In such a situation, using a jack, you will only need to lift the rear of the car, after which the bar should fall into place.
Which bushings to choose, analogue or original?
Original Renault stabilizer bushings 546114237R are installed at the factory. The cost of one piece is approximately 500-600 rubles. It turns out not very cheap when replacing 2 bushings at once, so you can choose quite inexpensive analogues.
Analogues of Renault 546114237R
- Akrado AK546114237R (Russia) from 150 RUR pcs
- Lemforder 3617901 (Germany) from 350 RUR pcs
- LYNXauto C8608 (Japan) from 250 rub. PC
- Sasic 2304026 (France) from 150 rub.
- Sidem 805845 (Belgium) from 300 rub.
Recently, polyurethane bushings have become popular. Judging by the reviews of car owners who install them on their cars, the service life of polyurethane bushings is longer, unlike rubber bushings. Therefore, as an option, you can choose them as a replacement. Several Russian companies are engaged in the production of such bushings.
Polyurethane bushings
- Vtulka.ru 2501008 (Russia) from 500 rub.
- X5 Resource 370017 (Russia) from 450 RUR
- Support point 13013217 (Russia) from 450 RUR
Polyurethane bushings are the exact same size and type as regular bushings, making them a great replacement.
Creak of stabilizer bushings
The driver and passengers often feel a squeaking sound when the car is moving. They especially begin to creak in severe frosts.
Let's look at the reasons why bushings squeak:
- The bushings were made of low grade material.
- In the cold, rubber becomes like oak and loses elasticity, which is why squeaks appear.
- The bushing is badly worn.
Ways to eliminate the creaking of car stabilizer bushings:
Logically, in order to eliminate the squeak, you need to lubricate the bushings, which is what some drivers do. But lubricant, be it lithol 24, various oils, silicone grease - all this attracts dust and sand. Adhering abrasives will only cause the bushings to wear out quickly.
Also, lubrication will lead to a partial loss of function of the bushings themselves, since they must tightly hold the stabilizers. The bushings are torsional and therefore protect against vehicle roll. For the bushings to function properly, they need to be seated tightly. And, if you lubricate them, they will already slide and can rotate.
Many drivers recommend changing bushings when squeaks occur. It happens that new bushings also creak. You should drive it for about a month, if the squeaks do not go away, then new ones need to be changed, but with polyurethane ones.
There are ways for folk craftsmen to improve the efficiency of stabilizer bushings. They wrap some of the bushings with electrical tape to make sure they fit tightly.
The video shows the process of replacing conventional bushings with polyurethane ones.
Source
Modern car suspension
Design and operation of the suspension
The main task of the suspension is to provide an elastic connection between the body and the wheels. Thus, the suspension softens the shocks and jumps that occur when the car moves on an uneven road or its absence. The smooth ride of a car directly depends on the suspension.
The suspension serves as a kind of shock absorber, absorbing the energy that occurs when hitting bumps or falling into holes and ruts. However, it does not guarantee complete smoothness of movement and wears out greatly with frequent movement over uneven surfaces.
Pendants are divided into the following types:
- McPherson;
- double lever;
- multi-link;
- adaptive;
- "De Dion"
- rear dependent;
- rear semi-independent;
- pickups and SUVs;
- trucks.
McPherson type suspension
The McPherson type suspension is one of the oldest. It was developed by the talented engineer Earl McPherson in 1960. Consists of a stabilizer bar, a lever and a block. A serious disadvantage of the suspension is the change in the wheel camber angle, but it is very popular due to its availability and reliability.
Double wishbone suspension
The double wishbone suspension is one of the most advanced designs. This is a suspension with two arms of different lengths (the upper one is short and the lower one is long). This design allows the car to maintain stability on the road and ensures the durability of the tires. Each wheel accepts its own obstacle independently and does not transfer the load to the other wheels.
Multi-link suspension
The multi-link suspension was developed not so long ago and is an even more advanced design. It is a set of many levers, silent blocks and hinges. All these components are designed to absorb shocks and strong shocks while driving. The noise level from the wheels in the cabin is also reduced. The suspension has separate lateral and longitudinal adjustments. The wheels are independent of each other. The design is ideal for all-wheel drive vehicles.
The cost of a multi-link suspension remained quite high for some time, but now even golf car drivers can afford it.
Adaptive suspension
The adaptive suspension is very interesting from a design point of view. For a long time it was primitive and weighed a lot, but now it has been greatly modernized. Thanks to this, it allows maximum body roll and wave swing at high speed and allows you to automatically adapt to any type of road surface. The adaptive suspension includes: adjustable anti-roll bars, active shock absorber struts, a chassis control unit and electronic sensors that record road irregularities and other parameters.
"De Dion"
“De Dion” is named after its French creator. The main function of such a suspension is to reduce the load on the rear axle of the car by separating the final drive housing. In this case, the crankcase rests on the body. This design allows you to make the suspension dependent or independent. But there are also disadvantages. With a sharp start, the car body can put a lot of pressure on the rear axle.
Rear dependent suspension
The rear dependent suspension is a real classic option, as it was used on many old VAZ cars. The suspension is based on cylindrical coil springs, which are elastic elements. The rear axle beam “hangs” on springs and is fixed to the body by means of four longitudinal arms. The reactive crossbar acts as a roll absorber and has a positive effect on handling. But don’t expect comfort and smoothness from this suspension, since the rear axle weighs a lot.
Semi-independent rear suspension
Semi-independent rear suspension is most often used in vehicles with all-wheel drive. Its main elements are two longitudinal arms attached in the center to the cross member. This suspension weighs little and does not require any special maintenance or major repairs. But such a suspension can no longer be installed on rear-wheel drive cars.
Other types of pendants
The suspension of trucks is most often dependent with transverse or longitudinal springs and hydraulic shock absorbers. This design simplifies the process of producing and repairing trucks.
What are bushings and why are they needed?
The main task of bushings is to reduce the noise of the suspension when driving and attach the stabilizer to the car body. As a rule, they are made from two materials: polyurethane and rubber. The parts have high elasticity and strength, which is why there are no squeaks or knocks when the height of any of the wheels changes. In addition, it is impossible to rigidly attach the stabilizer to the body, since the distance from the attachment point to the edge of the stabilizer changes when bending.
Bushings can be made from different materials
Often, a faulty bushing can be indicated by various sounds that occur when driving and making sharp turns - squeaks, knocks, and so on. This phenomenon is associated with the loss of elasticity of the bushing, as a result of which it becomes very rigid. Dust or sand may also accumulate under this part.
Sequence of replacing bushings on Mitsubishi Pajero 4
- Using a 12-mm open-end wrench, unscrew the 4 bolts that hold the car’s crankcase protection. To do this, unscrew 4 bolts
- This allows access to the bolts on the stabilizer bar mounting brackets. There are bushings underneath
- These brackets are easily unscrewed with a ratchet socket. Removed with a socket head
- After the brackets are removed, the stabilizer bar is moved down and the bushings are accessible. Installed in place of a worn one
If you compare the design of anti-roll bars on domestic cars and foreign cars, you will notice that on our cars it is a little more difficult to get to the stabilizer bushings. If on a Mitsubishi Pajero 4 to replace the bushings it is enough to unscrew a few bolts, and this can be done in any garage, then in the case of the “seven” you will need a crowbar and an inspection hole. However, with due patience, the breakdown can be repaired on your own.
Before dealing with the topic of what a stabilizer bushing is, it wouldn’t hurt to refresh your memory about the stabilizers themselves, what are they for? The main task of this part is to keep the car as parallel to the road as possible. Despite various risks, for example, turns, braking, which cause both lateral and longitudinal rolls. The stabilizer must cope with them.
In the photo: stabilizer bushings for Honda Civic 5D
Stabilizer bushing - yellow
At the slightest roll, the ends of the stabilizers begin to move, thereby reducing the roll. The movement occurs along the bushings, which will be discussed. The purpose of the latter is to allow the stabilizer to twist in different directions. That is why they secure it with bushings. Over time, the bushings wear out, causing play to occur, which will lead to improper operation of the entire mechanism. The so-called “freedom of the part” increases, then, by and large, the presence of a stabilizer plays no role. Because, similarly to its absence, roll increases due to large strokes and rotation, controllability is lost and this is felt mostly in turns.
Kinds
There are several types of bushings:
Rubber bushings.
Polyurethane. Similar to the previous ones, except for the production material.
Recently, motorists have given preference to polyurethane bushings due to their high performance characteristics. As a rule, they “walk” longer. But this is also individual, depending on how you drive.
Also, you should not lose sight of the nuance that almost every model has its own size and configuration of bushings, which is why special attention needs to be paid to the selection and selection for a specific model. This issue is most acute for foreign cars.
What resource?
This question is quite individual; as such, no manufacturer can give exact “mileages”. It all depends on the specific operating conditions; keep in mind that bad roads, driving style, all of this affects the “life” of the bushing, and the stabilizer mechanism as a whole.
By the way, bushings are considered the most problematic area in the suspension on the Lada Vesta.
A creaking noise begins almost immediately from the factory, and a knocking sound is often added to it while driving over bumps. The problem is that they use low-quality material for manufacturing, which is why the resource of the original bushings on Vesta is very small. It’s all very simple to treat; you need to select analogues from other models. For example, it is known that bushings from Toyota Corollas, Avensis and KIA Rio fit perfectly and do not cause problems for West owners.
Stabilizer bushings for Lada Vesta from Kia Rio. Bushing article - Hyundai/Kia 54812-1G100, bracket - 54814-1G000
Judging by the reviews of drivers, bushings from German brands, which are often installed on “Germans” from the factory, performed well. For example, original parts can often last more than 150,000 km. At the same time, when it comes to analogues from China, the resource is reduced several times.
In general, it is generally accepted among motorists that the average “mileage” for a rubber bushing is 70,000 km; more advanced polyurethane bushings “run” 100,000 km. Some manufacturers even recommend carrying out a scheduled replacement after 30,000 km in order to avoid “surprises”. But, as already mentioned, everything is individual, you need to take into account all the operating features.
It is also worth clarifying this nuance; the life of the bushings is greatly influenced by the state of the thrust (stub) itself.
. For example, if there is a hole in the place where the bushing is attached, then the part will definitely not last the stated period and will not fully cope with the task. As a rule, after replacing the original bushings, owners observe a small amount of metal wear, somewhere around 1.5 mm. With each replacement of the bushings, the output will only increase, so in case of severe wear, it is wiser to replace the entire part so that, in general, the operation of this mechanism will be useful.
Signs of trouble
The following signs may indicate that something is wrong with the suspension. And one of the places that is worth checking is the stabilizer. So:
There is a slight play when turning the steering wheel.
The car began to “yaw” when moving.
When turning, you can hear distinct clicks from the wheels.
The car goes one way.
Vibration is felt.
How to replace?
The issue of replacement for some cars is purely individual, because depending on the model, the fastenings may differ. For example, to replace the bushings on the Mazda 6 and 5 at the front, you will also have to remove the steering rods to get to the brackets securing the rod itself. But, in general, you can draw up a small work plan. So:
Raise the car on a lift or drive it into a pit for convenience.
Keep in mind that the bolts may not budge even after this. Then the “grinder” comes into play. But first take care to remove the fuel hoses from the “dangerous” area. Cut off the "ears" of the staples to "free" the bar.
After unscrewing the brackets (clamps), we sort of move the stabilizer itself away from the subframe to make it easier to remove the bushing. Use a crowbar.
Pull off the old bushing.
Photo — Drive2.ru
We put on a new part.
Replaced the bushing
Please note that in most cases, the clamp fits extremely poorly on the new bushing, so try to position it as evenly as possible and minimize friction (use lubricant).
We tighten the clamp with a bolt. By the way, we recommend that you pre-treat the bolt and nut with lubricant so that in the future there will be no problems with unscrewing it.
By the way, this is an important nuance during replacement. You need to change both bushings at once, that is, do not leave the old part on the right side, but, for example, install a new one on the left side. There should be new bushings on both sides.
The vehicle suspension is one of the most important parts, subject to heavy loads and taking on all the impacts of a rough road. Thanks to its operation, the driver can feel comfortable and not be afraid that while driving the situation may get out of control. However, due to heavy loads, especially when driving on bad roads, which is not uncommon in the Russian Federation, its parts often fail. The most common problem is broken stabilizer bushings. Let's take a closer look at why this happens and how the stabilizer bushings are replaced.
Sequence of work
- The car is securely fixed when jacked up.
- The wheels are unscrewed and removed. There is an engine protection shield in the right wheel arch. Its fastenings are unscrewed and the shield is removed.
- Most of the fasteners under the bottom are pretty acidic, so to speed up the process of replacing stabilizer bushings, they need to be thoroughly treated with a WD 40 solution, which removes corrosion.
- Using an open-end wrench, we fix the finger on the left post. It is slightly hidden from direct access, so you need to find the grooves almost by touch.
- We throw a spanner, preferably a ratchet, onto the nut that secures the shock absorber. Unscrew both fasteners.
- Having freed the stabilizer struts from their fastenings, we disconnect them from the shock absorber strut.
- We install a jack under the left rear part of the subframe. With its help, the subframe is fixed so that when the fasteners are removed, it does not suddenly jump off the studs. A metal plate of considerable size must be placed under the supporting head of the jack so as not to deform the subframe.
- Smoothly lower the jack a few centimeters from the body. Thanks to this, the subframe also lowers slightly, opening access to the bushings.
- A pipe is inserted into the resulting gap, and the subframe is further pressed down. A stopper is inserted into the resulting gap. A 27mm head is suitable; when installing it between the body and the subframe washer, it is better to use pliers. This will save your hand from injury if the pipe slips off the subframe washer.
- We generously water the bracket fastenings with WD-40. We unscrew the bolts gradually, without pressing too much.
Stabilizer design features
In the field of mechanical engineering, the stabilizer appeared along with the first cars whose maximum speed exceeded 20 km/h. Due to the large rolls that occur when turning, there was a need to install this component. The main purpose of the stabilizer is to protect the vehicle from rollover, since during a turn the load on the outer wheels increases, and on the inside, on the contrary, decreases. This causes the car to rock. The stabilizer makes it more stable on the road, preventing it from turning over.
On a note! All car suspensions are equipped with a stabilizer, not only in the front, but also in the rear. A stabilizer is not needed only if a torsion beam is installed at the rear of the car: the functions of the stabilizer will be assigned to the suspension itself.
The design of the stabilizer of many cars is a U-shaped metal rod made of spring steel. To secure the device to the body, special clamps and bushings are used to allow the stabilizer to rotate. To make the car more stable and increase the elasticity of the stabilizer, bushings are used - all impacts from various suspension elements fall on them.
Recommendations for use
The driver is always interested in how to repair the stabilizer link, but if you think about it, you can drive competently and won’t have to repair it so often, right? Russian mechanics have prepared several tips for drivers on how to operate their car with minimal damage to the anti-roll bar struts:
- drive smoothly, avoid skidding;
- slow down when turning;
- avoid small obstacles;
- do not increase speed on uneven roads.
In order for the struts to last longer, you first need to think about the correctness of your driving style. If the stabilizer receives a signal of danger during drifts, it tries to smooth out this very movement, which is first felt by the struts. To prevent this from happening, it will be enough to brake when turning, then the racks will wear out much longer.
Braking on corners
The stabilizer deals not only with turns. Also, its synchronous operation with the car’s suspension can be affected by uneven roads, small holes, humps or speed bumps. In this case, it is better to go around the bumps, but if the whole road is breathing with difficulty, then it is better not to increase the speed.
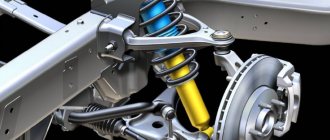
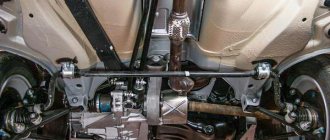
Car suspension diagram
The suspension is a multi-component unit of the car. This element includes a stabilizer, which is responsible for reducing roll and skidding during turns and braking, as well as for vehicle stability in any situation on the road. The racks act as stabilizer elements and take a significant part of the loads, thanks to their wide functionality. The main task of these parts is to reduce the sway of the car while driving. The struts connect the suspension to the body, creating a single whole mechanism thanks to which the system functions.
Many car owners are interested in the issue of self-repair and replacement of stabilizer strut elements. The fact is that a full replacement of such elements costs a considerable amount, and repairs at a service station are also expensive. Independent high-quality repair of struts is an inexpensive and short process, and knowledge of the tricks and nuances will allow each driver to carry out a range of work without compromising the current condition of the car.