How to remove rear brake drums on a VAZ 2101-2107
The brake drums of the rear wheels on the VAZ 2101-2107 do not have to be removed very often, but this causes a lot of problems for the owners of the “classic”, since this procedure is not a pleasant one. Over time, the drum body and hub become very attached to each other and it becomes almost impossible to knock it down. But still, I’ll start with a more civilized method of removal. For this you will need:
- Jack
- Balloon wrench
- 7-deep head with a crank or ratchet
- Penetrating lubricant
So, first of all, lift the rear of the car with a jack and unscrew the wheel:
Then remove the wheel and spray penetrating lubricant on the connections of the studs and brake drum 2107:
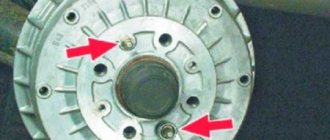
Now unscrew the two drum guide pins:
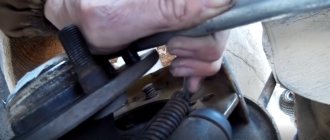
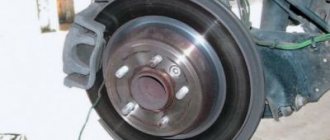
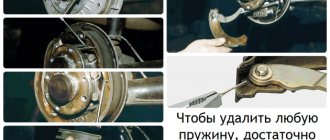
When you have dealt with them, you can try to knock the drum down from the inside by gently tapping it with a hammer through some kind of backing. If it was not possible to knock it down in this way, you can perform the following operation.
We get into the car and start the engine, turn on fourth gear and spin the suspended wheel in such a way that the speed on the speedometer is at least 60-70 km/h. And sharply press the brake pedal. At this moment, the pads begin to block the brake drum, and the hub tends to rotate further; it is at this moment that the disc breaks out of its place and then it can be knocked down without much difficulty.
If necessary, you can repeat the procedure with acceleration and braking (with a suspended wheel) several times until you achieve the desired result.
How to remove a brake drum on a VAZ 2107
Today we will tell you how to remove the brake drum on a VAZ 2107 with your own hands. It is worth noting that the procedure is not pleasant and requires a lot of effort and patience. The reason is that the drum body and hubs stick to each other over time and it becomes almost impossible to separate them.
We will need:
- jack; — balloon wrench; — 7-deep head with a knob or ratchet; - penetrating lubricant.
In the previous article, we talked about very relevant information for today - this is the installation of contactless electronic ignition on a VAZ 2107 with your own hands. Read more on our website.
Removing brake drums on a VAZ 2107
1. First of all, lift the rear of the car with a jack and unscrew the wheel.
2. Then remove the wheel and spray penetrating lubricant onto the connections of the studs and brake drum 2107.
3. Now unscrew the two drum guide pins.
When you have dealt with them, you can try to knock the drum down from the inside by gently tapping it with a hammer through some kind of backing. If it was not possible to knock it down in this way, you can perform the following operation.
We get into the car and start the engine, turn on fourth gear and spin the suspended wheel in such a way that the speed on the speedometer is at least 60-70 kilometers per hour. And sharply press the brake pedal. At this moment, the pads begin to block the brake drum, and the hub tends to rotate further; it is at this moment that the disc breaks out of its place and then it can be knocked down without much difficulty.
If necessary, you can repeat the procedure with acceleration and braking (with a suspended wheel) several times until you achieve the desired result.
Problems when paying with bank cards
Sometimes difficulties may arise when paying with Visa/MasterCard bank cards. The most common of them:
- There is a restriction on the card for paying for online purchases
- A plastic card is not intended for making payments online.
- The plastic card is not activated for making payments online.
- There are not enough funds on the plastic card.
In order to solve these problems, you need to call or write to the technical support of the bank where you are served. Bank specialists will help you resolve them and make payments.
That's basically it. The entire process of paying for a book in PDF format on car repair on our website takes 1-2 minutes.
Source
Several ways to remove a brake drum
Sometimes, when removing the brake drum on VAZ cars, a certain kind of problem arises when the VAZ brake drum is not removed. The reason for this, as a rule, is the wear of the inner working surface by the brake pads, so it turns out that the pads are in the recess and hold the drum itself.
How to remove a brake drum (option No. 1)
And so we have a situation where the brake drum rotates freely, but it cannot be removed. First you need to completely release the handbrake lever. Now, using a wooden block (never metal, otherwise the edge of the drum may break off), tapping the edges of the drum from the inside, at the same time turning, we try to remove it little by little. Please note that this operation must be carried out while the car is parked in a pit.
How to remove a brake drum (option No. 2)
This method of removing the brake drum should be used if it is stuck to the axle shaft
We hang the wheel whose drum needs to be removed on a jack, put shoes (counter-recoil wheels) under the other wheels, remove the wheel and guide pins, put a splint under the bridge and lower the car so that it sits tightly on the splint. We start the car, engage 3rd gear and spin the suspended wheel a little (about 3000 - 4000 rpm) and sharply hit the brakes, so the drum is torn from its place. Again, in 3rd gear, we accelerate all the way for 10 - 20 seconds, turn it off, go check it, remove the drum, if it doesn’t come off, then we go and accelerate again.
How to remove a brake drum (option No. 3)
There is another way to remove the brake drum in a situation where it is stuck to the axle shaft. The first step is to thoroughly clean the edge of the inner hole of the drum from rust and dirt using a knife or screwdriver, and then moisten it generously with a penetrating liquid, for example VD-40. After 30 minutes you can begin dismantling. On VAZ cars, the brake drum has two holes for guides, which do not contain threads, but two technological holes into which you can screw a screw of a suitable size and thus use them as a puller. I hope the point is clear to you. For a clear example and all the subtleties of removing the brake drum on VAZ cars in the video presented.
Downloading a book
After successfully completing the payment (by any method) and returning to the KrutilVertel store from the payment system website, you will be taken to the successful payment page:
The book you purchased will be in your personal account, from where you can always download it.
Please note that after making the payment, you need to return back from the payment system website to the KrutilVertel website. If for some reason you did not return back to the site and closed the payment system tab with a message about the successful completion of the payment, please let us know - we will send you a letter indicating access to download the book
If for some reason you did not return back to the site and closed the payment system tab with a message about the successful completion of the payment, please let us know - we will send you a letter indicating access to download the book.
How to remove the brake drum on a VAZ 2107? Try it yourself
Download PDF
As a rule, drivers, when faced with a task for the first time, wonder how to remove the brake drum on a VAZ 2107. This work, despite its simplicity, usually turns out to be a mystery for an inexperienced auto mechanic.
Without knowing some of the nuances, you can tinker with this part for a long time and unsuccessfully, or simply damage the drum or other elements of the axle shaft. It is worth studying the instructions for dismantling the brake drum. So that if repairs are necessary, you can immediately begin the process without asking unnecessary questions. Also, do not forget that such work may be required for many malfunctions. To get to the damaged parts, you will have to remove the drum. How to remove the brake drum on a VAZ 2107? This question arises due to the lack of visible fasteners that hold the part in place. Therefore, when it is necessary to dismantle the drum, a stupor arises, as to what to do.
Content
- When should you shoot?
- Brake system diagnostics
- Removing and installing the drum
- Useful tips
When should you shoot?
The job of removing a brake drum is actually quite common. This is due to a number of technical features of the domestic car. You will have to dismantle the drum in the following cases:
- Drum wear
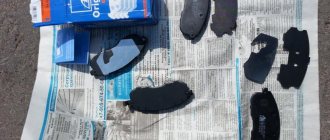
. During operation, it gradually wears off, which leads to the need to replace it; - Installation of new brake pads;
- The need to remove the rear axle shaft.
The drum will also need to be removed if it is necessary to repair or replace any elements of the rear brake. Sometimes in this case the drum is changed. Here you need to act based on the condition of the parts on your car.
Brake system diagnostics
Before removing the drum, it makes sense to diagnose brake system faults. This will allow you to purchase everything you need for repairs in advance. This way you will significantly save your time spent on repairs. It would be optimal to visit a service station and check the brakes on a stand, but you can do without it. Let's look at the main points that you should look at when checking:
- Pay attention to the behavior of the brake pedal. It should not be too soft or fall down when pressed;
- Stand on an incline and lift the parking brake lever. If the car starts to roll backwards, you should tighten the brake cable or replace the rear pads. Take precautions when checking. Make sure there is no one further down the slope;
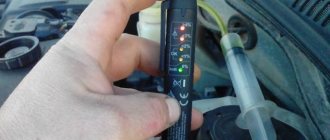
- Check for brake fluid in the reservoir. If it is not enough, check the system for leaks;
- Visually inspect all hoses; they should not have any damage;
- We should also consider diagnosing the condition of the drums. First of all, inspect the part; it should not have cracks or other visible damage. When viewed from the inside, the bead should show even wear. Also measure the inner diameter of the drum; it should not exceed 201.5 mm
. - Loosen the wheel screws of the wheel chosen to replace the drum;
- We jack up the car on this side. We install the stand and lower the jack a little. Our task is to ensure that the bottom lies tightly on the stand. In this case, the car will definitely not fall during further actions;
- Remove the wheel completely;
- Fill the guides with liquid key and wait a little;
- We unscrew the guides, for this you will need a key 13 for new cars, and 15 for older cars;
- Having unscrewed the guides, you can proceed to removing the drum. It can only be dismantled by knocking it off the bridge. But, do not forget that it is made of cast iron, so you cannot hit it with a hammer. You need to do the following. We take a wooden block, place it on the edge of the drum, and hit it with a hammer several times. We repeat the action on the opposite side. As a result, the drum will be removed from the support disk.
If any of the listed deviations are detected, then it is necessary to replace the damaged parts. Any malfunction of the brake system is deadly. Therefore, always give it due attention.
Removing and installing the drum
If during the diagnostic process you decide that it is necessary to remove the drum, you should figure out how to do it correctly. In fact, this work is not difficult, but it requires a certain skill. Or rather, you just need to understand what to do and why. First, prepare the necessary tools. You need to understand that having everything you need on hand will greatly simplify the repair procedure.
It will also be convenient to carry out work if there is an inspection hole. But this is optional. You can do without it.
Withdrawal occurs in the following order:
Separately, it is worth considering the process of installing the drum. This is not always an easy task. This is usually hampered by the pads, which are wider than the drum. Therefore, they need to be brought together. To do this, open the bleeder fitting slightly and use a pry bar to compress the pads together with the cylinder. As a result, you will be able to put the drum in place without much difficulty.
Useful tips
Finally, we will give some tips regarding replacing drums:
- Nowadays this part is often offered, made of aluminum
. In fact, there is no practical sense in such a replacement; - When you have the drum removed, do not press the brake pedal. This will damage the slave cylinder.
As you can see, there are no special rules or difficulties here. Knowing how to remove the brake drum on a VAZ 2107, you can easily complete this job, saving on a trip to a car service center. When performing any repairs, always check the operation of the brakes after completion; this must be done.
Rear brakes on a VAZ 2107, removal and disassembly, assembly and installation
↑ Removal and disassembly
- Lift the rear of the car and remove the wheel.
- Take measures to prevent fluid from leaking from the tank.
↑ Rear wheel brake drum
1 — bolts securing the drum to the axle shaft; 2 - threaded holes for installing bolts 1 when removing the drum
- Remove the brake drum by unscrewing the mounting bolts 1.
- Insert these bolts into technological holes 2 and tighten until the drum separates.
- Disconnect cable tip 15 from lever 18 of the manual drive of the shoes, remove the cotter pin, press pin 21 and remove the lever.
- Use pliers to disconnect the upper 2 and lower 7 tension springs.
- Having turned the cups of the support struts 17, remove them together with the struts, springs and lower cups; remove pads 8 and 16 and spacer bar 20.
- Disconnect the brake fluid supply tube from the wheel cylinder and plug the inlet holes of the cylinder and tube.
- Remove the wheel cylinder.
- When replacing the brake shield, remove the axle shaft as indicated in the “Rear Axle” chapter and disconnect the parking brake cable by unscrewing the two bolts securing it to the brake shield.
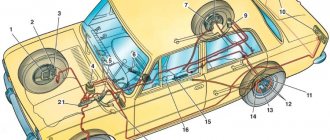
↑ Rear wheel brake mechanism
1 — wheel cylinder; 2 — upper tension spring of the pads; 3 — pad lining; 4 — brake shield; 5 — inner plate; 6 — rear cable sheath; 7 — lower tension spring of the pads; 8 — front brake pad; 9 — pad support plate; 10 - rivets; 11 — oil deflector; 12 — pad guide plate; 13 — rear parking brake cable; 14 — rear cable spring; 15 — rear cable end; 16 — rear brake pad; 17 — block support post; 18 — lever for manual drive of the pads; 19 — rubber cushions; 20 — pad spacer; 21 — finger of the lever for manual drive of the pads.
↑ Assembly and installation of the rear brake VAZ-2107
Install and secure the wheel cylinder to the brake shield, attach the brake fluid supply pipe to it and tighten the fitting nut completely.
- Attach the lever 18 for the manual drive of the shoes to the block and install the brake pads with the spacer bar 20, then install the racks 17 with springs and lower cups, place the upper cups and fix them on the racks by turning them in one direction or the other.
- Make sure that the ends of the pads are correctly positioned in the stop sockets on the wheel cylinder pistons and on the brake shield.
- Install the shoe tension springs.
- Attach the tip 15 of the rear cable to the lever 18.
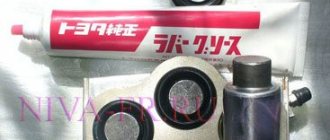
- Install the brake drum, having previously lubricated the seating belt of the axle shaft with graphite grease or LSTs-15 grease and tighten the drum mounting bolts until full.
If the wheel cylinder was removed during disassembly, remove air from the rear brake drive circuit.
Preparation
The work is best done on a flat, paved area - most typical garages will be a bit cramped. Find a suitable support in advance - hanging a car on a standard jack is dangerous, especially considering the state of the jacking sockets on cars, the youngest of which is almost ten years old. Also for work you will need:
- narrow nose pliers;
- a thin drift (at worst - a piece of 4 mm electrode or a thick nail);
- metal brush;
- powerful flat screwdriver;
- rubber bulb or large syringe.
First, you need to pump out the old brake fluid from the reservoir - when the working pistons are recessed, it can overflow, and replacing it with fresh one would be quite reasonable. It is worth placing stops under the wheels and, having removed the tightened bolts, hang the car, place a support under the threshold and release it down.
Features of removing the brake drum on a VAZ 2107 and replacing it
Every driver knows how important an element in the design of a car is the brake mechanism. This mechanism is complex and consists of many parts, and one of these parts is the brake drums. They are installed on the rear wheels, but due to their low reliability, the question often arises of how to remove the brake drum on a VAZ 2107 in order to repair or replace the mechanism.
How the rear brakes work on the VAZ 2107
The rear brakes on the VAZ 2107 are presented in the form of a special design consisting of a round base and a braking mechanism. You need to know the design of the mechanism in order to understand the principle of operation, and if you know how the wheel locks, then it will not be any problem to repair the brake system. To understand the design, let's look at each element separately.
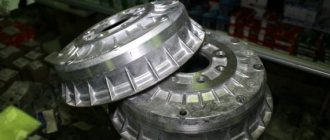
Brake drum
This is a device that is attached to the rear wheels and rotates with them. When this device is blocked, the rotation of the wheel slows down. Structurally, the device has a simple appearance, and is presented in the form of a massive round metal part with holes for mounting pins.
When considering the brake drum of the seven, it is important to mention the main dimensions of this device:
- The internal diameter of the brake drum is 250 mm. The maximum permissible diameter, taking into account the boring, is 2.2 mm larger.
- The internal height is 57 mm.
- The total height is 69 mm.
- The external size of the brake drum is 305 mm.
- The total number of holes is 8, four of which are needed for the studs that secure the wheel.
The operating principle of this device is quite simple - a locking mechanism (pads) acts on the inside of the part, slowing down the rotation of the device along with the wheel. This is how the car slows down.
Brake mechanism of the rear wheels of VAZ 2107
Knowing the design of the part, you need to find out how the blocking or braking process occurs. This function is realized due to a special design that is securely attached to the wheel hub. This design is based on the following components:
- Brake pads - there are 2 of them, which are shaped like a crescent. The outer part of the shoes is in contact with the inner part of the round base of the drum, reducing its rotation speed.
- Return springs - ensure that the pads return to their original position when the brake pedal is released.
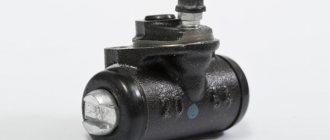
- Rear wheel brake working cylinder.
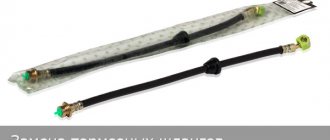
- A handbrake cable, which secures the wheels (and the car) when the handbrake is engaged.
The principle of operation of the mechanism is simple, and is based on the transmission of force from the pedal to the executive body. The force is transmitted using brake fluid, which acts on the working cylinder of the mechanism, driving the pads. Also, the pads are driven not only through the hydraulic system, but also through the handbrake cable, which is called the parking brake.
Payment via PayPal
After selecting payment via PayPal, the PayPal payment system will launch, where you need to select the payment method: bank card or PayPal account.
If you already have a PayPal account, then you need to log into it and make a payment.
If you do not have a PayPal account and you want to pay using a bank card via PayPal, you need to click on the “Create an Account” button - shown with an arrow in the picture.
PayPal will then prompt you to select your country and provide your credit card information.
After specifying the information required to make the payment, you must click on the “Pay Now” button.
Official website of the PayPal payment system https://www.paypal.com