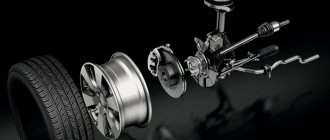
Brake discs are an important component of the braking system. The amount of time it takes to stop the car depends on the type of disc, quality and material of manufacture, and degree of wear. Often, due to wear, the wheel moves to the side, the working cylinder and pads jam.
Systematic technical inspection of the car, its elements, and assemblies will prevent negative consequences and premature breakdowns.
The process of replacing discs yourself is not at all difficult; every car owner can do the job. If you don’t have time, contact the service center to provide qualified assistance.
What front brake discs can be installed on Lada Kalina 2
By default, non-ventilated discs with grooves from a domestic manufacturer are installed on cars of the Lada family. The workmanship is not bad, but it is not enough for a long time.
We felt vibrations and beating in the steering wheel - the first sign of uneven wear. Carry out preventative maintenance as soon as possible, followed by replacing worn out elements.
The standard disc size is 19.0 mm. The maximum permissible minimum thickness of use is 17.8 mm, after which it is unsafe to use the brake system element. Similar standards apply to Lada Largus, Granta, Priora, Niva.
Advantages and disadvantages of different types of brakes
People tend to quickly get used to the conveniences that various technical means provide them. Do you have a desire to find out what is good about the rear disc brakes installed on Kalina?
Many experienced drivers will argue that rear disc brakes are much more effective than drum brakes. And we can quite agree with them. Naturally, skeptics will find shortcomings in such a braking system.
It's no secret that rear disc brakes are much more expensive than drum brakes. Caring for a disk system is much more difficult because it really does not like dirt. Particular difficulties arise if the car is an SUV. In general, there are many opinions from both experienced and novice drivers about which brakes are best.
Kalina Sport brakes are very effective
Not long ago, a comparison was made of the performance of rear disc and drum brakes. The difference of two meters in braking distance speaks for itself. The only condition for this check was that the brake system must have a certificate of conformity, which would guarantee the car’s ability to easily pass state technical inspection.
As a result, it was proposed to test two similar configurations, but different ones were provided by the first Ford Focus model, and the AvtoSportTekhnika organization provided the Chinese Cherry. As a result of the tests, the opinions and assumptions of skeptics were successfully debunked.
Original
| Name / article / OEM / front | Price, rub.) |
| ALNAS 2110-3501070 (diameter 24 cm) | from 1500 |
| ALNAS 2108-02 Euro (diameter 24 cm) | from 1600 |
| Autoreal 2110-3501070 (13 inches) 13r | from 1400 |
| Autoreal 2112-3501070 (14 inches) / 14r | —/— |
| 7701206339 (without ABS) 14r | —/— |
| 7701207795 (with ABS) Lada Kalina 2 | —/— |
| ALNAS 2112-03 Sport Lada Kalina 1117-1119 | from 2200 |
| ALNAS 2112-3501070 | from 1550 |
| ALNAS 2110-03 Euro | from 1700 |
| ALNAS 2110-02 Sport | from 2000 |
Final stages of work
Before replacing the caliper, you can immediately change the pad apron. This work will not take much time. In addition, replacing the old caliper with a new one is quite simple.
This is how the brake system is adjusted
It is also advisable to change the bleeder fitting. You can install a fitting from the Volga, since these parts are identical. After this, we return to screwing the caliper with the VAZ bracket. You can not unscrew the hose from the old caliper immediately, but only after the new unit is installed. If only the bracket is being changed, then the hose should not be touched, and there is no need to bleed the brakes either.
After finishing the work, you can paint the discs with alkyd enamel. It is best to apply three layers. The replacement of the front and rear brake discs can be considered complete. All that remains is to put on the wheel.
After about 200 kilometers, the new pads will begin to wear out. Remember that under no circumstances should you suddenly slow down, for example, from 100 kilometers per hour to 20. If you brake smoothly, you will be able to avoid thermal deformation of the disk.
Do not forget that for effective braking the rear brake disc must warm up gradually and several times. Manufacturers of Kalina strongly recommend replacing the HAZ every five years or after a mileage of 100 thousand kilometers. Do not neglect this valuable advice.
Substitutes
| vendor code | Price, rub.) | vendor code | Price, rub.) |
| ABS 17342 | from 1300 | METELLI 23-0411 | from 1350 |
| BOSCH 0 986 479 346 | —/— | LPR L1052V | from 1400 |
| BREMBO 09.8903.14 | from 1500 | TRW DF4107 | —/— |
| FERODO DDF1147 | —/— | BREMBO 09.8903.75 | —/— |
| VAZ (R13) ventilated LUCAS DF4108 | —/— | TRW 2110-3501070 | —/— |
| 2110-3501070/71 | —/— | —/— |
Substitutes
| vendor code | Price, rub.) | vendor code | Price, rub.) |
| Lightweight brake drum made of cast iron Pilenga 6224 | from 1600 | Fenox TO2108O3 | from 1700 |
| LPR 7D0271 (diameter 200 mm, height 50 mm.) | from 1800 | TRW DB4307 | —/— |
| Brembo 14707910 | —/— | Bosch 0986477146 | —/— |
| ATE 24.0220-0020.1 | —/— | BREMBO 14.7079.10 | —/— |
| TRW DB4171 | —/— | TRW DB4187 | —/— |
Changing the rear pads
Replacing the rear brake pads of a Lada Kalina is a complex operation, and it’s good that it is recommended to perform it every 60,000 km (4th scheduled maintenance). The principle of operation of drum brakes is easy to explain: there is a cylinder installed under the drum and two pistons that press on the pads. But in practice, disassembling the drum mechanism turns out to be more difficult than changing disc brake pads.
Steps to replace drum brake pads, VAZ-2192/2194
First of all, you will need to fix the car body on the support stand, and only then can you remove the rear wheel. Next, the sequence of actions looks like this:
- The handbrake handle is lowered all the way down;
- 7 wrench (socket wrench with a hex head), unscrew the two studs holding the drum;
- The brake drum must be removed: the body is turned by lightly hitting it with a hammer through a block in the “toward” direction;
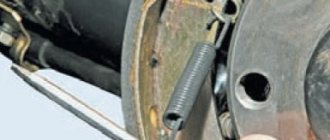
- Remove the upper and lower tension springs, remove the pad stops from the piston slots;
- Short guide springs are disconnected from each of the pads (there will be two in total);
- The block located closer to the front side of the body is removed. Then, remove the spacer bar;
- The second block is removed along with the parking brake lever.
Finally, the block and the handbrake lever will need to be disconnected (just remove the mounting cotter pin). Installation is carried out in reverse order. To quickly secure the guide spring, insert a wire into its eyelet and pull it towards you.
Installation of brake pads in drums, VAZ-2192/2194
The photos posted in this chapter show parts with serial number 3502090-01 (“Standard”). More expensive trim levels use pads 3502090-10, which have a slot for the ABS sensor.
Check out what we said in the previous chapter. New pads must first be allowed to “break in”. Their effectiveness can be assessed after several hours of continuous use.
When considering how to replace the cabin filter, we listed the manufacturers of parts and the differences in designations. In this case, the parts are designated the same: 3502090-01 or 10 (rear pads). As for the front pads, there will be several options:
- 1118-3501080-00 – manufacturer is AvtoVAZ;
- 1118-3501080-05 – issued by JSC TIIR;
- 1118-3501080-15 – the same as “05”, but with an anti-squeak plate;
- 2192-3501080-19 – the same as “05”, but with an anti-noise complex.
Don't go wrong with your choice! As a last resort, you can contact specialists, but preferably not the ones shown here.
How to do the replacement yourself
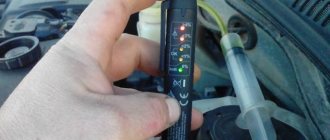
Before starting repair work, we carry out comprehensive diagnostics in order to study the general technical condition of the car, identify the breakdown, calculate time, effort, and resources. Often the cause is a faulty working cylinder, system depressurization, or pipe damage.
We carry out diagnostics by placing the car on the inspection channel, jacking up each wheel one by one, and measuring the thickness of the disk. If the actual value is less than 17.8 mm. - replace it with a new one, subsequent operation is unsafe. Otherwise, we continue the inspection and troubleshoot the brake pads and working cylinder.
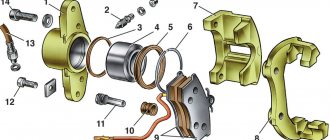
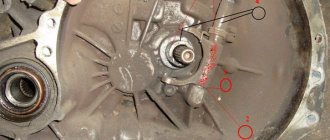
Brake disc: removal, installation
You will need: 18mm socket head, 7mm wrenches (two), TORX E14, large screwdriver, wrench for wheel bolts.
If there are deep scratches, scuffs and other defects on the working surface of the disc that increase the wear of the pads, thus reducing the effectiveness of the braking process, and if the lateral runout of the disc is increased, causing vibration during braking, the disc must be replaced. Such a disc can be ground and sharpened in specialized workshops on both sides with the same depth, but after processing the thickness of the disc cannot be less than the minimum permissible.
The minimum permissible brake disc thickness is 17.8 millimeters. If the thickness of one disk is less than this value, both disks should be replaced. When replacing brake discs, it is necessary to replace the brake pads with a new set.
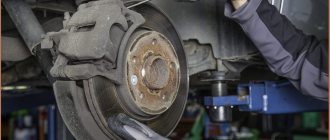
1. Loosen the tightening of the front wheel bolts on the side of the disk that is being removed, and place rear wheel chocks under the wheels. Raise the front of the car, place it on supports and remove the wheel.
2. Remove the caliper from the brake mechanism for the front wheel without disconnecting the brake hose from it and hang the caliper on a rope or wire to the front suspension strut. You should make sure that the brake hose is not too stretched or twisted.
3. Unscrew the two guide pins...
4...and remove the brake disc.
5. Install the brake disc in reverse order.
Before installing the disc, you should thoroughly clean the surfaces on the hub and disc from scale and rust, because even the smallest particles squeezed between such surfaces will cause the disc to beat and vibrate during braking.
6. Press the brake pedal several times until the piston of the worker cylinder is in the working position.
7. Check the brake fluid level in the reservoir and bring it up to normal if necessary.
Sequencing
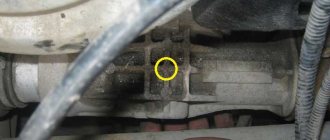
- We install the machine on a flat surface; for convenience, you can use a hydraulic lifting mechanism;
- Remove the wheel, unscrew the upper and lower guide on the caliper. We move it to the side and do not unscrew the brake fluid supply line. To make work easier, simply hang the caliper from the front strut (spring) housing;
- To dismantle the disk, unscrew the two bolts on the hub and hold the disk from turning;
- If necessary, tap the disc around the perimeter with a hammer from the end part. Direct impacts are prohibited, as there is a high probability of chamfer deformation;
- After removing the disk from the splines, we carry out troubleshooting, clean it of debris, and apply a thin layer of graphite lubricant to the guides;
- We install a new disk and assemble the structure in the reverse order.
When finished, press the brake pedal 3–4 times, bleed the system, and check the DOT level -4. We fill the missing amount as needed in the expansion tank of the master cylinder.
This completes replacing the brake disc with your own hands. Next, we carry out the procedure similar to the second wheel.
Tips for choosing tools
Original wheels for Kalina
We can advise you to immediately purchase everything you need so as not to be distracted later. With the right tools, you can always do your own car repairs. Moreover, operations can be of absolutely any complexity. We can only advise that when purchasing tools, first of all, choose those that are exactly suitable for repairing your car model.
Particular attention should be paid to brands and manufacturers, because this indicator can say a lot about the quality of the product. Collect the optimal set of tools for repairing your car, including all kinds of wrenches, sockets, ratchets, profiles and much more useful things.
Strictly following the instructions for replacing disks on Kalina will allow you to avoid unnecessary mistakes and do everything as quickly and efficiently as possible.
Algorithm for replacing rear discs on a second generation Lada Kalina
The process is similar to installing the front ones, except for the shape and method of fixation.
- We jack up the rear wheel, block the front part with wheel chocks;
- Unscrew the bolts, remove the wheel, unscrew the two mounting bolts, and remove the drum. If dismantling is difficult, carefully tap along the perimeter so as not to damage the edge;
- We carry out troubleshooting of brake pads, pressure springs, spacer bars, and handbrake cables. Replace with new ones as needed;
- We put on a new drum disc, screw in two bolts, and complete the installation.
When finished, bleed the system by repeatedly pressing the brake pedal. We replenish the missing amount of brake fluid in the reservoir.
Subject to compliance with installation technology, purchase of original consumables, moderate driving style, subsequent maintenance after 35,000 km. Which brake discs are better - obviously with factory catalog numbers and in the original design.
Features of Kalina Sport
Lada Kalina Sport was created in 2008. After the release of the first car, the state registration of the model was successfully completed. Soon Kalina Sport cars were sent to Yaroslavl, Moscow, Izhevsk, Vologda, Voronezh, Perm, Volgograd, Kirov, Orenburg, Krasnoyarsk and other cities of the country.
Lada Kalina Sport is very similar to the Lux model. The sports version of Kalina differs in that it contains quite a lot of different original parts. These are door moldings, an exhaust pipe nozzle, a combination of various instruments with white scales and orange backlighting, original bumpers, a spoiler, and a nameplate on the fifth door. The interior of Kalina Sport is made in an elegant dark color, which gives it a special chic and uniqueness. The car is equipped with special sports pedal pads.
If we talk about brake discs on Kalina Sport, then most car enthusiasts claim that they are better on a regular Kalina. Of course, opinions differ, so which brakes to choose when purchasing a car is up to the buyer himself to decide. Good luck in choosing a car!
Tuning brake systems