Which brake pads to choose for Lada 4×4?
Rear pad selection is limited. Among the manufacturers are the following:
- Brembo - price 1411 rubles;
- Lada (original) - 1200 rubles;
- Hi-Q - 998 rubles;
Brembo is definitely the best brand for producing brake pads. Original overlays often have defects and there is no guarantee of long-term operation, but Hi-Q is the best option in terms of price and quality.
Article number of brake pads Lada Niva - Lada 21010-3502090-02-0
Along with the brake pads, it is recommended to immediately purchase a handbrake cable.
Rear brake pads - replacement
To replace the pads, we place the car on an inspection ditch or a lift.
Remove the rear wheel and loosen the parking brake system drive cable (see here).
To secure the brake drum, bolts with a reduced head height are used. Therefore, to unscrew them, it is better to use a hexagonal tool head, the working edges of which begin immediately from its end (if necessary, the head can be turned out).
To dismantle the drum, the removed bolts can be screwed into the two threaded holes of the drum (unlike the mounting holes, the threaded holes are located symmetrically). When screwed in, the bolts will rest against the axle shaft flange and move the drum.
You can also remove the drum...
We show two ways to remove brake pads.
When removing using the first method ...
Elements of the block support post.
Remove the rear block support strut.
When removing the brake pads using the second method, remove the support struts of both pads.
We perform the operation carefully so as not to damage the wheel cylinder boots.
To remove the manual shoe drive lever...
assemble and install the pads in the reverse order (depending on the disassembly method). In the second method, before installing the second brake pad, we fix the first one from movement by installing a support post.
When installing new pads, it is necessary to press the pistons inside the wheel cylinder. This operation can be performed as follows:
After installing new brake pads, it is necessary to adjust the parking brake system (see here).
Addition
Drum brakes are still widely used on the rear axle of budget cars. The reason is that, thanks to their large working surface, they are highly wear-resistant, and they are also better protected from dirt. When driving quietly, the service life of drum brakes is quite long. However, their efficiency is significantly lower than that of disc brakes, this is especially noticeable when operating the car with a full load. Also, in cars with rear drum brakes, the front disc brakes wear out faster because they bear a greater load. In general, if previously the front brake pads wore out much faster than the rear ones, today the opposite situation is observed: on cars equipped with the ESP stabilization system, the rear pads often last even less than the front ones.
To a large extent, the effectiveness of the braking system depends on the type of friction materials used in the manufacture of brake pads. There are two main types currently common.
Just as there are different schools of automotive engineering, the requirements for brake pads differ in different countries. Plus, environmentalists make their contribution by introducing bans on vehicles or other materials, often unfounded. So, first, asbestos fell into disgrace; as a result of its abandonment, the service life of brake pads decreased significantly, then it was the turn of copper. In Western European countries, high braking efficiency is primarily valued, including in extreme conditions.
In North America and Asia, increased emphasis is placed on comfort, durability and environmental friendliness. In European countries, friction materials with low steel content are widespread. The advantages of this type are the following: high temperature and speed stability, good information content of the brake pedal, very high strength, pads clean the brake disc well from rust, low cost. Disadvantages: limited service life, increased wear of brake discs, during operation a large amount of brake dust is released, which is why environmentalists dislike them very much.
Currently, in Asian countries and North America, brake pads made of organic friction material, the so-called NAO, are widespread; they do not contain steel fiber. Main advantages: low noise level, high durability of pads and discs, the material does not contribute to the formation of discrepancies in the thickness of the brake disc, very low dust level. Until recently, they had one significant drawback - their high price, but recently, due to the increase in the production volume of such brake pads, their cost has been significantly reduced, and now they are comparable in price to Low Steel type pads. Another drawback is that pads made of organic friction material are less able to withstand hot braking cycles, and they also do a poor job of cleaning the brake disc from rust.
How do you know when it’s time to change the pads on your Niva?
To determine the wear of the rear brake pads on the Niva, there is a special inspection window. Drive the car into a pit or overpass, get to the rear wheels and look out the following window:
To see the pads, you need to pry and remove the rubber gasket.
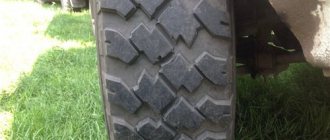
The remaining thickness of the block must be at least 1.5 mm. If it is less, the linings should be replaced.
Installing ventilated discs
But what needs to be done when replacing brake discs on a Chevrolet Niva? Installing ventilated discs instead of standard ones is quite difficult; you will have to perform several costly manipulations:
- Replace wheel rims. Instead of size R15 you will need to put R16.
- Of course, you need to buy the discs themselves.
- You will also need a new set of pads.
- You still need to install new calipers and fasteners.
After installing all the elements, you can start operating the car. And do not forget to promptly check the condition of the brake mechanisms. If necessary, you need to replace the brake discs on the Chevrolet Niva. If the standard ones do not suit you, you need to install ventilated ones - they can not only eliminate overheating, but also significantly improve braking efficiency.
Sources used:
- https://kalina-2.ru/remont-vaz/kak-snjat-zadnij-baraban-na-nive-2121
- https://prodemio.ru/kak-snjat-zadnij-baraban-na-nive-21214/
- https://auto-park24.ru/remont/kak-snyat-tormoznoj-baraban-na-nive-shevrole.html
How is the replacement performed?
Replacement of rear brake pads on VAZ 2123, 21213, 21214 and Niva Travel is carried out as follows:
Suspend the rear wheels and remove them:
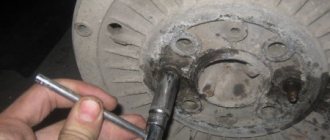
Now you need to remove the brake drum. How to remove a drum is a story that deserves its own article, but we will try to describe it briefly. The algorithm for removing a drum on a Niva is as follows:
- We take a metal brush and thoroughly clean the areas where the drum meets the hub and along the edges.
- Spray the joints generously with WD-40.
- Unscrew the drum mounting bolts.
- Apply blows with the mallet from the back side around the entire circumference of the drum. In the photo, the outer edges of the drums are knocked down and chopped off. This happens when you hit someone not with a mallet, but with a hammer. You shouldn't do this!
- If you fail to knock down the drum, try heating it and then repeat the procedure. In 99% of cases, this method will work.
- You can cut the drum only as a last resort if you plan to replace it.
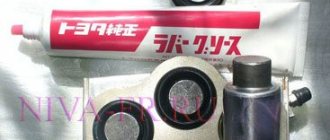
Attention! To ensure that the part is dismantled without problems next time, we recommend lubricating the area where it contacts the hub with copper grease.
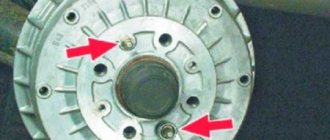
After removing the drum, the following picture should open:
Pry with a screwdriver and remove the upper spring:
Remove the support bar:
Remove the pad mounts. To do this, press on the cup and turn it to release the support post:
After this, dismantle the pads and remove the handbrake lever from one of the pads. To do this, simply pull out the cotter pin and remove the lever.
How to remove the rear brake drum of a Niva Chevrolet
How to remove the rear brake drum of a Niva Chevrolet
According to the AVTOVAZ catalog data for the VAZ 2123, the front pads are assigned the number 2123-3501090. The average price of original pads is 550 rubles.
Due to the low quality of most original products, we will consider analogues:
- SANGSIN SP1168 — 480 RUR;
- TRW GDB265M - 620 RUR;
- BOSCH 0986466601 — 650 RUR;
- FERODO FDB195 - 950 RUR;
- ATE 13046080062 — 1450 rub.
Based on the proposed substitutes, we conclude: for a small additional payment it is better to take a high-quality analogue from a world-famous manufacturer. Improved braking performance and safety may come at the cost of reduced brake rotor life.
Service and operation
Manuals → Chevrolet → Niva (Chevrolet Niva)
How to tension the top spring?
Install new pads in reverse order. The hardest part will be tightening the top spring. To do this, assemble the entire mechanism, put a spring on one of the pads and install a stump under the hub, screw in the drum mounting bolt and place the metal tube vertically as follows:
To secure the pads, clamp them using wooden wedges.
Now insert a screwdriver and tighten the spring as follows:
To make the spring put on, you can push it with your fingers towards the hole. All that remains is to put the drum in place and assemble it.
This is how to change the rear pads on Niva Chevrolet and Niva Travel.
see also
Hyundai salon photo- How to start a car
- Increase in MTPL tariffs in 2022
- Car battery terminals
- Where is Hyundai Greta 2019 assembled?
- Alarm Sherkhan Magikar 5 disable valet mode
- Which car lamps are better: Philips or Osram?
- How to clean car interior at home
- Where is the charging relay for the VAZ 2107 injector?
- How to choose xenon
- Renault Logan fog light bulb replacement
[edit] "Niva" and the bourgeoisie
Niva was actively exported to other countries. It is the only Avtotaz product that is truly known and famous in Europe, and not as a piece of socialist shit. There are more than 9,000 cars of this brand in the Spanish, French and Greek mountains; converted police and rescue Nivas are found in the mountains of Bulgaria and Montenegro. It also happens in southwest Germany. Not too often, but still. Tyoma even met the subject in harsh Greenland. Moreover, this is the only Soviet car officially exported to Japan. Occasionally he returned to his historical homeland, already with air conditioning. However, such a crappy air conditioner can now be installed right here.
Also, "VAZ-2121" appeared in the film "Detroit - City of Rock" about four rabid fans of the group KISS, for example. More specifically, the episode with the delivery of pizza to a parochial school; the delivery man arrived in a sub. And also in the funeral episode of the film “Largo Winch: The Beginning,” a red Niva with horizontal optics flashed.
Niva also appeared in the American series “Beauty and the Beast,” which takes place in New York.
In the racially Brazilian series “Cruel Angel”, a Niva with horizontal optics takes a Land Cruiser to a local rally, and even rides in the trunk of one of the negative characters.
The Niva also appeared in the film ROBOCOP, released in 2014. At the very beginning of the film, when journalists are shown the work of OSP Corporation robots in the Arab quarter, the Niva, without a fawn, stands on the side of the road.
Finally, in the plankton film “The Incredible Life of Walter Mitty,” an Icelandic native on a Niva tries to escape the Eyjafjallajokull eruption together with GG.
In 2001, AvtoVAZ management managed to sell its only asset - a VAZ-2123 prototype almost ready for mass production. This prototype was slightly modified by the GM-AvtoVAZ joint venture (in particular, they stuck on a Chevrolet badge, leaving the engine from the old Niva) and turned into the Chevrolet Niva. Prooflinks: 1, 2.
Drum brakes: how they work and how to repair them
Drums, of course, long ago lost the evolutionary war to discs, but to this day they are quite actively used on inexpensive and lightweight machines. All Ladas, Renault Logan, VW Polo sedan, Skoda Rapid, Daewoo Matiz - the list of completely modern models using these archaic but durable brake mechanisms will be very long. This means it’s useful to know how they work, why they break and how they are repaired. After theoretical preparation, we will go to the repair zone, where we will examine the drums of a rare Chinese sedan Chery Jaggi, better known in Russia under the name QQ.
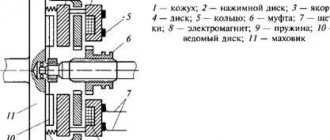
Drum brake design
Drum brakes have not changed fundamentally since their mass appearance in 1902 thanks to Louis Renault. True, those brakes had a cable drive, and therefore they were exclusively mechanical. Plus they did not have automatic adjustment, so the driver had to regularly check the gap between the pads and the drum. But the fundamental design, I repeat, has changed minimally.
We will describe here the most common, classic design of the drum brake mechanism. There is a brake flap that is rigidly attached to the rear axle housing or wheel axle, and it does not rotate. There is also a drum that is attached to the wheel hub and rotates with it and the wheel.
The brake pads are installed on the brake flap. On one side, the pads rest on the axles, on the other, on the pistons of the working brake cylinder (this is clearly visible in the photographs). When the brake pedal is pressed, the brake fluid pushes the pistons in the working cylinder apart, which in turn pushes the brake pads apart. The pads are pressed against the surface of the drum and the car slows down. Friction linings are glued or riveted to the pads. To prevent the pads from falling out, pressure springs are installed.
[edit] Niva update
Recently, AvtoVAZ designers, I don’t understand from what hangar, came up with the idea after more than thirty years of suffering of the population from this miracle thing - they, after all, decided once again (the first was in the early 90s) - to update this cart.
- New headlights, which are still only a drop, but improve aerodynamics and which now, oh my God!, have a reflector and DRLs.
- More aerodynamic rear-view mirrors that can be adjusted from inside the cabin.
- Euro-4 standards, and even Euro-5 have been laid down.
- Power steering f. ZF
- ABS f. Bosch
- New instrument cluster from 2115.
- Updated door and side trims.
- Drive shafts of axles on CV joints reduce noise and vibration, but the two transfer case supports in the form of a transverse axis seem to remain
- “Torn package” in the gearbox.
- Soundproofing of the engine compartment and floor tunnel.
- Electronic gas pedal, and simultaneously with Samara-2 and Lada Kalina.
- Clutch assembly from Shnivy.
- Steering from Shnivy.
- Athermal glass.
- Vertically mounted rear wheels - yes, my friend, she now drives normally on the highway!
- Double row bearings in the transfer case and almost goodbye to the rumble!
- Well, there are all sorts of isofixes and so on throughout the cabin.
We get rid of vibration and extraneous sounds of the Niva transfer case forever
The characteristic howl and hum of the transfer case on VAZ-21213 cars, alas, is familiar to many owners of such cars. Let’s figure out what is the reason for these problems, and most importantly, how to get rid of them without using “collective farm” methods, such as additional noise reduction.
Content
Understanding the terminology
Let's start by diving into the materiel. Transfer case (TC) is a separate unit of an all-wheel drive vehicle, which provides multi-mode power distribution from the engine to the front and rear axles.
Externally, this is a mechanism located under the bottom of the car, in the body of which a multiplier (divider) is placed in series to obtain an intermediate gear ratio in the transmission and a splitter of one power flow into two. It is with the help of this device and its controls (levers) that go into the vehicle interior that the LADA 4×4 driver selects the all-wheel drive operating mode.
Replacing front pads
The process of installing new auto parts is simple, so there is no need to visit the dealership. You can do it yourself, but don't forget to prepare your equipment. Follow these steps:
- Place the machine on a lift or above an inspection ditch. This will be required to gain access to the front pads.
- Hang up the first wheel and remove it. Then remove the cotter pin located on the front axle of the lever. Using a drift, remove the axle of the clamping lever and then remove the axle using pliers, holding the lever.
- Carefully remove the pressure lever and remove the springs from the guide. It's better to put them aside so as not to lose them. Lift the brake caliper using a screwdriver and place it on the steering knuckle.
- You need to remove the guides from the brake pad. Before installing new pads, move the pistons as far inside the cylinders as possible. The pistons are pressed with a gas wrench or a mounting blade into the cylinders.
We install new components, pressing the lever, and assemble the assembly in the reverse order (that is, we return the guides, caliper, and so on to their places). To make it easier to install the axle, sharpen its tip into a cone shape on a sharpener. Don't forget to lubricate the part with a graphite-based compound.