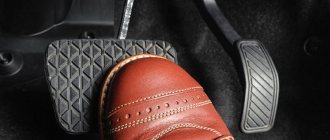
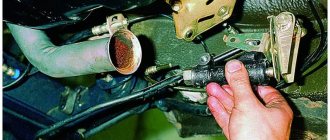
Hissing when you press the brake pedal is one of the most common problems encountered in the operation of both domestic and foreign-made cars.
The thing is that most drivers react sensitively to various sounds that accompany the operation of car mechanisms. An exception is the case when a hissing sound is heard when you press the brake pedal.
But it is not always worth panicking - especially in cases where the hissing of the brake pedal when pressed does not in any way affect the efficiency of the braking system. In order to understand the nature of this sound, let's take a closer look at the operation of the vacuum brake booster.
Brakes are one of the main components of any car. And if, when you press the brake pedal, you hear hissing, creaking, the structure itself fails or, on the contrary, is too hard, you need to urgently correct the situation, do not delay or shelve possible repairs. Or at least diagnose the causes of trouble. Knowledge and understanding of the problem leads to its fastest resolution, and timely correction can save you from unforeseen situations on the road.
The level of hissing when you press the pedal - which is normal and which is not
There is a category of drivers who listen very carefully to every slightest squeak or sound and try to hear signs of a breakdown. A car is a mechanical vehicle that contains a sufficient number of components and mechanisms that can create a small permissible noise level. You shouldn’t listen too much to this and go straight to the service center, where, with a lot of persistence, they will definitely find the problem and offer to fix it. The brake pedal, when pressed, in most cases emits a slight hiss.
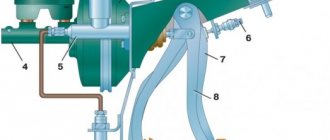
Vacuum brake booster for VAZ 2109
It must be said that you need to check the brakes for various noises while the car is running. In this case, windows and doors should be closed, and all devices that can make additional noise should be turned off, if possible. A small noise level in the cabin may occur due to the design of the brake system, which, as a rule, has two vacuum chambers. When you press the brake pedal, different pressures arise in them, which is why a slight hiss occurs. If it is minimal and almost imperceptible, then there will be no problems when braking.
If at idle, when you press the pedal, you hear a loud, choking sound or a strong hiss, and it is pressed tightly, then you need to look for problems. First of all, the vacuum booster is checked. A stiff pedal is not a sign of a breakdown of this part, especially in severe frost, but, coupled with hissing, it indicates the need to check it.
The brake system is constantly used by the driver, so the elements of the system are under load. Whatever driving style the driver preaches, over time it is necessary to check the brakes for serviceability. This will ensure the safety of all road users.
The vacuum amplifier has a diaphragm, which over time, like any rubber material, begins to burst and crack. This does not allow it to fully fulfill its functional purpose - to pump up the necessary pressure. The intake vacuum can also fail, but more often this is the first option.
"Boiling" brake fluid
If you ask hundreds of car owners which of them change their brake fluid at least once every two years, what do you think will be the answers? And how often do you change it yourself? Let's be honest with ourselves. Rare is the car enthusiast who has changed the brake fluid at least once in his life. The main thing is the oil. As for the rest, at least the grass won’t grow, as they say...
Useful tool to measure brake fluid temperature
Meanwhile, brake fluid is by no means eternal. It, like motor oil, exhausts its service life and loses the properties inherent in it. Moreover, it doesn’t matter at all what she looks like. Many people think that crystal clear brake fluid that has not changed color or become cloudy is an indicator of its suitability. But that's not true. Like all other working fluids in a car, it must be periodically replaced, followed by bleeding the system to remove air. How often should this be done? Ideally, at least once every two years. Moreover, it is not that expensive. Yes, and there is a little of it there.
Now let's return to our problem - the hum of the brakes. It may very well be that this kind of defect occurs due to a liquid that has lost its properties. It is often said that under load it “boils”, as a result of which it ceases to perform its functions. The hum is also quite reasonably present. Therefore, if you have had the car for more than two years, and you have not changed this consumable, there is no point in moving on to the rest of the items on our list. Replace. Even if it doesn't help, fresh brake fluid won't harm your car anyway.
How to check the vacuum brake booster
The braking system of a car is constantly exposed to loads, and in the so-called aggressive style of driving on city streets, these loads increase exorbitantly. In general, influences of this kind are carried out constantly, even if you prefer a loyal level of speed. Therefore, the brake system must be diagnosed with enviable regularity in order to provide the motorist with the maximum degree of safety. Malfunctions in the vacuum amplifier occur, as a rule, due to the loss of condition of the diaphragm located inside this unit. It may burst or become cracked; there is also natural aging of rubber and loss of its qualities. What's the result? The diaphragm stops forming a vacuum. In some cases, the exhaust valve may also fail.
To check the functionality of the vacuum amplifier, you need to resort to the following manipulations:
- We start the engine and let it run a little at idle until the operating temperature level is reached.
- We stop the engine.
- Depress the brake pedal.
- The first movement will be no different from normal when the engine is running. The pedal must be pressed to the limit, in this case the diaphragm is set and a vacuum is formed.
- Release the pedal and press it a second time. If there are any malfunctions in the vacuum booster, then when you press it again you will feel a characteristic short pedal stroke.
- If the reaction of the braking system is the same as the first time, then everything is in order with the amplifier. When the deviations seem insignificant to you, it is worth examining the supply pipes for the presence of microcracks.
In general, each time you press the brake pedal, the engine speed will decrease slightly, however, if the difference becomes significant, it is worth visually diagnosing the hose connecting the amplifier to the power unit. If it has any defects, the collector will become leaky, and accordingly, you won’t have to count on normal mixture formation and the motor will operate unstable. The solution is simple - change the damaged hose.
Functionality check
This instruction will be relevant when checking the vacuum booster on VAZ models from 2113 to 2115. So the technique is clearly universal.
- Press the brake pedal all the way to the floor about 4-5 times. In this case, the engine should not be started. Due to these presses, you will create equal pressure in two sections of your vacuum booster. The valve will report problems as soon as you start pressing the pedal. If you hear squeaks while pressing, this indicates a serious malfunction.
- Once the pressure is even, start the engine while keeping the brake pedal to the floor. If the brake booster system is working properly, then the pedal will rise by itself after the engine is started. If this does not happen, then you will definitely have to face repair work.
- If the check shows problems with the amplifier, do not forget to additionally check the quality of the hose fastening and the condition of the flange. When the mount is abnormal, this may result in the brake pedal not lifting.
Sometimes poorly fixed fasteners cause quite expensive and actually unnecessary repairs or replacement of the vacuum booster. Conduct a preliminary check so as not to complicate your life.
When to change the amplifier
Brakes are a whole system that consists of many elements. Each of them must function correctly and efficiently.
In addition to checking the vacuum booster itself, you should inspect the condition of the brake fluid pipes, make sure there are no brake fluid leaks, and look at the current condition of the brake pedal.
If no faults were found in the braking system, you can think in more detail about the issue of replacing the vacuum booster.
There is no point in repairing the element. It's easier to start replacing right away. The functionality of the car and the power that your engine is capable of producing depend on the quality and timeliness of the work performed. Lack of power negatively affects the speed and comfort of movement around the city and beyond.
To replace a vacuum booster you will need a certain set of tools and materials. It includes:
- Screwdriver Set;
- Pliers;
- Socket wrench for 13 and 17 millimeters;
- Special wrench for brake pipes;
- New plugs;
- New fittings.
Replacement procedure
Let's get straight to work.
- Removing the vacuum booster can be difficult due to the brake cylinder. Therefore, we advise you to remove it first. Another option is to disconnect the pipes from the brake cylinder and move them to the side for a while. Here you decide for yourself what is more convenient for you.
- The cylinder is not the main problem. It is difficult to cope with the mounting of the vacuum booster. It's just not very convenient to do this. This is the design of the VAZ 2114.
- Start with the valve - remove the hose fasteners from it, remove the support bush, after which you can pull out the brake pin.
- Next, using a 13 mm wrench, all four fasteners of the vacuum booster are dismantled.
- After all the inconveniences of the work done, you can remove the element and get ready to install a new amplifier in its place.
- To do this, you will have to install a special mounting frame. The frame is tightened with a 17 mm wrench, after which the new component is installed inside the car.
- If you want to make your work as easy as possible, do not forget to first connect the brake pedal to the booster with your finger when reassembling it. After this, it is much easier to cope with putting the vacuum seal back into place.
When replacing the vacuum booster, be sure to change the old vacuum hose at the same time. This element is far from eternal, therefore, as it wears out, it will negatively affect the quality and efficiency of the new vacuum seal.
Replacing the vacuum brake booster on a VAZ 2107 video
Brake vacuum is the most common cause. It’s another matter if the texture of the sound differs significantly from the ear. That is, the hissing turns out to be quite loud and, as it were, choking.
At the same time, when pressing on the brake pedal when it is cold, we feel its movement being excessively stiff. And also - the buoyancy of the engine speed (and sometimes it can stall). In such cases, you should pay close attention to the vacuum booster as a possible cause of the problem.
Well, a tight pedal, of course, could also be due to frost, for example, until the main one warms up. But the revs and a fairly strong hiss are already direct indicators that you need to look under the hood! How to check it?
The car's braking system is subjected to constant loads, and with the so-called sporty style of city driving, it is also subject to overloads. This happens regularly even with a measured and leisurely rhythm - there is no escape from this problem. Therefore, this unit must be regularly tested to ensure maximum driving safety for the driver and passengers. So it is with the brake vacuum story. As a rule, problems with its operation occur due to the failure of a special diaphragm located inside the device.
It bursts, cracks, and ceases to perform its duties—to create a vacuum. Sometimes the exhaust valve also malfunctions. Checking the functionality of the vacuum on their own, available to every driver, is carried out in the following way. We start the engine and let it idle for a while until it reaches ;
- We turn off the engine;
- Press the brake;
- The first press will be no different from the normal one when the unit is running.
- The pedal must be pressed as much as possible: at the same time, the diaphragm in the amplifier is extended and a vacuum is created;
Repair and repair
To repair a vacuum pump, you must first stop its operation, then lift it to the surface and inspect it. There can be many reasons for malfunctions; we need to look at them in more detail. What to do if the pump is working, but water is not pumping from the well, there is no rise? In this case, you need to do the following:
Diagram of a vibration pump.
- The pump rises to the surface already turned off, after which you should check whether there are any leaks in the equipment pipelines and whether the check valve is working correctly. After this, all joints of the device are inspected, since the cause of the malfunction is usually the entry of foreign objects into the housing. This applies to sand, small particles of clay and debris, leaves and other things. It is quite possible that the spring and the check valve itself have failed due to clogging.
- It is necessary to check the pipeline located between the well and the pump; there should always be water in it. The pump should not work if there is no water. If there is no liquid, then it is necessary to fill the pipeline through a special filling hole provided in the housing.
- The cause of the malfunction may also be that the well or well is simply dry; this situation is not anything exceptional. In this case, it is recommended to lower the pipeline or suction pump hose deeper. It is possible that the water level has dropped, but it may also be completely absent. This needs to be checked immediately. It must be remembered that the distance from the water surface to the pump should not exceed the maximum specified by the manufacturer. The water level must be carefully monitored.
- The cause of the breakdown may be the formation of a hole between the impeller and the housing; this phenomenon is caused by the increased abrasiveness of the water in the well.
To avoid this breakdown, experts advise immediately taking this possibility into account at the equipment design stage and conducting water tests. It is enough to immediately install filters and special means to reduce abrasiveness. Often the cause of development is ordinary sand, which can be found at the bottom of any well or borehole. In this case, the equipment begins to work on its own; you should not expect performance from the pump. The repair is simple; it is enough to replace the housing and impeller, if they are commercially available. Diagram of the device of a vacuum liquid ring pump. - There is another reason why such a breakdown occurred and the vacuum pump does not work. The network supplying the equipment is experiencing low voltage or constant surges. You should call an electrician or use special equipment to maintain the required voltage in the network.
see also
Comments 27
Hello everyone, I also have a hissing noise, but not only, if you press the car many times while the car is running, the revs drop! Is the amplifier hose the culprit? or something else?
I don’t even know how I got around to this problem.
Don’t drive, this is the correct operation of a vacuum pump with a switched off car, when you press the pedal after parking the car with the engine switched off, in the membrane cavity the pressure is equalized with atmospheric pressure and if you press the pedal through the check valve, the air is squeezed out of the manifold, which creates a characteristic hissing sound. With the engine running, This cavity is vacuum and when pressed there are no extraneous sounds, which indicates the serviceability of the vacuum and the integrity of the membrane, after the engine is turned off, the valve holds vacuum in the amplifier for some time and when the pedal is pressed, it does not make any sounds, but after parking, the sound when pressed will be repeated.
Okay, so I won’t get too worked up about this.
Don’t drive, this is the correct operation of a vacuum pump with a switched off car, when you press the pedal after parking the car with the engine switched off, in the membrane cavity the pressure is equalized with atmospheric pressure and if you press the pedal through the check valve, the air is squeezed out of the manifold, which creates a characteristic hissing sound. With the engine running, This cavity is vacuum and when pressed there are no extraneous sounds, which indicates the serviceability of the vacuum and the integrity of the membrane, after the engine is turned off, the valve holds vacuum in the amplifier for some time and when the pedal is pressed, it does not make any sounds, but after parking, the sound when pressed will be repeated.
Please tell me, I have a VAZ 2112 There was also hissing from the vacuum tank, before that the liquid was a little less than half, I topped it up but overfilled it (since everything was going back and was not visible) The next day I stopped by and bought a syringe, pumped out the liquid and now it’s exactly along the line , but there was such a problem! When I press the Brake on the move and without releasing the curls, I press it again, they seem to disappear, as if they were not pumped
When you press the pedal again, does it become hard or does it collapse? And where does the fluid go? If the wheels are dry, then look between the cylinder and the vacuum seal, there may be a main leak... then change the main one and it is advisable to change the vacuum seal as well, because the liquid most likely got on the membrane and it won’t last long enough…
The pedal becomes hard and the car barely stops. Pressing it again is normal. And this only happens on a hill or descent.
When you press the pedal again, does it become hard or does it collapse? And where does the fluid go? If the wheels are dry, then look between the cylinder and the vacuum seal, there may be a main leak... then change the main one and it is advisable to change the vacuum seal as well, because the liquid most likely got on the membrane and it won’t last long enough…
And a check was displayed, I started checking, it turned out that the mixture was lean, I was looking for where it was sucking in more air.
With the engine running, gently press the brake and listen...it will hiss and the speed should rise
Is this how you can find where the air is blowing?
If the vacuum pump is in trouble, then you will hear it... if the speed does not change and there is no hissing, then try changing the valve on the vacuum pump, the one on the hose...
With the engine running, gently press the brake and listen...it will hiss and the speed should rise
What does it consist of
- Frame
- Membrane (diaphragm)
- Fitting for air bleed from the chamber
- Bypass and atmospheric valve
- Air filter
- Pedal pusher and master cylinder piston rod
The body consists of two parts, separated by a rubber membrane or diaphragm. The first part is located closer to the main cylinder - the vacuum chamber. In it, from the intake manifold or carburetor through a hose and a fitting with a check valve, a vacuum (vacuum) is created.
The second is atmospheric, it has a connection with the outside air. This separation is necessary for it to perform its main task - to assist the driver when braking, to reduce the force on the pedal when pressed.
The diaphragm divides the body into two chambers. It is made of rubber to always remain elastic. It is not allowed to break it. In this case, the efficiency of the vacuum seal decreases and problems arise during engine operation; more on this below.
The fitting connects the housing cavity with vacuum to the engine intake manifold in the injection “sevens”, or the carburetor body under the throttle valves using a flexible hose. It is equipped with a check valve. This protects the vacuum booster from exhaust gases entering it. This can happen when the engine intake valves are not completely closed. Exhaust gases “break through” into the intake manifold through the hose and can damage the membrane.
Advertising:
The second function of the valve is to allow emergency braking in the event of an engine stop. It will close, maintaining a vacuum in the chamber. This will be enough for one or two clicks.
The air filter is located on the pedal assembly side. It prevents the penetration of dust and debris from the environment into the cavity of the amplifier.
There are two separate rods in the body. The first is connected to the brake pedal in the cabin, the second is connected to the pistons of the master brake cylinder. If the driver keeps his foot on the brake but does not apply pressure, there is no impact on the master cylinder. This is necessary so that the brakes do not activate and wear on the brake pads does not increase. We'll talk about how it works below.
Advertisement
Main reasons
First, let's look at how the mechanism works when braking.
The brake system has a vacuum booster. The vacuum structure consists of a brake pedal pusher, a hose, an air and check valve and an outlet to the brake master cylinder.
When braking, the pusher acts on the air valve. The valve rises and air leaks into the amplifier. The air mass presses on the diaphragm. The latter acts on the cylinder. A hissing sound occurs when a mass of air penetrates the structure.
During operation, the diaphragm bursts, tears and does not perform its functions. In this case, air enters the structure, allowing brake fluid to enter.
Damage to the vacuum booster and air in the system is the reason why noise is heard.
Hissing when you press the brake pedal is not always a consequence of problems. A slight hiss is considered normal and does not affect the functioning of the braking system.
General structure of the brake system of the VAZ 2110
The vacuum brake booster of the VAZ-2110 is located in the engine compartment of the car between the main brake cylinder and the brake pedal.
VUT layout diagram
We will briefly consider the operating principle of the vacuum brake booster in the following figure:
Principle of operation
In the initial state, both cavities are connected to the atmosphere through a follow-up valve (not shown in the figure). When you press the brake pedal, the rod moves the diaphragm to the left, the follower valve separates the cavities and a vacuum is created in cavity “A”. And since cavity “B” is still under atmospheric pressure, both of these conditions (vacuum + atmospheric pressure) together give additional force to the braking.
You can take a detailed look at the operation of the entire braking system of a car in its entirety in the following video tutorial.
How it works (video)
Diagnostics
You can diagnose such breakdowns yourself. The test is carried out with the engine running.
While the engine is revving, the temperature reaches the optimum level. After this, you need to turn off the engine and depress the brake pedal all the way. The first squeeze does not diagnose breakdowns. You will need to press the pedal again... If the second time you press the pedal, you feel the pedal move hard, then you should get under the hood or take the vehicle to a service center.
In addition to carrying out these manipulations, we pay attention to the hose that goes from the vacuum to the power unit. A worn out hose indicates the need for replacement.
Personal experience of car owners.
“I am a driver with little experience, so it was very difficult for me to independently determine the cause of the pedal hardness. I couldn’t even figure out how to remove this or that part in order to diagnose specific problems. In the end, I took my Audi A6 to a service station. The craftsmen working there determined the nature of the damage without even removing the units. Correct diagnostics helped me significantly save on repairs.”
“When the amplifier of my VAZ 2114 broke down, I verified that it was faulty in a simple way. To do this, the hose is removed and the amplifier is turned off. The presence of a vacuum when starting the engine indicates that the “vacuum valve” is faulty.”
“The vacuum booster and cylinders are very difficult to diagnose. The best vehicle diagnostics can be provided only by those car services that have pressure gauges.”
Troubleshooting
The vacuum amplifier is quite difficult to repair on your own, because... it is a non-separable mechanism. In order for it to work properly in the future, it is necessary to firmly connect all parts of the device , which not everyone can do.
Adjusting a repaired device requires special care. The performance of the amplifier depends on the repair. If it is not adjusted correctly, the likelihood of incomplete braking of the vehicle increases.
Damage to the amplifier cannot be repaired. In this case, the structure must be completely replaced.
How to replace the vacuum booster on a VAZ 2110-2112 if the brake pedal hisses - in the video
Malfunctions of the car brake assembly prohibit the use of the vehicle. Panic when damage occurs does not solve problems. Therefore, car owners must understand the cause of their occurrence and diagnose them correctly.
What types of speakers are there?
It must be said right away that it doesn’t matter what shape the car speakers are installed in the car - round or oval - the quality is determined only by their dimensions. Device sizes are a standard that determines their dimensions. Basically, on modern cars the sizes of loudspeakers that can be installed are standard - 10 cm, 13 cm or 16 cm
The rear shelves of cars are usually equipped with connectors for installing oval speakers measuring 15x23 cm
Basically, on modern cars the sizes of loudspeakers that can be installed are standard - 10 cm, 13 cm or 16 cm. The rear shelves of cars are usually equipped with connectors for installing oval speakers measuring 15x23 cm.
If the speaker diagonal is higher, it will be able to reproduce low frequencies better. In general, the size of the system largely depends on the size of the woofer, since it, as stated earlier, is the largest in the entire system.
- If the front speakers are 10 cm in size, then they will be able to reproduce sounds with a frequency of 120 hertz;
- with speaker dimensions of 13 cm, there will be good quality sound reproduction from 100 Hz;
- with dimensions of 16 cm, the device will be able to reproduce sounds from 80 Hz.
Operating mode
The pump pumps water from the well, but does not turn off. Breakdowns can be different, the reasons are usually the following:
Diagram of the pressure switch device.
- The relay needs to be adjusted. For this, two small springs are used. Using a large spring, you need to adjust the lower and upper limits for turning on/off, and using a small spring, you need to adjust the pressure difference when changing such limits. Sometimes it happens that during long-term operation, wear develops and the operating pressure changes. That is why the settings already need adjustment, they differ from the factory ones. It is necessary to reduce the tension of the springs by turning them in the “-” direction clockwise. But it is not recommended to overuse this method, since the settings can be completely lost and you will have to call a technician for repairs.
- Salts with poor quality of supplied water can cause the inlet of the control relay to become clogged. In this case, the sensor stops monitoring the readings and the pump does not turn off even when the desired readings are achieved. It is necessary to stop the equipment manually, and then clean this hole.
Wear and other disc defects
There are several types of wear on brake discs that can cause a hum to be heard under the described conditions. The first of them is the so-called furrows. They are clearly visible to the naked eye, sometimes even directly through the rims. They appear there for all sorts of reasons. The most obvious is any abrasive getting between the pads and rotating discs. Coarse dust, sand, dirt, small pebbles. All this can “register” water circles on disks.
The second type of excavation is a protruding edge. This defect usually leads to a hum when you press the brakes when the pads are changed. Very often these parts are purchased the wrong size, which, however, does not interfere with their successful installation. As a result, the pads do not contact the discs correctly, can overheat, wear unevenly and bite each other.
Which of these causes the buzzing doesn't really matter
The next defect is corrosion. It is observed in the form of small pits directly on the working surface of the disks. At a certain degree of severity, it can also cause brake noise. Again, the root cause is overheating under load. Parts overheat, a hum occurs, and braking performance may deteriorate.
The next possible problem with discs is when they are burnt or set on fire. These can be identified by blue or iridescent spots directly on the work surface. They say such “burns” mean that the brakes have been overloaded once or repeatedly. As a result, you should look for inadequate wear or deformation. In any case, this may well be the reason why the brakes are buzzing.
In all of these situations, the “treatment of the disease” is the same. This is a replacement brake discs. It should also be understood that after working together with defective discs, the pads are also very likely to become unusable. There is no point in using them with new disks. It is better to immediately replace with new ones. Fortunately, even if they are of high quality, these consumables do not cost a fortune.
It’s probably worth saying a few words about turning discs, which many car enthusiasts resort to. This repair method is justified, unfortunately, only in 1 case out of 10. And even then, if the groove was entrusted to a competent turner, and they did not try to “align” the disc with a grinder directly on the machine. The latter is strictly not recommended. The brake system is a mechanism that does not forgive inaccuracies. And the grinder and accuracy are antonyms.
