Cars admin26.02.2020
I hope the topic will be useful, the camshaft does not fail very often, if not rarely, the factory camshaft can go through a couple of major repairs.
Replacing the camshaft on a VAZ 2106 with your own hands
First, a little theory, or rather, indications that indicate a malfunction of the camshaft, wear of its journals and bed. Determining whether the camshaft or something else is knocking in the engine is not particularly easy, but it is possible. Usually the camshaft knocks dullly and strongly; the frequency of the knock varies with engine speed. You can listen to the engine through the valve cover using a wooden stick or a medical stethoscope. But often, if you are not an experienced mechanic, it is not so easy to distinguish the knock of a camshaft from the knock of a spun valve. Therefore, the surest way to diagnose a camshaft is to remove it from the engine, wash it, and inspect it. Thus it turns out:
- A faulty camshaft makes a dull knock, like being hit with a hammer.
- If the camshaft is worn, it is impossible to adjust the valve clearances, since when the crankshaft is turned, the camshaft occupies different positions all the time
- The most reliable way to diagnose a camshaft malfunction is to remove it from the car, wash it in gasoline and directly diagnose: you need to hold the camshaft with your left hand and hit the bed with your right, if you hear even the slightest knocking, then the camshaft is worn out. Just make sure that the camshaft does not move in bed, as when it hits the limiter, the camshaft will make a quiet knock.
- The camshaft affects the pressure in the lubrication system; the larger the gaps between the bed and the shaft, the lower the pressure, and, accordingly, the worse the lubrication of other parts.
I would also like to advise that no matter how good the rockers (valve levers) are, they also need to be replaced, because uneven output will lead to rapid wear of the camshaft. I also recommend that you pay attention to the condition of the tensioner shoe; it can be seen when the camshaft is removed, since replacing it is a rather labor-intensive process. The process of replacing the camshaft also involves adjusting the valve clearances, so keep this in mind. Well, let's begin.
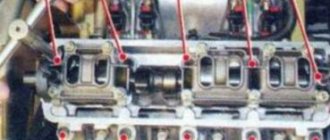
Torque and sequence of tightening the camshaft bed
Camshaft cover tightening sequence
Correct tightening of the camshaft bed, as well as other parts of the cylinder head, determines the normal functioning of all components and assemblies. So, in order to tighten threaded connections, a standard tightening pattern and a torque wrench are used.
Before installing the bolts in place, they must be washed thoroughly and lubricated with silicone grease.
In order to properly tighten the bolts, you need to know the sequence. It starts from the middle part and gradually moves directly to the edges. The detailed sequence can be seen in the photo below.
Tightening diagram for each camshaft bed bolt with numbering
As for the tightening force itself, it is 8.0-10.0 Nm . After the bed is installed on the block head, the connection bolts are tightened by hand or without much force using a ratchet with a head.
We tighten all the bolts by hand, but do not tighten them
When all the bolts are in place, you need to take a torque wrench and tighten them according to the standards in the order indicated above.
Torque wrench for tightening threaded connections
In what cases is it necessary to tighten the camshaft bed?
The bolts are tightened. Marked with arrows
Tightening the camshaft bed will be necessary if it was previously dismantled for restoration and repair work. So, in what cases will you need to remove the bed, let’s look at it in more detail:
- Replacing camshafts, lifters or valve seals.
- Overhaul of the block head.
- Engine repair operations.
- Replacement of individual elements of the cylinder head.
Consequences of improper bed tightening
The consequences of improperly tightening the camshaft bed include the following:
- Oil leakage due to a gap or loose connection.
- Passing air inside the cylinder head.
- Malfunction of the engine or cylinder head.
- Ingress of foreign objects (water, dirt, dust).
All these factors can negatively affect the performance of the cylinder head and main power unit.
Torsion bolts (plastically deformable)
Part number: 21213-1003271-01-0. Name: Torx cylinder head bolt. This name (torsion bar bolts) is fundamentally incorrect, but what can you do if they are called that on all forums and in all stores. According to science, when they say torsion bar, they mean deformation from twisting. And in this case, tensile deformation. In stores, these bolts are also called cylinder head bolts for Niva Chevrolet or cylinder head bolts of a new type. I also came across the name torx or chamomile. These bolts, unlike hardened ones, provide a constant load. That is, in a very primitive way we can talk about the grommet effect, that is, about the constant force to compress the cylinder head gasket in the axial direction of the bolt. These bolts are widely used on imported engines because they avoid human factor errors. In fact, you don't need to tighten with the precision of a torque wrench. The final values are taken as angular values. I don’t really like this approach, but such things are now commonly called “assembly guarantee”.
Engines ZMZ-402 and ZMZ-4021
Bolt for fastening the cover of the timing gears 11-16 (1.1-1.6) Nut for fastening the cover of the timing gears 12-18 (1.2-1.8) Nut for fastening the cover of the pusher box 12-18 (1.2-1.8 ) Cylinder head mounting nut 85-90 (8.5-9.0) Cylinder head rear cover mounting bolt 11-16 (1.1-1.6) Connecting rod cover mounting bolt nut 68-75 (6.8- 7.5) Flywheel mounting nut 78-83 (7.8-8.3) Crankshaft pulley mounting bolt 11-16 (1.1-1.6) Crankshaft pinch bolt (ratchet) 170-220 (17-22 ) Bolt for fastening the thrust flange of the camshaft 11-16 (1.1-1.6) Bolt for fastening the camshaft gear 55-60 (5.5-6.0) Nut for fastening the rocker arm axle rack 35-40 (3.5- 4.0) Bolt securing the rocker cover 4.5-8.0 (0.45-0.8) Nut securing the exhaust manifold to the intake pipe 44-56 (4.4-5.6) Nut securing the intake pipe and exhaust manifold to the block head 40-56 (4.0-5.6) Oil sump mounting nut 12-15 (1.2-1.5) Oil pump mounting nut 18-25 (1.8-2.5) Drive mounting bolt ignition distributor 6.0-8.0 (0.6-0.8) Main bearing cover mounting nut 100-110 (10-11) Oil filter mounting nut 12-18 (1.2-1.8) Fuel filter mounting bolt pump 12-18 (1.2-1.8) Fine fuel filter mounting nut 12-18 (1.2-1.8) Water pump mounting nut 18-25 (1.8-2.5) Pulley mounting bolt water pump 12-18 (1.2-1.8) Clutch housing mounting bolt 28-36 (2.8-3.6) Clutch housing mounting nut 40-56 (4.0-5.6) Pressure plate mounting bolt clutch 20-25 (2.0-2.5) Generator bracket mounting nut 44-62 (4.4-6.2)
Generator mounting nut 44-56 (4.4-5.6) Spark plug 30-40 (3.0-4.0) Fan mounting bolt 14-18 (1.4-1.8)
Disassembly
1. Unscrew nuts 1 and remove screen 5 of the phase sensor, bracket 2 for lifting the engine and exhaust manifold 6.
Remove the exhaust manifold gaskets. Unscrew bolt 3 and remove the 4th phase sensor.
Unscrew the emergency oil pressure sensors 7 and the oil pressure indicator 8.
2. Loosen clamp 1 and remove the hose from the idle air control pipe.
Unscrew nuts 2 and remove receiver 3 from the inlet pipe.
Remove the receiver gasket.
Remove the intake pipe gasket.
4. Unscrew bolts 1 and remove rear cover 2 of the block head.
Remove the cover gasket.
5. Remove valve lifters 1.
It is more convenient to remove hydraulic pushers using a magnet or suction cup.
Hydraulic pushers cannot be swapped, so before removal they must be marked so that they can be installed in their place during assembly.
Hydraulic lifters should be stored in the same position as they are on the valves, so that oil does not leak out of them.
Install a device for compressing the valve springs on the cylinder head.
Compressing the valve springs using a tool, remove the valve nuts 2.
Then, gradually loosening the pressure on the handle of the device, completely release the valve springs.
Remove the device from the block head. Remove valve spring retainer 3. Then remove the outer and inner valve springs.
6. Remove the oil deflector cap of valve 1.
8. Remove the valve from the combustion chamber side.
9. Remove the remaining valves in the same way.
Before removal, mark all valves so that they can be installed in their proper places during reassembly.
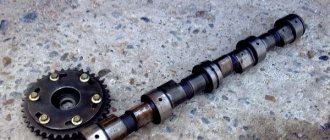
Camshaft VAZ 2106
The camshaft is an integral part in the design of the gas distribution mechanism (GRM) of any engine. It is made in the form of a cylinder on which necks and cams are located.
Description
On the sixth model Zhiguli, the timing mechanism shaft is installed in the cylinder head (cylinder head) of the engine. This arrangement allows you to repair and change the part, as well as adjust the valve clearances without any difficulties. The shaft is accessible after removing the valve cover. The camshaft (CV) is assigned the role of controlling the opening and closing of valves in the engine cylinders - at the right moment it admits the fuel-air mixture into the cylinder and releases exhaust gases. A gear is installed on the camshaft, which is connected to the crankshaft sprocket through a chain. This design ensures simultaneous rotation of both shafts.
On the camshaft there are cams and journals, by means of which the shaft is held on supports
Since the crankshaft and camshaft have gears of different sizes, the rotation speed of the latter is halved. A complete operating cycle in a power unit occurs in one revolution of the camshaft and two revolutions of the crankshaft . The valves in the cylinder head open in a certain order under the influence of the corresponding cams on the pushers, i.e., when the camshaft rotates, the cam presses on the pusher and transmits force to the valve, pressed by the springs. In this case, the valve opens and admits the fuel-air mixture or releases exhaust gases. As the cam rotates further, the valve closes.
The cylinder head consists of the following parts: 1 - cylinder head; 2 — exhaust valve; 3 — oil deflector cap; 4 — valve lever; 5 — camshaft bearing housing; 6 - camshaft; 7 — adjusting bolt; 8—bolt lock nut; A - gap between the lever and the camshaft cam
More about the design of the VAZ 2106 engine: https://bumper.guru/klassicheskie-modeli-vaz/poleznoe/ne-zavoditsya-vaz-2106.html
Options
The “six” camshaft has the following characteristics:
- phase width - 232˚;
- intake valve lift height - 9.5 mm;
- intake valve lag - 40˚;
- exhaust valve advance is 42˚.
On the sixth model Zhiguli, the timing mechanism has eight valves, i.e. two for each cylinder, the number of cams is equal to the number of valves.
Which camshaft is better to install
Only one gas distribution shaft is suitable for the VAZ 2106 - from the Niva. The part is installed in order to increase the power and dynamic performance of the car. It is possible to achieve the desired results, albeit small ones, by increasing the width of the phases and the lift height of the intake valves. After installing the RV from Niva, these parameters will have values of 283˚ and 10.7 mm. Thus, the intake valve will be open for a longer time and raised to a greater height relative to the seat, which will ensure that more fuel enters the cylinders.
When replacing the standard camshaft with a part from a VAZ 21213, the engine parameters will not change dramatically. You can install a “sports” shaft intended for tuning, but it is not cheap - 4-10 thousand rubles.
To improve the dynamic performance of the car, a “sports” camshaft is installed
Table: main parameters of “sports” camshafts for “classics”
Tightening scheme
Using a large screwdriver, the chain tensioner is removed, then the camshaft gear is placed in its original place. The bolt and washer are tightened. The latter is controlled with pliers.
Next, the thermal clearance of the valves is adjusted. Assembly is carried out in reverse order.
Video 2: replacing the timing tensioner.
Source
Signs of Camshaft Wear
The operation of the camshaft is associated with constant exposure to high loads, as a result of which the part gradually wears out and requires replacement. The need for repair arises when characteristic symptoms appear:
- knocking when the engine is running under load;
- reduction in power indicators.
There are a number of reasons why the RV fails:
- natural wear and tear;
- low-quality motor oil;
- low oil pressure in the lubrication system;
- insufficient oil level or so-called oil starvation;
- engine operation at high temperatures, which leads to deterioration of the lubricant properties;
- mechanical damage (wear or broken chain).
The main malfunctions that impair the performance of the camshaft are scuffing on the working surfaces (journals and cams) and deterioration of the limiter.
Over time, the camshaft's cams and journals wear out.
Knock
It is quite problematic to determine from the sounds coming from the engine compartment that the problem is related specifically to the camshaft, but it is still possible. The knocking sound of the engine resembles the dull blows of a hammer, which become more frequent as the engine speed increases. However, the best way to diagnose a shaft is to dismantle, disassemble and troubleshoot it. During inspection, the shaft should not move in the housing relative to the axis, otherwise a dull sound will be produced when hitting the limiter.
Video: reasons for the longitudinal play of the VAZ camshaft
Power reduction
The drop in power on classic Zhiguli cars is a phenomenon caused by wear of the camshaft and rockers. With proper engine operation (timely oil changes, monitoring its level and pressure), the problem only appears over long vehicle runs. When the cams wear out, the required phase width and valve lift at the intake are no longer ensured.
When the shaft and rockers wear out, the motor power may decrease several times
Deformation
The RV can become deformed under extreme heat, which is caused by problems in the cooling and lubrication systems. At first, the problem may manifest itself as a knocking sound. Therefore, if there is a suspicion of this breakdown, for example, the motor has overheated, then it is recommended to diagnose the shaft in order to avoid more serious troubles with the engine timing belt.
Camshaft replacement tools
The presence of these tools will simplify the procedure:
- a set of wrenches and sockets, including a ratchet;
- a set of screwdrivers - a slotted screwdriver for working with the seal or tweezers is required;
- micrometer;
- knob for clamping and rotation;
- dynamometer - a wrench for tightening threaded connections with a precisely specified torque;
- mount;
- puller and mandrel for pressing;
- hammer.
Before replacement, be sure to prepare a repair kit, which includes, in addition to the product itself: liners, oil seal, fastening bolts. If the system has hydraulic compensators, then these parts also need to be replaced.
Approximate cost of replacement at a car service center
As you can see, replacing the camshaft is done with your own hands, in a home garage. You don't need any special equipment. On the other hand, this is an intervention in the engine design, which, if unsuccessful, can damage the power unit. One of the signs of malfunction is that after replacing the camshaft, the engine begins to trip. Therefore, in order to avoid major repairs and large expenses, many car owners trust the procedure to car services.
The price of replacing a camshaft starts at approximately 4,000 rubles. If you only need to replace the oil seal, the service station will charge the same amount. Replacing the shaft sensor costs 500 rubles. Replacing the timing chain of a passenger car equipped with a 4-cylinder engine is usually estimated at 6-7 thousand rubles. On SUVs and crossovers, this procedure costs more - 10-11 thousand rubles.
The camshaft is most often installed in the upper part of the cylinder head, but there are also systems with a lower location. The latter option is found mainly on old cars or cars with weak engines. The upper location of the element, on the contrary, is the calling card of powerful internal combustion engines with high operating speeds.
General assembly information
Warnings before assembly
- When reassembling the engine, use only a new cylinder head gasket. It is not allowed to use a removed (even carefully) gasket.
- Also, do not forget that before installing it, you must thoroughly degrease the surfaces mating to it. The gasket itself must be clean and dry. Do not allow oil to come into contact with these surfaces.
- Before assembly, check the cylinder block bolts; they should not be stretched, i.e. their length should not exceed 95mm. If so, replace them with new ones. The use of such extended bolts is not permitted!
- Before assembling the engine, lubricate the threads and bolt heads. Regular motor oil is suitable for lubrication. It is necessary to lubricate the bolts 30 minutes before using them so that excess oil has time to drain.
- When installing the timing belt, do not allow sharp bends (with a radius of less than 20 mm) to avoid damage to its cord.