If the owner of a Priora notices that the battery is no longer charging, then first of all you need to check the condition of the generator brushes. It is worth noting that at first the battery charge will decrease slightly, but if the problem is not corrected in a timely manner, the battery charge will soon disappear altogether. Replacing the worn brushes of the Priora generator will help correct this problem. And since this process is not so complicated, you can carry out such work yourself, taking into account advice from professionals in your field. Subscribe to the channel - .
On automobile forums you can often see complaints from Lada owners with air conditioning about increased current. It is worth saying right away that the current cannot be increased - this applies to voltage. If the instruments show you that the current in the generator is too high, then you need to look for a problem in the relay.
If you chose the complete replacement method, all you have to do is install the new part and assemble all the elements in the reverse order. In any case, we recommend that you at least check the generator bearings and the condition of the collector plates. If the wear of the plates is within normal limits, before installing new brushes, clean the surface to a shine with fine-grained sandpaper.
If you need to replace a Priora generator with air conditioning, then there are two nuances that lie in the manufacturer of the air conditioner. Panasonic allows you to remove the unit without a compressor, but the Hull compressor will not allow you to get the generator. Replacing generator brushes on a Priora with air conditioning.
As is known, maintaining charging at the same level is carried out by adjusting the voltage supplied to the generator armature winding. For reliable contact, the brush leads are attached to the contacts of the voltage regulator relay by soldering.
To simplify car repairs, brushes, brush holder and relay regulator are most often sold assembled. The advantage of the complete replacement method is its simplicity. For example, the low cost of the assembly for many VAZ cars makes separate replacement of brushes very impractical. Well, there you are...
PLEASE LIKE AND DON'T FORGET TO SUBSCRIBE)) Brotherly My Instagram: Changing...
If you are sure that the problem is caused by wear of the carbon brushes, then you can change them without removing the generator. It is worth noting that generators on Priors have a non-repairable brush mechanism, that is, this part is completely replaced when the brushes wear out. REPLACING THE GENERATOR VOLTAGE REGULATOR RELAY. GENERATOR BRUSHES. Replacing generator brushes. VAZ 2110, VAZ 2111,…
Recently, the European repair standard has been increasingly used at car service stations. That is, most often the entire assembly is not replaced without attempts at minor repairs.
But there are some operations that continue to be carried out even now. One of them is replacing the generator brush mechanism.
Repair of generator 1118 Kalina, budget option, replacement of the factory voltage regulator with an external one, from…
You can determine whether the generator with air conditioning is working or not by measuring its voltage. First you need to get the readings at the battery terminals, you need to start the engine and take the data while the Priora unit is running. In this video I showed how to replace the voltage regulator of Lada Granta, Kalina 1st generation. If...
Uneven wear of these elements will certainly negatively affect the operation of the generator, so experts recommend replacing them without fail.
But when, after ringing all contacts and checking fuses, the malfunction is not identified, then there is a possibility that the generator will fail. The car owner is puzzled in advance by the question of how to remove the generator on a Priora, and in many cases it is quite reasonable. Do-it-yourself generator repair. One of the reasons for a generator malfunction may be a burnt diode...
Buying original brushes from BOSCH will cost 1000 – 1500 rubles, we will replace them with domestic analogues. We lift the top black cap, we see two contacts with the ends of the brushes on the relay, and disconnect them. What happened to my car?! The generator malfunction light came on!!! The current has stopped being produced...
The operation of the generator is monitored using a low battery warning lamp located in the instrument cluster. If the lamp burns brightly or burns at full intensity, it indicates a malfunction. For the BOSCH F000 BLO 652 generator, which is installed on the Lada Kalina, voltage regulator relay (0272220701 BOSCH)…
The replacement process will be almost the same for all VAZ models, so if you have, for example, a VAZ 2114, this article will also be useful to you. This is the first time I've seen such a crap design.
If you have decided to replace the problematic unit, read below...
On a VAZ 2106, during the last valve adjustment, I discovered: when I put the marks...
According to its design, the VAZ 2106 intake manifold, the price of which…
If you don't loosen it while the wheel is on the ground, then...
I suggest first of all protecting the lower part of the VAZ 2110 bumper, and...
The device is used for repairing cylinder heads of VAZ-2107,…
Such a part as the 2114 drawstring, with the proper desire and skill,…
Now let’s return to the question of how to find out which ECU is...
Repairing a gearbox on a VAZ 2110 with your own hands is not so...
Mounting blocks were installed on VAZ 2109 cars: 17. The difference between...
A diode bridge is one of the elements of a car generator that converts...
There is no need to install the KX either, everything remains on the standard shock absorber...
Source: https://baltikum.ru/rossiya/zamena-schetok-generatora-lada-priora.html
What signs will indicate that the generator brushes are faulty?
The following external signs will help you understand that the generator brushes have become unusable on a Priora with power steering or air conditioning:
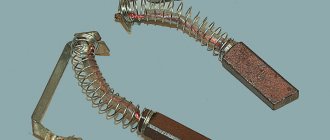
- length of the element being inspected;
- if upon inspection it is discovered that the length of the brushes is less than 5 mm, they must be replaced;
- Replacement will also be required if the appearance of the brushes indicates uneven wear, that is, one element is heavily worn out, and the second is brand new. Uneven wear of these elements will certainly negatively affect the operation of the generator, so experts recommend replacing them without fail.
The cost of new components for the Priora does not exceed 150 rubles; of course, you can also find cheaper brushes for the generator, but it is unlikely that such elements will serve faithfully for a long period of time, and such savings will lead to a repeated procedure for replacing these components.
Once high-quality brushes have been purchased (it is advisable to give your choice to well-known manufacturers), you can begin assembling the entire element and installing the generator in its original place. Lada Priora installation with air conditioning, on a generator along with.
But as was said earlier, such a process can be carried out without removing it, which, of course, must be decided by each car owner independently.
These operations, as many understand, are performed in reverse order, and after the final stage it is necessary to check whether the entire generator is working efficiently.
If the replacement of worn brushes is carried out correctly, and the problem with charging the battery was precisely the wear of these components, then the car owner will solve this issue, and without the help of service station employees, which will save a lot of his own money.
VAZ generator repair
One of the important activities of the Exclusive automobile service center is the repair and replacement of generators. We service both domestic cars and foreign cars, and we have been providing excellent services such as VAZ generator replacement for more than 20 years.
The generator is the “second heart” of your car.
We are happy to provide our services for all VAZ models, for example:
- VAZ 2107 generator replacement
- VAZ 2109 generator replacement
- VAZ 2110 generator replacement
- VAZ 2114 generator replacement
- VAZ 2115 generator replacement
- replacing generator Niva Chevrolet
Important advantages of the Exclusive car service
- We provide a guarantee for all types of work performed in our auto repair shop on Vasilyevsky Island.
- We carry out repairs and replacements of the VAZ generator and all its components extremely quickly - on the day of your call.
- Our tangible advantage is the presence of our own warehouse of spare parts and components for starters and generators.
- At the Exclusive car service center, diagnostics of the VAZ generator are free.
About VAZ cars
The largest car manufacturer in Russia. The plant was built on the initiative of the Chairman of the Council of Ministers of the USSR Alexei Kosygin in the 1960s. . Equipment and technologies for it were purchased from the Italian concern Fiat. During the Soviet Union, its model range consisted of the following brands: Zhiguli, Niva, Oka, Sputnik, Samara. Today it produces various modifications of cars under the general name Lada, and also assembles Nissan and Renault cars, since these global brands have a controlling stake in VAZ.
Initially, VAZ cars were designed to saturate the domestic market of the USSR. They were affordable, reliable and easy to repair. At the present stage, these qualities have been supplemented by comfort and ease of operation, thanks to many additional options and modern functional equipment. At the same time, the price remained very affordable.
VAZ generator replacement
To identify all generator malfunctions and determine the scope of work, it is necessary to carry out diagnostics.
Our qualified technicians will professionally determine the extent of the breakdown and will be able to say for sure what will be most optimal - replacing or repairing the VAZ generator.
Standard repairs are carried out without interfering with its internal structure, in contrast to major repairs, when it is inevitable to disassemble the unit.
Price list for repair of VAZ generators
| VAZ generator repair services | Price, rubles | |
| Removing/installing the generator | From 880 | |
| Replacing generator brushes | From 330 | |
| Replacing the generator bearing (front and rear) | From 770 | |
| Replacing the regulator relay | From 770 | |
| Rotor replacement | From 550 | |
| Replacing a diode bridge without soldering | From 330 | |
| Replacing a diode bridge with soldering | From 660 | |
| Diagnostics of a generator without a c/o | Free* from 330 | |
| Replacing the battery | Check by phone | |
| Replacing collector rings | From 770 | |
For more information about the service, see the section: generator repair
When you print the coupon, you get a 5% discount on your first visit! There is a cumulative discount system
Our car service center on Vasilyevsky Island repairs and replaces VAZ generators of all the following models:
- Lada Kalina 1117/1118/1119
- Lada Samara 2113/2114/2115
- Lada Priora (Lada Priora 2170/2171/2172/21728)
- Lada Granta
- Lada Largus
- VAZ 2104
- VAZ 2105
- VAZ 2106
- VAZ 2107
- VAZ 2108
- VAZ 2109/21099
- VAZ 2110
- VAZ 2111
- VAZ 11113 Oka
- VAZ 2114
- VAZ 2115
- Niva Chevrolet
Without removal
Car enthusiasts from Drive2 and thematic forums describe two main ways to get to the part without removing the generator:
- through the headlight (avoiding unscrewing the air conditioning compressor on models with it);
- by sliding the air filter by hand.
The remaining manipulations are similar to the removal process.
Replacing the voltage regulator (brushes) without removing the generator. Photo source: https://www.new-lada.ru/l/451992188822225058/
After replacement, the operating efficiency of the generating subsystem is checked. You can measure the charging process with a voltmeter and compare it with the panel readings.
Types of generator brushes
Brushes differ by generation of Lada Priora, type of generator, presence of air conditioning, type of engine (16 or 8 valves). The more consumers of electricity (climate system, electric power steering, heating), the greater the current strength the unit must support, therefore the critical characteristic of the device is its amperage. There are 14V versions:
- 90A;
- 115A;
- 120 amp;
- 140 amp.
The popular choice of Prior owners are:
- BATE 90 A;
- KZATE for 115 A;
- "Bosch" 120 A;
- developed by VAZ for 115-120 A.
Each model has its own brush units, although some are compatible within the family.
Brushes for the Priora generator 16 cl. Photo source: https://www.new-lada.ru/l/497298115200549291/
For example, a regulator with article number K1216EN1 is suitable for VAZ 2170 generators:
- 3701;
- 3701-01;
- 3701-17;
- 3701;
- 3701-01.
It is also suitable for some other modifications.
There is also a new type of relay on sale with the index number 3202:
It is recommended to install them in cars younger than 2022.
Selection of components
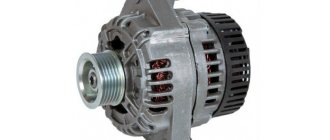
The original generator, installed on a car with a 16-valve engine at the factory, is marked with article number 5102.377. Its cost, as a rule, fluctuates around six to seven thousand.
Carefully check the generator itself and its packaging before purchasing so as not to encounter a counterfeit. It is important that the part is free of unevenness, chips and paint runs, as well as extraneous markings.
To avoid overpayments, you can purchase a similar original spare part. The following devices are suitable for installation on Lada Priora:
- VAZ (power 120/115a);
- KZATE (115a);
- BATE (90a);
- BOSCH (120a).
The price of analogues can be either higher or lower than that of the original. As a rule, it is in the region of 3500-6000 rubles. We choose a generator device with a large power reserve so that it lasts longer.
Keep in mind that installing less powerful generators is unacceptable, especially if you connect several different devices to the vehicle’s on-board network (when connecting a large number of electronics, it is generally recommended to increase the current). Before purchasing, we carefully check for damage to the case and the integrity of the unit.
New Lada: A Lada Priora with a mileage of a million kilometers was found in Russia - Motor
Replacing generator brushes on a Priora
There are often cases when, due to sufficient wear on the generator brushes, the battery is no longer charged. At first it may be a little lower, but over time it will become weaker and weaker.
If you notice similar symptoms on your Priora, then it is possible that the reason is the wear of the generator brushes. In order to replace them, it is best to remove the generator from the car.
And after that you will need the following list of tools:
- Open-end wrench 13
- Flat screwdriver
- 10mm head with crank or ratchet handle
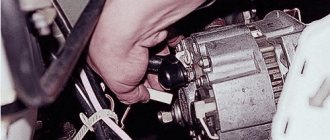
So, when the generator is removed from the car, the first thing you need to do is remove the plastic cover by prying it off with a screwdriver:
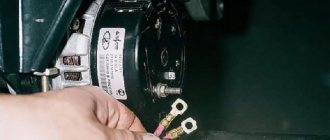
After this we get access to the brushes themselves. Now you need to disconnect the plug with the wires that are connected to them:
And then unscrew the two bolts that secure the brushes at the edges. Everything is clearly shown in the photo below:
But that’s not all, since there is one more fastening, and to free yourself from it, you will need to unscrew the nut with a 13mm wrench, as can be seen in the picture below:
But now the procedure for replacing brushes on the Lada Priora generator is almost considered complete. The brushes are free and can be removed without much difficulty:
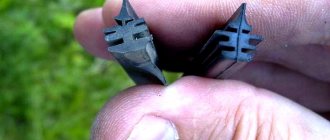
If you are not sure that the reason for the loss of battery charging is in the brushes, it is enough to measure their remaining length, which should not be less than 5 mm.
If you find that the length is less than acceptable, then there is no doubt that they need to be changed. Also, look at how evenly both brushes are worn.
It happens that one is practically erased, and the second is still quite usable - which can also affect the performance of the entire generator.
The price of new brushes on Priora is about 150 rubles for a more or less high-quality part.
You can, of course, find it cheaper, but you shouldn’t skimp on the “health” of your car, as you can then spend even more money on emergency repairs.
The installation is carried out in the reverse order and after that the efficiency of the generator as a whole is checked. If the problem with charging is solved, then it was the voltage regulator that was the problem; if not, look for another reason!
Checking the work
- Switch position “min” - for operation at high ambient temperatures (above 20ºС), as well as during operation in particularly difficult conditions (traffic in traffic jams, long climbs in the mountains, etc.);
- The middle position of the switch is for operation at ambient temperatures from 0ºС to 20ºС;
- The “max” switch position is for operation at low ambient temperatures (below 0ºC), as well as for recharging a discharged battery.
Average load (PTF, dimensions, music and heater fan at first speed)
Maximum load, maximum number of consumers activated
Will you be installing a three-level voltage regulator on your car? Take part in the survey and leave your feedback in the comments.
Let us remind you that another reason for low voltage on the on-board network may be a bad ground.
How to replace brushes on a Priora generator without removing it
- Battery disconnection.
- Removing the power wire with a 10mm wrench from the generator.
- Disconnecting the test lamp input from the connector.
- Removing the rear plastic cover with snaps.
- Using a screwdriver or wrench, unscrew the 2 bolts or nuts securing the brushes.
- Replace the brush mechanism with a new one, connecting the wires.
- Reassemble in reverse order.
Important! When carrying out any work on the generator or starter, repair, replacement, etc., it is necessary to disconnect the battery.
After replacing the generator brushes, be sure to measure the flow of charging current to the battery with a voltmeter and compare it with the readings on the Priora instrument panel. We need to make sure that its work is objective.
In the video you can watch a repair involving the replacement of a relay with brushes on a Priora generator:
How to remove RN
You can remove the old regulator without visiting a service station. To do this, you need to perform the following operations:
- Disconnect the terminals from the battery.
- Using a 10mm wrench, unscrew the nuts from the stud and disconnect the power cable.
- Unfasten the three latches on the plastic casing. After this, access to the regulator opens.
- Next, unscrew the two screws with a size 8 wrench and disconnect another wire.
- After this, you can remove the factory LV and install a 3-level one.
Please note that installation of a new generator occurs in the reverse order. There is only one feature: you need to bring out two wires for the control module. It is very important that the control module is secured very well and that there is no chance of moisture getting in there.
How to change alternator brushes on a Lada Priora
The replacement procedure is not complicated; repairs can be done yourself.
To work you will need:
- head with knob 10;
- open-end wrench 13;
- flat screwdriver.
Auto mechanics usually advise removing the generator itself before replacing it. This makes repairs easier, although in versions with air conditioning, access to the necessary areas may be difficult.
Installing a voltage regulator. Photo source: https://www.new-lada.ru/l/470516485849088176/
An overview of the main steps after removing the generator:
- Pry up and remove the protective plastic cover, gaining access to the brushes.
- Remove the “chip” (plug).
- Unscrew the two fastening clips located at the edges.
- Unscrew the fixing bolt with a wrench.
When the fasteners are removed, it is enough to inspect the unit considered to be faulty, assess its condition and, if necessary, replace it. Assembly is performed in reverse order.
You can change the brushes on the Priora generator without removing the generator.
Malfunctions of the relay regulator
Most often, the malfunction of the brush mechanism with a built-in regulator is the failure of the semiconductor transistor, a break or a short circuit to the housing. It is also possible for the graphite brushes themselves to wear out or break.
This is characterized by a drop or complete disappearance of the charge current. On the Priora this can be seen not only by the battery indicator lamp, but also on the mini display of the instrument panel. It has a charging voltage monitoring function.
New Lada: Lada Kalina what is an absorber
Attention! Under no circumstances should a Priora be checked for charging by removing the battery terminal! The Priora car has many built-in control systems. Disconnecting the battery while the engine is running threatens failure for any of them.
The brush mechanism of the generator on the Priora cannot be repaired. In case of any breakdown, you only need to replace the brush assembly.
What does it look like and where is it installed?
Now let's find out where the VAZ-2107 charging relay (carburetor) is located. Initially, this device was placed away from the generator on the arch under the hood (on the left side). On newer “sevens” equipped with an injection system, the voltage regulator was combined with a brush assembly.
The first voltage regulators were based on electromagnetic relays; they worked quite slowly and required constant intervention. The problem is that mechanical elements wear out very quickly. In addition, it was constantly necessary to adjust the gaps in the relay. Modern semiconductor devices operate silently, quickly, without electromagnetic relays. One silicon crystal can perform the functions of several mechanical relays.
( 2 ratings, average 4.5 out of 5 )
Reassembly
After purchasing high-quality brushes (it is advisable that your choice falls on a well-established manufacturer), you can begin the general assembly of the element, and then install the generator itself in its place.
However, as mentioned above, the last procedure can be performed without removing the generator. Which, however, is something every car owner decides independently. All operations performed should be performed in reverse order.
After completing the work, the operating efficiency of the entire generator must be checked.
You should use a voltmeter to check whether the charging process is moving, as well as what the panel displays. Make sure its work is objective. Indicators that correspond to each other are evidence that the remaining elements can be installed in their places and the generator repair has been completed successfully.
If the replacement of failed brushes was carried out correctly, and the battery was discharged precisely because the main elements of the car’s electrical system were worn out, the car owner will solve this problem without the help of service station workers.
And in this case, you will save a lot on such a service. The replacement process is really quite simple. However, if you encounter any difficulties during the repair work, you can watch the help video. It is provided by specialists.
On the Internet resource you can, among other things, find out:
- about design features - generator 2170;
- how to check the generator for operability, what you should pay special attention to;
- how to change wipers on a Priora and so on;
- What other possible problems can occur with the power generator?
Generator replacement process
Most often, the unit fails precisely after connecting various electronic devices to the onboard part of the car. The more energy consumers there are, the higher the generator voltage should be.
This is why we recommend that you consider the number of electronic devices you use when purchasing a new node. The best option is generators with 115-120 amperes.
Let's get started with the work. To dismantle the generator you need a 13 key:
- Disconnect the battery. Remove the mechanism drive belt according to the operating instructions.
- Disconnect the connector from connector D. Then move away the rubber boot to gain access to the fastening of the contact pin and the wiring block.
- Now unscrew the fixing nut and remove it. Remove the screw and get rid of the remaining fasteners. Don't forget about the adjusting screw.
- When all fasteners are removed, dismantle the tension bar.
- Remove the mechanism itself.
Now you can replace individual elements or purchase a new unit. After completing the repair work, all that remains is to install the generator in place; the process itself is almost identical (performed in reverse order).
Please note that if you are the owner of a Lada Priora with air conditioning, the process of removing the generator will be slightly different:
- Remove the protection and disconnect the positive terminal from the generator.
- Lower the belt tensioner roller and unscrew the air conditioner fasteners.
- Move the air conditioner away to make room for further removal of the generator.
- After unscrewing all the fasteners, carefully remove the device.
Don't forget to adjust the strap tension to avoid malfunctions of the mechanism. Then tighten the tension film fixing nut, maintaining a torque of 20 Nm. Be sure to rely on the diagrams during installation to avoid mistakes that will lead to system failure.
You may need additional replacement of bearings and diode bridge. If you have doubts and are not sure that you can carry out the procedure for replacing components yourself, it is better to contact a salon.
Preparation and necessary tools
It is more convenient to remove the generator on a Lada Priora on an overpass or inspection hole. Before you begin dismantling, prepare the following tools:
- locksmith's crank;
- extension;
- cardan from the tool kit;
- heads for 10, 12, 13, 17;
- spanners for 10, 12, 13, 17.
- WD-40 product.
This is interesting: Reasons for engine overheating When driving onto a pit or overpass, do not forget to install chocks under the wheels so that the car does not roll spontaneously. Then disconnect the negative terminal from the battery. Apply WD-40 to the mounting areas of the generator and air conditioning compressor. Wait 10-15 minutes for the product to take effect.
With air conditioning
A car with air conditioning consumes more electricity and needs a more stable and efficient unit. Auto mechanics advise choosing devices compatible with 115-120 A.
Brushes for the generator (with air conditioning). Photo source: https://www.new-lada.ru/l/451992188822225058/
The Priora is often equipped with a generator from the “Lux” version KZATE 9402.3701-14. Replacing the brushes of a Priora generator with air conditioning in such a case is usually carried out with a model with article number 897.3702. These generator brushes are installed on a Priora with a 115A device.
New Lada: Kalina station wagon trunk lock repair
How to check relay type YA112V1
These devices (“chocolate bars”) were installed on previously produced VAZs. To check the device, you need to unscrew it from the generator cover. For testing, use the homemade stand described above. The wire coming from the plus of the battery and the charger is connected here simultaneously to three points: the contact of the light bulb, terminal “B” and “C” of the relay regulator.
Connect the minus to its body. Terminal “Ш” is connected to the second contact of the lamp. We carry out testing in the same way as described above.
The most common breakdowns
There are several popular problems with the generator, most of which can be solved by simply replacing components. For example, a vehicle may have a faulty ignition switch, which will require immediate replacement. A break may also occur in the power supply circuit of the instrument devices. You will notice that when you turn the ignition on, the light will stop turning on.
When the generator light does not give any signals both when the engine is running and when the ignition is turned on, check the functionality of the instrument panel. Most likely, the battery is discharged, and the voltage regulator relay is out of order.
Also, the cause of this malfunction is oxidation of the contacts of the commutator rings and brushes, or their excessive wear or breakdown of the diode bridge. In this case, it is recommended to install new elements to replace those that have become unusable.
Even if the control light comes on, but the battery is being recharged, it is recommended to replace the voltage regulator relay. It would be a good idea to check the contact rings of the excitation trim and the contacts between electrical appliances and the generator terminals - they may have broken.
If the drive belt slips, it indicates that the voltage needs to be adjusted. If a malfunction occurs, the battery discharge lamp will light up. It also lights up if the diode batteries of the excitation winding have been damaged. The only rational solution in this case is to replace the rectifier unit.
Does the voltage drop sharply, problems arise with the power steering, does the generator not charge or is it overheating? In such cases, it will also need to be replaced.
parking lights
For example, the electrical circuit of a Lada Priora station wagon has the function of both automatic and manual activation of side lights. The activation itself occurs after turning the handle for the side lights and headlights on the dashboard. The contact is triggered and the lights turn on.
The circuit contains fuses that serve to protect against overvoltages and short circuits. Power is supplied to a lamp located on the dashboard. To adjust the brightness of the lights, a special regulator located on the lighting control module is used.
The headlight design of the Priora differs from other cars. The electrical circuit of the VAZ Priora contains a light sensor, as well as a lighting control unit. After turning on the ignition and the lighting control button, the electronic unit responsible for lighting control is activated.
If there is not enough light outside, the unit receives a signal from a sensor located on the windshield. There is also a rain sensor there. After receiving such a signal, the electronic control unit supplies power to the electromagnetic relay coil. Power is supplied to the headlights.
Priora generator brushes: how to replace correctly and do it yourself
If the owner of the Priora notices that the charge from the battery is disappearing, first of all, he needs to check the condition of the generator brushes. Of course, at first the charge decreases insignificantly, but if the problem is not corrected in time, the charge will very soon disappear altogether. Replacing the brushes of the Priora generator, which are clearly worn out, will help correct this problem.
Important! The brush mechanism of the generator on the Priora cannot be repaired. If any breakdown occurs, only a replacement along with the brushes will be required.
Since this process is not so complicated, you can do everything yourself. You just need to take into account the recommendations of professionals.
Required tools and materials
Every car owner should have a minimum set of tools in the trunk; this will help avoid great difficulties that may arise in the absence of this very tool. It is not difficult to check the condition of the generator, but the final result will depend on the type of check and the accuracy of the equipment used. The best solution would be a multimeter; even an inexpensive device with a minimum of functions will do. In addition, you may need:
- wrenches (usually sizes 10–14);
- flat or Phillips screwdriver;
- knife, side cutters, pliers and other tools for working with wires;
- electrical tape or heat shrink tubing.
Don’t forget about electrical safety - wear gloves, avoid contact of “positive” wires and terminals with the car body and other grounded objects.
Source
Brush mechanism with relay regulator
On older models of generators, the brushes that transmit current to the rotor winding to create an electromagnetic field that generates electricity could be replaced individually. They were installed in a special device - a brush mechanism, from where they could be easily removed. In modern generators, brushes are mounted complete with an electronic device - a relay regulator.
The relay regulator is designed to equalize the voltage supplied to the vehicle's electrical system. A transistor with a threshold for turning off the excitation voltage is built into the relay circuit. He is able to change it depending on the engine speed and, accordingly, the generator.
The fact is that without a regulator, as the speed increases, the voltage jumps to 16-18 V, which can lead to failure:
- side lighting lamps;
- low and high beam;
- instrument lighting;
- electric motors of various components.
At low speeds, the generator, on the contrary, produces a low voltage of 11.5-12 V. This leads to insufficient battery charge and premature failure.
By changing the current in the rotor windings, the relay-regulator maintains the voltage parameters supplied to the on-board network within the required limits, from 13.6 to 14.5 V.
How to check the generator voltage regulator with a multimeter without removing
Set the meter to the DC voltage test position and first measure it at the battery terminals without starting the engine. It should be 12.5-12.7V. If the value is less, the battery already needs to be charged: that is, you need to look for the reason for the undercharging. Further actions:
- start the engine and measure the voltage again, having previously set the limit value of the voltmeter scale to 20V;
- at idle it should be in the range of 13.2-14V;
- ask the assistant to press the gas pedal, bringing the speed to 2-2.5 thousand;
- measure the voltage, which should not exceed 14.2V;
- increase the speed to 3.5 thousand;
- measure the voltage again, the value of which should not be more than 14.5V.
If during testing the voltage remains at 12.7V or exceeds 14.5V, the relay regulator must be replaced. But there is a small nuance: the above signs may also indicate a malfunction of the generator. If the voltage regulator is separate, you should check it first, and only then work on the generator. You can simply take a known-good device and replace it with the one you removed. If the relay is located inside the brush assembly, the device will have to be dismantled.