Some car enthusiasts have come across the concept of when the voltage in the on-board network drops or a hum appears in the area of the VAZ-2112 generator. This is due to the fact that the bearing of this part has failed. Not all motorists will be able to change it themselves, so this article will focus specifically on the replacement process.
Video about overhauling the generator and its repair on cars of the VAZ 2110-2112 family:
The video material will tell you about replacing the bearing of the VAZ-2112 generator, and will also indicate the nuances and give some recommendations.
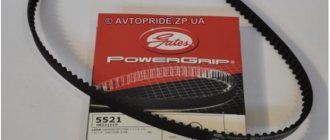
Which generator bearings are best to choose?
Replacing generator bearings VAZ 21124
Generator bearings last a long time, but, as mentioned above, they do not last forever. Nevertheless, if you correctly decide on the manufacturer of the bearings, their service life can be significantly increased. Two types of bearings are usually installed on the VAZ 2112:
- Front bearing 6302 or 6303.
- Rear bearing 6202 and 6203.
The price of bearings, as a rule, is not high - 50-150 rubles. Bearings differ in size. So, the rear bearing has an internal diameter of 15 mm, while the front bearing has an internal diameter of 17 mm. As for the outer diameter, on the rear bearing it is 35 mm, and on the front 47 mm. The highest quality generator bearings:
- Our domestic bearings produced at the Vologda plant are rightfully considered the best.
- In second place are KOYO bearings.
- In third place is Kraft.
- Bearings produced by ANDYCAR, Czech Republic, are also considered to be quite good, but are much cheaper.
What do you need to know when choosing new parts?
Initially, in the design of the 2110 generator, as mentioned above, two bearing devices are usually installed. In older versions of the car, parts marked 6302 or 6303 (these are front units), or 6202 (rear units) are used; in more modern versions, 6203 bearings are installed at the rear.
As for the sizes, they are as follows:
- for 6303 (or the domestic analogue under number 180302) the dimensions are 17*47*14;
- for marking 6302 (or domestic analogue 180303) - 15*42*13;
- for marking 6202 (Russian parts are marked as 180202) the dimensions are 15*35*11;
- for 6203 (domestic equivalent - 180203) dimensions - 17*40*12.
Replacing bearings
To remove the generator on a VAZ 2110 car, you must perform the following operations:
disconnect the positive terminal of the battery; release the belt tensioning mechanism and remove the belt, to do this, unscrew the fixing nut 13 and unscrew the bolt 10 of the tensioner mechanism;
disconnect the generator wires; Unscrew the lower mount of the generator, remove the bolt and remove it from the car.
Now that the generator has been removed, you can begin disassembling it. First you need to remove the pulley, for which you unscrew its nut by 24. This can be done either using an impact wrench, or by holding the pulley in a vice and wrapping it with two or three old belts.
Unscrew the pulley nut and pull it off the generator axle. To do this, you will need a two- or three-legged puller of a suitable size, which can be purchased at any automotive market. After the pulley is removed, you can disassemble the generator housing, having first removed the voltage regulator with brush holder, diode rectifier and capacitor, which are hidden under a plastic cover.
To disassemble the generator housing, you need to unscrew the 4 screws that hold its halves together. Usually the screws become stuck during the life of the generator, so it is recommended to fill them with some kind of liquid like WD-40 before disassembling. After unscrewing the screws, remove the front cover of the generator, which contains the front 303 bearing. At the factory, when installing the bearing, the generator housing cover will be rolled to securely fasten it, so you will need to select a mandrel according to the diameter of the bearing seat, on which to rest the housing cover and knock it out or press it out from the back side.
Having selected a mandrel according to the diameter of the outer race of the bearing, hammer it into place. If the bearing has been replaced several times and its seat in the cover is broken, it must be replaced. The new cover is sold with the bearing already installed. If it is necessary to replace the rear bearing, then continue disassembling the generator by removing the stator with windings from the generator, then using your fingers to push out the plastic support of the rear bearing and remove it from the generator rotor. After removing the support, access to the rear bearing will open. To remove it, you will need the same puller as for the generator pulley. Having pulled off the old bearing, press in a new one using a mandrel of the diameter of the inner race of the bearing
ATTENTION! In this case, hitting the outer race of the bearing is prohibited! This significantly reduces its service life. Clamping the rotor in a vice by the axis is prohibited! Scratches on it will interfere with the assembly of the generator.
If the bearing is installed without the help of a hydraulic press, the rotor must be supported with its axle on a wooden surface, preferably having first screwed a nut onto the pulley mounting thread to prevent damage. After pressing on the new bearing, reassemble the generator in the reverse order and install it on the car, connect the wiring, and then tension the belt
Before installing the old belt, check its condition and replace it if necessary.
The belt is tensioned according to the following algorithm:
- with the fixing nut on 13 of the generator belt tension mechanism loosened, tighten the tensioner bolt with a 10 wrench until the belt, when pressed with a force of 10 kgf, sags by 10-15 cm;
- Tighten the generator fixing nut.
ATTENTION! Retightening the alternator belt is unacceptable! This threatens rapid failure of its bearings and severe wear of the belt and pulleys (crankshaft and generator). At this operation, the process of replacing the generator bearings can be considered complete
At this operation, the process of replacing the generator bearings can be considered complete.
To summarize, it should be emphasized that you should not delay replacing bearings. In addition to the unpleasant sound, untimely replacement of bearings can lead to their destruction, wedge and, as a result, failure of the generator.
In some cases, the generator cannot be repaired, and a new one costs much more than the bearings and the time spent replacing them. New bearings solve the problem of generator noise and significantly extend its service life.
Dismantling and disassembling the generator (in detail)
Work order:
- Disconnect the negative terminal of the battery.
- Next, unscrew the terminals of the device itself, having previously unscrewed the fastenings of these terminals.
- We study the diagram of the generator fasteners in order to begin removing the unit.
- Then remove the crankcase guard and get under the car.
- Next, unscrew the fasteners securing the generator to the frame (positions 5 and 2 in the diagram).
- While unscrewing the last fastener, hold the mechanism with your hand.
- Remove the unit, remove dirt and wipe with a rag. Lubricate the threaded connections with WD-40.
- Use a screwdriver to remove the rear plastic cover on the generator.
- Using a Phillips screwdriver, unscrew the voltage regulator and brush holder fastenings.
- Remove the pulley from the axle and clamp the product in a vice.
- Using an adjustable wrench or other wrench, unscrew the nut on the pulley. To prevent the shaft from spinning, insert the hexagon into a special recess at the end.
- Remove the washer and, having unscrewed the corresponding bolts, disassemble the unit body.
- Remove the plastic cover and then the front ball bearing to access the armature.
Generator repair for VAZ 2110
To carry out repairs, the generator must be completely disassembled.
If it is necessary to replace the conductors of the VAZ 2110 generator, the car owner should select only those cables that correspond to the length and cross-section.
Belt adjustment
To adjust the belt, follow these steps:
- Use a wrench to loosen the tightening of the nuts on the lower and upper fastenings of the generator device.
- To perform tension, the assembly is moved away from the internal combustion engine cylinder block; for this, the adjusting screw is turned clockwise. To loosen the strap, the bolt is turned in the opposite direction, only the generator device moves towards the BC. The approximate play between the threaded surface for the adjustment bolt and the black frame should be about 1.3-2 cm.
- Using a key, the crankshaft of the power unit is turned by the screw that secures the pulley two turns. Scrolling is done clockwise. Then the strap is re-diagnosed. If necessary, it is adjusted.
- Upon completion of the work, the nuts securing the assembly are tightened.
The channel “In Sandro’s Garage” showed in detail the process of adjusting the tension of the drive belt on “ten” generators.
Repair of brushes and regulator
The brush assembly repair procedure looks like this:
Using a construction brush, the outer surface of the generator unit is cleaned. If there is a compressor, the housing is purged. If it is not available, a vacuum cleaner may be used. Further steps to disassemble the device are performed on a workbench or clean table
The generator unit is installed on the working surface with the shaft down. Using a flat-head screwdriver, carefully release the three spring-loaded metal clips. The plastic cover located on the back of the device body is removed. Using a Phillips-blade screwdriver, unscrew the bolts securing the brush holder
This element is carefully dismantled. When performing the task, you must be careful not to damage the brush assembly. The central terminal of the electrical circuit is disconnected from the mechanism. The nut is unscrewed from the screw of the contact elements. The spring part is removed. The second washer is being dismantled. The conductor connected to the capacitor device is disconnected from the contact screws. Then the screw that secures the part is unscrewed. The capacitor element is dismantled. Before installing a new brush mechanism, it is necessary to diagnose the main elements of the device. The brushes should be located 0.5 cm from the body of the holder itself. When performing a task, it is recommended to immediately check the capacitor device.
To repair the control device, do the following:
- Three spring elements are disconnected. The protective cover located on the diode bridge is dismantled.
- The two bolts that secure the control device are unscrewed. To complete the task you will need a Phillips head screwdriver.
- The block with the conductor is disconnected from the output of the regulatory device. The part is dismantled and replaced with a new one. Assembly is carried out in reverse order.
The MegaMeyhem channel talked about the procedure for repairing and replacing the regulatory device on domestic “ten” generators.
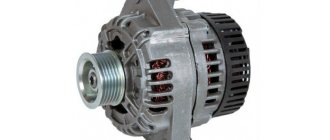
The device of a car generator
- Front cover.
- Back cover.
- Middle part with windings.
The rotor has a thread and a keyway on one edge. Using such simple elements, the impeller and pulley are fastened. On VAZ 2110 early releases (with a carburetor injection system) pulleys were used for a V-belt. Similar ones have been used for a long time on VAZ 2108-21099 cars.
During operation, the windings and body of the device become very hot. Therefore, there is a need for forced airflow.
The rotor has an excitation winding, which is connected to the power circuit through a voltage regulator and a lamp on the dashboard. The latter signals whether there is voltage at the generator output. To rectify the current received on the stator windings, a diode bridge is required.
Bearing 330802 (1НР16092)
Radial double-row bearing, combined, ball-roller (one row of balls and one row of rollers), the coding of which is subject to separate rules. The product has a double-sided seal and a roller instead of an inner ring. Bearings of this design are also called “pump”, since they are used in water pumps of cars (VAZ), which have a second name - pump. Another name for them is “popsicle”. Full marking is 6-1НР16092EKС17, but may differ between different manufacturers and depending on the design features. Thus, the Vologda plant completely switched to a foreign-brand system of symbols. A product with the outdated marking 330802 indicates exactly the same bearing, and is often sold in illiquid quality.
6 - degree of accuracy, HP indicates that the rolling elements are balls and rollers, the first number 1 is a smooth roller with an annular groove on a long ring, 16 and 115 are sizes. E - polyamide separator, K - design, 17 - type of lubricant used in production (Litol-24).
The bearing is produced at two factories in the country, both of which are famous for their high quality products - VBF (23 GPP, Vologda) and SPZ (Saratov Bearing Plant, 3 GPP), however, at the latter they have been discontinued, although many still have them in stock companies. To purchase them in bulk, you can contact EPK or VBF dealers in your region (some also carry out retail sales). The approximate price is about 130 rubles.
The bearing is used in the pump (water pump) of front-wheel drive VAZ cars - 2108, 2109, 2110, 2111, 2112, their modifications, as well as in such outdated models as VAZ 1111 "Oka", "Tavria", LuAZ and some others.
Dimensions and technical parameters of bearing 330802 (1НР16092)
Inner diameter (d) - 16 mm;
Outer diameter (D) – 30 mm;
Width (B) – 39/92 mm;
Dynamic load capacity - 6.5/12.7 kN;
Static load capacity - 2.7/11.8 kN;
Rated rotation speed: 10,000 rpm.
There are currently a variety of brands and manufacturers of water pumps on the market; each manufacturer claims that its products are the best. We will try to impartially figure out what’s what, and consider one of the most popular items - a pump for front-wheel drive eight-valve VAZ cars.
To avoid any confusion, let's clear things up right away. Eight-valve engines on front-wheel drive VAZs were constantly modernized and changed, so the pumps listed below are suitable for all engines equipped with the so-called “eighth” timing belt. If we take it by model, then these are VAZ 2108, 2109, 21099, 2110, 21013, 21014, 21015, as well as Kalinas and Prioras of the first years of production.
We purchased seven samples of pumps from different manufacturers - both domestic and foreign. But before we start introducing the products, I would like to explain some of the terms that are used below.
The impeller is a low impeller, which is located on the reverse side of the main impeller, its purpose is to relieve the shaft-housing seal
Equally important is the presence of holes in the base of the impeller - they also help reduce the load on the mechanical shaft seal with the housing
Product description LADA 2112370102
The Part-auto online auto parts store works exclusively with trusted suppliers of auto parts, which gives you confidence in purchasing truly high-quality spare parts. Available LADA spare parts are focused on the most popular models of automobile brands: Spare part 2112370102 can be used in several modifications and models. To clarify applicability, you must send a VIN request and our specialists will check the compliance of the spare part with your car.
Other modification
As for the direct brother of the car mentioned above, replacing the generator bearings on a VAZ 2112 differs little from the process described. After all, the filling of these cars is virtually the same. Moreover, the marking number of the bearing for the VAZ 2112 is identical to what we mentioned earlier, both for the front and rear.
For repair actions you will need the same set of tools and accessories:
- spanners;
- round timber and block;
- puller;
- "Litol."
Procedure.
- We de-energize the car from the battery power.
- We dismantle the electric motor we need in the same way as for the “ten”, since it is mounted in the same way.
- In the sequence described above, we release the necessary parts from the assembly unit.
- Using thick lubricant, we install new parts.
We did not pay much attention to this instruction, since the VAZ 2110 engine and the VAZ 2112 engine are essentially the same, and the generator model used in these cars is the same.
Fourteenth model
Let's turn to another AvtoVAZ modification. Next, we will look at replacing the generator bearing in a VAZ 2114.
The reasons for the breakdown of parts here are similar to those given at the beginning of the article. Well, what will be useful to us for the next repair, we list here in a short list:
- set of wrenches;
- screwdriver;
- hammer and round timber;
- Litol lubricant.
Let's describe the repair technology point by point.
- Disconnect the terminals from the battery.
- We loosen the long adjusting bolt at the top of the unit being dismantled, then unscrew the lower mount of the electric motor, having previously treated the threaded connections with penetrating lubricant.
- Having disconnected all the wires, we remove the electric motor (you can try through the top), and also prepare new parts. Their numbers are 180302 and 180201.
- We unscrew the plastic cover of the electric motor, remove the brush holder and voltage regulator. At the same time we study the degree of wear of the brushes.
- Use a screwdriver to separate the stator from the cover. A hammer may come in handy here, but we do everything very carefully!
- Unscrew the nut from the pulley area and separate the impeller.
- We remove the bearings and install new ones, applying thick grease.
- Assembly is done in reverse
It is easy to understand that the procedure resembles the process we described for the case of the “ten”. That is, the set of stages again does not cause any particular complexity. But it happens that some owners of VAZ cars with front-wheel drive either do not have time to do the repairs themselves, or do not have the conditions, or enough funds to contact a car service center.
How much does the repair cost?
Therefore, we will also touch upon such an important point as the average cost of partial repair of an electric generator at a car service center.
To make a selection for large cities of the Russian Federation, let’s take as an example an operation such as installing a new bearing on a VAZ 2110 generator. We present the results in the table below.
| City | Price |
| Moscow | 600 rub. on the removed unit, 1200 rub. with removal and installation of the unit. |
| St. Petersburg | 600 rub. on the removed unit, 1200 rub. with removal and installation of the unit. |
| Ekaterinburg | 450 rub. simple replacement, 900 rub. with removal and installation of the electric motor. |
| Samara | 400 rub. minor generator repairs, another 300 rub. for its removal and installation, total: together – 700 rub. |
| Novosibirsk | 450 rub. – 500 rub. bearing replacement, 300 rub. – removal and installation of the unit on the car, together about 800 rubles. |
Let us add that you can buy the bearing itself for a VAZ 2110 generator at a low price, within one hundred rubles for the entire set, consisting of two standard rolling parts.
Return to top
Based on the above data, we can draw the following conclusion: the cost of work, even when removing the entire unit at a car service and then installing it back, does not go beyond reasonable limits.
Let's sum it all up. We found out that the procedure for removing and installing the on-board electric motor on a VAZ, as well as disassembling it and dismantling old parts, is not so difficult to do with your own hands if you have a certain skill. But the prices for this work in a car service are also low and, if desired, you can contact a workshop.
Now read about replacing the oil filter on a Citroen C4 and how much brake fluid is needed for a complete replacement.
How to check the VAZ 2107 generator
The need to diagnose the generator on the “seven” appears when there is no charge or when the battery is being recharged, i.e. when the voltage does not correspond to the norm. It is believed that a working generator should produce a voltage in the range of 13.5–14.5 V, which is quite enough to charge the battery
Since the charge source contains many elements on which the voltage supplied to the battery depends, attention should be paid to checking each of them separately
Checking the brushes
The generator brushes on the VAZ 2107 are a device made as a single unit with a voltage regulator. On earlier models these two elements were installed separately. The brush assembly sometimes fails and requires replacement, especially if low quality parts are used. Problems first appear in the form of periodic interruptions in the voltage supplied by the generator, after which it completely fails. However, there are also cases of sudden failure of brushes.
You can determine that the problem with the charge lies in the brushes by a number of signs:
- car consumers are switched off for unknown reasons;
- lighting elements dim and flicker;
- the on-board network voltage drops sharply;
- The battery discharges quickly.
To diagnose the brushes, it is not necessary to remove the generator itself. It is enough to unscrew the brush holder fasteners and dismantle the latter. First, the condition of the node is assessed by its external condition. Brushes can simply wear out, break, crumble, or break off from conductive contact. A multimeter will help in troubleshooting; it can be used to test each part.
Video: checking the brushes of the VAZ 2107 generator
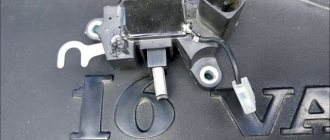
Checking the voltage regulator
The following signs indicate that there are some problems with the voltage regulator:
- The battery is not fully charged even when a new battery is installed;
- the voltage source boils, which indicates overcharging.
In any of the above situations, the relay-regulator needs diagnostics, which requires a multimeter. The check can be performed using a simple or more complex method.
Simple option
To check, perform the following steps:
- We start the engine, turn on the headlights, and let the engine run for 15 minutes.
- Open the hood and use a multimeter to measure the voltage at the battery terminals. It should be within the range of 13.5–14.5 V. If there are deviations from the specified values, this indicates a breakdown of the regulator and the need to replace it, since the part cannot be repaired.
Complex option
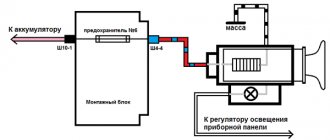
This verification method is used if the fault cannot be identified by the first method. This situation may arise, for example, if, when measuring the voltage on the battery, the device shows 11.7–11.9 V. To diagnose the voltage regulator on a VAZ 2107, you will need a multimeter, a light bulb and a 16 V power supply. The procedure consists of the following steps:
- The relay regulator has two output contacts, which are supplied with power from the battery. There are a couple more contacts going to the brushes. A lamp is connected to them as shown in the figure below.
- If the voltage at the outputs connected to the power supply is no more than 14 V, the control lamp between the brush contacts should light brightly.
- If the voltage at the power contacts is raised to 15 V or higher, with a working relay-regulator the lamp should go out. If this does not happen, then the regulator is faulty.
- If the lamp does not light up in both cases, the device must also be replaced.
Reasons for failure
There are many reasons for bearing failure, but there are several main reasons, which are discussed below.
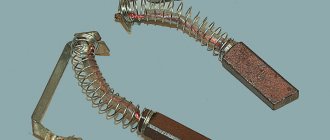
Wear
On the left are old bearings, on the right are new bearings.
Wear is a typical cause of bearing failure, since the number of revolutions of the generator rotor is huge over the Nth period of time. Consequently, the lubricant in bearings under the influence of high temperatures loses its properties and the bearing ceases to receive the required slip coefficient, which causes heating and increased clearances in the ball part of the bearing.
Belt tension
Excessive tension on the alternator belt greatly affects the life of its bearings. It is necessary to tension the belt correctly, observing all norms. The generator belt should bend under the influence of 10 kg. by 5-7 mm.
Symptoms of a problem
The main sign of wear on the generator bearings is the appearance of a distinct noise when the rotor rotates.
Typically, bearings begin to make noise due to insufficient lubrication, mechanical damage (destruction of the cage, severe wear of the tracks) or due to the rotation of the outer race in its seat, although this happens very rarely.
It is believed that if there is no lubricant, it is enough to apply a new one to get rid of the problem.
But this is not always the case; operation of this element without lubrication is accompanied by intense wear, so after adding new lubricant, the noise may stop, but not for long; the bearing will fail very quickly.
In any case, if problems are detected with the generator bearings, it is better to replace them immediately.
Next, we will consider how to replace these elements in the generator of a VAZ-2110 car.
The design of the generators is almost the same, so the sequence of work will be similar for generators of other cars.
Technical specifications
If the old generator fails, many motorists wonder which generator they should now replace the old one with.
There is no need to invent anything here. The most correct solution is to install the same generator as before, or a more powerful one.
Today, the VAZ 2110 provides for the use of three types of power supply devices:
- Katek 5102.3771. The generator produces 80 Ampere power and its voltage is approximately 14V.
- Katek 94.3701. This is a device with the same parameters. They are not seriously different.
- Catek 120 amp. A generator that is more adapted to modern realities, when in addition to standard electrical equipment, motorists install many additional devices.
If you have a powerful audio system in your car, you use an electric pump powered by the car, as well as a number of other additional consumers, it is recommended to install a 120-amp unit instead of a standard 80-amp generator.
If we take into account the size of the devices, then we can distinguish between ordinary and compact ones. They have a certain difference in design
To be specific, the differences are in the following components:
- Brackets;
- Anchor;
- Excitation wire;
- Drive pulley;
- Number of mounting bolts.
But in reality this does not play a special role. After all, the structure of all generators used for the VAZ 2110 is the same. Therefore, let's look at the circuit and structure of this unit.
| Element | Functions |
| He's an anchor. It is a rotating element of the generator, which creates a magnetic field due to the excitation winding located on the shaft. The field wire receives power from the slip rings. They are mounted on the same shaft. There was also room for a drive pulley, field winding wire, bearing assembly and fan impeller. There may be 1-2 last ones | |
| This is a stationary three-phase element that includes three windings. They provide the creation of alternating current. The windings are connected to each other using a triangle or star | |
| A lightweight non-magnetic aluminum alloy is most often used to make the generator housing. The body looks like a pair of covers connected by a bolt. The front cover is located near the drive pulley, and the rear cover is located on the side of the slip rings. Each connecting bolt must be tightened. To disassemble the housing, simply unscrew the mounting bolts. | |
| The upper mounting bracket for the generator uses two bolts, while the lower bracket is predominantly mounted on one bolt. In some cases there are two. It is not recommended to modify the brackets, since the factory one performs important functions. The purpose of the brackets is to hold the generator. It is recommended to monitor the condition of the brackets as they are subject to wear and breakage | |
| Brush unit | It consists of a pair of graphite brushes, springs that press the brushes, as well as a brush holder |
| Brush holder assembly and voltage wires | This design is typical for modern Katek generators. Therefore, if the regulator fails, you will have to replace the entire assembly |
| Rectifier block | Equipped with 6 diodes, it is responsible for converting alternating current into direct current. It is direct current that is required for the operation of all auto equipment. This element charges the battery, among other functions. |
| Belt drive transmission | The belt drive allows you to increase the speed at which the crankshaft rotates. If the pulley has a small diameter, then the V-belt will wear out faster. Therefore, for small driven pulleys it is recommended to use a poly-V-ribbed drive. It is most often found in modern generators |
The presented device is relevant for all generators used on the VAZ 2110, regardless of their power - 80-120 Amperes.
Margin of safety
If we take into account the standard Katek generator, which is installed on domestic dozens, then its resource is enough for about 10 years of operation or 140 thousand kilometers. The specified safety margin of the device can only be relied upon if it is handled properly
The specified safety margin of the device can only be relied upon if it is handled properly.
Many people fear that a powerful 120 A generator can negatively affect the condition of the battery. In practice, nothing like this happens. Moreover, installing a more powerful unit is recommended if you plan to install an impressive audio system or video equipment on the car.
Principle of operation
But such a problem occurs extremely rarely and is due to non-compliance with the operating conditions of the generator. If water, oil, or other liquids get on it, you will soon get a short circuit. This is an instantaneous increase in the current strength in the circuit to an infinitely large value.
But when the ignition is turned on, voltage is supplied to the rotor winding (excitation winding). Without power to this circuit, the operation of the entire VAZ 2110 generator is impossible. When the rotor is set in motion, a magnetic field is formed around it. And this is the most important condition for the operation of generator sets.
As a result, the output of the automobile generator produces a voltage that is variable and stabilized (due to the stabilization of the supply voltage to the rotor winding). The next stage is rectification using semiconductor diodes. The result is a constant voltage, which is filtered by a large capacitor.