Print this article Font size 16
One of the most important elements of the chassis is the suspension. This is an independent design with hydraulic shock absorbers and coil springs. At least such a system is present on the VAZ 2110 car we are interested in.
The components of the assembly are braces, wishbones and a stabilizer bar. Shock absorbers allow you to dampen vehicle vibrations that appear when hitting potholes, for example.
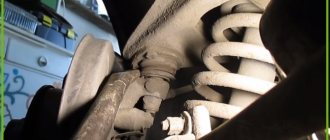
Photo of stabilizer struts on VAZ 2110
The stabilizer and stabilizer bar of the VAZ 2110 are responsible for the comfort and safety of the driver and his passengers while driving. It is quite possible to replace this element of the suspension unit yourself. To do this, it is not at all necessary to be a highly qualified specialist. You can also avoid serious financial costs of paying for the services of masters.
Today we will introduce you to how to replace stabilizer struts on a VAZ 2110.
Replacing stabilizer struts and itself on a VAZ 2110-VAZ 2112
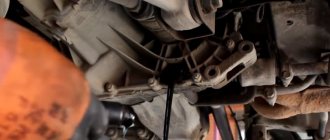
Welcome! The anti-roll bar is, as such, a metal stick that works to twist when the car enters a turn, that is, it has two ends that are connected to the levers and in the very center it has a U-shape (See the photo above, you can see what this looks like stabilizer), thanks to this shape, when the car turns, this stabilizer prevents it from falling on its side; it works to twist, and when the left part of the body, for example, rolls, and the right rises, it twists and it turns out that it holds that part which tilts so that it does not fall too much, and on the one that has risen, the stabilizer puts pressure on it so that it does not rise even higher, thus in turns the car is more confident and does not fall too much on its side, which ensures its stability on the road and safer driving.
Note! To replace the stabilizer on a car, you will need to stock up on: Firstly, an inspection hole, because the stabilizer is located under the bottom and you will have to crawl under the car, in addition, you will need a wrench with union heads, or you can also stock up on an extension cord instead of a wrench, as well as Take all the wrenches that you have (spanners, sockets, etc.), you will need a bit of a suitable diameter (you will understand exactly what diameter of the bit is needed as you read the article), and we recommend stocking up on WD-40 or something like this, since the bolts are most likely soured and you won’t be able to unscrew them so easily!
Summary:
Where is the anti-roll bar located? As we have already said, in order to see it you will have to crawl under the car, move under the bottom closer to the front wheels and you will see there the stabilizer itself (Indicated by blue arrows) and also the levers to which the stabilizer struts are connected (Connection points indicated by red arrows).
When should you replace the anti-roll bar? If it is deformed, it needs to be changed or after a very long time of use, as we all know, iron over time loses all its properties and weakens, thereby the car begins to roll more when entering a turn and it becomes no longer safe to drive, with regards to the deformation of the stabilizer , then it may be due to a collision with a curb or due to a collision with a large stone, since usually the bottom of the car is deformed during a collision, also the exhaust system (Muffler) and even the stabilizer can get damaged, so if you have this happened on the road, be sure to get out of the car and inspect the underbody of the car for deformed parts; if necessary, replace all parts that are damaged with new ones.
Note! As for the stabilizer struts, if they are deformed, the first thing that will appear is knocking in the front part of the car, with these knocks there will also be a kickback on the steering wheel and the front part of the car will begin to sway, in addition, if you let go of your hands from the steering wheel, the car can pull to the side , this will indicate that the racks have become unusable and it’s time to inspect them and, if damage is detected, replace them with new ones!
How I changed the anti-roll bar myself
Dismantling
Using the keys “17” we tear off the bolt of the strut to the lever and pull it out. If you do not first clean it from dirt, it will be problematic to unscrew it. Therefore, be sure to clean all threaded connections. Open-end wrenches will not work , they will only “slick” the edges, unless, of course, you have a brand new car from the showroom.
The stabilizer can unscrew the strut, and these bolts will become skewed. Therefore, it is better to completely unload the front suspension, as I said earlier. If you can’t pull them out, you can knock them out, but this is an extreme measure, you can damage the threads.
Unscrew the stabilizer mount to the body. If the car is many years old, you need to do this with extreme caution. There is a chance of breaking the studs. Therefore, we clean the dirt and soak the threaded part of the VD 40.
We remove the bushing clamps, so when removed, the stabilizer will cling less to the suspension elements and it will be easier to pull it out. For the same purpose, you can remove the struts from the stabilizer, but this is difficult to do under the car. We take out the anti-roll bar.
On some cars, the exhaust manifold can cause difficulties, especially on lowered models. We unscrew the bolts securing the “pants” to the catalyst. We lower the latter, and the stabilizer is pulled out without any problems.
Mandatory part
We check the condition of the stabilizer struts, or rather its rubber-metal part. If there are cracks in the rubber or it has lost its shape, yes, and this happens, you need to replace not only the stabilizer bar bushings, but also the struts themselves.
After dismantling, we inspect the mounting studs to the body. If necessary, clean their threads. It’s good if they haven’t rotted, so as not to lose the “stub” along the way. If everything is that bad, it's better to update them.
Now let's see why I have play on the racks. It turns out that there is a banal wear on the bar itself from the racks. Therefore, I need to change it to a new one; I won’t be able to increase the metal in any way.
Installation
I had to replace the stabilizer bushings because their appearance did not inspire confidence. They are made split, so they simply slide onto the barbell. To make it easier to move them along it, you can smear them with soapy water or a special lubricant. It may come with elastic bands, but in most cases it is not.
It is important not to use Litol 24, grease and other greases. Because the rubber from which the bushings are made is not gas- and oil-resistant, it will quickly become unusable.
We put the strut on the stabilizer and try to push it into place. Using the sticking method, twisting the bar and remembering the maternal relatives of AvtoVAZ engineers, I managed to insert it.
First of all, we put the clamps on the stabilizer bushings, so that the rubber “stick” on them coincides with the hole in the clamps.
We screw the stabilizer to the body. There is no need to tighten the nuts too much; the stabilizer should move freely.
We align the racks relative to their fastenings to the lever. Insert the bolt and tighten it.
It is important that before tightening the rack mounting bolt, it is recommended to lubricate the threads so that you can then unscrew it. The same applies to the threads of the studs securing the stabilizer to the body.
After tightening the bolts of the struts, we finally tighten the nuts of the bushing clamps. This must be done with a certain tightening torque. This way they won’t unscrew themselves due to vibration and you won’t break the thread.
Torque
- Nut securing the rod to the body: 12.9 – 16.0 N*m or 1.32 – 1.63 kgf*m.
- Stabilizer link bolt: 42.1 – 52.0 Nm or 4.29 – 5.3 kgf.
How to replace the anti-roll bar and its struts on a VAZ 2110-VAZ 2112?
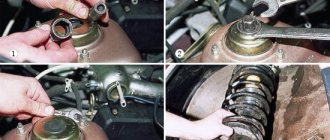
1) First, you will need to lift the front part and for convenience (you don’t have to do this in principle) remove both wheels from the car (For information on how to remove a wheel correctly, read the article: “Replacing wheels on a car”), then take two wrenches and one hold the bolt (indicated by the red arrow) from turning, and with the other unscrew the nut of this bolt, which is indicated by the white arrow.
Note! Before hanging the front part (this is if you are going to remove the wheels), be sure to put something under the rear wheels, and also brake the car with the handbrake so that it stands upright and does not fall to the ground at one point!
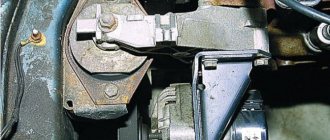
2) Then take a bit of a suitable diameter or something else like it and with its help knock out the bolt, the nut of which you unscrewed with a wrench a little earlier (see photo 1), immediately after which go to the other side and do exactly the same operation of unscrewing the bolts with the nut and knocking it out, as soon as the operation is completed, you will have to remove the two central fasteners that hold the stabilizer in the central part, to do this, take the wrench and socket in your hands and use it to unscrew the two nuts that hold the bracket, for example the left pillow or the right one is attached (see photo 2), as soon as you finish with one bracket, remove it, on the other side, unscrew the two nuts in the same way and remove exactly the same pillow bracket.
Note! If you are changing the stabilizer struts, then it makes no sense to completely remove the stabilizer itself, so as soon as you knock out the bolts, proceed to removing the struts, to do this, just pull them and remove them along the stabilizer bar, see the video at the end of the article for more details!
3) Well, when you remove the stabilizer, proceed to disassemble it or immediately replace it with a new one, but simply the parts removed from it may be useful to you in the future, it is possible that the new parts will not be deformed soon, so the old ones, and even if they in good condition (This is unlikely) it is recommended to leave it, in general disassembly, at the beginning of the stabilizer strut, remove it from the bar itself as shown in photo 1, then make a mark for yourself with either a bright colored marker or electrical tape (see photo 2, the mark is indicated by an arrow), in which exact place your pillows are currently located (One of the pillows is indicated by a blue arrow in photo 2), as soon as you have indicated their installation locations, you can safely remove them from the bar and when installing new pillows on barbell, you know the place where they need to be placed, but removing the pillow, by the way, is not very difficult, first the steel bracket is removed from it (indicated by a green arrow) and only then it is either cut or carried along the bar until it is removed from it , for the convenience of removing and installing new cushions, we recommend that you lubricate the rod with soap so that the cushions can be removed much better.
How to replace the Kalina stabilizer
To replace the bushings and stabilizer on a car, you need to perform the following steps:
- install the car on a lift or inspection hole (in the latter case, you need to place wheel chocks under the wheels);
- treat threaded connections with WD-40;
- unscrew the left and right nuts securing the stabilizer struts;
- unscrew the nuts holding the left and right stabilizer mounting clamps;
- dismantle the struts, bar and stabilizer brackets;
- Unscrew the nuts securing the stabilizer links to the arms;
- knock the stabilizer struts off the rod using a polymer or wooden hammer;
- inspect the stabilizer pads (bushings) and, if necessary, replace them with new ones;
- inspect the condition of the stabilizer bar;
- if the ends of the rod are in different planes or it has other signs of deformation, a new rod should be used;
- inspect the condition of the stabilizer struts and their bushings;
- replace worn bushings and deformed struts with new ones;
- lubricate the threaded connections with graphite lubricant;
- install the bar and stabilizer pads on the car;
- tighten the nuts of the stabilizer mounting clamps;
Tip: when using split pads, the nuts must be tightened until the gap in them is eliminated. To do this, first tighten the front, then the rear fastening nut.
- tighten the nuts holding the Kalina stabilizer struts;
- if the replacement work was carried out on a lift, it is necessary to lower the car to load the wheels;
- make a final tightening of the threaded connections of the clamps and stabilizer struts (4.5-5.3 kgf and 1.3-1.6 kgf, respectively).
At this point, the replacement of the Kalina stabilizer is completed and the car is ready for use.
Stabilizer strut mounting bolt 2110
The design of the front suspension of the VAZ 2110 is identical to most Lada models and consists of the following elements:
- Oil type shock absorber;
- Spring;
- Support bearing;
- Stabilizer's pole;
- Stretcher;
- Silent blocks, rubber bushings.
During the operation of the car, parts wear out, become unusable, and operating efficiency decreases. The technical equipment needs preventive maintenance and repair.
The process of replacing suspension elements yourself is not complicated, and the operating principle is intuitive. We carry out restoration work on our own; there is no need to contact a workshop.
Originals, analogues, article number, price of stabilizer strut for VAZ 2110
Technical data: length 110 x width 32 mm.
Stand structure: base, metal tip, rubber boot, lock ring. Nuts and washers are not supplied, the owner must purchase them separately. Thread pitch 1.25, diameter 8.0, length 60.0 mm.
| vendor code | Price, rub.) | vendor code | Price, rub.) |
| Original front | |||
| VAZ-2110 assembled kit 2110-2906050 | From 320 | VAZ-2110 2110-2906050SS | From 320 |
| 2110-2906050 | —/— | 2110-2906055 | —/— |
| Front analogues | |||
| SIDEM 19169 | From 300 – 350 | MOOG LALS10573 | From 300 – 350 |
| SS40106 | —/— | SS40102 | —/— |
| SLST-104 | —/— | SS20-10-29060 | —/— |
Before purchasing consumables, be sure to check the compatibility of the catalog items specified in the operating instructions.
Sequence of actions when carrying out diagnostics
Diagnostics is essential before starting work on replacing parts. A visual inspection will help identify the source of the breakdown, assess the general condition of the vehicle, and correctly calculate spare parts and consumables.
- We drive the car into the inspection hole, ensure priority safety measures, squeeze the handbrake, install wheel chocks;
- Jack up the side, unscrew the bolts, remove the wheel;
- We use a metal pry bar to facilitate the diagnostic process. We press at the junctions of metal structures. If the rod is in good condition, there should be no squeaks or knocking. Otherwise, this will indicate defects and wear of elements.
We summarize the data obtained based on the diagnostic results and make a decision on the need to replace spare parts.
At the same time, we check the technical condition of silent blocks and the brake system. If there are signs of wear or deformation, we replace the elements with new ones.
Reasons why you need to change the shock absorber struts of a VAZ 2110
- Knock in the suspension.
- A slight vibration feedback to the steering wheel, which impairs vehicle controllability.
- The appearance of rocking of the front of the car.
- A slight deviation of the wheels from straight-line movement.
If the driver detects such deviations, an urgent replacement of the VAZ 2110 stabilizer strut is needed. The durability of the struts depends on the quality of the road surface and the manufacturer. The price of quality products is slightly higher than that offered by less popular manufacturers of structures.
Tip: There is no need to check the wheel alignment after replacing the shock absorber struts; they do not have any effect on the wheel alignment angles.
Replacing stabilizer parts for a VAZ 2110 car
To work you need to purchase:
The instructions suggest the following procedure:
- The car is installed on a viewing hole or its front part is raised and fixed on supports.
- For safe operation, the car is placed on the handbrake.
Tip: To prevent unexpected movement, the car must be firmly secured in place by placing “shoes” or wheel chocks under the rear wheels.
- Unscrew one nut at a time, securing the car body to the arms of the anti-roll bar struts, on both sides.
- The spring washers are removed.
- The bolts are removed from both sides.
- Unscrew two nuts holding the stabilizer bars to the body.
- The spring washers are removed from the studs.
- Along with the struts, the brackets and stabilizer bar are pulled out.
- If you only need to replace the stabilizer bar on a VAZ 2110 or its bushings, unscrew the nuts securing the struts to the levers, then knock the struts off the assembly rod with a polymer or wooden hammer.
- The VAZ 2110 stabilizer strut and bushing are visually inspected. In case of deformation of the racks, rupture, wear, loss of elasticity, cracks or loose fit of the bushings to the surface of the rod, all elements are replaced with new parts.
Removing the racks
Before removing the rear pillar, you must completely empty the trunk. Follow these steps:
- There is a small hole in the rear luggage compartment arch with a rubber plug. It contains the attachment nut.
- Remove the rear straps and brackets holding the seat in place. This will greatly facilitate access to the rack mounting points.
- Using a special rack wrench, unscrew the fastening nut.
- Raise the rear of the car using a jack. Place the jack only under the body, not under the rear beam. To release the springs, you must completely unload the car's suspension.
- Unscrew the nuts securing the lower tabs of the support bar to the crossbar.
How to install a new strut when replacing rear struts of a VAZ-2110
Now you need to install the rear pillar on the VAZ-2110. Be sure to install new shock absorbers, springs, bump stops, pads and support washers. Secure the cushions to the springs using electrical tape or wire. All rubber products must be replaced. Next, you should perform the following steps.
- Place the spacer assembly in place and drive the spacers into the cup holes.
- Raise the shock absorber strut using the rear beam. To do this, you can use a long drift or jack.
- Install the lower shock absorber spring into the bracket on the cross member.
- Insert the bolts and tighten the nuts.
- Install the nuts securing the shock absorber rod at the top.
The rear pillars of the VAZ-2110 cost about 1000-1200 rubles (stock version). The kit will cost about 2500 rubles. (pads, boot and springs not included). The operation is the same for the left and right side of the car. After completing the repair, it is necessary to install the wheels, lower the car and check the condition of all threaded connections. It is recommended to tighten the nuts after placing the car on the wheels. The vehicle's suspension system must be under load.
Replacing stabilizer struts on a VAZ 2110
Service center technicians recommend replacing suspension elements in pairs. It is highly undesirable to leave worn parts in their original places without attention, since repair work will soon be repeated.
- We install the car on the inspection hole, install the shoes to avoid any arbitrary rollback, squeeze the hand brake;
- Jack up the side, unscrew the bolts, remove the wheel;
- Using a “17” wrench, we unscrew the rack mount from under the hole, use a metal spacer to knock out the bolt, and knock down the rack;
- Lubricate the bolt with graphite grease, having previously cleaned it of rust and deposits;
- We carry out troubleshooting of adjacent mechanisms, parts, levers. If there is no damage, install a new rack, fix it with a bolt, and tighten the nut.
By analogy, we carry out work on the opposite side.
The best stabilizer struts for VAZ 2110-12
Stabilizer struts or anti-roll bar, or “eggs” in Russian, are suspension consumables. Because of the “Russian roads” it has to be changed quite often. In the survey, we select high-quality stabilizer struts for the VAZ 2110 .
It is clear that each element of a car’s suspension performs its own very specific functions, and at the same time is responsible for the safety of movement in general. And only for one unit the priority task is to directly ensure safety, and only then comfort - this is the stabilizer and its struts.
How to determine that the stabilizer links need to be changed? Knocks in the suspension and possible slight kickback on the steering wheel.
What if the stabilizer link breaks on the road? A strong knock will appear in the suspension, handling will deteriorate and the front of the car will sway. A slight drift is also possible. All this allows you to get to the nearest service station and replace the stabilizer links.
Stabilizer struts for VAZ 2110-2112 cars
Stabilizer struts for front-wheel drive vehicles are a rod, to both ends of which two rubber-to-metal hinges are attached by spot welding at right angles. The stabilizer links connect the stabilizer bar to the lower arm of the front suspension, providing a movable connection that takes the brunt of the load when the car rolls, returning it to its original position. At the same time, the hinges and their joints can be affected by long-term radial, coaxial and thermal loads both in tropical conditions and in the winter frosts of Siberia. In the SEVI-EXPERT stabilizer struts, the rubber is made using innovative USPK technology, which is characterized by high elasticity (52-54% rebound) and hardness (73-75 Shore units).
The main differences between the rubber elements of the SEVI stabilizer struts and similar products from other manufacturers is the ratio of all characteristics, these are:
- Super elasticity and low heat generation when exposed to all types of loads, which ensure a long service life.
- High hardness of rubber elements, which ensures quick response of wheels to steering input. This is achieved through the use of innovative rubber and USPK technology.
Rubber retains its properties at temperatures from +100 to -50°C. The metal structure of the stabilizer struts has increased reliability, which provides (PSI) and is confirmed by test results.
| AvtoVAZ technical requirements | Technical characteristics of SEVI products | Technical characteristics of the following most popular brands |
| Not less than 8000 N (0.8 tons) | Not less than 22400 N (2.24 tons) | 16010-19500 N (1.6-1.95 tons) |
PSI is achieved by strengthening the metal structure and increasing the spot welding contact patch. Welding ensures high adhesion of metal parts (With a load of 2.24 tons, the parts break along the metal, and not along the weld)
This means that under extreme loads the SEVI-EXPERT stabilizer strut may be deformed, but rupture will not occur. When rolling, the car will not lose lateral stability and will return to its original position. The housing of the stabilizer struts is coated with an impact-resistant anti-corrosion powder coating, the same coating is used when painting car wheels.
Replacing suspension arm silent blocks
Sometimes the knocking noise is caused by a worn out silent block of the lever. To replace it with a new one, perform the following steps:
- Jack up the side and remove the front wheel;
- Unscrew the ball joint fixing nut, the key is set to “14”. We knock out the finger from the seat;
- The fastening of one silent block is located vertically, the other horizontally. Unscrew the nuts one by one, head to “19”;
- We remove the lever from under the car;
- We fix it in a vice, press out the rubber bushings one by one;
- We inspect the seat and, if there are no defects, press in new bushings. We reassemble the structure.
After installation is complete, we visit a service station to check the wheel alignment angle. Despite the fact that the tie rod ends have not moved, the wheel angle may not be set correctly initially.
Replacing front stabilizer bushings
Regardless of the car model, the general procedure for replacing bushings remains the same. Only the instruments and some details of the procedure change. Even a novice driver can guess what exactly needs to be done as an additional action.
Front stabilizer bushing
To replace bushings, follow these steps:
- Place the car stationary on a pit or lift.
- Using tools, loosen the bolts of the front wheels.
- Remove the car wheels completely.
- Unscrew the nuts securing the struts to the stabilizer.
- Separate the struts and stabilizer.
- Loosen the rear bolts securing the bracket framing the bushing and unscrew the front ones.
- Using available tools, remove dirt from the area where the new bushings will be installed.
- Using silicone spray or soap solution, thoroughly lubricate the inside of the bushings.
- Install the bushings and perform a series of procedures inverse to those listed to return the car to working condition.
To install new bushings on some car models, it may be necessary to remove the crankcase protection. This will make the replacement process easier.
Replacement of the rear stabilizer bushings is carried out in the same way. The only thing is that removing the front bushings is sometimes more difficult due to the complexity of the car's front design. If the driver manages to change the front bushings, then he can probably cope with replacing the rear bushings.
Often the reason for replacing bushings is that they squeak. This factor, although not critical, still causes inconvenience to many drivers and passengers.
Reasons why you need to change the shock absorber struts of a VAZ 2110
- Knock in the suspension.
- A slight vibration feedback to the steering wheel, which impairs vehicle controllability.
- The appearance of rocking of the front of the car.
- A slight deviation of the wheels from straight-line movement.
If the driver detects such deviations, an urgent replacement of the VAZ 2110 stabilizer strut is needed. The durability of the struts depends on the quality of the road surface and the manufacturer. The price of quality products is slightly higher than that offered by less popular manufacturers of structures.
Tip: There is no need to check the wheel alignment after replacing the shock absorber struts; they do not have any effect on the wheel alignment angles.
Replacing stabilizer parts for a VAZ 2110 car
To work you need to purchase:
The instructions suggest the following procedure:
- The car is installed on a viewing hole or its front part is raised and fixed on supports.
- For safe operation, the car is placed on the handbrake.
Tip: To prevent unexpected movement, the car must be firmly secured in place by placing “shoes” or wheel chocks under the rear wheels.
- Unscrew one nut at a time, securing the car body to the arms of the anti-roll bar struts, on both sides.
Unscrewing the stabilizer fixing nuts
- The spring washers are removed.
- The bolts are removed from both sides.
- Unscrew two nuts holding the stabilizer bars to the body.
- The spring washers are removed from the studs.
- Along with the struts, the brackets and stabilizer bar are pulled out.
- If you only need to replace the stabilizer bar on a VAZ 2110 or its bushings, unscrew the nuts securing the struts to the levers, then knock the struts off the assembly rod with a polymer or wooden hammer.
- The VAZ 2110 stabilizer strut and bushing are visually inspected. In case of deformation of the racks, rupture, wear, loss of elasticity, cracks or loose fit of the bushings to the surface of the rod, all elements are replaced with new parts.
Maintenance and replacement of racks
The frequency of inspection and replacement of shock absorbers is determined by the maintenance instructions. However, the state of domestic roads and neglect of vehicle loading standards lead to accelerated wear of these elements.
Why the suspension rattles and the car is poorly controlled: signs of wear
- The car bounces on uneven surfaces, body vibrations are not damped.
- Severe washboard road vibration.
- On bumps, the movement of the suspension is transmitted to the steering wheel.
- The braking distance is increased with a working brake system.
- When entering a turn at a safe speed, the car drifts or skids (depending on whether the front or rear struts are out of order).
- Characteristic knocking noises in the suspension when the stabilizer struts are in good working order. The part may also rattle.
- Unstable behavior of the car on a straight road.
In addition, the condition of the shock absorbers can be checked visually.
Faulty struts have oil stains.
Maintenance of rear suspension on VAZ 2110
The rear suspension circuit consists of:
The process of replacing elements of the stabilization system is similar to the front ones. After jacking up the rear of the car, remove the wheel, unscrew the upper mount of the stabilizer bar, key to “17”.
- To unscrew the lower mounting nut, slightly pry the suspension arm with a metal pry bar. We clean the lugs, carry out troubleshooting, inspect the levers for integrity and absence of deformation.
- We install new rods and screw the structure.
- The source of the knock is also a sagging spring. To eliminate the defect, dismantle the rear shock absorber assembly. We remove the spring, support bearing, support bowl.
- We install a new spring, troubleshoot the shock absorber, and check the tightness of the cylinder. We reassemble the structure and check the proper operation of the rear shock absorber strut. We replace the rubber bushings of the shock absorber eye.
Do-it-yourself repair of VAZ 2110 suspension elements is completed.
Preliminary diagnostics and subsequent replacement of VAZ-2110 struts
Rear suspension device for VAZ-2110.
Before you start replacing the rear shock absorbers, you need to make sure that the problem is related to them. To do this, there is no need to go to a service station; a visual inspection is sufficient. It is possible that the struts themselves are not damaged and only one spring needs to be replaced.
During the inspection, you should pay attention to the following.
- If the rubber bushings on the lever are very worn, they must first be replaced. It is possible that the service life of the rack itself has not yet expired.
- It may also happen that the spring has collapsed or become compressed. In this case, it can also be replaced separately.
- A characteristic knocking sound in the rear suspension can be caused by loose installation of the strut at the top or bottom.
- The bushings on the lower ends should also be carefully checked.
- Alternatively, the buffer mounted on the stem may be broken.
All connections must be carefully tightened, except as noted above. This is often the cause of a knocking noise in the rear suspension.
We change the parts of the anti-roll bar on a VAZ 2110
1. To carry out work, lift the front of the machine or stand on the inspection hole.
2. Disconnect the exhaust pipe of the muffler from the exhaust manifold and lower it down.
3. Unscrew 1 nut securing the stabilizer struts to the arms, remove the spring washers and remove the bolts on both sides.
4. Unscrew 2 nuts securing the stabilizer bar to the body and remove the spring washers from the studs.
5. Remove the brackets on both sides and remove the stabilizer.
6. To replace the stabilizer struts, remove them and install new ones, lubricated with soapy water.
7. To replace the rubber pads, remove the posts from the bar, and then the pads (the easiest way is to cut them lengthwise).
8. Reinstall the stabilizer in reverse order. The nuts securing the stabilizer struts to the arms are finally tightened when the car is standing on the ground.
The design of the front suspension of the VAZ 2110 is identical to most Lada models and consists of the following elements:
- Oil type shock absorber;
- Spring;
- Support bearing;
- Stabilizer's pole;
- Stretcher;
- Silent blocks, rubber bushings.
During the operation of the car, parts wear out, become unusable, and operating efficiency decreases. The technical equipment needs preventive maintenance and repair.
ATTENTION! A completely simple way to reduce fuel consumption has been found! Don't believe me? An auto mechanic with 15 years of experience also didn’t believe it until he tried it. And now he saves 35,000 rubles a year on gasoline! Read more"
The process of replacing suspension elements yourself is not complicated, and the operating principle is intuitive. We carry out restoration work on our own; there is no need to contact a workshop.
Installation of a 20mm suspension stabilizer on a VAZ 2110, 2111, 2112
Participated in local amateur rally-sprint competitions. For me, this was an excellent opportunity to test my “sporty”, as I considered it, balanced suspension. At that time, Eibach ProKit springs and KYB Exel-G front struts were installed.
0:448
After driving a few laps around the track, I couldn’t help but notice that the car had excessive roll when cornering, and this not only affected comfort, but also handling.
0:760
Save to Album
0:798
1:1303
A little physics
If the roll is excessive, the inner wheel is unloaded, loses contact with the asphalt and begins to slip.
At the same time, the differential comes into operation and the torque is lost on the loaded outer wheel. As a result, under gas, the car understeers and goes “plow” out of the turn. You have to slow down the gas so that the car grabs the surface, levels out and still fits into the turn. Naturally, the speed of cornering, especially sharp ones, drops significantly. 1:2246
The first thought that came to me was “I want a differential lock” so that both wheels can row and turn the car into a turn. But after analyzing the results of the rides, I decided that I needed to start with something else. A stiffer stabilizer will prevent the inner wheel from unloading and will maintain traction. The wheel will not spin, which means that the differential will continue to properly transmit torque to the wheels and the car will spin into the turn without a significant loss of speed and trajectory.
1:960
To make it clearer, I’ll tell you a little about the principle of operation of the anti-roll bar.
.
The operation of the anti-roll bar is based on the redistribution of load between the elastic elements of the suspension. During a lateral roll, the stabilizer is twisted in such a way that the ends of the stabilizer move in different directions (one rises, the other falls). On the loaded side, the stabilizer tries to lift the body, as it were, and on the unloaded side, lower it accordingly. The greater the body roll, the greater the resistance of the stabilizer. This ensures that the vehicle is aligned with the road surface. The thicker the stabilizer bar, the more effectively it will combat roll. 1:2283
The essence of our modification is to install a thicker stabilizer. There are tuned stabilizers of different thicknesses and even different designs on sale. Due to the fact that tuning parts are not so easy to get here, I decided to use the most budget-friendly, proven option and install a stabilizer from Priora.
1:614
The VAZ 2110 uses a stabilizer with a thickness of 18mm, while the stabilizer from Priora has a thickness of 20mm.
1:786
2:1291
The Prioro stabilizer is equipped with bushings and struts from viburnum, respectively, the catalog numbers on them are also Kalinovsky. 1118-2906050 1118-2906040
2:1554
3:2059
I bought a stabilizer from Priora for 800 rubles, brought it to the garage, removed the old one, installed a new one, but it won’t install. So I was convinced from my own experience that the stabilizer from Kalina is NOT SUITABLE for the VAZ 2110
.
As it turned out, buying a stabilizer from Priora is not so easy; sellers are not able to distinguish it from Kalinovsky. 3:554
The stabilizer from Kalina is easy to distinguish from the tenth (or priority one), it is not symmetrical, there is a bend in the area of the right bushing.
3:786
4:1291
Also, the Kalina stabilizer has a sharper and higher bend in the center, because of which it just doesn’t fit into the top ten, resting against the body.
4:1538
5:2043
6:504
Replacing the stabilizer
Replacing the stabilizer is a simple procedure and can be done by anyone who can unscrew a few nuts. To replace the stabilizer, you will need a 13mm wrench and a pair of 17mm wrenches; of course, it is advisable to have a ratchet. Using two 17mm wrenches, unscrew the bolts securing the stabilizer struts to the arms.
6:1066
7:1571
Next, unscrew the 4 nuts securing the stabilizer to the body.
7:1686
8:2191
This should be done with extreme caution, because... there is a possibility of breaking the studs. It is better to use a penetrating lubricant such as wd-40. Remove the brackets securing the stabilizer to the bottom of the car.
8:356
We remove the stabilizer from the space between the bottom of the car and the muffler. Many people wrote that they were able to remove the stabilizer without removing the muffler, but I didn’t succeed. I believe that this is only possible on a non-lowered car. I had to unscrew a couple more bolts securing the pants to the catalyst. After which the stabilizer is easily removed.
8:1014
9:1519
The new stabilizer is installed in the reverse order.
9:1611
10:2116
11:504
12:1009
13:1514
The old stabilizer links are already a little tired, the rubber has lost its shape and stretched.
13:1674
14:2179
15:504
Tired stand
15:537
conclusions
15:555
The effect of installing a “fat” stabilizer is obvious. Let me start with the fact that a rigid stabilizer does not make the suspension stiffer, and there is no loss in comfort. Subjectively, the suspension began to work even quieter and softer. Small irregularities, asphalt joints and rails go better. Roll in corners has been significantly reduced. Now you don’t have to bend to compensate for rolls, turning has become more pleasant.
15:1286
Previously, when skidding, you had to catch your face by releasing the gas, and your ass, as if belatedly, obediently dragged behind. Now the car is turning into a corner. There was a concern that with a stiffer front stabilizer I would get even more understeer. But surprisingly, under the gas there was oversteer, and when released it was closer to neutral. I suppose this is due to the stiffer springs and struts. Now the muzzle is no longer blown away, but the ass tends to sharply align itself with the muzzle. The car behaves more predictably and tends to level out during drifts. Cornering speed has increased noticeably. The rigid stabilizer perfectly complements the rigid struts and springs, and now the suspension works as it should.
15:2596
16:504
https://www.drive2.ru/l/5442239/
16:540 next article:
Replacing rear shock absorber struts with Acomi ES in VAZ 2110, 2111, 2112
Finally got around to installing the Acomi ES rear struts, which we won in a competition a couple of months ago.
Racks
17:1404
Rating 0.00 [0 Vote(s)]
27190
Recommendations for servicing the VAZ 2110 suspension
- Strictly follow the recommendations of the operating manual regarding the timing of technical inspection. For VAZ 2110 it is 15,000 km.
- The average service life of the suspension does not exceed 50 – 60 thousand km. Mandatory maintenance every 15,000 km.
- Buy consumables mainly from certified points of sale and dealerships;
- When purchasing, always ask for quality certificates.
- Check that the catalog numbers correspond to the data in the operating instructions.
- If you do not have personal skills in servicing technical equipment, use the services of certified service stations, where they provide a quality guarantee for the work performed.
A moderate driving style and professional installation of parts will increase the service life of vehicle mechanisms by 7–10%.
Many motorists ask: which racks are better - obviously those whose catalog numbers are indicated in the instruction manual.
Source