Today we will talk about how you can remove the engine from a VAZ 2110 car on your own. The procedure is far from simple, but sometimes without it it is not possible to restore the machine’s functionality.
Upcoming work
It is necessary to remove the engine for various reasons:
- There is a desire or opportunity to install a new, more powerful engine as part of tuning;
- Major intervention in the power unit is required;
- A failed engine is being replaced, etc.
Removing and installing the engine.
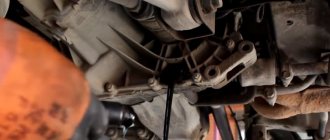
The manufacturer recommends removing the power unit (engine with clutch and gearbox) downwards.
To do this, you need a lift to raise the front of the car higher. In garage conditions, it is easier to remove the engine upwards after first removing the gearbox. The removal and installation process is shown using the example of an engine mod. 2111. Engine mod. 21114 is removed in the same way. The process of removing engines 2112 and 21124 is shown separately using the example of an engine mod. 2112 (see “Removing and installing the engine”).
1. Remove the battery.
3. Remove the engine crankcase protection by unscrewing two screws securing the crankcase protection to the mudguards on both sides.
4. Unscrew the five nuts of the front and two bolts of the rear mounting the crankcase protection to the body, holding the protection with your hand (it is advisable to have an assistant do this).
5. Carefully remove the protection from the vehicle by moving the mudguards to the sides.
6. Drain the oil from the engine crankcase and coolant from the cooling system.
7. Remove the air filter with the intake pipe hose (see “Removing and installing the air filter”).
8. Disconnect the exhaust pipe with the bracket from the engine and lower it down a little so that its flange comes off the exhaust manifold studs (see “Replacing the muffler exhaust pipe”).
9. Turn the throttle drive sector all the way and disconnect the throttle drive rod from it.
10. Remove the two bolts securing the throttle linkage bracket. Move the bracket to the side without disconnecting the rods from it, so that it does not interfere with engine removal.
11. Unscrew the fastening nut and remove the tip of the engine ground wire from the stud.
12. Unscrew the two fastening nuts and remove the tips of the “mass” wires from the studs securing the rear cover of the cylinder head.
13. On vehicles with engines 21114 and 2111 (only with Bosch M 7.9.7 controller), disconnect the wiring harness block from the phase sensor from the rear cover of the cylinder head.
14. Disconnect the block with wires from the coolant temperature sensor by squeezing the plastic clip.
15. Loosen the clamps and disconnect the radiator outlet hose from the thermostat and the radiator inlet hose from the cooling jacket pipe.
16. Disconnect the wire from the coolant temperature gauge sensor.
17. Loosen the clamp and disconnect the heater supply hose from the water cooling jacket pipe.
18. Disconnect block 1 with wires from knock sensor 2 or remove the sensor. To remove the sensor, unscrew the nut that secures it and remove the sensor from the stud, leaving it on the wiring harness.
19. Disconnect the block with wires from the low-voltage terminal of the ignition module by pressing the plastic latch.
20. Disconnect the block with wires from terminal “D” of the generator. Sliding the rubber boot, unscrew the nut and disconnect the wires from the contact bolt (terminal “B+”) of the generator.
21. Disconnect the block with wires from the adsorber by pressing the plastic latch.
22. Disconnect the wire from the low oil pressure warning lamp sensor.
23. Loosen the clamp and disconnect the vacuum booster hose from the receiver fitting.
24. Disconnect the vacuum hose of the electro-pneumatic valve from the receiver fitting.
25. Press the plastic latch and disconnect the block with wires from the idle air control valve installed on the throttle pipe.
26. After loosening the clamp, disconnect the canister purge hose from the throttle pipe fitting.
27. Disconnect the block with wires from the throttle position sensor by pressing the plastic latch.
28. Unscrew the fastening nuts, holding the hoses from twisting with a second wrench, and disconnect the fuel supply hoses 1 and drain 2 from the fuel pipes (the fuel supply hose is marked with paint). Please note the following.
29. . O-rings are installed on the fuel pipes. After disconnecting each hose, remove the O-ring from the tube (we recommend replacing the O-rings regardless of their condition).
30. Disconnect the heater outlet hose from the water pump inlet pipe.
31. Disconnect the injector harness block by pressing the plastic latch.
32. Unfasten or cut the clamp securing the wiring harness to the water pump supply pipe.
33. From the bottom of the car, disconnect the block with wires from oil level sensor 1 in the engine crankcase (next to oil filter 2).
34. Disconnect the block with wires from the crankshaft position sensor.
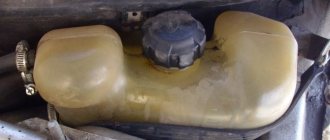
35. Disconnect the two holders with wires from the front camshaft drive belt cover by unscrewing the two bolts securing the cover.
36. Pull the wiring harness out from under the receiver.
37. Pull the wiring harness out from under the thermostat. Double-check that all wires and hoses are disconnected from the engine.
38. Loosen the bolt of the adsorber fastening clamp and, having removed it from the clamp, set the adsorber aside (without disconnecting the hoses from it) so that it does not interfere with engine removal.
39. Unscrew the nut securing the gearbox housing, under which the eye is installed. Remove the eyelet from the stud.
40. Install an eye under the upper ignition module mounting bolt.
41. Hang the engine by hooking the cable onto two eyelets and tightening it with a hoist or crane.
42. If there is no hoist or tap, first remove the washer reservoir (see “Windshield washer reservoir”), then.
43. . Install a suitable board on the front fenders, placing soft pads under its ends so as not to spoil the paintwork.
44. . and tie the engine to it by the eyes using cables, ropes, etc. (they must be taut).
46. Unscrew the two bolts securing the front suspension mount of the power unit.
47. Lift the engine up and place it on strong supports so that the engine does not rest on the flywheel and generator drive pulley.
48. Install the engine in the reverse order of removal. After installation, fill the engine crankcase with oil and coolant into the cooling system.
49. Adjust the throttle actuator and clutch actuator.
50. Start the engine and check for fuel, oil and coolant leaks. Check oil pressure. Listen to the engine, it should run smoothly, without any extraneous noise or knocking. Check the operation of the indicator lamps in the instrument cluster.
Oil change intervals
Experts advise replacing the lubricant in the VAZ 2110 engine every 8 thousand kilometers, and this is especially true for difficult operating conditions, which include:
- constant driving in urban conditions with long traffic jams, when the engine is forced to idle for a long time;
- low ambient temperature, which increases the viscosity of the oil and increases the load on the main parts and components;
- driving in the steppes and on other dusty or sandy roads;
- long idle time of the vehicle, as a result of which condensation forms in the engine - it penetrates the oil and changes the characteristics of the liquid.
You can determine that it is time to change the fluid by the darkening of the lubricant. This happens due to the accumulation of fuel combustion products in it, which adversely affects the operating parameters of the lubricant.
If you are interested in changing gear oil in the top ten, read a separate article on our website.
How to remove a window regulator
Most VAZ 2110-2112 cars have electric windows, so this is the example where everything will be shown. To do this job we will need several tools, a list of which is given below:
- Phillips screwdriver;
- 10 mm socket head;
- extension;
- ratchet handle.
First, check out the detailed video review that I made specifically for this article.
Video on replacing the front door window lifter on a VAZ 2110-2112
Everything is done in literally 10 minutes, and you are unlikely to encounter any particular difficulties during this repair process.
Photo report on the removal and installation of the VAZ 2110 electric window
So, before you do anything, you will first need to remove the front door trim. Then, lowering the glass to the required height (so that the bolts securing it to the rail become accessible), unscrew everything with a 10mm head, as shown in the photo:
And the glass can be raised as high as possible so that it does not create problems when dismantling the window regulator. After this, unscrew all the nuts securing the VAZ 2110 electric window, which are shown in the photographs below:
- Top rack mount
- Bottom mount
- Three lift nuts
Now you can stick your hand into the hole in the door and disconnect the plug with wires from the motor:
Now you need to move the rail together with the mechanism (motor) all the way back, that is, to the back of the door. The result of the work done is clearly shown below:
And then we carefully try to remove the entire structure through the upper hole in the door.
When installing, follow the reverse sequence.
In terms of cost, I can only give an approximate price, and it is about 500 rubles for the motor and about another hundred for the rack and cable.
- Replacement of outer and inner CV joints
- Removing and replacing the instrument panel
- Replacing the heater damper gearmotor
- How to tighten the steering rack
- Replacing caliper guide pins
2 comments on “How to remove a window regulator”
Good material. It’s a pity that I didn’t say so from the very beginning. And yet, after watching the video, I decided not to go there. Thanks to the author of the video.
I had to change the electric window lifter motor on a VAZ 2112, right door. Having seen that the window lifter was on a cable, I tried and succeeded in the following: Without unscrewing the window lifter mechanism itself, I unscrewed the 3 nuts securing the electric motor. Then, moving the electric motor aside so that the pins would come out of the door body, I removed the lower pin along with the plastic base, pulling it down along the motor body. After that, I bent the electric motor to the right, since the cable allows this, and unscrewed the remaining 2 studs by hand. And having pulled the electric motor from the gear on the cables, he took out the electric motor. I reassembled it in reverse order. It may not be very convenient, but there is no need to unscrew and lower the glass too much. It will lower slightly when the studs are aligned when installing the electric motor into the gear.
How much oil do you need?
Before changing the oil, many car owners have a question: how much oil to pour into the VAZ 2110 engine? Opinions differ on this issue, since not all the oil is drained from the system, and some motorists fill the lubricant to the maximum mark, while others fill it a little lower. In addition, the VAZ 2110 is equipped with various engines - with 8 and 16 valves. Despite all the factors, on average you will need a volume of engine oil in a VAZ 2110 from 2.2 to 3.5 liters to fill it. Therefore, you are better off buying a 4 liter canister and that should be enough.
How to remove the engine on a VAZ 2110 (video)
Today we will talk about how you can remove the engine from a VAZ 2110 car on your own. The procedure is far from simple, but sometimes without it it is not possible to restore the machine’s functionality.
Upcoming work
It is necessary to remove the engine for various reasons:
- There is a desire or opportunity to install a new, more powerful engine as part of tuning;
- Major intervention in the power unit is required;
- A failed engine is being replaced, etc.
Knocks in the engine
It is not uncommon for even ordinary knocking sounds in the engine to become the cause of its complete failure. Therefore, be careful if you suddenly hear extraneous knocking noises coming from under the hood.
A knock in the engine almost always indicates serious problems, so it is not recommended to get to the service center on your own. Call a tow truck or cling to someone with a rope to get to a service station or garage to determine the cause of the sounds.
The knocking noise can be caused by various components of the 8-valve and 16-valve engines installed on the VAZ 2110.
Source of knocking
What you need to know
This is a dangerous type of knocking. You need to immediately stop the engine and tow it to the service station or garage. The knock is low-pitched and comes from the bottom of the crankcase. As the load increases or the speed increases, the noise increases; the knocking sound is often accompanied by a drop in oil pressure.
No less dangerous type of knock. You need to stop quickly. Get to the garage or car service only in tow. This sound is ringing, metallic, medium in tone, rhythmic. As the load on the engine increases, the knocking noise increases, but disappears completely when the spark plugs are turned off.
A less dangerous knocking option, in which you can get to the service center under your own power, but with minimal engine load. The sound is rhythmic, high-precision, and has a strong metallic tint. It comes from the engine in any operating mode, and intensifies with increasing loads. When I turn off the spark plugs, the sound goes away completely.
Worn pistons and cylinders
The knocking does not pose a danger to the engine. If the engine load is light, you can get to the service center or garage under your own power. The sound is similar to the clinking of clay dishes, and is especially audible on a cold engine. When the engine warms up the sound disappears
This is not a dangerous type of knocking in the engine, allowing you to get to the garage or car service station under your own power. Against the background of a dull noise, a metallic knock is heard, which is best heard at medium and low crankshaft speeds from the cylinder head above the valves. This type of knocking noise occurs due to a breakdown of the hydraulic compensators, which should be replaced to eliminate the problem.
Potentially dangerous to the engine if ignored and nothing is done. Sometimes they lead to the need for major engine repairs or replacement. If you do not delay repairs, knocking can be eliminated by simply replacing the knock sensor. Without overloading the engine, you can get to the garage or service station under your own power. The sound is ringing, metallic, and comes from the engine mainly when accelerating. The cause of knocking is a malfunction of the knock sensor, low-grade fuel and engine overload due to early upshift. It is necessary to replace the sensor and add additives to the fuel to remove carbon deposits inside the combustion chamber and on the valves
Cost of model 21114 with a volume of 1.6 liters
I think that there is no need to explain and talk in detail about the fact that not only 1.5 liter engines, but also 1.6 liters were installed on the VAZ 2110. Due to the increase in displacement, engine power also became slightly higher - up to 81.6 hp.
Also, the engine characteristics were affected by the increased piston stroke in the cylinder to 76.5 mm compared to 71 mm. Although, with all the improvements, this motor has a certain design feature - a bubbling sound during operation, which is due to the fact that the piston is not fully compatible with the cylinder in size.
The price of this unit is also 49,000 rubles.
Drain the old fluid
Before changing the lubricant, warm up the engine to operating temperature, and also find a pit or overpass for work. If possible, use a lift - it will be most convenient.
To drain the oil, proceed as follows:
- We unscrew the filler plug, preventing the formation of a vacuum in the engine and better drainage of oil.
- Place the prepared container under the drain hole.
- Unscrew the drain plug using a wrench.
- Drain the old motor fluid.
- We work carefully so as not to burn our hands, as the oil is hot. If the plug falls into the container along with the used oil, don't worry - you can get it out later.
- The oil will drain for about 10 minutes - be patient and wait until the process is complete.