Print this article Font size 16
If the fuel pump on a VAZ 2109 malfunctions, the fuel supply to the carburetor is completely or partially stopped. Therefore, it is not possible to start the engine cold or hot. It will start at first, but then immediately die. Plus, instability at idle is often observed.
Before changing the fuel pump, it is recommended to first check the condition of the device. It is not uncommon for a breakdown to be corrected with minor repairs.
Malfunctions of the pump with carburetor
Repairing the VAZ 2109 carburetor fuel pump should also begin with diagnostics. But in this regard, there is a significant difference from the injection version of the car. It lies in the fact that the fuel pump, in this case, is mechanical. The principle of operation, and therefore the repair, is different. Diagnosis involves the following basic steps when checked:
- general condition of the fuel pump;
- intake and exhaust valves;
- tightness;
- filter for clogging or damage;
- pump diaphragm;
- pusher
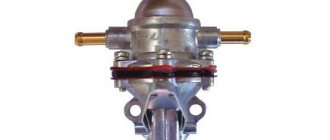
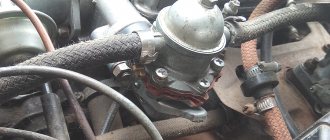
VAZ mechanical fuel pumps come in two types: DAAZ and Pekar. The principle of operation is similar, there are slight differences in design. The main parts of all mechanical pumps are: inlet and outlet valves, fittings, pusher, diaphragm and rod.
To check the inlet valve, you need to disconnect the hose from the suction fitting. Close the fitting with your finger and pump up the pump manually. If the finger is attracted to the valve, everything is in order - this part is serviceable; if not, the valve must be replaced. The outlet valve is checked by unscrewing the discharge fitting. By placing your finger in the same way and pumping up the lever, you should feel pressure.
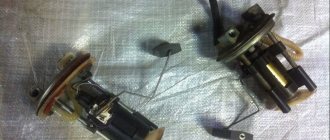
It happens that the filter mesh is clogged. You need to take out the filter, clean it, wash it and blow it with compressed air. In case of obvious deformation or damage, the fuel pump mesh is replaced. If the fuel pump leaks or gets hot, the sealing diaphragms are most likely damaged. To replace them, remove the pump cover and unscrew the nut that holds the rod. Next we remove the diaphragms. In the case of the DAAZ pump there are 3 of them, while Pekar has one.
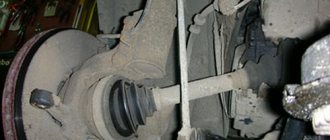
If the pusher is damaged, you need to unfasten the pump, and leave the heat-insulating insert, gasket and the pusher itself on the engine. Rotate the crankshaft to extend the pusher as much as possible.
We measure the size of the protrusion above the topmost gasket (acceptable value is 0.8 - 1.3 mm). If this value does not correspond, you can try to adjust the gap using thinner or thicker shims. If that doesn't work, change the pusher.
Operating principle of a mechanical fuel pump
The fuel pump is driven by the camshaft cam, which moves the pusher in a horizontal direction, causing it to perform reciprocating movements. The pusher, in turn, acts on the mechanical pumping lever, and it already raises and lowers the membrane rod.
Thus, a certain pressure is created inside the fuel pump, which is maintained by the valves of the device cover. One of them lets fuel in without letting it back in, and the second pushes it into the fuel line going to the carburetor.
As you can see, the design is very simple, therefore, to determine the reason that the fuel pump does not pump, it is enough to disassemble it and check the condition of the main elements.
Since the housing does not affect the operation of the fuel pump in any way, unless it is damaged, of course, we will start with the pusher. This element is made of steel and cannot simply break. But wear and tear is welcome, especially if it is not original, but purchased as a separate spare part. As soon as its length decreases by a few millimeters, the fuel pump does not pump fuel.
Or rather, it pumps, but the amplitude of movement of the diaphragm is significantly reduced. This results in low fuel pressure in the system, and, as a result, interruptions in engine operation. The standard pusher length for DAAZ pumps is 84 mm. Measure its length and, if necessary, replace the worn part.
The most common malfunction of the diaphragm is its rupture. It also happens that it becomes deformed. Due to this damage, the diaphragm begins to leak fuel through itself, which also causes a drop in pressure in the system.
Such a malfunction can only be detected by disassembling the fuel supply device. If the diaphragm is to blame for the fuel pump not pumping, you will see it immediately. This problem is solved by replacing it.
Replacing the fuel pump on a VAZ 2108/2109
The procedure for replacing a faulty fuel pump on a VAZ “eight” and “nine” is relatively simple. The main thing is to be careful so that when installing and dismantling you do not accidentally catch parts of other elements of the car.
Preparing tools
In order for the work to be completed quickly and not have to be distracted by searching for this or that tool, it is necessary to prepare everything in advance. So, to remove a faulty fuel pump and install a new one, you will need the following set of tools:
socket wrench (or head) size 7 mm;
open-end wrench 17.
It is recommended to carry out all stages of operations with gloves so as not to stain or injure the skin on your hands.
Step-by-step instructions on how to remove a faulty fuel pump
The first stage of work is to dismantle the old device, which can be divided into several steps:
1. Turn off the ignition.
2. Fold down the rear seat in the cabin.
3. There is a small hatch under the foot carpet in the cabin; it must be opened by removing the fastening screws with a Phillips screwdriver.
4. Raise the hatch cover.
5. A plug will appear in your field of view; you will need to bend the latches on it and disconnect its parts.
6. Next, you need to unscrew the fuel pipes with a 17 wrench.
7. The tubes must be diverted in different directions so that they do not interfere with further work.
8. There is a pressure plate under the hatch - you will need to unscrew all the nuts on it to open it.
9. The fuel pump is located under the plate; to get it out you will need to pry off the rubber seal with a screwdriver.
10. As soon as you manage to lift the device a little, you will need to tilt it so as not to touch the body of the fuel level sensor.
Step-by-step instructions on how to install a new fuel pump
Further actions involve the reverse order:
Carefully insert the new device into the hole, not forgetting to change the O-ring.
Retighten all nuts on the pressure plate.
Connect the fuel pipes to each other.
Connect the two parts of the plug.
Close the cavity with the hatch cover and screw the hatch.
Place the carpet in its original place.
Video instruction: how to replace the fuel pump yourself
Thus, you can diagnose and repair the fuel pump in VAZ 2108/2109 cars yourself, without involving service station specialists. The procedure for determining the performance and replacing a faulty device is quite simple, so performing these procedures yourself will not cause difficulties even for inexperienced drivers.
How to remove the fuel pump
The VAZ 2109 fuel pump is located under the rear seat. The injector implies its installation directly in the tank. The thing is that the pump is a submersible type. In the same unit there is a float-type fuel level sensor. It works due to the fact that the float moves the slider using variable resistance. At the same time, the current in the power circuit changes. The amount of gasoline remaining in the tank is determined by the magnitude of the change. To remove the pump you will need to use pliers, screwdrivers and an 8mm wrench.
It is quite possible that the reason that fuel is not supplied is a non-working VAZ 2109 fuel pump relay. The injector contains it, as well as a fuse, which could easily burn out. Before starting work, thoroughly clean the entire cover so that after removal no dust gets inside the tank. Then, using a screwdriver, loosen the clamps that secure the hoses. Remove them; if you can’t do it with your hands, try gently squeezing them with pliers and twisting them. After this, use a size 8 wrench to unscrew all the nuts that secure the lid to the tank body. Please note that there are washers there. Don't lose them. That's all, now the pump can be easily removed for replacement or repair.
Checking the general condition of the fuel pump
First of all, let’s check whether the supply system of your VAZ 2109 is working at all. To do this, you need to take the following steps:
- Remove the pump fuel hose from the source or discharge fitting;
- Manually press the fuel pump lever several times;
- If the pump is operational, a strong stream of fuel will immediately flow through the fitting;
- If there is no jet or it is very weak, it will be necessary to carry out other checks.
Intake Valve Check
- Disconnect the hose from the suction fitting so that both hoses are eventually removed, each from its own fitting.
- Simply plug the suction fitting with your finger, then pull the lever several times to manually pump fuel. If everything works fine, your finger will begin to be sucked into the fitting. This effect indicates that the pump is working properly. Therefore, we look for the problem in the tank or lines.
- If there is no suction, you will have to disassemble the device to replace the inlet valve. Its tightness is most likely broken.
Leak test
To check the tightness of the intake valve, you must:
- Place your finger on the hole from the injection fitting and pump up the fuel several times using manual pumping;
- In this case, a stream of air should come out of the hole, significantly repelling the pressed finger;
- If the stream turns out to be weak or does not exist, the fuel pump simply does not pump.
In this situation, there are two options - look for the problem inside the fuel pump device, disassembling the pump, or change the entire unit.
The filter is clogged or damaged
To fix the situation, you need:
- Remove the cover from the fuel pump, remove the filter, clean and rinse it with clean fuel. Then be sure to blow out with compressed air;
- Check the condition of the filter. If it is deformed, no repair will help. You will have to change the filter device;
- If you have a Pekar pump or a similar one, the filter can be removed by unscrewing the suction fitting from the cover. That is, it is not necessary to remove the cover at all.
Pump diaphragm failure
You need to do the following for your fuel pump:
- Remove the upper part of the fuel pump housing and remove the diaphragm assembly from there;
- Unscrew the nut on the rod, and then pull out the 3 diaphragms;
- Replace faulty elements with new ones. They are available in any repair kit for the VAZ 2109 fuel pump;
- Reassemble the assembly in reverse order;
- If you have a Pekar pump, there is only one diaphragm. It can be removed by removing the cover;
- To disconnect the diaphragm assembly, rotate it 90 degrees.
Be sure to simultaneously check the condition of the spring located under the diaphragm. To do this, you need to remove the upper part of the pump housing, remove the diaphragm rod and look at the current state of the spring. If it is broken, deformed or lacks elasticity, replace the element.
Node elements
Intake and exhaust valve malfunctions
If both valves raise doubts about their functionality, certain measures will have to be taken.
- Remove the cap from the fuel pump and remove the strainer.
- Visually assess the condition of the pump cavity and inlet valve.
- With the top of the pump body removed, you can take a look at the outlet valve.
- If both valves are not installed tightly enough, they are not pressed well or have become motionless, replace the entire pump completely.
- If you find traces of clogged valves, remove them and blow out the housing with compressed air.
In the case of the Pekar pump, two valves are located in the cover, so to assess their condition, simply remove the cover from the fuel pump housing.
Damage to the pusher
It is not uncommon for a fuel pump to fail to operate due to damage to the pusher. We have prepared separate instructions for this case.
- Remove the pump from the studs by unscrewing the fastening nuts. The thermal insulation insert, pusher and gaskets remain on the motor.
- Rotate the crankshaft to extend the pushrod as far as possible.
- Measure the distance that the pusher protrudes relative to the top gasket. Normally, the figure is 0.8-1.3 millimeters.
- If the protrusion is smaller or larger, try adjusting it using thicker or thinner shims.
- Between the thermal insulation insert and the pump there is an external gasket with the greatest thickness. It is this that needs to be changed when adjusting the protrusion.
- New gaskets are available in repair kits, although many make their own. To do this you will need a piece of paronite.
DIY fuel pump repair
If the dynamics of the car have sharply decreased, “dips” and jerks when driving begin to be observed, and after parking the car does not start. You may have to resort to repairing the fuel pump. Mechanical fuel pumps are becoming less and less common, as they are not efficient enough to meet the needs of injection and diesel cars.
Electric fuel pumps can be submersible (located in the gas tank) or booster. Their common function is one - to ensure the supply of fuel to the intake system.
The fuel pumps of older generation cars are mechanical. Over time, their gaskets dry out and must be replaced. To replace, you only need a screwdriver and a repair kit. We remove the fuel pump, wash it with gasoline (so that dirt does not get inside), unscrew it and take out all the parts, remembering the order of their location. We replace old parts with new ones from the repair kit. We assemble the fuel pump using new gaskets. We carry out the assembly by tightening the bolts crosswise for uniform clamping force. It happens that the cause is a broken fuel pump valve. It can be pressed out and replaced. But the part is extremely rarely found on sale as a spare part, and replacement is quite complicated, so it is more advisable to buy a new fuel pump. Also, the reason for poor operation of the fuel pump at high engine speeds can be a weakened diaphragm spring. Its normal length is 47mm. If, when measured, the length differs from the standard, then the spring must be replaced.
There can be several reasons for the breakdown of an electric fuel pump: a breakdown of the motor, rupture of gasoline pipes in the fuel pump body, or a dirty mesh (internal filter). We remove and disassemble the fuel pump. The internal filter, corrugated tubes and fuel pump motor can be found in car dealerships.
Having disassembled the fuel pump, we look at the condition of the conductive plates of the rotor. If you have experience and a soldering iron, you can replace worn plates with new, homemade ones. We grind new plates to perfect condition.
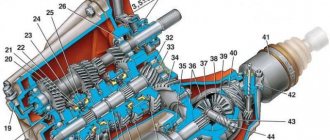
Do-it-yourself fuel pump repair diagram:
When replacing tubes, everything is simpler: a new gasoline tube must be heated in boiling water until the rubber softens and put in place of the old one.
The motor with the mesh can be changed without any problems - we install new parts in place of the old ones, and assemble everything. As a rule, after such manipulations the fuel pump works like new.
https://remontysvoimirukami.ru
Models of fuel pumps for VAZ 2114/2115 cars
VAZ 2114/2115 cars are equipped with 1.5 cm3 and 1.6 cm3 gasoline engines with a distributed injection system. A submersible electric fuel pump is used to supply fuel. It is part of the fuel module installed at the top of the gas tank (under the rear seat). In addition to the pump, the module includes a fuel accumulator (cup), a coarse filter and a fuel level sensor with a float.
To supply fuel in VAZ 2114/2115 cars, a submersible electric fuel pump is used
The VAZ 2114/2115 fuel pump is a conventional DC electric motor in a sealed housing with a one-way valve at the outlet. An impeller of a special shape is located on the electric motor shaft. Its rotation ensures the fuel supply.
The fuel module includes a fuel pump, a fuel accumulator, a coarse filter and a fuel level sensor
The fuel pump is powered from the vehicle's on-board network. The electrical circuit of the pump, protected by a fuse, is closed using a separate relay.
Electric fuel pumps for VAZ cars are produced by both domestic (Utes, SAAZ, Pekar) and foreign companies. The latest modifications of the VAZ 2114/2115 are equipped with BOSH pumps, which are distinguished by their high reliability, long service life and relatively low price.
Design of the electric fuel pump VAZ 2114/2115
Catalog numbers of standard fuel pumps for VAZ 2114/2115:
- 2112–1139009–12 — for engines with a volume of 1.5 cm3;
- 2112–1139009–01 — for engines with a volume of 1.6 cm3;
- 580453453 (BOSH) - for engines with a volume of 1.5 and 1.6 cm3.
These models differ in operating pressure. The former are capable of creating a pressure of 2.8–3.2 kPa in the fuel system, the latter - 3.7–3.9 kPa. BOSH fuel pumps are rated at 3.5 kPa.
Checking the pump on the injection "nine"
The VAZ 2109 with an injection engine has an electric pump. It is powered by receiving voltage (12 V) from the battery. Its location is directly in the Lada gas tank. The mission of the electric pump is to deliver gasoline to the fuel rail under high pressure. Next, the fuel from the ramp enters the nozzles, which inject it into the combustion chamber.
If the injector on a VAZ 2109 does not pump the fuel pump, check the following elements:
- fuel pump relay VAZ 2109;
- fuse;
- voltage to the pump;
- wires from the mounting block to the pump;
- pressure in the fuel rail.
A working fuel pump should start working when the engine starts. The sound of its operation should be heard under the rear seat. We begin the first stage of verification.
Possible situations and your actions
We take a voltage indicator and check the serviceability of the relay and fuse, which are located in the mounting block.
If the electrical circuit connection diagram is in order, you need to check the voltage supply directly to the pump. To do this, we dismantle the rear seat of the Lada 2109 car. Under it there is the top cover of the pump and the connected wire connector from the mounting block, and the fuel line hose is also supplied here. We disconnect the contacts and unscrew the bolts on the cover.
Now you have direct access to the pump. We remove the fuel pump from the gas tank.
We measure the voltage at the fuel pump using a multimeter (tester) or a 12-volt light bulb. If the device shows that voltage is supplied to the VAZ 2109 fuel pump, the problem is not electrical. This means that the fuel system should be checked. Well, if there is no voltage, you don’t have to worry about the pump malfunctioning. Just check the integrity of the wire leading from the mounting block to the pump for damage.
On a fuel-injected "nine", the fuel level in the gas tank should be maintained at least 10 liters. This is done to ensure that the fuel pump does not suck in air under any circumstances. We check the serviceability of the pump by measuring the pressure in the fuel rail.
We connect the device to a special hole in the ramp. If the voltage is normal and the pressure gauge shows no pressure, the problem may be in the fuel filter. We check its integrity and throughput. If the filter is working properly, we check the fuel line leading from the gas tank to the ramp.
If all these parts are in good working order, we conclude that the fuel pump itself has failed. Having replaced the pump with a new one, we connect it and try to start the car. If the car starts, the problem really was in the pump. If the engine fails to start, the fuel system should be checked more carefully.
In the absence of a pressure gauge, the performance of the gasoline pump is checked by the amount of gasoline pumped per unit of time.
This check can be performed by connecting a hose to the ramp and lowering it into a container. We wait and let the fuel flow into the container for one minute. Then we check the volume of fuel in the container. It should be from 0.5 to 1 liter.
Fuel pump VAZ 2109 (carburetor)
If the VAZ 2109 carburetor fuel pump does not work correctly, then this affects such an important process as the supply of fuel to the carburetor. Failures lead to a lack of fuel in this part of the car.
Now we will talk about such a procedure as replacing a VAZ 2109 fuel pump. But, before starting the process itself, let’s do primary diagnostics. To find out the reasons, perform the following steps:
• First, remove the hose from the discharge pipe. Using the pumping lever, you need to check the fuel supply. If gasoline does not enter the carburetor, the hose is removed from the suction pipe. Now you can find out if there is a vacuum. If it is not there, the fuel pump should be disassembled to check all parts.
On average, the price for a VAZ 2109 carburetor gas pump ranges from five hundred to seven hundred and fifty rubles. In the first case, we get the native DAAZ. For a large sum you can buy imported Pekar. The second, according to many drivers, is more durable. For 450-500 you can buy an Italian equivalent. A little simpler than the French, but not bad. Some drivers install an electric fuel pump on a VAZ 2109 carburetor. Others prefer to install a carburetor with automatic suction on a VAZ 2109.
The procedure for disassembling the fuel pump and replacing it
- first of all you need to remove the air filter;
- After this, the hose through which gasoline is supplied to the fuel pump is removed. To do this, loosen the clamp;
- the hose supplying gasoline to the carburetor is also removed in the same way;
- unscrew the nuts securing the fuel pump.
We remove it as carefully as possible, otherwise you can simply ruin the gaskets. We examine all parts for cracks and chips. We check the valves (intake and discharge) for leaks. We also check the pipes - they should not rotate in their sockets.
We make sure that the diaphragms are in order - without damage or peeling fragments. Now we wash the parts with gasoline and blow them with air under pressure.
When you have checked all the spare parts, you can begin to replace those that have already worn out; the pump gaskets must be changed. Believe me, this will not make things worse for you or your car. During installation, Litol-24 lubricant is used.
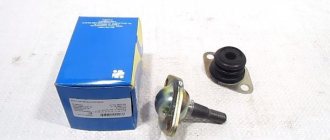
If the damage is serious enough, we replace the VAZ 2109 fuel pump (carburetor) completely
After you have checked all this and replaced the necessary parts, the VAZ 2109 fuel pump (carburetor) can be put back in place. During the process, the fuel supply should be adjusted. This is done using gaskets. You need to find out how far the pushrod protrudes from the gasket surface. The correct distance should not exceed 1.3 mm. If the distance is greater, the fuel pressure will be higher than necessary.
This, in turn, causes the shut-off valve to malfunction. When the distance is less than 0.8 mm, in situations where the car is driving faster or is experiencing increased loads, the amount of fuel entering the carburetor is insufficient.
When installing the pump, the steps are reverse to those for removal. Note that there is an arrow on the fuel pump body that should be directed to where the gasoline flows - to the carburetor.
The last thing you will need to do for the VAZ 2109 fuel pump (carburetor):
When the pumping lever is released, you need to tighten the screws on the fuel pump housing cover. If the car does not start or stalls, also check the accelerator pump of the VAZ 2109 carburetor.
Removing and disassembling the fuel pump
The fuel supply mechanism in the Priora is located in the gas tank, so to get it you need to:
- Remove the rear passenger seat. The latches holding it in place are on the sides.
- There is a hatch in the bottom of the car, secured with two self-tapping screws. Having removed it, we gain access to the fuel pump, which is fixed in the fuel tank with a flat metal ring.
- Remove the ring, which is held in place by nuts screwed onto eight threaded pins spaced evenly around the hole in the gas tank.
- We remove the two fuel hoses and remove the retaining ring.
- We disconnect the electrical connector through which power is supplied to the pump located in the plastic casing.
- We take out the housing; this must be done carefully so as not to damage the float, thanks to which the filling level of the gasoline tank is shown on the instrument panel.
- The next step is to pull out the pump itself, bend the four latches located on the body, and take out the fuel pump, at the bottom of which there is a coarse mesh.
As a rule, the entire mesh looks quite dirty, and its central part is literally clogged with various debris. To remove the old mesh, you just need to grab it on all sides with your fingers and pull it towards you, or pry it with a flat-head screwdriver.
It comes out of its seat relatively easily. After this we install a new mesh. A mesh for the Lada Priora fuel pump can be bought in a specialized store or on the market. It costs about 50 rubles.
There is usually also a lot of debris at the bottom of the plastic cup in which the pump was located. It needs to be rinsed well and wiped with a dry cloth.
Then everything is put together in reverse order. After replacing the mesh, the engine picks up speed smoothly and runs stably. While driving on the highway, the car no longer jerks and accelerates normally.
Most of the units and components in cars of the Lada Samara model line can be changed with your own hands. To do this, just stock up on the necessary tools and purchase a new part. This material describes in detail how to replace a VAZ 2110 fuel pump and its filter element - a mesh. The work is quite simple, since installing a new product does not require an inspection hole or a lift. After studying this material, the reader will learn how to change the fuel pump, when it needs to be done and how to determine that the unit has failed. To make sure that the device has failed, you need to measure its pressure - the article contains several ways to perform this action.
Pump failure - how to determine the cause?
Like any part, sooner or later the fuel pump shows all signs of malfunction, or even fails altogether. It's best to replace or repair your pump before it breaks down completely. Most often the problem occurs due to the fuel pump relay. The relay is based on a fuse, which is what usually breaks.
Lift the back seat and find the chip under the trim; it is where the relay with the fuse is located. Replace the fuse with a new one and your pump should work. However, do not forget that the cause of the malfunction may be the reduced performance of your battery. This problem occurs in a VAZ 2109/2110 car with an electric pump. When a car engine is running, regardless of whether it has an injector or a carburetor, changes are always heard if there is a problem with the pump. The engine may even stall when idling.
In cars with a mechanical pump, the rod most often fails. Whether to make a partial repair or replace a mechanical fuel pump depends on the characteristics of the breakdown. As practice shows, it is enough to perform partial repairs on a VAZ 2109 car.
Fuel quality and fuel pump life
ECU VAZ 21099 injector
The practice of using electric fuel pumps has shown that their service life directly depends on the quality of the fuel that is poured into the car tank. If you drive on domestic fuel, then do not expect the device to last more than 3 years.
Of course, if the latter breaks down, the best thing to do is replace it. However, their cost can reach from 50 USD. and higher. Therefore, it would be advisable to carry out partial repairs yourself. Why partial, read on.
The easiest way to repair is to assemble one worker from 2 - 3 units lying around in the garage, replacing only the gate holder. But, unfortunately, not everyone has spare fuel pumps.
Checking the electrical circuit
At the beginning of the diagnosis, you should check the electrical circuit of the fuel pump. To do this you will need:
- car tester (multimeter);
- crosshead screwdriver;
- two pieces of wire about 2 m long.
Checking the electrical circuit is carried out in the following order:
- Turn on the ignition without starting the engine. When the key is in the first position, a click should be heard, characteristic of turning on the relay, followed by a slight whirring of the pump electric motor. If there is no click, the relay is faulty or is not receiving power. If there is a click, but no buzzing, the wiring coming from the relay or the pump motor itself is faulty.
- Under the glove compartment, find an additional mounting block consisting of three relays and three fuses. The pump relay is located in the middle, and the fuse is located to the left of it. Remove the fuse from its socket, test it with a multimeter, and if the result is negative, replace it. When replacing the fuse, please note that it is rated for a maximum of 15 A.
The relay and fuse for the fuel pump on the VAZ 2114/2115 are located in the mounting block under the glove compartment.
- Set your multimeter to voltmeter mode. Connect one probe of the device to the relay terminal to which the pink wire fits, and the second to the car body. Turn on the ignition. The device should show the on-board network voltage in the range of 11.7–12.4 V. If there is no voltage, the problem may be a broken wiring or a malfunction of the ignition contact group. In this case, it is better to contact an auto electrician. If power is supplied, check that the relay is working. With the ignition on, use a screwdriver or a piece of wire to close the contacts to which the pink and gray wires go. This closes the circuit bypassing the relay. If the fuel pump works, replace the relay.
- Be sure to check the connection of the pump's negative wire to ground. Often it is the lack of “ground” that causes interruptions in the operation of the fuel pump. Remove the plastic trim from the center console near the parking brake handle. Under it there is a “negative” wire of the pump, screwed to the body with a self-tapping screw. Unscrew it, clean the contacts, screw it back and repeat the test.
The ground wires of the fuel pump are attached to the body with a self-tapping screw
Then check the fuel module. Remove the rear seat, peel back the carpet and sound insulation. Unscrew the two screws securing the gas tank flap and disconnect the electrical connector on the fuel module cover. Using two wires, supply power to the pump directly from the battery. If the pump works, the wiring is faulty; if it doesn’t work, the pump itself is faulty.
Tips for motorists
VAZ 2109 21099 2108
VAZ-2109 passenger cars of the last years of production had injection engines, so on these “nines” an electric fuel pump was installed in the fuel tank. And on a small part of the VAZ-2109 with a carburetor engine still in use today, mechanical fuel pumps were installed.
Failure to operate the fuel pump on VAZ-2109i injection engines is determined quite simply, since when the ignition key is turned to the “ignition on” position, the driver simply will not hear the characteristic noise that the running electric motor of the fuel pump makes. Typically, drivers of “nines” begin their search for the cause of a fuel pump failure by checking the condition of the fuse that protects this electrical circuit.
It is located under the front panel shelf, which is located below the glove compartment. When you unscrew the fastening screws, the block of three relays and three fuses on the wires will move lower, so it will be more convenient to work with it. You will need to check the rightmost fuse and the condition of its contacts. If a blown fuse is detected, it will have to be replaced with a new one. And also find the reason why he burned out.
If the fuse is intact and the contacts are not oxidized, then the next step in troubleshooting is to check the functionality of the fuel pump relay. It is located in the same block as the fuse and is located on the far right. Drivers usually check it by replacing it with a known-good relay. If after such a replacement the fuel pump starts working, then you will have to purchase and install a new relay.
But when the fuel pump still continues to be “silent”, then you will need two wires four meters long. They are needed to check the condition of the fuel pump itself by connecting it to power directly from the battery. To do this you will need to: lift the rear seat cushion, remove the hatch cover, disconnect the plug block and connect the wires from the battery to the fuel pump terminals. There are three terminals in the block: one for ground, the negative one from the battery is connected to it, two more positive ones, for the fuel pump and the fuel level indicator in the tank.
If the fuel pump, when connected directly, works, then you will have to ring the wires going from it to the fuel pump relay, and if it does not work, then either replace it with a new one, or you will have to disassemble it and look for a fault inside the fuel pump.
On “nines” with a mechanical fuel pump, the most common malfunction is wear of the fuel pump diaphragm, as a result of which gasoline will leak through the drainage hole in the housing when it operates. The second reason for the failure of such a fuel pump is wear of the pusher, which transmits force from the camshaft cam to the fuel pump drive lever.
Types of fuel pumps - characteristics and design
According to the type of operation, there are two types of pumps - electric, which is used in injection and diesel cars with a distributed fuel injection system, and mechanical, which is used only in carburetor cars. In the VAZ 2109 and VAZ 2110 cars of a later production (after 2006), a replacement took place - the carburetor was replaced with a modern injector, and accordingly, an electric fuel pump was installed. Models manufactured before 2006 always have a mechanical carburetor and pump.
The VAZ 2109 and VAZ 2110 fuel pump (injector) of the electric type is located in the fuel tank of the car - this location is considered the most convenient for the operation of the device, but not very convenient for repair or cleaning. With this arrangement, the fuel system does not require an additional suction line, which is found in a mechanical type pump. The location of the pump in the fuel tank allows it to cool much faster.
There is also an internal fuel filter in the tank near the pump. The electric fuel pump consists of an internal strainer, a fuel flow float, 2 valves and a fuel intake mechanism. The characteristics of a pump of this type make it possible to maintain a pressure of up to 4 atmospheres, which is more than enough for normal operation of the car.
For a VAZ 2109 car (injector), a normal operating pressure is considered to be 2.4–3.3 atm; for a VAZ 2110 car, the working pressure should reach 3.6 atm.
An electric centrifugal pump is installed in the VAZ 2109/2110 tank (injector). One of the main components in the operation of the pump is the relay. In these car models, the relay is activated as a result of pulse signals that come from the central control unit, and only after that the pump is activated.
The mechanical type of pump is used only in models on which a carburetor is installed; it is not suitable for injection ones, and it cannot be used to operate on a diesel engine. The pump is located under the hood of the car, directly on its engine. Consists of several parts that require infrequent but necessary maintenance. The pump body, which consists of two parts, contains a filter, two valves, a mechanically driven rod and a retractor spring. A special diaphragm is inserted between the body.
The mechanical fuel pump is driven by the camshaft, which transmits pressure using a lever with a pusher. On imported carburetor-type models, a slightly different operating scheme is implemented; it is based on a rocker arm with two arms and a lever.
Carrying out repair work
Older car models have carburetors and a mechanical fuel system. Such a device breaks down less often compared to injection-type cars. The latter are equipped with an electrical system and a modern fuel pump. The electronic system controls the level and speed of fuel supply. The functions of the gas pump are to transport fuel from the tank to the point where the mixture is formed, as well as to create the required pressure level.
It is easier to carry out any repairs yourself if you know the sequence of individual operations. First, you need to check the device for the absence of factory debris (small metal particles) inside the fuel tank, which can get into the pump and damage it.
All repair work related to the functioning of gasoline pumps can be divided into several areas:
1) if foreign particles are found in the fuel tank, it must be washed. If it is impossible to wash out all the debris, the tank must be replaced;
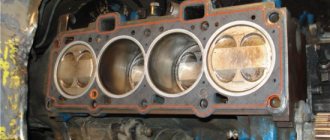
2) oil leakage is a signal to check the junction of the cylinder block and the fuel pump. The thermal insulation gaskets are also checked;
3) to remove the pump, you need to disconnect the injection and supply fuel lines, then unscrew the fastening nuts and remove the washers on the springs. After this, it is possible to dismantle the fuel pump itself;
4) a malfunction of the pump can be caused by a deformed diaphragm. In this case, it must be reinforced with plastic film;
5) cars with high mileage may have diaphragm springs weakened by load. Repair - stretching the spring and putting it back in place.
This article answers the car owner’s question: is it possible to independently repair the fuel pump in an injection-type car? Not only can it be done with your own hands, but it is also not complicated, as the video confirms:
Symptoms of a problem
A faulty fuel pump can be determined by several signs:
- Starting the engine is difficult or not possible at all;
- Unstable engine operation in idle mode;
- When the ignition is turned on, the fuel pump does not operate briefly to create pressure in the system;
- Loss of power, “dips” during acceleration.
The above symptoms also appear during other malfunctions of engine power system components. Before you start checking the fuel pump, you need to be sure that:
- The pressure regulator and nozzles operate in their own mode;
- The fine fuel filter is not dirty;
- Sensors that affect mixture formation work properly. We recommend checking the mass air flow sensor, throttle position sensor, and lambda probe.
Also, if the “CHECK” lamp on the instrument panel lights up, you need to perform computer diagnostics.
Checking the pump's functionality
It is easy to check the VAZ 2109 fuel pump even without special instruments. The injector will not be able to operate without pressure in the fuel rail. Therefore, you need to keep the pump motor spinning. It’s easy to check; just connect its terminals to the battery. If you are afraid, then turn on an incandescent lamp in the gap of one wire. It will help determine the health of the motor winding. Please note that the filter must be as clean as possible. If it is clogged, be sure to change it. Otherwise, the pump will not be able to create the required pressure.
Signs of breakdown
There are several situations in which the pump or its components can be at fault. This will definitely have to be checked. Otherwise, you can spend a lot of money buying and installing a new fuel pump, but in the end it turns out that the problem is completely different.
- The engine will not start. This is not a clear sign of problems with the pump, but still. Therefore, first check the condition of the spark plugs, the presence of a spark, and the absence of traces of oil on them. Also check the electronic control unit.
- Pressure inside the fuel system. If the pump is operating normally, it will create a pressure of 3.2 bar. Depending on the type of engine in your VAZ 2114, the characteristics may differ slightly: For a 1.5-liter engine, the optimal values are 285-325 kPa;
- For a 1.6-liter engine, these characteristics in optimal operating mode will range from 375 to 390 kPa.
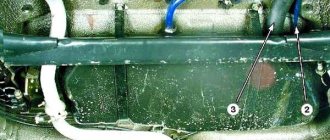
New and old coarse filter
Many people purchase the entire fuel module assembly at once, which includes a filter, sensor, float, intake chamber and the pump itself. Such a purchase will cost approximately 3,000 rubles. It is much more profitable and practical to buy a separate pump, which costs up to 1000 rubles. This is due to the fact that when the pump fails, the remaining elements almost always remain intact and are fully suitable for further use.
Reasons for fuel pump failure
The pump can fail for various reasons:
- For carburetor engines, the main source of the problem is usually the fuel pump rod. During operation, it becomes shorter and the pump stops supplying the required amount of fuel to the engine.
- The device may stop functioning due to wear on the inlet valve or its O-ring.
- Injection engines are equipped with electric fuel pumps. In this case, the most common cause of device failure is poor quality fuel. The inlet strainer becomes clogged with dirt and restricts the flow of fuel.
- Electric pumps may become inoperable due to faulty wiring, relays, fuses, or terminal oxidation.
Some of these problems can be prevented by refueling with high-quality fuel at well-established gas stations. In addition, it is recommended to occasionally clean the gas tank and replace this and other elements of the fuel system when their service life has expired.
Checking the functionality of the relay
The fuel pump relay is a device that supplies or stops electrical power to the fuel pump. If it fails, the operation of the fuel system will stop.
Electrical power to the fuel pump is supplied through a relay
Checking the functionality of the relay and the corresponding one is carried out according to the following scheme:
Open the hood and remove the cover from the fuse and relay box.
Using your hands or special pliers, remove the relay and fuse that control the pump.
Inspect the relay and fuse and, if faulty, install new ones.
Check if current is flowing to the relay. This can be done with a wire with a 12 V lamp, connecting it to the connection point.
Often the relay stops working after installing an alarm system on the car. In this case, you should reset all settings from the alarm key fob.
Video: checking relay functionality
The mechanism works, but does not pump fuel
Sometimes the device makes a characteristic hum, but gasoline is not supplied to the engine. The fact is that the pressure in the fuel system should not exceed 3 atm. It can be measured by connecting a pressure gauge to the fuel rail. If there is no pressure or it is very low, the element has failed.
It may happen that the device simply does not receive voltage. To check this, turn on the ignition and determine by ear whether the pump is working. It should make a slight buzzing sound. If nothing is heard, power is not supplied to the pump. Relays, fuses and wiring should be checked.
Video: what to do if the pump does not pump fuel
Pressure in the fuel supply system is not maintained
The pressure in the fuel system is maintained not by the pump itself, but by its check valve. Fuel enters through the inlet valve, which supplies it under pressure through hoses to the engine, and the check valve does not allow gasoline to return.
Due to severe wear, the check valve may not operate. As a result, the mechanism loses its ability to maintain the required pressure.
Depending on the make of the car, the check valve can be located either inside or outside the device body. Replacing a valve is a rather complicated procedure. Therefore, it is more convenient to replace the pump as a set.
The car jerks at low speed
If the engine begins to make unusual noises and jerk while driving at low speeds, the filter screen is most likely clogged. The pump simply does not have enough fuel to operate properly. The problem will go away after cleaning the mesh.
Similar symptoms may also be caused by incorrect operation of the device valves. Due to wear, they cannot pass gasoline in both directions. In this case, it is necessary to replace the mechanism.
What are the signs of a fuel pump malfunction and the possibility of repairing it?
The first sign of a malfunction may be a lack of pressure in the fuel supply system. This is expressed by interruptions in the operation of the engine unit (it begins to “cough”), after which the car stalls. Such symptoms can occur both while driving and when the engine is idling.
However, even earlier, before the fuel pump fails, an attentive driver can diagnose problems. These include:
- high tone of the engine;
- having problems starting the engine;
- gradual loss of power while driving.
Thus, if you listen to the nature of the sounds while driving and monitor the dynamic performance of the car, you can timely repair or replace the fuel pump without waiting for it to break down.
For what reasons can fuel pumps fail?
It is important not only to know exactly how to determine wear and tear of a fuel pump, but also to take into account the reasons why the device may fail. The most common causes of breakdowns and incorrect operation of fuel pumps on VAZ 2108/2109 vehicles are:
The most common causes of breakdowns and incorrect operation of fuel pumps on VAZ 2108/2109 vehicles are:
- debris in the fuel tank;
- short circuit in the fuel system wiring;
- clogging in the fuel filter;
- pump overheating.
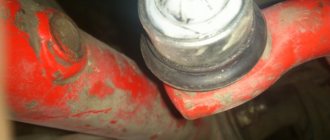
What to do if it leaks
Either fuel or lubricant (oil) may be leaking. If liquid leaks are found on the fuel pump body in a VAZ 2108/2109 car, it is recommended to take the following actions:
- tighten the clamps on the hoses of the device (at the “input” and “output”);
- check the integrity of hoses and connections;
- tighten the fuel pump cover bolt (or replace it if the thread has been stripped);
- replace the pump fitting.
What to do if fuel does not pump: repair
In cases where the device does not supply gasoline to the engine unit, you will need to establish the functionality of the gas pump itself. It is quite possible that it is functioning, but some element has failed.
Repairing a fuel pump is advisable only in cases where it is necessary to replace the smallest part of it. It is worth initially calculating the cost of materials, as well as taking into account the loss of time. It is quite possible that it is easier and cheaper to buy a new fuel pump.
Repair work to restore the functionality of the fuel pump, if it does not pump fuel from the tank, is carried out taking into account the following details:
- The fuel pump will need to be removed from the tank.
- Using the tool carefully, you will need to disassemble the device body.
- Inspect the pump components and find any damage.
Next proceed based on the existing problem:
- if one of the four springs bursts, you will need to replace it (as a rule, springs are inexpensive and are sold in almost all car stores);
- if the valve plate is seriously worn, this element will also need to be replaced, and the valve seat will need to be hammered into place with a blunt screwdriver;
- the pump drive rod has started to jam - you can straighten the surface of the rod to make it smoother;
- the surface of the fuel pump is dirty - you will need to clean the device with a soft, lint-free cloth
After troubleshooting, you should reinstall the fuel pump and check its functionality by starting the engine. If the ignition problems persist, most likely the problem lies in the fuel system itself, or your device will need to be replaced.
Operating principle of an electric fuel pump
Installation and installation of oil pump VAZ 2108-2109-21099
The functional work of the fuel pump is to supply fuel to the injectors. For normal operation of the injectors and creation of the required pressure, the supply of gasoline must begin before the engine starts.
The electric fuel pump is turned on by a special controller using a relay. When the ignition key is turned to the “starter” or “ignition” position, the controller instantly energizes the fuel pump switch relay, and as a result of the created pressure, fuel is supplied to the injectors.
Electric fuel pump VAZ 2114
If the engine does not start running within a few seconds, the controller turns off the relay until the engine is cranked again. After scrolling, the controller turns on the relay again, determining the start of rotation using the reference signal from the crankshaft position sensor.
Diagnostics of electric fuel pump faults
The service life of the electric fuel pump on the VAZ injector is quite long, but everything has its limit. Poor fuel quality primarily damages the discharge part of the unit.
An uncorrected fuel pump in a car prevents it from working at full power, and the engine also becomes unstable at idle. Due to a lack of fuel, when trying to start, the engine begins to “sneeze”, starts with difficulty for a few seconds or does not start at all.
Another available method is to check the pressure in the fuel system with a pressure gauge while the engine is running. But it is recommended to first replace the fuel filter in order to avoid distortion of the device readings.
A decrease in performance also indicates a pump malfunction; this is easy to notice when driving in 3rd or 4th gear. If, when you press the accelerator pedal, the car reacts with dips or does not react at all, most likely the fuel pump on the VAZ 2114 has failed.
Self-replacement of the electric fuel pump
The fuel pump on a VAZ injector, as a rule, cannot be repaired, however, like most electric fuel pumps.
Do-it-yourself is not particularly difficult and does not require special equipment and tools. You will need:
- Phillips screwdriver;
- ratchet with head at 7 and 10;
- key to 17.
The unit is replaced in the following sequence:
- The rear seat is removed. To do this, remove two plugs and, using a ratchet with a 10-mm head, unscrew the two bolts. After removing the seat, a slot in the sound insulation should open in the shape of the letter P. The fuel pump cover is located under it.
- Use a Phillips screwdriver to unscrew the cover, revealing the upper part of the fuel pump module underneath.
- The wiring harness suitable for the module is disconnected.
- Now you need to relieve the pressure in the power system. To do this, the car engine starts and runs until the fuel from the line is completely used up, that is, until the car stalls.
- The battery turns off.
- Using a 17 key, unscrew the fuel line tubes one by one.
- 8 nuts are unscrewed around the perimeter of the clamping ring. To do this, use a ratchet with a 7-mm head. The pressure ring is removed.
- The fuel pump module is carefully removed from the gas tank.
After the fuel pump module is removed, it is possible to either completely replace it with a new one, or replace only the electric fuel pump itself, but this will require disassembling the fuel module.
Disassembling the fuel module and removing the electric fuel pump
- The block of wires is disconnected from the connector of the cover and the fuel pump, then the sensor indicating the fuel level is removed. To do this, two latches are pressed out and the sensor moves along the grooves towards the cover.
- The drain pipe is separated from the body; to do this, you need to slightly pry it with a screwdriver. Then the four housing latches are pressed out one by one and the module cover is removed along with the fuel pump.
- The mesh filter is carefully pryed off with a screwdriver and removed. The lock washer is removed from the installation hole.
- The plastic latch is pressed out with a screwdriver and the pump is pushed out of the holder with your finger.
- The plastic corrugated tube is removed from the pump nozzle. To make removal easier, it can be heated over steam.
- Reassembling the fuel pump is done in the reverse order.
After installation, you should connect the battery and start the car briefly to check for gasoline leaks from the connections. If there is no leak, it means that the replacement of the electric fuel pump in the VAZ 2114 injector fuel module was successful.
What is a fuel pump?
The fuel pump pumps fuel from the tank to the injector rail. On injection engines, the part is submersible, and its power supply is approximately 12 V. It provides high pressure in the rail, which is why fuel is sprayed from the injectors into the intake manifold.
The injectors on an injection engine are solenoid valves. The moment and time of valve opening is controlled by an electronic control unit. The valve is closed by the action of the return spring. If there is a breakdown, there will be no pressure in the transport system, and fuel will not flow into the combustion chamber.
Replacing the fuel pump
In the car, the part is installed on the fuel tank, rotary type, non-separable and two-stage. That is, if it breaks, it will need to be urgently replaced. Most often, the main causes of failure are a decrease in engine power, periodic howling of the pump, provided that other elements of the system are in good condition.
So, how is a fuel pump replaced in a vehicle?
Source