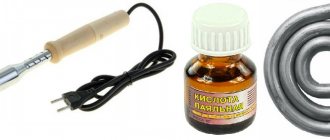
On a Renault Duster, removing the radiator grill can be done using the “quick method”. The bumper will remain in place, but such a maneuver is officially prohibited. There is another way, when the assembly is removed. This “assembly” includes a bumper with a grille at the bottom, and a “top” grille is attached to the bumper. This method is standard. It is discussed at the end of the review, and now let's talk about a faster and riskier method.
An example in the video below: dismantling does not take place without WD-40.
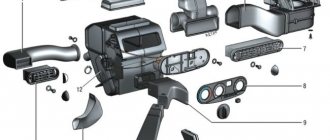
Modifications of protective nets on Lada Granta Liftback
- metal mesh with a perimeter frame made of polymer;
- all-metal mesh;
- all-metal with chrome inserts along the outer perimeter.
Each of the presented models has its own advantages and disadvantages. Let's look at them. Plastic frames are susceptible to the negative effects of direct rays of the sun and high/low ambient temperatures. Loose fit, vibration, metal knocking are the first signs of deformation.
The all-metal mesh on the radiator grill is more resistant to overheating. At the same time, even the slightest blow to the metal can deform the fasteners. As a result, driving a car is accompanied by knocking and vibration in the area where the radiator grille is located.
Metal with chrome inserts - more aesthetics than practicality. This is how you can briefly describe the accessory. Poor manufacturing is the first factor contributing to the destruction of the spray layer.
When choosing and purchasing “protection”, pay attention to the cell diameter. Too large will allow the passage of leaves, fluff, small stones
A cell that is too small will quickly become clogged and interfere with natural air flow. Premature overheating of the power unit is not excluded. The original protection is equipped with a solid rubber plug for use in winter. Thus, using the accessory, there is no need to dismantle the metal grill for the winter.
Tuning "Lada Priora" using moldings
A very interesting radiator grille (Lada Priora) is obtained if you use a couple of moldings. This tuning allows you to radically change the appearance of the front of the car.
The work is quite simple - you do not need any special skills.
- remove the radiator grille;
- cut off the VAZ icon located in the middle;
- We mark 2 chrome moldings along the length and cut them to the required size with a hacksaw;
- Using epoxy resin, we glue the moldings to our base and wait for it to dry;
- use a file to smooth out any unevenness if necessary;
- We install the resulting product on the car - and the tuning is successfully completed.
In the photo you can see what the radiator grille (Lada Priora) will look like after you do this tuning.
How to remove the radiator grille of Renault Duster
How to make tuning of the VAZ-2107 radiator grille
We will need:
Flexible Torx screwdriver with T20 tip;
Upper grille
1). Open the hood.
2). We unscrew the 4 screws from the top and bend the grille forward.
3). Using a flexible screwdriver, we approach the screws on the side (they are fixed at the same level as the central point of the emblem) and unscrew them.
4). We are trying to remove the grille from the grooves (see photo). Each “horn” ends in a groove in which the lattice protrusion is placed.
5). If you have dealt with the side fastenings, then with the “central spur” everything will work out quickly. It is necessary to move the plastic protrusion upward, then tilt the grille forward. The fastener should snap off immediately.
The bumper and grille are “sewn” together with plastic tabs. They go in one row, 5 on each side. And you can remove the Renault Duster radiator grille, and not break it, only by snapping off all 10 tabs.
Lower grille
It is impossible to get to the lower grille from the outside, so you will need to remove the bumper.
1). Place the entire assembly on a flat surface, then use a screwdriver to snap off the plastic tabs. But before that we remove the shields (see photo).
2). The design does not use self-tapping screws, only plastic fasteners. Each shield is secured with 5 separate tabs. 9 tongues hold the grille itself (4 at the bottom and 5 at the top).
Pattern of the bottom mesh
Without dismantling the bumper, you cannot remove the lower radiator grille on a Renault Duster. This is the law. It can be bypassed by securing the mesh to the outside. We have a suitable pattern.
Dimensions and radii are entered without errors
Make a template from paper. Glue this template to the grid. All that remains is to cut out the part along the contour, and everything will be ready.
A part called the “radiator mesh” is installed on top of the grille. Let the fastening elements be the ties. The color of the ties is black, the material is plastic.
How to remove radiator grille on Kia Rio, photo, video
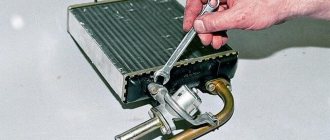
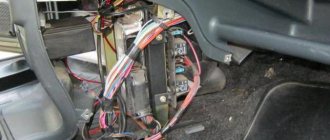
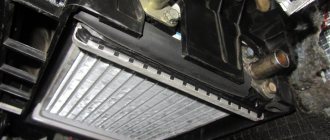
Lada Kalina Hatchback RED DRAGON Logbook Replacing the heater radiator without removing the panel and steering wheel
The reasons for removing or upgrading the radiator grille are completely different. For some, this is the preferred way to minimize coolant cooling. For others, it’s a simple procedure of tuning another part of the car to make it stand out from the crowd. And for others, it is necessary to install an additional, finer mesh, for example, to prevent small foreign objects from getting inside.
In any case, you will have to remove the factory radiator grille. And this, simplest at first glance, process of replacing a Kia Rio spare part, no matter how surprising it may seem, has its own subtleties and nuances.
In general, there are two methods of dismantling.
Removing the radiator grill separately
From the name it may seem that this method is simpler. Unfortunately, not quite.
In this case, you will need a convenient 10mm wrench and a regular small Phillips screwdriver.
- First of all, you need to remove the four bolts located on top of the engine compartment. They are located in a visible place and there should not be any difficulties here.
- Now, you need to unscrew the ten screws that secure the radiator grille from the inside. And this is where the difficulties begin, because getting close to them is not so easy, and you have to work in not the most comfortable positions.
- If you were still able to accomplish this small “feat”, you should carefully pull the radiator grill towards you, pressing the two fastening latches at the bottom (see photo above). If you can’t snap them off from the inside, you can try to “bend” them from the outside with a thin long object, pushing it between the bumper and the grille.
All that remains is to do what it all started for.
For example, install an additional small protective mesh, which, by the way, you can make yourself by cutting it to the desired geometry from an ordinary household mesh.
And secure it to the inside of the standard accessory.
Or install a new grille purchased at a car store.
Removing the grille along with the bumper
Tip: if something remains unclear, be sure to watch the video example at the end.
If you don’t want to bother with unscrewing the “hidden” screws, another method is proposed - remove the entire structure, and then disassemble it into the necessary components, including the desired radiator grille.
- Unscrew the top two of the four mounting bolts. The remaining ones will prevent the bumper from falling after the latches are disconnected.
- Remove the mounting screw holding the side of the bumper. In the official instructions, and this can be seen in the attached picture, it is recommended to remove the part immediately. But! To avoid breaking the clips, do not disconnect it at this stage (see point 5).
- Remove the lower fasteners.
- Disconnect the left fog light connector.
- Now, a little trick that complements point 2. Due to the fact that the clips on the side joints that fasten the bumper to the wing are held apart by screws, in order to remove them without consequences, you need to bend the fender liner a little and unscrew the screws, and only then remove the parts.
- Finally, you can carefully pull the bumper down and disconnect the right fog light connector. Don't forget about the two latches under the headlights.
- Remove the remaining top bolts.
The removal process can be considered complete. All that remains is to remove the radiator grille, which should now not cause any problems, and replace or tune it.
Assembly is carried out similarly, in reverse order.
Fastening grilles from other machines
As mentioned above, sometimes car owners put grilles from “sevens” and “fours” on their “sixes”. In this situation, the main problem arises with the mounting holes that do not line up. In particular, if on the “six” each half of the grille is held in place by six screws, then on the “seven” there are five such screws. A driver who decides to install such a grille on a “six” will have to drill new holes. This is done with a regular drill of a suitable size. As for the remaining old holes, they are sealed with a special sealant for plastic. After the sealant has dried, the hole area is sanded with fine sandpaper and painted over with black paint.
So, even a novice car enthusiast can replace the radiator grille on a VAZ 2106. All that is required is the ability to use a Phillips screwdriver and caution when removing the fragile plastic lining.
How to remove the radiator grille of Renault Sandero
Protective mesh for radiator grille
The radiator grille is designed to protect the radiator itself from mechanical damage when the car is moving. When driving on any road, there is always a chance that a stone or other object will fly out from under the wheels of the car in front and hit the radiator. In order to protect the unit from mechanical damage, you can install a mesh behind the plastic.
There are several ways to remove the radiator grille on a Renault Sandero. Any of them will take some time and require a specific tool.
Without dismantling
You need to start by unscrewing several screws that secure the lower part of the bumper to the Sandero body. This will loosen the tension, making it easier to remove the radiator grille. This is done using Torx screws. Self-tapping screws have a six-point head. You won’t be able to unscrew them with a simple Phillips screwdriver, so it’s better to stock up on the right tool.
After unscrewing the screws, the tool will no longer be needed. The remaining procedures are carried out manually. As already mentioned, the plastic part itself is held in the bumper by latches. To dismantle it, you need to press each latch down and press the plastic itself inward. This way you can take him out of the holds one by one. We do the same with the remaining latches of the lower part.
Next, the plastic needs to be shifted to the right. At this stage it is necessary to act extremely carefully. Having moved it to the right, you need to slightly lift the upper edge of the bumper, and then pull the part towards you. Thus, the left part will be dismantled. Then you need to slightly bend it in the plane and move it to the left.
Thus, you can remove the radiator grille without removing the Renault bumper
In some cases, such operations can lead to the fastening elements breaking, so you must act with extreme caution
Partial dismantling
This method will allow you to easily remove the radiator grille without fear for its safety. In this case, you can spend more time on partial dismantling. However, it will be much easier to get the right part.
Before starting work, you need to unscrew the bolts around the perimeter of the bumper that are attached to the Sandero body. The next step is to unscrew the bolts under the wheel arch. They are located at the junction of the bumper and fender of the car on both sides. After this, you need to open the hood and unscrew 4 more fasteners.
It is worth noting that in addition to the bolts, the bumper is held in place by 3 more plastic latches on each side of the Sandero. They are attached to the wings. To remove it, it is best to pull the bumper away from the car.
Since the method involves partial dismantling, you only need to remove one side from the latches. Next, you need to disconnect the plastic part from the latches, pressing it into the space that appears, and remove it.
This method is preferable, since there is no risk of damaging the plastic part itself. However, you will have to spend time on it in this Renault model.
With dismantling
The problem with dismantling this element is relevant for all Sandero owners. In any case, the process takes some time and requires special tools, without which dismantling is not possible.
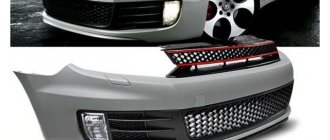
Replacing the Lower Bumper Grille of a Priora
Preliminary replacement of the front bumper
Welcome! Front bumper . basically when we drive around the city it suffers the most from the front bumper, we catch the car in front of them and sometimes we put out reinforcements or just a stone lying on the ground that we see and end up getting hit which deforms the bumper and it's bigger doesn't become as nice as it used to be because many owners immediately choose to replace that bumper, giving 100 cars to many people, they would like to take a lot to replace because basically most people prefer replacement, you save on your car and, as they say, your money and your time for trips to the service, well, even more so, because the bumper essentially does not change the work, since it is only attached to the bolts, completely unscrewing it, which can be unnoticed, we will talk about this in this article .
The note! To replace the front bumper on a Prior, you will need to stock up on a set of tools that will come with them: a wrench or socket of about “10”, as well as a screwdriver to unscrew the side screws. this is to attach the bumper!
Result:
Where is the front bumper of the previous one? Many people at this point will say: “Why open this question at all, it’s clear where it is before the grill,” the main answer. people who have never encountered replacing a bumper on a Prior, the fact is that on most cars this bumper is actually located strictly under the grille, and it is removed separately from it, while the previous one, in principle, is still the same, this bumper is strictly under grille, and the grille, it seems, is also considered a bumper, since it comes as a single unit. The block with it, on many cars it is not done ethnically, because when people find out about oh, even they are surprised to tell me to change the strip, but on the other one I need Should I remove and replace the entire bumper? Actually, no, the radiator grille can be replaced without removing it or even replacing the bumper itself, you just need to know how (how to remove the radiator grille, see the article entitled: "Replacing the radiator grille. About priority") Take a close look on the subject, for example, under the photograph showing a standard Lada Prior car bumper:
Repair and replacement of the front bumper of Lada Priora
repair and replacement
front
bumpers
frets
in
.
Priority: install grille and eyelashes
In this video we install a new grille
radiator instead of the old drain,
play in
, and put eyelashes.
How to replace the front bumper on a VAZ 2170-VAZ 2172?
Removal: 1) You will need this at the very beginning of the operation to disconnect the battery because you will still be working with the wires when you disconnect the bumper from the body of the car (Working with the wires involves disconnecting the wires from the fog lights, so if you don't have those headlights, you cannot disconnect the battery).
The note! Many people say: “Why turn off the battery? What if I don't turn it off? The point is that when moisture gets on the exposed wires, it can easily cause a short circuit, after which you will have problems with the wiring, and when the battery is de-energized, this will not happen because the wires will not be alive! (For information on how to disconnect the battery, see the article "Replacing the battery", point 1).
2) Then crawl under the front of the car and there you will find the bolts that secure the engine block to the bumper, some call this crankcase swing, so the bolts that secure the engine block to the bumper need to be unscrewed. and, having unscrewed, carefully lower the syringe so that it hangs a little, as shown in the small photo below:
3) Next, without leaving the car, locate the six screws that secure the bumper to the fender of the car, and then unscrew them completely, this way all the lower bumper mounts will be removed and you can stand up and move not too far towards the wheel arches.
4) As you approach the wheel arches, there will be three more screws that secure the bumper to the front fender, so unscrew the three screws on each side, then get into the car and pull the handle that opens the hood.
The radiator grille on Granta is the last steps towards the ideal
1.3k
Anyone who has at least once seen the latest car model from the VAZ concern will say that a new radiator grille for the Grant is an extremely necessary thing. Don’t worry, the item fully complies with all standards and has a modern appearance. However, unlike the grilles on previous Lada models, it tends to let in a large amount of dust, which severely clogs the radiator and engine of the car.
1 Improvement of Lada Granta
When purchasing the newest model from the Volzhsky Automobile Plant, you can expect that you are getting a reliable, modern car at an appropriate price. The car is equipped with reliable parts, an original body and a full list of instruments necessary for comfortable everyday driving. Despite this, craftsmen do tuning, most often replacing optics, wheel rims and completely painting the car.
The radiator grille is also often replaced. It is by this detail that many judge the character of the car and the capabilities of its owner. Another reason for the huge demand for new grilles is the ease of DIY installation. To do this, you do not need to have certain skills or buy expensive equipment. All you need is straight hands and standard tools that are found in every garage.
https://youtube.com/watch?v=cchvdNUAfEE
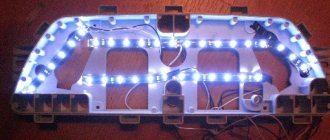
2 Making a grid from household mesh
Many new owners of Grants, who are just planning to tune the radiator grille, begin to visit specialized salons in the hope of finding an original part. It is worth saying that this method works great, but only if the buyer has an amount of 5–6 thousand rubles or more. And if you add the payment for installing the grille, then the owner of the new Lada model will have to “take it out and put it in” more than 8 thousand rubles.
To save money, you can create the element yourself. The main material for the manufacture of the radiator grille on the Lada will be a regular chain-link mesh with small cells. You can purchase this product at any hardware store in the country. On the shelves there are both plastic and steel products. In addition to the material for manufacturing, we will also need:
- file;
- needle file;
- hacksaw for working with metal;
- sandpaper or sanding paper;
- cold welding tool;
- fasteners.
First you need to remove the standard Lada grille. To do this, we need an “8” key, a Phillips screwdriver and a TORX T20 key. You need to dismantle the part very carefully - it is quite possible that you will need it again. The work of removing the grating must be carried out according to a certain algorithm. First you need to lift the Granta's hood and remove the front bumper. There are 9 nuts under the bumper that need to be unscrewed. After this, you need to pull out the side clamps of the grille and then remove the part.
Upon completion of dismantling, you need to make a frame for tuning. To do this, you will need to cut off the vertical and horizontal jumpers of the bumper. Do not be alarmed if the coating in the front part of the Lada body becomes less rigid - this is a common effect of such tuning. The burrs that appear after removal must be sanded with sandpaper, and then cold welded all the holes obtained after cutting off the jumpers and stiffeners.
3 Installation of the radiator grille
After processing, the radiator grille is installed on the Grant. To do this, take the finished part and insert it into the opening in front of the radiator. Next, we fix the product with fasteners and check the front part of the body for any irregularities. If there are any, the Lada bumper can be carefully cleaned with a file or fine-grained sandpaper.
To more effectively protect their Lada Granta, experienced drivers resort to installing additional products, one of which is an additional grille. To make it, you can use the same Chainlink, which needs to be cut and placed in a special frame. The finished protection is attached with bolts in the upper part, and from the bottom - to the “ears” of the radiator, which go out under the bumper.
By tuning the radiator grille and installing external protection on the Grant, every owner of this car can sleep peacefully. Now no insects, dust and small debris are scary.
1.3k
Tuning "Lada Priora" using moldings
A very interesting radiator grille (Lada Priora) is obtained if you use a couple of moldings. This tuning allows you to radically change the appearance of the front of the car.
The work is quite simple - you do not need any special skills.
- remove the radiator grille;
- cut off the VAZ icon located in the middle;
- We mark 2 chrome moldings along the length and cut them to the required size with a hacksaw;
- Using epoxy resin, we glue the moldings to our base and wait for it to dry;
- use a file to smooth out any unevenness if necessary;
- We install the resulting product on the car - and the tuning is successfully completed.
Radiator grille - how to remove and replace the protection
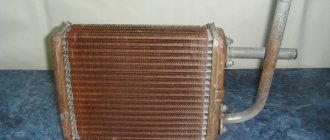
The radiator grille has not only a decorative, but also a protective function. It protects the radiator from various damage caused by pebbles and dust getting into it. It would seem that if there is already a regular radiator grille, then why do you need a protective one? Let's try to find out why a protective radiator grille is needed, how is it removed and replaced with a new one?
Functions of the radiator grille
As you already know, the radiator grille must provide protection for the last element from various foreign objects that end up on the road and are picked up by oncoming traffic. However, designers do not always very accurately calculate the properties of the factory radiator grille. The fact is that it may have a fairly thick base, which provides a good protective function, but cannot pass a sufficiently large air flow necessary to cool the engine. As a result, the engine overheats and can easily fail.
The other side of the problem is that the distance between the cavities is too wide. Here the radiator receives enough air, but may be damaged by some small stone. A damaged radiator, at best, will lose its pleasant appearance, and at worst, it will be broken. A broken radiator will also cause the engine to overheat.
The solution to the problem is a protective radiator grille. Its design has the form of a metal mesh, which allows the radiator to receive a large amount of oncoming air and maximum protection from damage, since the mesh has thin cavities that have a small distance relative to each other
In addition, the protective radiator grille gives the car a different look, which is very important for the appearance of the vehicle. Thus, it solves three problems at once and is a universal car part
How to remove the radiator grille?
This procedure may be performed differently for many vehicles. This is due to the design difference and economic feasibility. So, for example, in the VAZ 2106 the radiator grille is attached with bolts, but in the VAZ 2109 with special strips. Therefore, in order to remove the radiator grille, you must first find out how it is attached and then use the appropriate tools (if necessary).
When removing the radiator grille, remember that driving without it can be dangerous for the radiator. After all, if it is not there, the radiator will no longer be protected and may be damaged due to oncoming debris on the road.
The grille is removed with the hood open. This makes it more convenient to get to the bolts or nuts that are tightened from the inside of the engine compartment of the car. In addition, this is where the fastening strips or latches are located.
Many radiator grilles can also be mounted on the bumper, which is why some cars need to be placed on a viewing hole in order to remove such an elementary element.
Replacement of the VAZ 2109 radiator protective grille
Replacing the radiator grille is necessary when it has suffered mechanical damage. This could be an accident in which the grille was completely destroyed or simply damaged due to a large pebble hitting it. In both cases, it is recommended to replace the faulty part as soon as possible.
Replacing the radiator grille “on a nine” is not uncommon. The fact is that the grille for it is made of plastic, which does not always cope with very strong mechanical stress.
To change the protective radiator grille on a VAZ 2109, you need to open the hood and use a screwdriver to unscrew the two screws located in the upper part of the mount. After this, take a flathead screwdriver and remove the end of the latch, thereby freeing the grille from its fastening. Now it needs to be removed from the brackets, tilting it in its direction.
Installing a new radiator grille occurs in the reverse order. This completes the replacement of the protective radiator grille.
The main reasons for changing the grille
Another design option
Tuning and grille removal are necessary to give the car an original appearance. Car owners should know how to replace a part if cracks appear on it. It should be noted that this design has:
- resistance to large temperature changes;
- individuality;
- low price.
Tuning the Priora se involves installing an “aggressive” grille. This model will give the vehicle a sporty look by increasing radiator cooling. Some Lada owners prefer to tune the factory model. For this you can use chrome strips and moldings. They stick easily to the ribs.
Tools you will need:
- hacksaw;
- scissors;
- double sided tape;
- epoxy.
The radiator grille of the Priora se can be easily tuned with your own hands. To do this, you will need to cut out the VAZ badge using a hacksaw. Then you will need 2 moldings, which are first placed on the plane, marked and cut to size. This element is attached to the grille with tape. Moldings must be wrapped with masking tape in advance. This will prevent damage to the main element.
The next step is to dilute the epoxy glue in a container. Moldings and radiator grille are coated with it. Then the strips are applied, pressed down and held for some time. After the glue has dried, the edges are trimmed. A file is used for this.
how to remove and tuning methods
In any car, the radiator grille is one of those elements that catches your eye when you first look at the car. It is located on the front of the car and is therefore so noticeable. The “facial expression” of a car also very much depends on how the radiator grill looks.
It is for this reason that many car owners change it or perform tuning to give their car some individuality. The Lada Granta radiator grill is no exception. You can see many attempts to improve it in various ways.
Many owners complain that this model has virtually no protection for the radiator from dust and dirt entering from the outside. Proper tuning helps eliminate this problem.
How to remove the radiator grille of a Lada Granta
Before tuning this element, let's figure out how it can be removed from the car.
The Lada Granta radiator grill can be removed in 2 ways. According to the classical method, you need to proceed as follows:
- remove the front bumper;
- on its inner side, unscrew the nuts securing the grille, there are 9 of them;
- Click to open 2 locks under the headlights.
The second method makes it possible to do without dismantling the front bumper. The algorithm looks like this:
- Unscrew 6 bolts from the top of the grille;
- bend it, stick your hand in, find by touch 4 bolts at the top and 5 nuts at the bottom - for this you will need a figure eight wrench;
- Under the headlights, use a screwdriver to open the 2 clamps.
After dismantling, you can begin tuning. After this, installation is performed in reverse order.
Tuning using a utility net
Tuning the front part of a Lada Granta car using a Chain-link mesh is very common. Such a mesh can be bought at any hardware store - it can be metal or plastic.
Choose the option with small cells
This is important to avoid excess dust getting under the hood of the car.
Next you need to follow a simple algorithm:
- using one of the methods described above to remove the radiator grille;
- cut off all horizontal and vertical jumpers, leaving only the outer frame;
- using cold welding, seal all the holes that were created after the jumpers were cut off;
- clean the surface from all irregularities and burrs;
- Cut the mesh to size and attach it to the frame. If the mesh is plastic, you can simply glue it. If it is made of metal, heat the frame so that it does not burst, and screw the mesh with self-tapping screws;
- paint and wait for it to dry. At this point the tuning can be considered complete.
Installing a radiator grille on a Lada Granta car
After tuning is completed, the Lada Granta radiator grill is installed back. To do this, the finished part is placed in the standard opening in front of the radiator and secured with nuts, bolts and clamps. Next, you need to check how correctly the fit is made and inspect the front part of the machine for irregularities, burrs and protrusions. If any are found, clean them with a file or fine sandpaper.
Conclusion
Tuning the radiator grille is a good way to make the appearance of a car more attractive, make it stand out from the crowd, and add originality. This can significantly change the visual perception of your car when looking at it from the front.
The car will acquire a more modern, stylish and attractive exterior. It is precisely these considerations that drive those car owners who decide on tuning.
In the case of the Lada Granta car, the argument in favor of alterations of this type is the actual lack of protection of the engine compartment from particles of dirt, dust and moisture entering from the front. This is unlikely to benefit the car. Therefore, many car enthusiasts resort to making radiator protection with their own hands.
Education: secondary specialized. Specialty: car mechanic. Professional diagnostics, repair, maintenance of passenger cars of foreign production 2000-2015. Extensive experience working with Japanese and German cars.
Types of parts
In spare parts stores you can purchase different options for radiator grilles for the Skoda Octavia A7:
- matte;
- black glossy;
- with mesh;
- with a recess for the cruise control system.
You can diversify the appearance of your car by replacing the cladding - from standard chrome to black. Many car enthusiasts believe that in this case the Octavia A7 grille looks more expensive and more presentable.
In this video, the owner of the Skoda Octavia A7 will talk about methods of protecting the radiator:
Without dismantling
This method will take less time than the other.
However, it comes with some risks. The fact is that the grille in this Renault model uses special ears on the sides for clamping. They hold the plastic tightly in the bumper. During operation, if handled carelessly or if excessive force is applied, these ears can be torn off. In addition to the ears, the plastic is held in place by 8 more fasteners on top and 8 on the bottom. You need to start by unscrewing several screws that secure the lower part of the bumper to the Sandero body. This will loosen the tension, making it easier to remove the radiator grille. This is done using Torx screws. Self-tapping screws have a six-point head. You won’t be able to unscrew them with a simple Phillips screwdriver, so it’s better to stock up on the right tool.
After unscrewing the screws, the tool will no longer be needed. The remaining procedures are carried out manually. As already mentioned, the plastic part itself is held in the bumper by latches. To dismantle it, you need to press each latch down and press the plastic itself inward. This way you can take him out of the holds one by one. We do the same with the remaining latches of the lower part.
When the lower part is released, you need to slightly press it inward. We perform the same operation with the upper part.
Next, the plastic needs to be shifted to the right. At this stage it is necessary to act extremely carefully. Having moved it to the right, you need to slightly lift the upper edge of the bumper, and then pull the part towards you. Thus, the left part will be dismantled. Then you need to slightly bend it in the plane and move it to the left.
Articles
List from the Renault catalog:
- 620220025R – bumper without PTF
- 620220030R – bumper with PTF
- 622231300R – mounting bracket to the body, left side
- 622220011R – the same, right side
- 620931777R – plastic adsorber (amplifier)
- 752102945R – additional amplifier
- 623825665R – external grille (chrome)
- 623100260R – internal grille (black plastic)
- 6001549321 or 8200597650 – right PTF holder
- 6001549322 or 8200597649 – left PTF holder
- 622540008R – lower grille
- 214998574R – shield (air duct), left side
- 214949303R – the same, right side
We hope no questions arise here.
All items refer to cars of the 2010 model year. The details for the restyled version are different: 620226895R is the bumper, etc.
Selection of analogues
High-quality plastic is produced by Breckner and NPA. The Taiwanese brand Api also looks good. And the company Asam SA (Romania) produces fasteners.
- Bumper without PTF – Breckner BK71303; NPA NP513-07211; Api DC6000000-0000;
- Bumper with PTF – NPA NP513-07212; Api DC6000000-1000;
- Left bracket – NPA NP513-07235; ASAM 80133;
- Right bracket – NPA NP513-07236; ASAM 80132;
- And so on.
Experts' recommendations for choosing a radiator protective mesh
- Regardless of the modification of the accessory, always buy only from certified points of sale and official representative offices;
- any quality-made part will last longer than a cheap fake;
- if the car is often used in rough terrain, with poor road surfaces, it is not rational to install chrome-plated protection for aesthetic reasons;
- To visually distinguish the original from the fake, look at the method of fixing the grille to the body. The presence of nylon ties will indicate a factory type of manufacture, while typical plastic latches indicate a handicraft production.
The main reasons for changing the grille
Another design option
Tuning and grille removal are necessary to give the car an original appearance. Car owners should know how to replace a part if cracks appear on it. It should be noted that this design has:
- resistance to large temperature changes;
- individuality;
- low price.
Tuning the Priora se involves installing an “aggressive” grille. This model will give the vehicle a sporty look by increasing radiator cooling. Some Lada owners prefer to tune the factory model. For this you can use chrome strips and moldings. They stick easily to the ribs.
Tools you will need:
The radiator grille of the Priora se can be easily tuned with your own hands. To do this, you will need to cut out the VAZ badge using a hacksaw. Then you will need 2 moldings, which are first placed on the plane, marked and cut to size. This element is attached to the grille with tape. Moldings must be wrapped with masking tape in advance. This will prevent damage to the main element.
The next step is to dilute the epoxy glue in a container. Moldings and radiator grille are coated with it. Then the strips are applied, pressed down and held for some time. After the glue has dried, the edges are trimmed. A file is used for this.
Sequential steps for replacement
Body-matched grille
For the work you will need a screwdriver and an awl. Auto mechanics distinguish 2 methods for dismantling the grille.
- The bumper is removed.
- The bumper cannot be removed.
At the first stage, the ground wires are disconnected from the battery. Then the engine mudguard is removed. To do this, you will need to unscrew the 3 bolts from below that attach the bumper to the protective covers. The next step involves removing:
- screws securing the bumper to the front of the body;
- 2 screws for fixing the left and right headlight housings;
- 2 screws on the right and left side of the arches, they attach the bumper to the front fenders.
Removing the grille is completed by removing the bumper. If you remove the Priora SE grille using the second method, then you will need to press the locking washer located near the bumper. Then the washers securing the grille are removed. Otherwise, the hood is raised and secured with a stop. After this, the screws securing the combination lights to the front panel are removed. The lights themselves are removed, the electrical wiring is disconnected from them. Using a screwdriver, turn the locking washers 1/4 turn. The old grille is then tilted forward, pulled up and removed.
Replacing and tuning the grille on a Priora se are processes that require attention, since this unit provides maximum air flow to the radiator. The procedure will not take much time if you install a branded radiator grille. To secure it, you will need special parts. To do this, it is recommended to determine in advance the location on the bumper where this unit will be installed. In this case, a sealant is used.
Removing the front bumper
We carry out the work when repairing and replacing the front bumper, the energy-absorbing beam of the front bumper, removing the headlight unit and for access to the hood lock and sound signal. Unscrew the nuts securing the power unit mudguard 5–6 turns (see “Removing the power unit mudguard”). We unscrew the screws securing the fender liners to the front bumper (see “Removing the mudguards and front wheel fender liners”). In the wheel arch...
… use a Phillips screwdriver to unscrew the self-tapping screw securing the bumper to the front fender bracket. Similarly, unscrew the screw on the other side of the car.
Using a Phillips screwdriver, unscrew three screws 1 and one self-tapping screw 2 securing the decorative trim of the headlight...
...and remove the cover. Similarly, remove the decorative trim on the other side of the car.
Using a Phillips screwdriver, unscrew the two screws securing the bumper to the upper cross member of the radiator frame.
Using a little force, remove the bumper side flange from the body bracket. We perform a similar operation on the other side of the car.
Remove the front bumper. If it is necessary to remove the energy-absorbing beam of the front bumper...
...using the “8” head we unscrew the three bolts securing the energy-absorbing beam to the body...
...and remove the energy-absorbing beam. We install the energy-absorbing beam and the front bumper in the reverse order, ensuring uniform gaps between the bumper and body parts. After the bumper is secured to the body, we press the sidewalls of the bumper to the body brackets until the sidewall flanges are fixed on the body brackets.