What fuel pumps were installed on VAZ 2108/2109 cars
Most VAZ 2108/2109 cars were equipped with gasoline engines with carburetor injection of a combustible mixture into the combustion chambers. Only their latest modifications were equipped with fuel injection systems.
Table: serial engines of VAZ 2108/2109 cars
| Engine modification | Volume, cm3 | Number of valves, pcs | Injection type | Years of manufacture |
| VAZ 2108 | ||||
| 2108 | 1289 | 8 | Carburetor | 1984–1997 |
| 21083 | 1499 | 8 | 1986–2005 | |
| 21081 | 1099 | 8 | 1987–1997 | |
| 2111–80 | 1499 | 8 | Injection | 1994–2005 |
| VAZ 2109 | ||||
| 2108 | 1289 | 8 | Carburetor | 1987–1997 |
| 21081 | 1099 | 8 | 1988–1997 | |
| 21083 | 1499 | 8 | 1988–2004 | |
| 2111–80 | 1499 | 8 | Injection | 1994–2004 |
| 11183–20 | 1596 | 8 | 1994–2004 | |
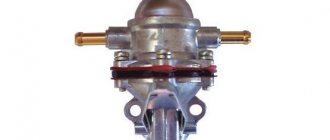
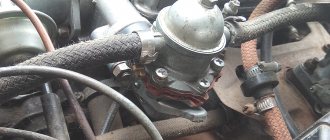
Absolutely all carburetor “eights” and “nines” were equipped with DAAZ mechanical fuel pumps produced by the Dimitrovgrad Automotive Accessory Plant. They were and are now produced under catalog number 2108–1106010.
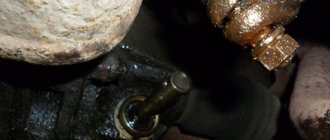
Mechanical fuel pump DAAZ 2108–1106010
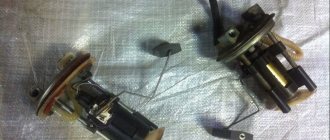
VAZ 2108/2109 injection engines were equipped with electric submersible gasoline pumps produced by Russian enterprises Pekar, Utes, SAAZ, as well as pumps of joint and foreign production. Fuel pumps were installed on the latest modifications. The catalog number of the submersible electric fuel pump VAZ 2108/2109 is 2112–1139009.
Electric pump "Bosch" 2112–1139009
Checking the serviceability of the fuel pump on cars with an injector
Models with electronic injector belong to the latest series of this brand. In this case, the device is installed in the gas tank of the car and supplies gasoline to the fuel rail under high pressure.
If the fuel pump on a VAZ 21099 with an injector does not pump, then you should conduct several tests on its operation. In order to check the serviceability of this element, you should perform several specific actions:
- If the pump is fixed, then its operation can be clearly heard after starting the car’s power unit. If the operation of the fuel pump is not audible, the driver should check the relays that are responsible for starting the fuel pump. You can also use a multimeter to check the voltage at the fuel pump itself;
- Another reason for problems with the fuel pump on cars with injection may be a low fuel level in the tank. To do this, drivers of such cars should always monitor the amount of fuel, not allowing its level to drop to less than ten liters.
Features of the design and location of fuel pumps VAZ 2108/2109
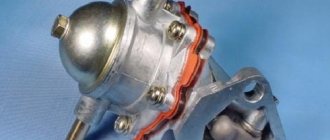
The DAAZ gasoline pump has a simple mechanical design. It includes:
- a body consisting of an upper and lower part;
- lid;
- mesh filter;
- valves (inlet and outlet);
- diaphragms (3 pcs) with spacers;
- the rod to which the diaphragms are attached;
- return spring;
- manual pumping lever.
Design of the DAAZ fuel pump
The VAZ 2108/2108 mechanical fuel pump is located in the engine compartment of the car and is installed on the auxiliary drive housing (in front of the ignition distributor). It is driven by the camshaft through a cam mechanism and a rod (pushrod). The camshaft rotates an eccentric, which transmits force through a pusher to a balancer at the bottom of the pump housing. The latter raises and lowers the rod with the diaphragms. Thus, a vacuum is formed at the pump inlet, and pressure is formed at the outlet. Valves located in the device body are responsible for its maintenance.
The VAZ 2108/2109 mechanical fuel pump is located on the auxiliary drive housing
On injection VAZ 2108/2109, the fuel pump is not a separate device, but an element of the fuel module. It also includes:
- plastic storage cup;
- coarse mesh filter;
- fuel level sensor.
Fuel module assembly
The module is located in the car tank. Its lid (base) is located at the top of the container. You will find it by removing the back seat and peeling back the carpet.
The electric fuel pump in the injection VAZ 2108/2109 is located in the car tank
Structurally, the fuel injection pump VAZ 2108/2109 is an electric motor with an impeller on the shaft, which, rotating, pumps gasoline, creating a vacuum at the inlet fitting and pressure at the outlet. The pump is powered from the machine’s on-board network, protected by separate relays and a fuse.
Design of the electric fuel pump VAZ 2108/2109
An article dedicated to self-repair and replacement of the gas tank on a VAZ 2109 is located here:
Disassembling and replacing the fuel pump
So, now we’ll tell you specifically about how to properly disassemble, replace damaged elements of the fuel pump, or completely replace this device with a new one.
Hatch
- In any case, we recommend purchasing a repair kit. It doesn't cost much. But there is no need to rush into buying a fuel pump. Who knows, maybe a simple repair will bring the pump back to life.
- Remove the air filter along with its housing.
- Disconnect the fuel supply and return hoses from the fuel pump fittings.
- Unscrew the mounting nuts that hold the pump itself.
- Carefully remove the pump, being careful not to damage the gaskets.
- Inspect the pump parts for cracks or damage. Check the fuel pump valves for leaks and perform all the operations we described above.
- Assess the current condition of the suction and discharge fittings. When dismantling, they must remain motionless in their seats. They break extremely rarely, but nothing should be ruled out.
- Check the fuel pump diaphragm. The presence of ruptures and peelings indicates that it must be replaced.
- Look at the current filter. Damage and excessive contamination are clear signs of wear and warrant replacement.
- Treat the filter components with clean gasoline and blow with compressed air using a compressor.
- If you find damaged elements, replace them with new ones using a repair kit.
- Replace the pump gaskets if necessary.
- When installing new gaskets, be sure to first treat their surface with Litol 24.
- If the pump housing itself is damaged or there are other serious problems, you will have to completely replace the fuel pump. Repairs won't help him.
- Next, when partial repairs are completed or you decide to take a completely new pump, it’s time for reassembly.
- Be sure to adjust the feed using shims of the required thickness so that the pusher output has an optimal indicator. We talked about this above.
- If the pushrod protrudes too much, it will cause the fuel pressure to be too high, causing your carburetor check valve to break.
- If the distance is less than required, as the load increases and the vehicle speed increases, the engine will not be able to receive enough fuel.
- Reassemble by following the reverse sequence of dismantling the fuel pump.
- Make sure the arrow on the body points towards the carburetor.
- When installing the diaphragm pump assembly, the holes in the gasket are located away from the muffler pipe.
Well, you figured out how you can repair and replace the fuel pump yourself. The task is really not difficult, although this unit plays a very important role in the performance of the entire VAZ 2109 car.
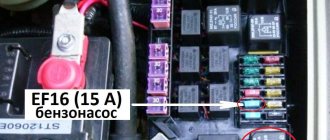
Where is the fuel pump relay located?
Where is the fuel pump relay located? The installation location of the relay varies depending on the make of the car. Most often, it is located under the hood, in the fuse and relay box.
The fuel pump relay is designed in the circuit to prevent accidental application of high voltage to the fuel pump winding. The relay is standard and consists of a plastic body and coils with contacts. It is located in the car interior near the console. To access it, you need to remove the protection cover.
In appearance, it is a small box that resembles a “plug” with an American type of output. Each terminal has a marking that indicates the following: 31 – mass; 30– +12V constant (regardless of ignition); 15– +12 with the ignition on; 50– +12 when the starter is running; TD – signal from the ignition system; TF – engine temperature signal from the injection control unit KE. Outputs: 87 – supplies power to the fuel pump; 87H – oxygen sensor heating; 87V – turns on the starting injector.
Installing a fuel pump
Despite the fact that this mechanism has a simple structure, its installation is quite complex. First you need to determine which device is suitable for a specific carburetor and fuel group. Additionally, additional parts will be required for installation. So, to install an electric fuel pump, a hose is required. Its size should be about 5 m and thickness 10 mm. You also buy the fuel pump itself and a relay for it. You will also need a 3-5 mm drill, an injection system filter and a carburetor filter. A steel tube 7 mm thick is also required. The width of the latter holes should be at least 2.5 cm.
First, remove the device showing the fuel level in the gas tank. A hole is made in its lid into which a 7 mm tube is inserted. In order for the return line to drain properly, the end of this tube should be bent slightly so that it is at a greater distance than the fuel intake pipe. The upper part is also bent until parallel with the tube intake hole. Then a modern fuel level measuring device is installed, equipped with an intake and return line.
It must be borne in mind that the rubber tube must be connected with a return fitting from the power system. Now one of the ends of the hose is connected to the heat intake fitting. Subsequently, using clamps, the device is attached to a metal tube. The electric fuel pump is mounted horizontally in relation to the engine shield through a special bracket included with the device.
The second fitting is connected to a 7 mm tube; it is attached vertically for proper fuel supply from bottom to top. Using a hose, connect the fuel pump to the tank. The last step is to connect the electric fuel pump to the carburetor using a fuel filter.
Electric fuel pump for carburetor: installation features
Let's start with the fact that the carburetor is a mechanical component of the power supply system of a gasoline engine. The main task of the carburetor is to prepare a suitable fuel-air mixture, as well as to dose the finished working mixture when supplied to the engine.
Naturally, many solutions are borrowed from more modern systems. Quite often on carburetor cars you can find electronic ignition or an electric fuel pump. Next, we will talk about what advantages an electric fuel pump provides for carburetor engines, how to connect an electric fuel pump to a carburetor engine, as well as what subtleties and nuances need to be taken into account during such an installation.
DIY installation of an electric fuel pump on a carburetor VAZ 21099
Let's start with the fact that I have an old VAZ 21099, produced in 1993.
Naturally, carburetor. And it was on this car that I decided to install an electric low-pressure fuel pump - as it turned out, this is a very necessary and useful thing. In the article I will share with you how the electric fuel pump was installed, and also why I took this step in the first place. I decided to install an electric fuel pump on the VAZ carburetor, having had a fair amount of trouble with the standard mechanical fuel pump. Over the entire service life of the car, countless numbers of them have been replaced: either the rod breaks, or simply wears out, or the pump does not gain the required pressure. Naturally, all this does not have the best effect on the stability and power of the engine.
When deciding to install an electric fuel pump, I was guided by the following factors:
- stability of fuel supply to the carburetor, regardless of engine speed;
- reliability of the system, since I constantly drove with a mechanical pump in anticipation of its failure;
- ensuring the supply of gasoline in the quantity required for the engine: so that at high speeds it does not lose power due to lack of fuel.
After going through many different options, I decided to settle on a low-pressure electric fuel pump from the manufacturer OSIAS, model HEP02A. By ordering it on Aliexpress.
Scheme of work
The movement of the diaphragm starts the mechanism. Due to the fact that the direction of its movement is up and down, when it moves down, a vacuum is formed above it and the inlet valve opens, through which gasoline passes, subsequently entering the recess of the diaphragm, having previously passed through the filter. When the diaphragm moves up, pressure is generated, stimulating the closing of the intake valve, then the exhaust valve opens and gasoline flows through the fuel system.
Design of an automobile electric fuel pump 1 - outlet fitting; 2 - check valve; 3 - electrical terminal; 4 - collector; 5 — brush holder with spring and brush; 6 - stator permanent magnet; 7 fixed axis for the electric motor armature and for the pump rotor; 8 — electric motor armature; 9 — coupling fork; 10 - centrifugal roller; 11 — supercharger cover with outlet slot; 12 — supercharger stator with an eccentric cylindrical cavity; 13 — supercharger rotor with five centrifugal rollers; 14- supercharger bottom with inlet slot; 15 — inlet; 16 — fuel coarse filter mesh; 17 — outlet; 18 — relief valve; 19 — recess in the bottom of the gas tank.
CONCLUSION
The VAZ carburetor electric fuel pump I installed works excellently and fully copes with its task. In just a few hours of work, I was able to overcome the problem that had plagued me for decades with the uninterrupted supply of fuel to the carburetor. If you have any questions, write to me in the comments and don’t forget to subscribe to content updates.
Repost and win a laptop!
Every month on the 1st of the month iBook.pro gives away gifts.
- Click on one of the social buttons. networks
- Get a personal coupon
- Win a LENOVO or HP laptop
—> LENOVO or HP from 40-50 TR, 8-16GB DDR4, SSD, 15.6″ screen, Windows 10
- 7010 Do-it-yourself installation of a plastic window; step-by-step instructions with photos 1601301900 1610546299
- 7123 Step-by-step instructions for installing interior doors with your own hands, photo 1582953900 1611060661
- 34217 Sheathing a house with OSB (OSB) on the outside with your own hands: step-by-step instructions 1579618800 1603548832
- 22112 We make a house for a cat with a scratching post with our own hands; step by step instructions 1571935140 1604569414
- 6482 Making a comfortable computer chair from a car seat with your own hands 1569341400 1604749369
- 18006 How to make sliding doors with your own hands at home 1567227000 1604815047
- 3837 How to make a wood splitter with your own hands at home: assembly instructions 1565239080 1604840748
- 3339 How to make a porch for a house with your own hands quickly and cheaply: we design and build 1558191600 1605445998
Peculiarities
The carburetor was invented a long time ago.
Received widespread use in the last century. However, over time, more and more new technologies appear and the carburetor has been replaced by injection mechanisms. The carburetor performs its task by adhering to the mechanical devices. While the injection system works thanks to electronics. Most car owners of carburetor vehicles combine it with the latest mechanisms. For example, they mount an electric fuel pump on a carburetor. The essence of the operation of the gas pump on the carburetor is to ensure the supply of fuel from the gas tank to the cylinders. A high-pressure electric fuel pump for a carburetor is not really needed, because together with these mechanisms, electric pumps operate at low pressure, which distinguishes them from injectors, where high pressure is needed in the fuel system. In injection engines, the electric fuel pump is mounted inside the fuel tank. The electronic fuel pump on the carburetor is located under the hood.