The Chevrolet Lanos fuel pump is necessary to create pressure in the engine fuel system. That is why, if the pressure in the fuel system is insufficient or absent, the engine on the Lanos will not start or will work intermittently.
- Difficulty starting the engine - this is due to the fact that the fuel pump on Lanos cannot create sufficient pressure in the fuel system, so sometimes you have to turn the ignition key twice before starting the engine.
- Increased or extraneous noise when the Lanos fuel pump is running - the reasons are obvious, wear and tear on the electric motor of the fuel pump. Most often this happens due to time, mileage, or frequent driving with an almost empty tank. The point is that the fuel pump is cooled by gasoline and if it is not there, it constantly overheats.
- The engine stalls after starting or does not start at all (the hum of the fuel pump is not heard when you turn the ignition key) — problems with the wiring (connection) or with the fuse (or Chevrolet Lanos fuel pump relay) in the fuel pump circuit cannot be ruled out.
- Reduced power of the Lanos engine - most often due to a clogged fuel pump grid
Not all faults can be solved by replacing the fuel pump, so diagnostics of the fuel system is necessary.
For information, the article number for the Lanos GM fuel pump is 96344792 , but you are unlikely to find it new on sale. For example, now it’s 2022 and it’s temporarily out of stock on exist.ru. But there are a great many analogues, I’ll leave a link to the existential one.
Mostly, owners install the following fuel pumps on Lanos:
- Bosch 1987580030
- Denso DFP0105
- Marco 22512
- Stellox 10-01693-SX
- FSO 580453453
- TSN 7.2.21
- SK 070/SK0580453453
- Japan Line FJP 058045 J
How it works and what the device consists of on Daewoo and Chevrolet Lanos
To understand the principle of operation, you need to understand the design of the catalytic converter on Lanos. Inside the cylindrical barrel there is an appropriate amount of noble metals, which are tasked with filtering exhaust gases. Inside the device consists of small meshes, which are also called honeycombs. These meshes are made of a ceramic or metal base using expensive non-ferrous metals. The honeycomb is opened from above using a platinum-iridium alloy. A special sensor is installed in front of the converter, the existence of which everyone has probably heard of - this is a lambda probe or an oxygen pressure sensor. He is responsible for recording and analyzing the level of gas contamination before the device. If the cells are clogged, clogged or destroyed, then the CO2 level accordingly increases, which is recorded by the sensor. It sends a signal to the ECU and the Check Engine light comes on.
This is interesting! The reason for the high cost of the catalyst lies precisely in the presence of non-ferrous metals (platinum and iridium) inside the device.
If gold is present in the composition, it is in very small quantities. The device starts working only after warming up, so for the first 3-5 minutes after starting the engine, the exhaust gases are not filtered by the neutralizer, from which you can hear the corresponding smell of acetone. As soon as the device heats up to a temperature of 600 degrees or higher, an oxidation reaction begins to occur. In the process of this reaction, harmful substances from the operation of the Lanos engine are burned, and low-harm substances - nitrogen and carbon dioxide - are already released into the atmosphere. A normal reaction to reduce harmful substances occurs when the neutralizer is heated to a temperature above 750 degrees.
This is interesting!
On new models of Lanos and Chance, converters began to be installed directly at the outlet of the exhaust manifold. This is done to quickly warm up the device, so the neutralizer starts working immediately after starting the engine.
Design and types of fuel level sensors
The fuel level sensor on Lanos cars is located directly in the gas tank. This device is a potentiometric device or variable resistor, which has a number of advantages:
- Simplicity of design
- Reading accuracy
- Reliability
- Low cost
Among the disadvantages, it can be noted that due to the simplicity of the design, the device tends to wear out during operation. This wear is especially accelerated when the driver adheres to the refueling method when the gas tank is completely empty. To understand why the device fails, let’s look at its design.
A potentiometric device consists of a group of contacts, some of which are movable. Due to this mobility of contacts, the filling of the gas tank with fuel is determined. When the moving contact (slider) moves, it rubs against a fixed scale, consisting of conductive marks made of resistive material. During the friction process, the fixed scale wears out, which causes malfunctions such as incorrect readings or a complete malfunction of the fuel gauge on the Lanos instrument panel. The photo below shows the design of a potentiometric fuel level sensor, which is used on Chevrolet and Daewoo Lanos cars. Such sensors are called lever sensors, but there are other types of such devices.
FLS on cars, installed directly in the gas tank, are of the following types:
- Lever or float
- Tubular
The principle of operation of both types of sensors is the same, and it is based on the fact that the float connected to the moving contact of the sensor takes the corresponding position on the fixed contacts. As the gas tank empties, the position of the float decreases, which means that the moving contact moves along a fixed scale. The amount of fuel in the tank is measured due to the fact that an electric current flows through fixed contacts. By changing its position with the moving contact, the resistance increases or decreases, on the basis of which the level of gasoline in the container is determined.
If a lever sensor is a block consisting of a fixed resistive scale and a moving contact connected to a float, then a tubular sensor is a separate container. This container is presented in the form of a tube, which is filled with gasoline. Inside the tube there is a float that changes its position depending on the fuel level in the tank. The float is connected to a movable contact that moves along a fixed resistive scale. The advantage of a tubular sensor is that it is possible to determine the amount of fuel in the tank more accurately than when using lever devices.
This is interesting!
The disadvantage of a tubular fuel level sensor is that it is not suitable for use in all cars, which depends on the geometric parameters of the tank.
Lanos cars with nameplates from various Chevrolet, ZAZ and Daewoo factories, as well as Sens and Chance, use lever-type fuel level sensors. They are located directly inside the gas tank, and they are attached to the fuel pump module.
https://youtube.com/watch?v=UVK_Ce83wcw%3F
Checking the fuel pump directly
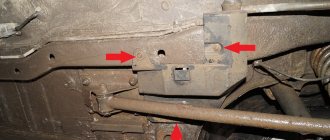
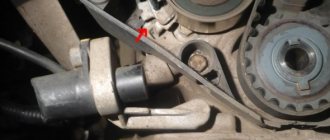
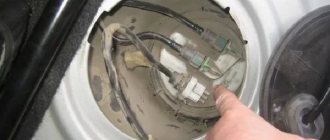
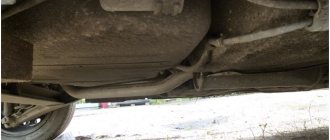
Having suffered a fair amount, it’s time to suffer even more... To gain access to the fuel pump cover, you need to “pull” the rear sofa: it is attached in two places to the floor (seen in the photo above), approximately in those places you need to pull. We removed the sofa - we unscrew the cover with a screwdriver and see the fuel pump connector (in the photo above on the right). To check the fuel pump directly , excluding all other elements of the car's electrical wiring, you need to apply voltage to the fuel pump directly from the battery. To do this, you first need to find which contacts in connector C901 are responsible for powering the fuel pump.
The picture above shows a connector (or, as people say, a chip) of a fuel pump (view from the pins). I didn’t remove the fuel pump from the gas tank, I just used a long wire to connect it to the battery. The fuel pump turned out to be alive!
Having experienced some bewilderment in connection with the diagnostic information received ( the pump is working, the fuse is working, the relay is working - all the obvious participants in the circuit are working! ), I decided to use a tester to check the voltage on the second half of the fuel pump connector (C901), coming from the bowels of the car. There was tension on him! That is, voltage was supplied to the fuel pump, the fuel pump was working, but did not work! How is this possible, you ask?
Why this situation has arisen and what transient contact resistance is, I will tell you in the next part of my adventures as a car enthusiast: Lanos (Lanos 1.5) will not start, part 2: the “Check” does not light up, the fuel pump or “C301 connector” does not hum
Models of radiators for Chevrolet and Daewoo Lanos by manufacturer
If a malfunction of the stove radiator occurs if it is damaged, it is recommended to replace the device. Do not use liquid sealants that are recommended on the market. These sealants not only clog the damaged areas of the tubes, but also reduce the permeability of the tube channels. As a result of the slightest blockages, not only of the heater radiator, but also of the engine cooling, malfunction of these devices occurs.
Having understood the technical issue of which is the best heater radiator to choose for Lanos, you should pay attention to the manufacturers. You have to choose among the following manufacturers for Lanos, Sens and Chance cars:
- Delphi are original Polish radiators, with which Daewoo Lanos were originally produced, and subsequently Daewoo Sens cars.
Such devices are no longer produced, but Delphi brand heat exchangers can still be found on sale. The devices were made of aluminum and consisted of 21 tubes. They are distinguished by quality, affordable price and reliability - NRF is a Dutch company that produces aluminum heat exchangers.
The devices consist of 18 tubes of increased diameter with turbulators. They are distinguished not only by high performance, but also by build quality - DAC is a Korean company that produces tubular-band heater radiators.
Among the models there are devices that are suitable for Lanos, Sens and Chance cars. The quality and performance are not inferior to the original devices - Profit are Czech heat exchangers that consist of 25 aluminum tubes with honeycomb strips.
The device can be described as a high-quality radiator, manufactured in compliance with standards. After manufacturing, the devices are tested and then go on sale. - LUZAR (Luzar) are Russian radiators that consist of 16 aluminum tubes.
Judging by the number of tubes, it is clear that the device is inferior in terms of heat exchange to the above models. It is characterized by low cost and a fairly long service life - GROG (Grog) - consists of 22 aluminum tubes, and is distinguished by its affordable price, high-quality workmanship, and also popularity.
The tanks on the device are made of aluminum - KMC is a product of the Korean company Korea Motor Company.
Despite the low cost, the radiator is of high quality, but its main drawback is the use of only 17 main tubes, which negatively affects performance - Tempest is a Taiwanese company that produces quality products.
The devices have 25 main tubes and are also distinguished by high-quality workmanship. The products have a special design - reduced height and increased width of the tubes - AVA - Ava brand stove radiators are on sale.
This is a budget option made in Holland, which has 17 main tubes. Manufacturers claim that the devices are made only from high-quality materials, but in practice this is far from the best option. - Nissens is a heat exchanger consisting of 18 tubes.
The radiator tanks are made of plastic. The Danish company produces high-quality products, and despite the fact that the design has only 18 tubes, the heat exchanger is highly efficient. Customer reviews indicate that the radiator does not fit in size and has a different shape. During installation, it is necessary to cut out the side of the heating system housing
Heat exchangers of the Nissens and NRF brands are produced with plastic barrels. From experience it follows that if you change the heater radiator on Lanos, it is better not to save money and buy a high-quality heat exchanger that will last at least 4-5 years. Replacing a device is a time-consuming process, and it's unlikely you'll want to return to it every year. There are other manufacturers of the devices in question, in particular - AURORA, SHIN KUM, LSA ECO, AT, Van Wezel.
This is interesting!
The service life of the heater radiator is affected not only by the frequency of use of the heater, but also by the use of high-quality coolant and antifreeze. It is not recommended to use antifreeze at all. What is better to fill in the Lanos cooling system - coolant, antifreeze or antifreeze, as well as their types, differences, advantages and disadvantages, are described in this material.
Where is the relay located?
The part on cars is installed mainly together with all the fuses, but in some brands of cars there is also a different arrangement of devices. In cars with an injector, the relays can be located both under the hood and under the instrument panel. Most often, the fuel pump relay is located in the following places:
- Near the ABS blocks.
- Near the fuel injection control unit.
- Under the dashboard. Most often it is installed on the passenger side under the dashboard.
Since the fuel pump relay ensures the supply of fuel, it is sometimes worth diagnosing the part so that an unpleasant breakdown does not cause a premature end to the trip.
How drum brakes work
In addition to the pads and drum, the components of the devices in question include:
- working and main cylinders, inside of which the pistons are located;
- compression and return springs;
- spacers;
- racks for supporting brake pads;
- parking brake mechanism.
Lanos is equipped with rear drum brakes with two cylinders, the efficiency of which is higher than that of single-cylinder ones. Below is the appearance of a working brake cylinder with two pistons with its component elements, from which it is not difficult to understand how the mechanism works.
One of the main roles in the design of the working cylinder of drum brakes is played by sealing cuffs.
Cleaning the injectors
Cleaning and washing the engine injectors, as well as replacing the fuel pump mesh on a Chevrolet Lanos, is necessary every 30,000-35,000 mileage (and with the current quality of gasoline, even more often). There are several washing options:
Flushing the injector with specialized fuel additives is the easiest and most affordable cleaning option, but also the most questionable. These additives become effective when regularly added to gasoline; Cleaning without removing from the engine
– instead of the factory power supply system, a unit is connected to the injectors that supplies a special cleaning solvent, and the engine runs on it for 20-30 minutes.
The efficiency of this method is very high; all deposits are removed from the injectors without leaving any residue; Cleaning on an ultrasonic stand
is considered the most effective way of washing and cleaning. The advantage is that there is no need for an expensive solvent, but you have to remove the injectors from the engine;* We also recommend reading the article “How to wash injector injectors.” Everything is explained there in detail.
There are also ways to wash it yourself; with the right approach, it will be no less effective, but we’ll talk about that separately.
Replacing the fuel tank Lanos
Reduce the pressure in the power system 2. Disconnect the injection and drain hoses of the fuel pump from the pipelines by squeezing their clamps.
Disconnect the fuel vapor discharge pipe into the adsorber by squeezing its clamps. Squeeze the clips and disconnect the fuel pump wiring harness.
Remove the parking brake cable from the holders located on the fuel tank in its front part. Loosen the clamp securing the ventilation hose and disconnect the hose from the fuel tank nozzle. If, when these spots are detected, you try to clean the gas tank from external blockages, this will only speed up the process of destruction of the metal, so you should think carefully before replacing the Chevrolet Lanos gas tank.
New gas tanks for Lanos are supplied without protective canopies, which eliminates the possibility of them rotting. Repair the tank or install a new one on Lanos, which is better? If you are faced with the problem of a leaking tank on Lanos, then you can solve it in two ways: However, there is a recommendation here - choose a replacement Chevrolet Lanos gas tank device produced by the ZAZ automobile plant.
The article number of the part in question has the number TF69Y Tanks from other manufacturers in Poland and China have the following disadvantages: Low quality Low weight, which indicates the use of thin metal for the manufacture of the device Mismatch of fasteners on the tank, which complicates the possibility of its installation. Replacing the gas tank of a Chevrolet Lanos would not replace the gas tank of a Chevrolet Lanos; the fuel tank on a Lanos is made in China or Poland, it is recommended to initially compare these models, and only after that make the appropriate choice in favor of the appropriate option. Mismatch of mounting holes when installing the fuel pump. Based on the above, we can conclude that if the tank on Lanos leaks, it should be replaced immediately, and by purchasing a new device.
After purchase, it is recommended to remove the protective visor, and carefully treat the problem area with degreasing materials, and paint it with paint containing zinc, gravitex or mastic. To ensure the integrity of the device, you should thoroughly clean it with a metal brush, pour liters of gasoline, and look for the appearance of oil stains.
Their absence indicates the integrity of the device.
Fuel tank - removal and installation
When the device needs to be cleaned internally. A sign of the need to clean the inside of the tank is if the fuel pump mesh is clogged. If the underbody of the car is treated with mastic or other protective materials. If a leak occurs in the gas tank.
In this case, replace the Chevrolet Lanos gas tank, remove and replace the device, replace the Chevrolet Lanos gas tank in a car. Before carrying out removal and replacement work, you should prepare the following set of tools: On our Lanos, the gas tank leaked, which means that it should be replaced as quickly as possible.
This is what we will do. There is not much choice here!
Since there are two working options. The second option is to purchase a fuel tank from a disassembly site. Why is only the fuel tank from ZAZ indicated in the first option? The answer is simple!
Chevrolet Lanos fuel tank and its replacement
I don’t recommend dealing with tanks from other manufacturers in Poland or China, as their quality, to put it mildly, will disappoint you.
The differences begin with the weight of the replacement Chevrolet Lanos gas tank and Chinese or Polish-Chinese tanks are noticeably lighter than the fuel tanks from ZAZ and end with problems during installation; simply not replacing the Chevrolet Lanos gas tank, the mounting holes on the tank and with the holes on the car body. Plus, we can add to this that there are also problems with the seat of the fuel pump module: the seat angle is different, or the tightness of the fasteners is broken.
That’s why I advise you to take only ZAZ. There are no problems with the installation, everything is clear. There is only one thing, but finding a fuel tank in good condition at a disassembly site is a big problem.
There is a high probability of buying a rotten tank that will start leaking in six months. A 10mm layer of construction thermal insulation was laid between the tank and the body. At the moment everything is fine, the tests were carried out. Buck sits dead and does not move. There are no photos of the old tank and damage, I took a photo of replacing a Chevrolet Lanos gas tank with something, but not from my phone.
Checking the fuel pump directly
Having suffered a fair amount, it’s time to suffer even more... To gain access to the fuel pump cover, you need to “pull” the rear sofa: it is attached in two places to the floor (seen in the photo above), approximately in those places you need to pull. We removed the sofa - we unscrew the cover with a screwdriver and see the fuel pump connector (in the photo above on the right). To check the fuel pump directly , excluding all other elements of the car's electrical wiring, you need to apply voltage to the fuel pump directly from the battery. To do this, you first need to find which contacts in connector C901 are responsible for powering the fuel pump.
The picture above shows a connector (or, as people say, a chip) of a fuel pump (view from the pins). I didn’t remove the fuel pump from the gas tank, I just used a long wire to connect it to the battery. The fuel pump turned out to be alive!
Having experienced some bewilderment in connection with the diagnostic information received ( the pump is working, the fuse is working, the relay is working - all the obvious participants in the circuit are working! ), I decided to use a tester to check the voltage on the second half of the fuel pump connector (C901), coming from the bowels of the car. There was tension on him! That is, voltage was supplied to the fuel pump, the fuel pump was working, but did not work! How is this possible, you ask?
Why this situation has arisen and what transient contact resistance is, I will tell you in the next part of my adventures as a car enthusiast: Lanos (Lanos 1.5) will not start, part 2: the “Check” does not light up, the fuel pump or “C301 connector” does not hum
How to replace the fuel pump on Lanos, Sense and Chance
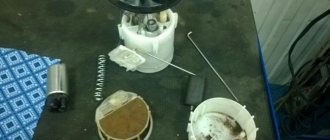
The process of replacing the device in question is not difficult, however, its implementation must be carried out with strict adherence to the sequence of actions. To replace the fuel pump on a Lanos, you will first need to remove the fuel module, then disassemble it and install a new fuel pump in place of the faulty device. Let's look at how to do this correctly below.
First you need to remove the fuse or relay in the mounting block under the hood. The photo below shows which fuse and relay are responsible for the operation of the fuel pump on the Lanos. After that, we try to start the engine. This procedure is necessary so that the fuel pressure in the fuel line decreases. Disconnect the negative terminal from the battery and move to the location of the fuel module. It is located under the rear sofa on the right side. The sofa seat is attached using one bolt at “12”. After removing the seat of the rear sofa, we find a protective cover that needs to be pryed off with a screwdriver to remove it. Under the cover there is a chip with wires and two tubes for supplying gasoline and back drain. Before continuing with further steps, you should first carefully remove the contaminants to prevent them from getting inside the tank. To remove the chip, you need to move the orange lock to the side towards the fuel pipes, and then press the tongue and pull the block to the side. Next, remove the hoses. To do this, you need to press the white latches, and then pull them to the side. At the next stage, take a punch or a chisel with a hammer, and act on the locking ring, through which the module is attached to the tank
We turn the ring to the side counterclockwise until it disengages. The retaining ring is removed. Carefully, holding the chip, you need to remove the module from the tank, pointing it to the right. When removing, it is important not to bend the float, which is located at the very bottom. After removing the module, it will be visible that there is gasoline inside the flask. It can be drained back into the tank or another container. The extracted part is located on the table, after which we proceed to disassemble it to remove the fuel pump. Using a screwdriver on the three latches in the plastic outer flask, you need to remove the top cover. Disconnect the power supply to the sensor and fuel level indicator in the tank. You can disconnect the float so that it does not interfere
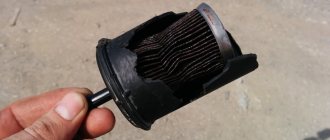
It is attached using a plastic plate that needs to be squeezed and pulled out. Next, you can heat the outer flask with a hairdryer to remove the inner part along with the fuel pump. When it warms up, it will be easier to dismantle it, but in any case you will need to bend a steel rod in the form of a hook and use it to pry off the plastic part with the fuel pump. There is dirt inside the glass that should be removed. Remove the fuel pump mesh. If it is clean, then it does not need to be changed, but it is better to replace it so that you do not have to repeat the procedure again in the near future. A detailed description of how to replace the fuel pump mesh on Lanos, Sense and Chance is described here. To remove the mesh, you need to pry off the retaining ring with a screwdriver. The fuel pump is attached using plastic latches that need to be pressed out. After removing the pump, you should snap off the chip with the power wires. Loosen the fastening of the clamp that secures the tube. To do this you will need to use pliers. This clamp is disposable, so it will need to be replaced during assembly. We disconnect the tube from the fuel pump, using a screwdriver as a lever. Now, instead of the faulty fuel pump, we install a new one. To do this, install the tube in place and fix it with a new clamp of 8-12 mm
All subsequent assembly operations are carried out in the reverse order of removal.
When assembling, it is important to take into account one point - cleaning the surface of the tank near the hole for installing the module. The module is attached to the tank through a rubber sealing gasket in the form of a ring
It must be cleaned or replaced if deformed. The area around the hole should be cleaned, and this should only be done with a clean cloth. Using a vacuum cleaner or other types of electrical appliances is strictly contraindicated.
After replacing the fuel pump, you can install the fuse and relay in their places, and also connect the minus terminal to the battery. We turn on the ignition and wait until the new fuel pump pumps fuel into the tank. We start the engine and enjoy its operation.
https://youtube.com/watch?v=EiXYNq7qRUk%3F
This is interesting!
After removing the device, you can check it by connecting it to a 12V power supply, which will once again confirm the malfunction.
Checking the fuel pump directly
Having suffered a fair amount, it’s time to suffer even more... To gain access to the fuel pump cover, you need to “pull” the rear sofa: it is attached in two places to the floor (seen in the photo above), approximately in those places you need to pull. We removed the sofa - we unscrew the cover with a screwdriver and see the fuel pump connector (in the photo above on the right). To check the fuel pump directly , excluding all other elements of the car's electrical wiring, you need to apply voltage to the fuel pump directly from the battery. To do this, you first need to find which contacts in connector C901 are responsible for powering the fuel pump.
The picture above shows a connector (or, as people say, a chip) of a fuel pump (view from the pins). I didn’t remove the fuel pump from the gas tank, I just used a long wire to connect it to the battery. The fuel pump turned out to be alive!
Having experienced some bewilderment in connection with the diagnostic information received ( the pump is working, the fuse is working, the relay is working - all the obvious participants in the circuit are working! ), I decided to use a tester to check the voltage on the second half of the fuel pump connector (C901), coming from the bowels of the car. There was tension on him! That is, voltage was supplied to the fuel pump, the fuel pump was working, but did not work! How is this possible, you ask?
Why this situation has arisen and what transient contact resistance is, I will tell you in the next part of my adventures as a car enthusiast: Lanos (Lanos 1.5) will not start, part 2: the “Check” does not light up, the fuel pump or “C301 connector” does not hum
Chevrolet Lanos fuel level sensor
I don't think it's the wires. and in the slider it doesn’t come into contact with the scale; I’ll look later, since it’s -25 outside
perhaps the scale is very worn out, on the slider the contact point may simply be soldered down or up a little
Folks, I also have some kind of canoe as a delivery device, sometimes it works, sometimes it doesn’t, so I’m thinking about leaving it like that or something needs to be done.
I re-read 11 pages of this thread, but I didn’t find anything intelligible, I only realized that before ordering you need to go to the service center and see what to order.
If you measure 150 Ohms, go buy 96388928, if 280 - 96388930