Let's continue. I started connecting. Let's go in order. First I’ll tell you what and how, and then how I did it.
Let's start with the general outline.
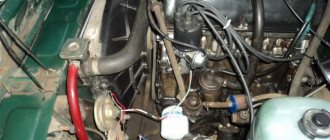
Now let's see what needs to be changed in the engine compartment.
Let's start with the fan. This braid has a single contact; if you open the insulation a little, you can see that it has a white-black wire.
The fan worked differently on different units, but the main feature was that it was turned on by a sensor on the radiator. Now it will be turned on by the injector unit. And instead of the old scheme
I will not consider all the sensor plugs, but will consider only those points that baffle a novice electrician)))) There are two brown wires in the engine compartment
These are the “minuses” that are named G1 and G2 in the SUD diagram. They need to be screwed onto the body. Usually they are screwed onto the cylinder head in the area of the thermostat.
Also one black wire
In fact, this is an optical illusion. This is actually the red wire. You can verify this by moving the insulation back a little. This is “+12” which is attached directly to the battery. It feeds the "brains".
Well, that seems to be all. There was nothing else unknown in the engine compartment. Now let's see what's going on inside the car.
Let's look at the connections of the fuel pump.
In the carb version, two wires approached the tank
The fact is that in a carburetor circuit, the external fuel pump is located in the engine compartment, and these wires simply go to the gasoline level sensor. One, blue and red, supplies voltage, the second, pink, transmits information about the availability of gasoline. In this case (injector), we have a fuel pump in the tank. and it is connected using a block. In order not to pull unnecessary wires, you should do this - connect the old wires to the block as follows: the pink wire of the block to the pink wire, the gray wire of the block to the green-red, black and white - ground, blue is not needed.
Now we have power supply connected to the fuel pump and a contact indicating the fuel level. We throw the black and white wire to minus. those. frame. The blue-red wire is not needed. Everything in the gas tank area is connected.
VAZ 2109 fuel pump injector: do-it-yourself replacement and diagnostics
When considering the fuel system, you should definitely mention the VAZ 2109 injector fuel pump. The injection system consists of several components, which are basic. On our website you can also find information for newer VAZ models, for example, 2110. Nines are also equipped with electric fuel pumps that supply gasoline under a certain pressure to the ramp. Moreover, the pressure must be constant, otherwise the operation of the engine will be unstable. So, what is the injection nine fuel pump and how does it work.
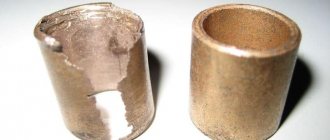
Pump operating principle
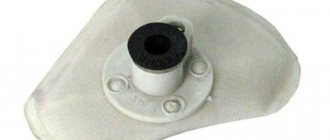
The VAZ 2109 fuel pump has a fairly simple design; the injector functions only thanks to it. It is based on two elements - an electric motor and a pump with a filter element. Please note that the “diaper” (as people call the filter for its similarity) needs to be changed on time - try not to let it work for more than 20 thousand km. Otherwise, it becomes saturated with metal shavings, dirt and other rubbish, which gets into the line and clogs the injectors.
The fuel rail contains a mixture of gasoline and air (also purified, by the way). The proportion is always the same - 14 parts of air and one part of gasoline. This is the ideal mixture for combustion to occur. But you need to pay attention to the fact that the VAZ 2109 fuel pump relay, which is controlled by an electronic unit, is involved in the operation. It is used to supply power to the pump motor. The pump's performance is high, so the engine does not run constantly, but intermittently (and depending on the operating mode of the engine, the pauses between starts may be different).
For control, there is a pressure regulator installed on the ramp. To drain excess gasoline - a check valve. With its help, all excess gasoline flows back into the tank. The VAZ 2109 fuel pump (injector) is removed if it is being repaired or replaced. The following tools will be useful:
But if the pump suddenly fails, you should first check the condition of other elements. Carefully inspect the fuse and relay of the VAZ 2109 fuel pump. If they are faulty, then the entire injector will not be able to work normally. As they say, we check the least expensive breakdowns first. If the reason is really in the fuel pump itself, then you can start dismantling it:
The main thing in this matter is accuracy, as there is a risk of damaging the fuel level sensor. And one more thing: before removing the VAZ 2109 fuel pump, you need to get rid of dirt and dust. Therefore, blow the installation area with compressed air or at least clean it with a brush.
To verify the serviceability (or malfunction) of the fuel injection pump of the VAZ 2109, just remove it and connect it directly to the battery. If it works normally, without any extraneous sounds (and air pressure is felt from the outlet), then there are no problems with it. But if it does not turn on even this way, you should think about replacing it. The price of a new one will be about 2000 rubles. Is it worth repairing an electric motor? It is unlikely that this will improve the situation for a long time, but as a temporary solution it is quite normal. But you can do this procedure only if you are confident in your abilities and have an understanding of how electric motors work.
Malfunctions of the pump with carburetor
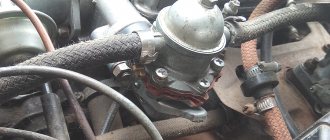
Repairing the VAZ 2109 carburetor fuel pump should also begin with diagnostics. But in this regard, there is a significant difference from the injection version of the car. It lies in the fact that the fuel pump, in this case, is mechanical. The principle of operation, and therefore the repair, is different. Diagnosis involves the following basic steps when checked:
- general condition of the fuel pump;
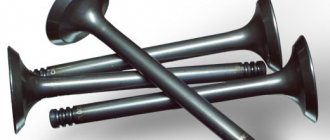
- intake and exhaust valves;
- tightness;
- filter for clogging or damage;
- pump diaphragm;
- pusher
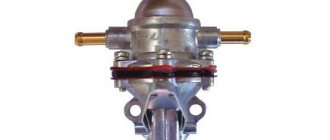
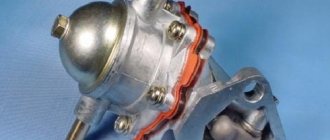
VAZ mechanical fuel pumps come in two types: DAAZ and Pekar. The principle of operation is similar, there are slight differences in design. The main parts of all mechanical pumps are: inlet and outlet valves, fittings, pusher, diaphragm and rod.
To check the inlet valve, you need to disconnect the hose from the suction fitting. Close the fitting with your finger and pump up the pump manually. If the finger is attracted to the valve, everything is in order - this part is serviceable; if not, the valve must be replaced. The outlet valve is checked by unscrewing the discharge fitting. By placing your finger in the same way and pumping up the lever, you should feel pressure.
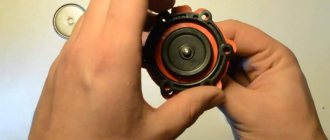
It happens that the filter mesh is clogged. You need to take out the filter, clean it, wash it and blow it with compressed air. In case of obvious deformation or damage, the fuel pump mesh is replaced. If the fuel pump leaks or gets hot, the sealing diaphragms are most likely damaged. To replace them, remove the pump cover and unscrew the nut that holds the rod. Next we remove the diaphragms. In the case of the DAAZ pump there are 3 of them, while Pekar has one.
If the pusher is damaged, you need to unfasten the pump, and leave the heat-insulating insert, gasket and the pusher itself on the engine. Rotate the crankshaft to extend the pusher as much as possible.
We measure the size of the protrusion above the topmost gasket (acceptable value is 0.8 - 1.3 mm). If this value does not correspond, you can try to adjust the gap using thinner or thicker shims. If that doesn't work, change the pusher.
Pinout and diagram of a fuel pump with a VAZ relay
The fuel pump on a car is designed to supply fuel to the combustion chamber. Its operation is controlled using a relay. On a VAZ (depending on the model), the fuel supply unit can be electrical or mechanical - it all depends on the fuel supply system. On a fuel-injected car, the fuel pump is located in the tank. When the ignition is turned on, voltage is supplied to the terminals of the unit and it begins to pump fuel. If the required pressure is created in the system, the relay automatically turns off the fuel pump - the engine is ready to start.
When the ignition is turned on, the relay creates pressure in the fuel lines by turning on the fuel pump (BN) for a couple of seconds. After this, the BN will work either when the engine is cranked by the starter, or when the engine is running.
Sometimes this system needs repairs - there is nothing complicated here, and the editors of the 2Skhema.ru website will tell you how to do it yourself. Let's start with the BN pinout, then we will indicate it on the diagrams and at the end there will be instructions for replacing the fuel supply elements.
Pinout of fuel pump VAZ 2107
1 – radiator fan drive motor; 2 – mounting block block; 3 — idle speed sensor; 4 – engine ECU; 5 – potentiometer; 6 – set of spark plugs; 7 – ignition control unit; 8 – electronic crankshaft position sensor; 9 – electric fuel pump; 10 – indicator of the number of revolutions; 11 – lamp for monitoring the health of electronic systems and the brake system; 12 – ignition system control relay; 13 – speedometer sensor; 14 – special factory connector for reading errors using the BC; 15 – injector harness; 16 – adsorber solenoid valve; 17, 18, 19,20 – fuse box for repairing the mounting block that protects the injection system circuits; 21 – electronic fuel pump control relay; 22 – electronic relay for controlling the exhaust manifold heating system; 23 – exhaust manifold heating system; 24 – fuse protecting the heater circuit; 25 – electronic air sensor; 26 – coolant temperature control sensor; 27 – electronic air damper sensor; 28 – air temperature sensor; 29 – pressure control sensor and low oil pressure lamp.
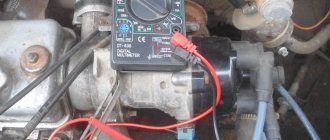
You can check the fuel pump on a VAZ 2107 simply by checking the voltage at its connection block with a tester. The presence of voltage will indicate a malfunction of the electric motor. Instead of a tester (multimeter), you can use a test lamp to diagnose a malfunction.
In the absence of one, this can be done by disconnecting the connection block for the fuel pump and fuel level control and applying voltage with wires from the battery to the place where the gray wire is connected +12 and to the place where the black wire is connected - minus. A humming pump will indicate a faulty fuse, power circuit or ECU.
Work in the salon
Repairing the fuel pump on carburetor VAZ 2108, VAZ 2109, VAZ 21099
This is the most difficult stage of DIY work, because:
- The instrument panel is difficult to install;
- Requires partial disassembly and removal of devices;
- Requires replacement of some terminals.
The VAZ 21099 wiring to the instrument panel injector is connected to the new one after re-soldering the connectors.
Precautions
When working with electrical equipment, the following precautions should be observed:
- Familiarize yourself with the requirements contained in the standard instructions;
- Disconnect the battery;
- Work with terminals and contacts using rubber gloves to avoid unnecessary contamination.
Replacing the pad
The complexity of the upcoming work lies in the fact that on older models the instrument panel wiring harness connectors are made with 9 contacts. And in order not to change it, you can use the old one.
And for this you will need:
- wiring diagram for VAZ 21099 injector for clarity;
- old block, cut from the removed wiring;
- availability of free time and desire.
9-pin header to be replaced
Diagram of devices connected to the block
Step-by-step instructions for replacing the pad are as follows:
- the wire transmitting readings from the speed sensor must be connected to pin 9 of the block (indicated as SP in the diagram);
- The Check Engine signal is sent to pin 8 of the block (BP);
- The fuel consumption sensor transmits information to the trip computer (MC);
- the diagnostic block is connected to the GB and interacts with the BC;
- the electronic tachometer receives information from the ECU and is output to pin 2 of the block (on the gearbox diagram);
- The RF connector provides 12V power and also powers the starter relay. The operation of the Check Engine is also tied to it;
- the starter is started through the ignition switch, and the inverter connector activates an additional relay when the key is turned to the “Starter” position;
- The 12 V ignition switch power is redistributed to the instrument panel via the GPU connector. Also supplies power to the ECU and the fuel pump to start the engine;
- Connector P is responsible for information about the level of gasoline in the car tank.
The process of connecting the block on the gas tank
Connection diagram for electric fuel pump VAZ 21083, 21093, 21099 (injector)
On VAZ 21083, 21093, 21099 cars with a 2111 injection engine, an electric fuel pump is installed. It is located in the fuel module installed in the fuel tank.
For VAZ 21083, 21093, 21099 vehicles with ECM control unit (controller) January 5.1 (2111-1411020-61). Euro-2 toxicity standards (one oxygen sensor).
After turning on the ignition, the control unit supplies 12V to the fuel pump relay. The relay supplies voltage to the fuel pump. It turns on and builds up pressure in the engine fuel system. If there is no signal from the DPKV (the crankshaft does not rotate), the ECU turns off the relay and the pump. If the crankshaft rotates, the relay and the fuel pump work. All this work is accompanied by relay clicks and the buzzing of the electric fuel pump in the gas tank.
Notes and additions
— A similar connection diagram for the electric fuel pump (fuel pump) of VAZ 21083, 21093, 21099 cars with an injection engine 2111 and an ECM control unit M1.5.4N. The only difference is the color of the wires.
More articles on injection engines of VAZ 21083, 21093, 21099 cars
Connection diagram for electric fuel pump VAZ 21083, 21093, 21099 (injector): 1 comment
During the operation of any car, the need arises to replace parts and assemblies. If you intend to install a new injector on a VAZ 21099, then in recent years the automaker has been producing a unit with an M73 21114-1411020-12 Itelma controller, for which you will also have to replace the wiring.
Fuel pump VAZ 2109 injector
>The fuel pump for the VAZ 2108 2109 21099 is installed with an electric injector. That is, it is turned on by supplying +12V voltage from the battery to it. It is located in the gas tank of the car. The task of the fuel pump is to supply fuel under pressure into the fuel rail, from where it is sprayed directly into the working cylinder using the injection system. Checking the performance of the fuel pump VAZ 2108 2109 21099: 1) When the ignition is turned on, the pump should start working. That is, the sound of its operation should be heard in the rear seat area. Therefore, the very first thing you need to do is check the fuse and the fuel pump relay. The assignments of the relays and fuses are labeled on the back of the mounting block cover. If the fuse is intact and the relay is working properly, then you need to remove the back seat of the car and measure the voltage at the fuel pump itself. This is done using a multimeter or wires with a 12V light bulb.
The injection VAZ 2109 has an electric fuel pump
If there is voltage at the pump, then everything is fine with the electrical part; you need to look at the fuel system. If voltage is not supplied to the fuel pump, you need to check the wire from the mounting block to the fuel pump; it may be damaged. 2) On the VAZ 2108 2109 21099 injector, it is not recommended to allow the fuel level in the tank to be less than 10 liters. Not the most convenient requirement, given that the car’s gas tank capacity is 45 liters. However, there is a reason for this: if the fuel level in the gas tank is low, the gas pump may catch air, which is unacceptable.
If you do not have a pressure gauge, the operation of the gas pump can be checked by the amount of fuel pumped per unit of time. Having unscrewed the spool, we connect a hose to the ramp, which we lower into the container for measurement. On Kalina and Grant, the pump should pump 35 liters per hour, or 0.5 liters. in a minute. At ten, the pump pumps 1 liter. in a minute. If much less fuel has leaked out, all filters must be checked. Under the bottom, next to the gas tank, there is a high-pressure filter. Another filter that needs to be checked is located in the tank itself on the fuel module. What to pay attention to: To remove the fuel pump from the car, you must remove the fuel tank. The VAZ 2108 2109 21099 fuel pump and injector cannot be removed directly from the passenger compartment, you can only check the voltage supply to it.
Tips for motorists
VAZ-2109 passenger cars of the last years of production had injection engines, so on these “nines” an electric fuel pump was installed in the fuel tank. And on a small part of the VAZ-2109 with a carburetor engine still in use today, mechanical fuel pumps were installed.
Failure to operate the fuel pump on VAZ-2109i injection engines is determined quite simply, since when the ignition key is turned to the “ignition on” position, the driver simply will not hear the characteristic noise that the running electric motor of the fuel pump makes. Typically, drivers of “nines” begin their search for the cause of a fuel pump failure by checking the condition of the fuse that protects this electrical circuit.
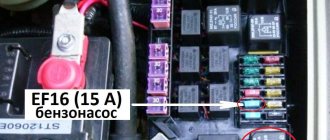
It is located under the front panel shelf, which is located below the glove compartment. When you unscrew the fastening screws, the block of three relays and three fuses on the wires will move lower, so it will be more convenient to work with it. You will need to check the rightmost fuse and the condition of its contacts. If a blown fuse is detected, it will have to be replaced with a new one. And also find the reason why he burned out.
If the fuse is intact and the contacts are not oxidized, then the next step in troubleshooting is to check the functionality of the fuel pump relay. It is located in the same block as the fuse and is located on the far right. Drivers usually check it by replacing it with a known-good relay. If after such a replacement the fuel pump starts working, then you will have to purchase and install a new relay.
But when the fuel pump still continues to be “silent”, then you will need two wires four meters long. They are needed to check the condition of the fuel pump itself by connecting it to power directly from the battery. To do this you will need to: lift the rear seat cushion, remove the hatch cover, disconnect the plug block and connect the wires from the battery to the fuel pump terminals. There are three terminals in the block: one for ground, the negative one from the battery is connected to it, two more positive ones, for the fuel pump and the fuel level indicator in the tank.
If the fuel pump, when connected directly, works, then you will have to ring the wires going from it to the fuel pump relay, and if it does not work, then either replace it with a new one, or you will have to disassemble it and look for a fault inside the fuel pump.
On “nines” with a mechanical fuel pump, the most common malfunction is wear of the fuel pump diaphragm, as a result of which gasoline will leak through the drainage hole in the housing when it operates. The second reason for the failure of such a fuel pump is wear of the pusher, which transmits force from the camshaft cam to the fuel pump drive lever.
Removing and replacing the fuel pump on VAZ 2108, 2109, 21099 (injector, carburetor)
Hello, in this article you will learn how to replace the fuel pump on injection and carburetor VAZ 2108, 2109, 21099. The fuel pump is usually changed if there is low pressure in the fuel system, or the pump does not pump fuel at all. First, let's look at replacing a fuel pump on a carburetor car. In fact, in the case of a mechanical fuel pump, such situations as pump leakage are possible, i.e. when it starts to drip, and if your fuel pump on a carburetor car starts leaking, under no circumstances drive it, gasoline will drip directly onto the hot outlet. Automotive stores sell repair kits for mechanical fuel pumps, but usually repairing a fuel pump has a short-term effect, so it is better to replace it with a new one. In order to remove the fuel pump, you need to unscrew the clamps on the fuel hoses and pull them off the pump (gasoline will flow from the hoses, so prepare some kind of container and plugs for the hoses in advance)
Fuel pump VAZ 2109: how the injector works. Replacement and inspection
You will need to consider the features that the VAZ 2109 fuel pump has. If the injector is in the fuel injection system, then the pump is of an electric type. Its use is due to the need to control the fuel supply to the combustion chambers. But, as you know, gasoline first enters a special ramp, in which it is mixed with air in a certain proportion (14 to 1). It maintains constant pressure, with the help of which the mixture is supplied to the combustion chamber through holes in the electromagnetic injectors. These are devices that transform the air-fuel mixture into very small droplets. Essentially, the mist in which the gasoline is suspended in the combustion chamber is ignited.
How does a fuel pump work?
There is nothing complicated about the fuel supply system. A conventional pump, which is driven by the rotor of an electric motor. To protect the entire fuel system from small particles, a filter is used. But this is not the end of the features, because it is worth noting that it is necessary to maintain the pressure in the ramp at the same level. And the VAZ 2109 fuel pump (the injector simply cannot work without it), provided that it constantly pumps gasoline, will begin to pump up the pressure higher and higher. And this will disrupt the operation of the system.
Therefore, it is necessary to adjust the pressure. For this, a special device is used, which is called a pressure regulator. It is installed in the fuel rail and connected to a pipeline that serves to dump excess gasoline into the tank. When the ignition is turned on, the rail pressure sensor is polled, after which the fuel pump drive is turned on. After the pressure in the rail has increased to the required value, the fuel pump is turned off. Therefore, it does not work all the time.
How to remove the fuel pump
The VAZ 2109 fuel pump is located under the rear seat. The injector implies its installation directly in the tank. The thing is that the pump is a submersible type. In the same unit there is a float-type fuel level sensor. It works due to the fact that the float moves the slider using variable resistance. At the same time, the current in the power circuit changes. The amount of gasoline remaining in the tank is determined by the magnitude of the change. To remove the pump you will need to use pliers, screwdrivers and an 8mm wrench.
It is quite possible that the reason that fuel is not supplied is a non-working VAZ 2109 fuel pump relay. The injector contains it, as well as a fuse, which could easily burn out. Before starting work, thoroughly clean the entire cover so that after removal no dust gets inside the tank. Then, using a screwdriver, loosen the clamps that secure the hoses. Remove them; if you can’t do it with your hands, try gently squeezing them with pliers and twisting them. After this, use a size 8 wrench to unscrew all the nuts that secure the lid to the tank body. Please note that there are washers there. Don't lose them. That's all, now the pump can be easily removed for replacement or repair.
Checking the pump's functionality
It is easy to check the VAZ 2109 fuel pump even without special instruments. The injector will not be able to operate without pressure in the fuel rail. Therefore, you need to keep the pump motor spinning. It’s easy to check; just connect its terminals to the battery. If you are afraid, then turn on an incandescent lamp in the gap of one wire. It will help determine the health of the motor winding. Please note that the filter must be as clean as possible. If it is clogged, be sure to change it. Otherwise, the pump will not be able to create the required pressure.
Checking the pump characteristics
As you can see, the main reasons for a non-working fuel pump are valves, filters, hoses, and diaphragms. At the outlet we get insufficient pressure. How to measure this pressure, and within what limits is the norm? Firstly, you need to know exactly the nameplate value of the output pressure to the carburetor of your car at idle speed. Approximately the indicator should vary from 0.2 to 0.35 atm.
Measurements are carried out using a pressure gauge with a division value of 1.6 atmospheres. If the pressure is not much less than normal, replacing individual parts may help solve the problem. But if there is a significant deviation, the VAZ 2109 fuel pump will most likely need to be replaced. Timely maintenance and rational use help to avoid this.
In addition to the pressure indicator, in order to repair a part, you should know the characteristics of the pump itself. If the linear parameters have changed, the tightness and stability of the entire mechanism may be impaired.
The rod must have a length of 82.4 mm and protrude above the gasket by no less than 0.8 mm and no more than 1.3 mm. The thickness of the closest gasket is 0.3 mm. The stroke of the rod should be in the range from 2.5 to 2.8 mm.