01/26/2022 3,588 VAZ Niva
Author: Ivan Baranov
As you know, the purpose of power steering, be it electric or hydraulic, is to provide more comfortable rotation of the steering wheel. Currently, almost all models of manufactured cars are equipped with power steering or electric steering, and in those cars in which the manufacturer did not provide for their presence, you can install the amplifier yourself. In this article we will look at how to install hydraulic power steering and electric power steering on a Niva and whether this makes sense.
[Hide]
Operating principle of EUR and power steering
Before installing the amplifier in the VAZ 2121 with your own hands, let's look at the operating principle of the systems, starting with the power steering. When the steering wheel is in the central position, it is fixed using centering springs. In this position, the liquid circulates through all elements of the system, provided that the distributor is positioned correctly. In this case, the power steering pump operates in enhanced mode, which is due to the need to pump fluid through the system. Moreover, it always functions, regardless of whether the steering wheel is turning or not.
When the steering wheel is turned, the spool moves, as a result of which the element blocks the drain lines and liquid begins to flow into one of the cylinders. In this case, the piston, as well as the rod, are exposed to oil under pressure, which leads to the rotation of the wheel, as well as the housing, in a certain direction. The spool overtakes the device body when it stops moving, which indicates that the driver has completed the turning maneuver. In this case, the spool returns to its original position, and then the hose opens to drain the liquid.
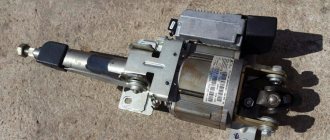
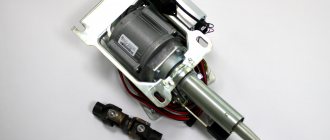
As for the principle of operation of the electric power steering, the amplifier itself is mounted on the steering shaft of the vehicle. Its component parts are connected to each other using a torsion shaft, with an installed engine speed reading controller. When the driver turns the steering wheel, the torsion shaft twists, which is detected by the torque sensor. In accordance with the information received from the torque, speed and engine speed controller, the control module determines the compensation force, as a result of which it sends a command to the amplifier electric motor.
Security measures
If during operation of your car a pump fails, or a hose is damaged, or any other breakdown associated with the steering mechanism, repair the breakdown immediately. Reduce driving in this condition as much as possible. It is not safe.
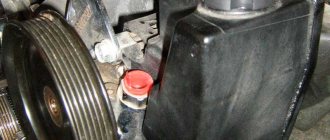
The power steering pump periodically needs to be inspected and cleaned. Don't let it become inoperable.
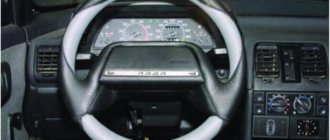
Steering wheel for Niva (VAZ 2121). First, let's tell you why power steering is needed in general. Its main function is to provide sufficient stability in the event of a sudden drop in tire pressure. It is also indispensable in extreme vehicle operating conditions - power steering will increase dynamic cross-country ability. An undoubted and tangible advantage of cars equipped with a hydraulic booster is that it reduces the force requirements on the steering wheel by three times, that is, it becomes much easier to drive the car.
The feasibility of installing EUR and power steering
Does it make sense to install an electric or hydraulic booster on your car? The only, but most important thing that such an installation can provide is to provide more comfortable driving. But you need to take into account that installing such a system is a rather complicated task that not everyone can cope with. At the same time, its cost is quite high, and if you cannot install the unit yourself, you will also have to pay a substantial amount for installation. Therefore, you need to decide whether it is profitable for you to install an amplifier from an economic point of view (the author of the video is Gennady Martynyuk).
Delivery by transport company
Delivery by one of the transport companies with a representative office in your city. Delivery time: 2-10 days depending on the distance of your locality from Togliatti. The most convenient and fastest way to deliver orders of different sizes. Delivery cost from 250 rub. depending on weight and delivery distance.
Orders are sent by transport companies based on 100% payment for the order.
We cooperate with:
PEC
Find the nearest representative office, track the cargo and calculate the cost of delivery
pecom.ru
Business Line
Find the nearest representative office, track the cargo and calculate the cost of delivery
dellin.ru
Baikal Service
Find the nearest representative office, track the cargo and calculate the cost of delivery
baikalsr.ru
Energy
Find the nearest representative office, track the cargo and calculate the cost of delivery
nrg-tk.ru
GTD (formerly KIT)
Find the nearest representative office, track the cargo and calculate the delivery cost
https://gtdel.com
Zheldor expedition
Find the nearest representative office, track the cargo and calculate the cost of delivery
jde.ru
SDEK
Find the nearest representative office, track the cargo and calculate the cost of delivery
edostavka.ru
If you do not know which method of delivery of goods will be more convenient for you to use, then place an order for any method, and when our manager contacts you to confirm the order, he will recommend you the most optimal method in terms of cost and delivery time for your order. No matter what region of Russia you live in, there is always a profitable and convenient delivery method for you.
The lead time for placing orders with “In Stock” items is 1-4 business days, after receipt of funds (orders are not generated on Saturday and Sunday). Lead time for orders that include painting services: 3-8 business days. The lead time for placing orders and “made to order” items is from 14 days; you can check with the manager for more detailed information.
Delivery is carried out throughout Russia and the CIS. Orders for pickup are placed on the website, the processing time is on average 1-4 business days, after the items arrive at the pickup point, the manager will notify you when you can receive your order.
Attention! Regardless of which delivery method you choose, check the integrity of the goods and packaging upon receipt of the cargo (parcel).
ATTENTION! All fragile goods (headlights, plastic products, glass, etc.), by default, are sent in additional paid packaging from TK. If you take responsibility for integrity, we can ship without it. To do this, you need to make a note in the comments when placing your order. For additional information, please contact the managers.
To improve the quality of customer service, video recording of order packaging is performed.
Detailed instructions for installing electric power steering on a Niva
The procedure for installing the EUR with your own hands is as follows:
- First you need to disconnect the battery.
- Then the plug is removed from the steering wheel, the fixing nut is unscrewed, and the steering wheel itself is dismantled. You also need to unscrew the four screws and remove the plastic cover.
- The mounting bolts are unscrewed and the instrument panel is dismantled. Disconnect the steering column switch plug, unscrew the bolt that secures it, and then remove the device.
- Then the ignition switch wiring is disconnected, the device itself is removed, to do this, unscrew the two mounting screws and turn the key to position I.
- The next step is to dismantle the steering column; to do this, you need to unscrew the steering shaft screw, as well as several mounting screws and nuts. Please note that Nivas use screws with shear heads, so the best option would be to apply notches using a chisel and unscrew them with pliers. Next, the column itself must be lowered down and then dismantled.
- After this, unscrew the nuts on the mounting blocks with fuses and remove them. Also remove the relay cover located under the instrument panel.
- The interior and engine compartment are separated from each other by a partition; it has an elastic plug, which must be removed. The EUR wire is pulled through the hole. Make sure that the installed wire does not come into contact with moving components of the wiper motor.
- Under the dashboard itself, to the left of the steering wheel, there is an 8-pin connector, two gray wires are connected to it. The yellow-blue one from the EUR should be connected to this connector. Then, to the red block, which comes from the tidy, you need to connect the orange and blue-pink wires from the electric amplifier. Here, behind the instrument panel, you can find a ground bolt; you should connect the minus to it.
- An amplifier bracket is installed under the tidy; the wiring from the ignition switch should be threaded into it.
- Next, an intermediate shaft should be installed on the splines of the amplifier itself; remember that a ground should be connected to it in advance. The shaft itself should be securely fixed to the steering gear shaft and the EUR should be attached to the bracket. The shaft must not be pinched or too tight.
- The assembly itself is fixed to the plate using two bolts and two studs; it is advisable to install nuts under them.
- Next, the power and information connectors are connected to the amplifier.
- In fact, the installation procedure can be considered complete. Now you need to reinstall the ignition switch and steering column switch. To install the steering column trim, it will need to be cut, for example, with a hacksaw. The steering wheel and dashboard are put in place. Then the wiring is pulled from the EUR to the battery. Please note that in the existing plug in the partition between the engine compartment and the passenger compartment, it will be necessary to increase the size of the hole. Perform a functional check of the equipment and check all connections again.
Photo gallery “Installation Help”
Possible malfunctions of the EUR on the Lada Grante Liftback (Sedan)
| See all advertisements in the archive |
| Malfunction | Diagnosis | Elimination method |
| The diode on the side pillar glows due to a faulty speed sensor. | Checking the serviceability of the speed sensor by dismantling it and ringing it with a multimeter. | Replacement of the sensor with a new one, since the design is not subject to repair (partial, complete). |
| Low voltage in electrical wiring. | Checking the integrity of the insulating layer and contact terminals. | Replacement of damaged cable sections, insulation of connection points. |
| The electric amplifier rotates slowly. | Checking the voltage supply to the input contacts from the relay regulator. | Replacing the relay regulator. |
| During rotation, a characteristic creaking, metallic grinding sound is heard. | Dismantling the EUR, disassembling it into its component elements, checking the condition of the rolling bearings. | Replacement of two rolling bearings with new ones. |
Features of installing power steering
Briefly about the features of installing power steering on the Niva:
- First, the central nut of the steering wheel is unscrewed, after which it is dismantled. A puller may be required to remove the nut. The universal joint is also removed from the steering wheel.
- Then the fan strap is loosened.
- After installing the hydraulic booster, you need to fill the system - to do this, unscrew the expansion tank cap and fill the system with oil to the required level. After this, the steering wheel should be turned to its extreme positions several times with the engine turned off, this will get rid of the air lock in the system.
- When bleeding the system, it is recommended to jack up the front of the car or disconnect the steering rod from the bipod. Next, the engine is started and the required amount of liquid is added to the system. If you notice that after adding the oil it begins to foam, this indicates that air has entered the power steering hoses. Then you will need to turn off the engine and wait a while until the bubbles stop coming out.
- The procedure is carried out almost identically to installing the EUR, only there are some nuances. Before you begin the process, carefully read the service book that comes with the kit (the author of the video is the Andrew Humm channel).
Review of prices of manufacturers of electric power steering for the Lada Granta
| Name/article | Price, rub.) |
| OJSC "AVTOVAZ" 11117-3450008-02, voltage 13.5 V, current 55 A, weight 9.0 kg. | From 23500 |
| OJSC "AVTOVAZ" 11186-3450008-02 | —/— |
| OJSC "AVTOVAZ" 2172-3450008-02 | —/— |
| JSC "Prosport" RE-49114 | From 24000 |
| RE-49113 | —/— |
| OJSC "LadaCenter" FR-00001716 | From 25000 |
| JSC "Autoelectronics", 11186-3450008-02 (122.3405010-02) | —/— |
*prices are current as of October 19, 2018.
The nuances of adjusting the steering wheel position
As for the adjustment, it is usually performed if the driver is not satisfied with the height position of the steering wheel. To adjust the EUR, you need to grind off the edges of the shaft to the required dimensions or install a gasket between the mechanism body and the plate.
Price issue
As for the price, it depends on the type of amplifier, as well as the store where the kit is purchased. The cost of an ESD kit today averages about 27-32 thousand rubles. As for the hydraulic booster, on average the installation kit will cost the buyer from 31 to 40 thousand rubles. You can assemble a power steering system from different parts from different cars, for example, install a column from an Opel or Nissan, and a pump from a BMW or other car models. But you will have to tinker, since you will need to perform more than one alteration.
Loading …
Price issue
Wanting to install an EU on a VAZ 2110, many car owners are interested in how much the installation will cost them.
We cannot say the exact prices of such services at car services, since each service station has its own pricing policy. If you plan to do the installation yourself, then we suggest that you familiarize yourself with the approximate price list for everything that you will need during the work process.
Electric power steering VAZ 2110
The steering wheel of a car is the main means of control for a motorist. Driving skill depends on the ability to turn the steering wheel. Today, the automobile market is filled with many different models of different classes: from minivans to heavy trucks. Maybe this is what led to the creation of the EUR. It is noteworthy that the electric power steering on the VAZ 2110 can significantly increase the convenience and efficiency of the steering wheel. Installing electric power steering on a VAZ 2110 is a topical and in-demand issue lately.
Previous posts from the category: NIVA CHEVROLLE
Fuel pump design The Chevrolet Niva fuel pump is located in a gas tank and is combined into a common module with a fuel pressure regulator and a gasoline level indicator. The electric submersible pump has a commutator motor.
Changing the chain tensioner on a Chevrolet Niva
Hydraulic Chain Tensioner The chain tensioner is one of the parts of the gas distribution system that relates to the engine camshaft. It is located in front of the “head” of the cylinder block under the cooling system nozzle.
You can make payment in one of the ways convenient for you:
- To a SberBank or Alfa-Bank card. The most profitable method for the buyer, as well as the most convenient one, is to use the Sberbank Online service, Alfa-Click, an ATM, or through an operator at the bank. After placing your order, the manager will send you the card details. If you do not have a SberBank or Alfa-Bank card, you can also top up your card using the details at any SberBank or Alfa-Bank branch. Payment is credited within an hour.
- Yandex money. Customers who have Yandex.Wallet can quickly and easily pay for an order in our online store, the commission will be 0%.
- Yandex.Checkout is an online payment acceptance service. A convenient option with a large selection of payment methods for your order: plastic cards of any banks, including credit cards, in cash through terminals, ATMs or phone shops, Qiwi Wallet, Yandex.Money, WebMoney, from your phone balance, purchase on credit (payment in installments) . Please carefully check which email address you provided during the ordering process, as you will receive a receipt for payment for your order. Yandex.Checkout commission for transfer will range from 3% to 6% .
- QIWI wallet. If it is more convenient for the client to use a QIWI wallet or, if it is not available, to pay through the nearest QIWI terminal, the manager will provide you with the wallet number. Commission 0%.
- Payment at any bank using an invoice or receipt (+3% to the cost). If you do not use electronic wallets and plastic cards, we provide the opportunity to make payments at any bank in Russia. The site manager will send you a pre-filled receipt “Form No. PD-4” by e-mail; please carefully check the e-mail address you provide. The bank commission will be approximately 3% and depends on the bank itself
- Cash on delivery upon delivery by the Transport Company (payment for purchase upon receipt of the order).
- Cash on delivery upon delivery by Russian Post (payment for purchase upon receipt of the order). The order arrives at the post office, after which you pay its cost and pick it up, in which case the Russian Post charges a commission.
Technical characteristics of the VAZ 2123 engine
The VAZ 2123 power unit has a working volume of 1690 cubic meters. cm. It is naturally aspirated and runs on gasoline fuel. His weight is 127 kilograms. The electronic fuel injection system increased engine power to 80 hp, and the torque is 127 NxM, which becomes available at around 4000 rpm.
On the highway the car can reach a speed of 140 km/h. A five-speed manual gearbox is responsible for shifting gears. Highway consumption does not exceed 8.5 liters per 100 km. In the city it increases to 14 liters per 100 kilometers. In such an engine, for its stable operation and responsive traction, it is recommended to fill AI-95 gasoline.
A timing belt with a hydraulic chain tensioning system requires increased oil pump performance. To increase productivity without increasing power, engineers reduced the number of teeth on the pump drive gear.
To lubricate the engine, 3.5 liters of oil is required. Both synthetic and semi-synthetic oils are suitable. The only thing that requires attention is the viscosity indicator, which must correspond to the 5W30 index. To preserve the life of the Chevrolet Niva engine for many years, it is recommended to change the oil every 10,000 km.
Replacing power steering fluid in Chevrolet Niva
Tools:
- Key for 10
- Container for draining liquid
- Phillips screwdriver
Parts and consumables:
- Fluid - power steering oil
- Rags
Notes: Replace the fluid in the power steering system if it is excessively dirty. The manufacturer does not give clear recommendations on the frequency of replacing fluid in the hydraulic system, so we recommend replacing it after six years, regardless of its condition.
For use in the hydraulic system of the amplifier, the manufacturer recommends a fluid - Pentosin Hidraulik Fluid CHF11S oil. However, for technological reasons, cars starting with VIN No. X9L21230040005880 use Shell Donax TA D-21631 (Dexron II) hydraulic fluid in the hydraulic system, and with VIN No. X9L21230040006248 - Ravenol Dexron II D. Cars filled with Shell Donax oil have a mark on the tank - “*”, and cars filled with Ravenol Dexron II D are marked “R”, but on cars of the latest production these marks may not be present.
Dexron II fluids (red) cannot be mixed with Pentosin Hidraulik Fluid CHF11S (green). It is possible to completely replace the fluid after flushing the power steering hydraulic system.
When using Dexron II fluids, reduce the period of use by half the recommended time.
1. Remove the coupling bolt of the power steering reservoir reservoir bracket.
2. Unscrew the tank cap.
3. Remove the reservoir from the bracket and drain the liquid from the reservoir into a suitable container.
4. Loosen the clamp securing the outlet hose and remove the hose.
5. To prevent fluid from leaking out, plug the hole in the tank fitting and lower the end of the outlet hose into a container for drained fluid. Start the engine and, turning the steering wheel from lock to lock in both directions three or four times, drain the old fluid while adding new fluid. Repeat the operation until fresh fluid appears from the outlet hose.
Warning: Carefully monitor the fluid level in the reservoir and do not allow air to enter the power steering pump. This may damage the pump.
6. Install the tank in the reverse order of removal.
7. Add fluid to the level of the upper mark on the dipstick of the reservoir plug.
8. Bleed the power steering system as described here.
The article is missing:
High-quality photos of repairs
carpedia.club
Motor device
Briefly about how the VAZ 2123 Chevrolet Niva engine works.
Cylinders
They were combined with the upper part of the crankcase. Like most VAZ engines, this power unit has cylinders operating in a 1-3-4-2 pattern. The lower part of the cylinder block is connected on five supports to the crankshaft.
1 — tension roller of the air conditioning compressor drive belt; 2 — air conditioning compressor drive belt; 3 — air conditioning compressor clutch; 4 — thermostat; 5 — throttle assembly; 6 — outlet pipe of the cooling jacket; 7 — coolant pump pulley; 8 - phase sensor; 9 — tension roller for the auxiliary drive belt; 10 — cylinder head; 11 - generator; 12 — power steering pump pulley; 13 — support roller for the auxiliary drive belt; 14 — cylinder block; 15 — auxiliary drive belt; 16 — crankshaft position sensor; 17 — auxiliary drive pulley; 18 — air conditioning compressor drive pulley; 19 — oil pan; power unit support; an exhaust manifold; receiver; cylinder head cover;
Crankshaft
Five-legged. Cast from cast iron. If necessary, the journals can be reground with a diameter reduction of 0.25; 0.50; 0.75 and 1 mm.
Exhaust valves
Welded in two parts. One is an alloy of chromium, nickel and molybdenum, and the other is made of multi-component steel. The operating temperature of the exhaust valves is 700-900 degrees, since during engine operation they are heated by processed gases. In order for them to withstand such temperatures, a special heat-resistant alloy is applied to them.
Intake valves
Their rods are treated with nitrogen and hardened under the influence of high frequency current. This is enough to withstand operating temperatures of 350-500 degrees.
Pistons
The VAZ 2123 engine has pistons cast from an aluminum alloy. A layer of tin is applied to them to make the process of breaking in the car faster. The piston stroke is 80 mm, and it itself has a diameter of 82 mm. The compression ratio is at 9.3 atmospheres.
Camshaft
Cast from cast iron and installed in a removable aluminum housing. Its rotation is carried out by a single-row roller chain.
Chain
It is stretched by a spring-hydraulic tensioner. Its size has increased significantly. Until the engine starts, the tension is carried out by a spring, and during its operation it is provided by oil pressure.
Attached to the block itself with 11 bolts. Centering is performed using the power of two bushings.
Crankcase ventilation system
Closed, and crankcase gases are discharged through the oil separator into the intake pipe. From there they are transferred to cylinders and burned.
Main elements of the system
The design of the VAZ-2123 provides refueling tanks that ensure smooth functioning of the mechanisms.
The main elements of the system include the following filling containers:
- fuel tank;
- transmission housing;
- power steering;
- cooling system;
- engine lubrication system;
- axle and transfer case housings;
- container for hydraulic drive of the brake system;
- tanks for washer fluid;
- containers for refilling the air conditioner.
To improve the performance characteristics of an SUV, working fluids must be poured in quantities recommended by the developers of the Chevrolet Niva.
Unpredictable operation of the electric amplifier
If such a malfunction occurs, it is absolutely prohibited to continue driving, otherwise, due to this breakdown, you can get into a traffic accident or fly off the road. To continue further movement, just turn off the amplifier. To do this, you need to remove the fuse responsible for power supply to the electric power steering, after which you can continue driving without the amplifier.
To eliminate the breakdown, most likely, you will have to completely replace the electric amplifier. It is not recommended to carry out replacement in a garage environment. To do this, it is better to contact a specialized service station. After replacing the electric booster, it is advisable to perform adjustment work on all components of the steering mechanism.
Story
I have already said many times that I do not do tuning or modifications for the sake of the process. Only if there are problems. In this case, it all started with the “collective farmers” of AvtoVAZ. For a very long time, the plant installed German ZF power steering pumps on the assembly line, and then suddenly the Russian version came into use. As usual, the plant was not going to give any explanations, so I had to turn to another source, the manufacturer ZF.
A technical seminar was held in St. Petersburg, organized by this company, and I asked the German a question about this situation. Directly at the lecture (that is, the official position), the German specialist said that this is a trade secret. And during the lunch break, when I addressed him in German, he straightened up and said the following. Quote.
Along with the supply of pumps, we gave a recommendation to AvtoVAZ on what SHOULD be poured into the system. At first, the plant filled in an approximate analogue of the liquid that we recommended, and then suddenly it began pouring green Pentosin. The result was not long in coming - leaks and a humming sound when turning. But the funny thing is that all these “supposedly” warranty cases were transferred to the shoulders of ZF.
Also interesting: Refinement of the Chevrolet Niva stove - Auto magazine MyDucato
The German said that we “butted heads” with the plant a little, did not get clear answers from the managers and management and simply stopped supplying this spare part. End of quote. Now we come to a simple conclusion: in order to get a working unit, as intended by the designers, we need to flush the system and fill it with what is recommended. The fluid is simple, good synthetic dextron, but along with it I recommend replacing the low pressure hoses.
Preparation for installation
Alas, not every “ten” has a native electric amplifier. But this is not a problem, since the unit can be installed with your own hands. The work is not very difficult, because if you follow the instructions, you can do everything yourself perfectly.
The main advantage of self-installation is the impressive savings in money. The unit itself is expensive, and installation at a service station will cost almost the same amount.
At the preparation stage, you should purchase and prepare tools and materials in advance:
- New electric booster;
- Plate;
- Wiring kit;
- Promval;
- Cover and steering wheel;
- Set of different screwdrivers;
- Drill;
- Ruler.
Since we are talking about an electrical device, all kinds of oils and lubricants are not required here.
Installation
When everything is ready and you are ready to work, you can begin installing the power supply.
- Remove the standard terminal from the block and insert it into the block on the harness.
- Now the free terminal, which comes off the harness, is placed in place of the standard drive adjacent to the block. This will allow you to pass the standard wire between the two harnesses. The wire coming from the blocks has a rating of 50 Amps.
- Next, disconnect the shaft casing, and then remove the ignition switch. Be sure to separate the switches. This stage is carried out carefully and slowly so that the casing does not crack.
- Unscrew the steering rack mounting bolt and remove it.
- Measure the length of the hole. If necessary, use a trim plate. We recommend recording the received parameters.
- An electric amplifier must now be installed in the vacated area.
- Please select the correct size shaft as it will not fit on the steering rack. To adjust the shaft, you will need a plate and a regrind for the shaft from Priora. By the way, when installing power units, elements from the Priora model are excellent. Take note of this.
- After adjusting the plate, drill a larger recess than there is now. The shaft is a hollow structure, so any metal drill can easily cope with the task.
- The plate is placed on the amplifier and the resulting depth indicator is checked. If everything fits, secure the structure with a small bolt.
- Put all the switches back in place and start working on the wiring.
- It is necessary to remove two wires from the interior that go directly to the battery. This is done through the left wing.
- Remove the washer fluid reservoir and take a piece of wire. It will be needed to secure the wires leading to the battery. They are attached to the end of the opposite one, passed and pulled through both at once.
- Remove the instrument panel and remove the red colored block. Carefully tighten the wiring into the under-panel space.
- Now he removes the orange wire from the red box.
- The red block is attached to this wiring and combined with the wiring from your electric amplifier. Don’t forget to place the end of the wiring with the “bare” terminal from the amplifier onto the free standard wire located in the red block.
- The operation is performed in a similar way with the gray wiring, which is also located in the red block. It is pulled into its regular place and secured with terminals.
- Next, we move to the battery, securely fix the black negative wire to the pink positive wire.
- All that remains is to connect all the wiring from the power unit and start it up.
- At this point, the installation is almost complete. You should definitely assemble all the components, return the components to their original positions - switches, casing, steering wheel, etc.
Customizing the EU
If you do not have experience in such work, you will definitely need to adjust the electric amplifier after completing the installation work.
Fitting includes the following activities:
- Steering wheel alignment;
- Elimination of all gaps formed between parts;
- Reducing the length of the power cable;
- Checking the installation of LED diagnostic sensors for the EU;
- Replacement of worn or damaged elements if necessary and available.
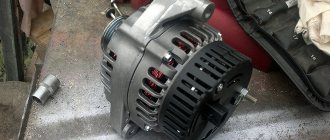
Removal
Over time, the power steering wears out or breaks, so it needs to be replaced, but to do this it needs to be removed, this can be done as follows:
- The first step is to remove the belt that drives the power steering, as well as the protection of the pan with mud flaps of the engine compartment.
- We pump out all the liquid from the tank
- We take a screwdriver and stop the pulley, loosen the bolts that secure it to the flange
- Unscrew all the bolts and remove the pulley
- Drain the remaining liquid
- Disconnect the hose
- Unscrew the bolt fitting
- Seal the hose tip with a special washer
- We unscrew all the existing fasteners, including the top bolt, and remove the pump.
After the pump is removed, it can be repaired.
Read news about the new Niva
- Auto parts catalog for Chevrolet Niva 1.7
- Replacing and adjusting the front wheel bearing Niva
- Chevrolet Niva engine and its volume
- TOP 10 cool products for Lada Niva 4x4 from China from Aliexpress. Tuning VAZ Niva / Selections, listings, top 10, etc. / iXBT Live
- Freewheel: what is it and why is it needed, advantages
- ▷ Which winch to put on the Niva: calculation of traction, installation location, nuances
- side member amplifiers - Niva tuning
- VAZ Niva 2121 tuning recommendations