Which TRN is suitable for LADA
| Generator, article number | Automobile | TRG, article number |
| 26.3701, 37.3701, 371.3701, 372.3701 | VAZ-2107, -2108, -2109, -2110, OKA | 67.3702-01 |
| 3002.3771, 332.3771, 3202.3771, 3212.3771, 4302.3771, 94.3701, 9402.3701, 9422.3701, 3740.3771-38, 3743.3771-61, 3747.3771- 93, eld-a-21214, LG01214 | VAZ, GAZ | 67.3702-02 |
| 4052.3701, 409.3701, PRAMO “ISKRA” 5102.3771, -10, 5112.3771, -10, 5122.3771, -10, -30, 5142.3771, AAK 5727 | VAZ, GAZ, UAZ with generators PRAMO “ISKRA” 5102.3771, 5122.3771 | 67.3702-04 |
| G222 | VAZ-2104, -2105, -2107 | 67.3702-09 |
| 26.3701, 37.3701, 371.3701, 372.3701 | VAZ-2107, -2108, -2109, -2110, OKA | 67.3702-11 |
| 3002.3771, 332.3771, 3202.3771, 3212.3771, 4302.3771, 94.3701, 9402.3701, 9422.3701, 3740.3771-38, 3743.3771-61, 3747.3771- 93, eld-a-21214, LG01214 | VAZ, GAZ | 67.3702-12 |
| generators with an additional three diodes, the excitation winding of which is connected to the positive circuit | 673.3702 |
Operating principle of the voltage regulator (VR)
RN is structurally an electromagnetic relay and a series-connected transistor circuit with resistances, which themselves are connected in series to the excitation winding on the generator stator. The physical meaning of the activity of an electronic launch vehicle is as follows.
The generator voltage is unstable and changes abruptly. As it increases, the electric relay turns on additional resistance, which limits the excitation current and the voltage decreases. If, on the contrary, the voltage drops below the permissible value, the relay turns off the resistance and the magnetic flux in the field winding increases, and the generator voltage increases. Since this is all a high-frequency process, the voltage in the automotive electrical network remains within an acceptable stable value.
If we consider the launch vehicle in a practical sense, then this device solves the following problems:
- this device activates the electric generator;
- it exercises autonomous control over the output of alternating current;
- maintains a constant set voltage value, regardless of the amplitude of oscillations generated by the primary windings of the generator.
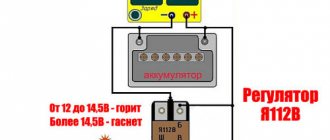
For the generator model 9402.3701, which is mounted on a VAZ 2114, a voltage regulator 611.3702-14 is installed. This electrical appliance is mounted complete with a brush assembly. Technical characteristics of the launch vehicle:
- rated voltage supported by the regulator is 14.5 V;
- rated current - 5 A;
- maximum weight - 60 g;
- size - 66x55x32.
Installation and connection instructions
For Lada cars (except Vesta, XRAY)
, photo author:
2.
Remove the plastic casing of the generator. To do this, first disconnect the generator excitation wire. Then unscrew the nut from the stud (10mm wrench) and move the power wire to the side. Next, 3 latches on the plastic casing are unfastened.
3.
Remove the standard voltage regulator from the generator. To do this, unscrew two screws ("8" key) and disconnect the wire.
4.
Install a three-level voltage regulator on the generator instead of the standard one.
5.
Output 2 wires for the control module. The module itself should be mounted in conditions of reliable contact with the “ground” and as far as possible from the possibility of moisture ingress. For example, on a hairpin near the right headlight.
For Lada Vesta, XRAY cars (with Valeo TG12C209 generator).
This generator is no different from the previous ones, the only difference is in the voltage regulator. It communicates with the engine ECU via a “lin” interface. The task of this “lin” is to avoid loss of throttle response at power modes. By installing the TRN, we cut off the ability to control the regulator using the ECU!
For this generator there is no ready-made solution in the form of a TRN yet, so the design will have to be modified.
- three-level voltage regulator (article 67.3702-01)
- 2-pin block 904576 NORD YADA
- generator voltage regulator (leave the standard one (if the brushes are live) or ARV1103AD)
- wire for powering the regulator (2 meters)
How to check the relay on a VAZ 2110?
To analyze the condition of the regulator, you need to purchase a voltmeter, which has a measuring scale in the range of 15–30 volts. The check is performed as follows:
- start the car engine at medium speed and let it run for a quarter of an hour (the operation is carried out with the headlights on);
- A voltmeter is used to determine the voltage between the “ground” of the generating device and the “plus” on the battery.
If the measurement shows a voltage value from 13.5 to 14.2 volts, replacing the regulator is not necessary. But in situations where the voltage has a different value, indicating a constant overcharging or undercharging of the battery, the relay needs to be replaced.
You can also remove the voltage regulator and check it together with the generator brush holder. To do this, a 12-volt light bulb with a power of 1–3 watts is placed between the brushes, a power source is connected to the “ground” and the positive terminal of the battery, from which a voltage of 12 volts is first supplied, and then 16 volts.
If the light comes on at 12 volts and goes out at 16, replacing the regulator on a VAZ 2110 is not necessary. If the lamp does not light up, this indicates that there is no required power contact between the relay terminals and the brushes, or that a break has occurred. And the burning of the lamp at 12 and 16 volts indicates a breakdown of the regulator.
Checking the work
- Switch position “min” - for operation at high ambient temperatures (above 20ºС), as well as during operation in particularly difficult conditions (traffic in traffic jams, long climbs in the mountains, etc.);
- The middle position of the switch is for operation at ambient temperatures from 0ºС to 20ºС;
- The “max” switch position is for operation at low ambient temperatures (below 0ºC), as well as for recharging a discharged battery.
Average load (PTF, dimensions, music and heater fan at first speed)
:
Maximum load, maximum number of consumers activated
:
Will you be installing a three-level voltage regulator on your car? Take part in the survey and leave your feedback in the comments.
Let us remind you that another reason for low voltage on the on-board network may be a bad ground.
Share on social networks:
Found an error? Select it and press Ctrl+Enter..
Source
Symptoms of a problem
So in case of low voltage, the battery simply will not charge.
This means that in the morning the car will not be able to start, the light on the dashboard may not even come on, or problems will arise while driving.
For example, dim lights at night, unstable operation of the electrical system (problems with electrical appliances - wipers, heating, radio, etc.)
High voltage can cause the electrolyte level in the battery cells to drop or boil. This may cause a white residue to appear on the battery. If the battery is overcharged, it may not behave correctly.
Signs, malfunctions and repair of the generator and voltage regulator
In addition, you can also pay attention to the following signs of voltage regulator failure (in some cases, some of them may or may not be present, it all depends on the specific situation):
- after turning on the ignition, the warning lamp on the instrument panel does not light up (however, it may indicate other malfunctions, for example, a lamp has burned out, a contact has fallen off, etc.;)
- the battery control light on the instrument panel does not go out after starting, which means that there are obvious problems with charging the battery;
- The brightness of the headlights becomes dependent on engine speed (you can check this somewhere in a secluded place by placing the car against a wall and accelerating - if the brightness changes, the voltage regulator is probably faulty)
- the car does not start normally the first time;
- the battery is constantly discharged;
- indicators on the instrument panel turn off when engine speed exceeds 2000 rpm;
- the dynamic characteristics of the machine are reduced, this is especially noticeable at high engine speeds;
- In some cases the battery may boil over.
Generator voltage regulator VAZ 2112 16 valves
To check the operation you will need:
– power supply with adjustable voltage up to 20 V or battery charger.
1. We prepare the car for work and disconnect the wire block from the negative terminal of the battery (see “Preparing the car for maintenance and repair”).
2. Disconnect the wire block from terminal D of the generator and remove the protective cap.
3. 10 mm
unscrew the nut securing the wire lugs to the “+” terminal of the generator.
4. Remove the ends of the two wires from the contact bolt.
5. Release the three spring clamps securing the housing of the rectifier unit.
. and remove the casing from the generator.
Instructions for installing a new type voltage regulator in Niva VAZ-2121-21213-21214-2131
After purchasing the Niva, I was always surprised by the operation of the generator. Even after replacing the original one with a more powerful KZATE 80A from 21214, the voltage of the on-board network varied greatly depending on the load: headlights + stove = decent landing at xx. How so?! There are 1 million electronics in my Mercedes. times more and its native 90A Bosch, even at full load, provides a stable 14.2V in winter and clearly 13.7V in summer on a warmed up car. Whatever I turn on or turn off, the voltage DOES NOT CHANGE at any engine speed! Only when starting a cold engine in cold weather does the voltage rise to 14.7V. With all this, Mercedes does not provide any three-level voltage regulators. Taking into account the not very large difference in the power of the generators (80A Niva versus 90A Mercedes), we draw conclusions about the efficiency of their voltage regulators (VRs)... Fortunately, the domestic auto industry began to “catch up” with the foreign ones and released a new type LV, analogues of which have been in use in foreign cars for about 20 years -30., and they are installed on Shnivas, Priors, Kalinas of the latest releases. Features of the new sample launch vehicle are: 1st
and the main thing: the voltage is controlled at the B+ pin, i.e.
essentially on the battery itself, and not on the output of additional diodes, 2nd
: no external voltage is needed at terminal D (the one to which the thin wire is connected) to power the excitation winding, because
it is taken from the output of one of the windings, i.e. pin D is used only for the operation of the charging indicator lamp (by the way, the new model LV “can” signal both a lack of charging and an overvoltage) and for the signal to turn on the generator, and 3rd
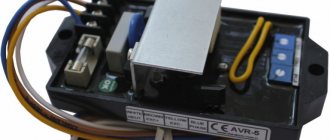
: power is supplied to the excitation winding after “spin up” generator up to 400 rpm (not to be confused with engine speed!), this is useful during cold starts, because an unexcited generator does not create a load on the starter. Now about the installation of such a launch vehicle in the VAZ 21214 KZATE 80A generator. I came across RN 845.3702 “Orbita” from Chevrolet Niva (but there are other analogues on sale that are compatible with our boot: 941.3702 - Autoelectronics, 611.3702-05 - Energomash, 7931.3702 I4 - Electromodul, Belarus).
There are two options for replacing it (as you can see from the photo, I tried both): 1. Budgetary, if the “native” diode bridge is alive (you only need the LV itself and 2 round terminals 8 and 6mm). 2. The correct one, in my opinion, is the factory one (you will also need a diode bridge of the new type BV04-105-01 without additional diodes and 1 6mm round terminal, or a 6mm washer with a male terminal). Let's consider both options (although this is not a new topic).
1. Budget
: Remove the generator from the car and open the rear plastic cover. We see this:
Let's remove the old RN.
We cut off the “mother” terminals from the new regulator and solder the previously purchased 6mm and 8mm round ones in their place in this way: 6mm for the B+ terminal of the generator, 8mm for the winding terminal:
Next, we MUST cut out (bite off, etc.) the jumper between the additional. diodes and output D of the generator:
We move the rectangular boot from the old RN to the new one:
We clean the copper contact rings on the rotor and install a new LV, connecting it as follows:
Be careful! Do not lose and do not forget to place the textolite washer under the bolt securing the winding terminal and the terminal of the new LV. There should be no contact between this bolt and the terminals! For reliability, you can put heat shrink on the bolt:
All! We put the back cover in place, install the generator on the car, drive about 300 km, because... The brushes still need to get used to it and we are happy with the stable voltage of 13.8 - 14.2 V under any load and at any engine speed! Valuable advice: before buying, measure the pH with a tester, or ask the seller to measure the resistance of the brushes. It should be approximately 0.1 ohm. If the resistance of at least one of them is noticeably higher (for example, 2 Ohms), ask for another RN.
Option 2
. We buy a diode bridge BV04-105-01 and a new model RN:
As you can see in the photo, the new “horseshoe” differs from the old one in the complete absence of additional diodes. They are not needed in the new scheme. If you did everything as described in the first option, then you can solder a pin (wiring) to the circuit of additional diodes in any convenient place and use it to turn on, say, DRL. They will turn on/off themselves after starting/stopping the engine. This installation option is simpler, because The diode bridge of the new model already has one terminal for connecting the LV. Then everything is exactly the same as in the first one: we remove and disassemble the generator, replace the diode bridge with a new one, clean the contact rings, rearrange the boot, connect one terminal of the new LV to the terminal on the “horseshoe”, and the second to terminal B+ of the generator. The factory version uses a washer with a male terminal. I didn’t find one, so I soldered one RN pin from the “mother” to a 6mm ring:
After installing the new model LV, the charging indicator lamp works correctly. If suddenly it glows at full intensity, then you just need to “bite” the resistor (resistance) out of its circuit in the instrument panel.
https://www.drive2.ru/l/5548842/
next article:
Connecting a rear view camera for Niva VAZ-2121-21213-21214-2131
A rear view camera was purchased from the Chinese. Rear view camera. especially for navigator with video input
Rating 0.50 [1 Vote]