AVTOVAZ first began installing side mirrors of the new SE model (with heating, electric drive and turn signal indicators) on the Lada Granta liftback. Then they began to be equipped with Luxe trim levels of the sedan. The following describes how to install and connect standard liftback mirrors with your own hands to simpler versions of the Lada Granta sedan, as well as to the Lada Kalina station wagon and hatchback.
Heating element for side mirrors
The cold season is ahead, creating additional difficulties for motorists, including fogging and freezing of side mirrors.
Driving with such mirrors is not only inconvenient, but also dangerous. And opening the window every time to clean and wipe is not much fun, especially if it’s cold and rainy outside. Many foreign cars are equipped with a heated mirror system. It is really very convenient because it allows you to keep your mirrors clean in any weather. But only on budget models, as well as on domestic cars, such equipment is very rare.
There is still a way out of the situation, and more than one:
- Purchasing mirrors with an integrated heating system;
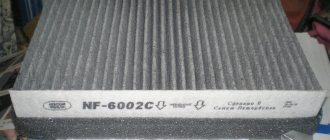
- Purchase and installation of factory heating products (film, printed heaters);
- Folk remedies;
As for mirrors, this is the most expensive solution to the problem; moreover, it is not always possible to find elements that are suitable for mounting. Factory products are cheaper, but they require selection according to shape.
Among the simple folk remedies, you can use a regular car incandescent lamp, which is placed in the mirror housing. This solution to the problem is inconvenient because there must be enough space inside the case to install the lamp and the base for it.
The simplest and cheapest, yet effective way to provide heated mirrors is to use nichrome wire.
Through any other bank according to the issued invoice (non-cash payment)
ONLY for legal entities
Payment is made by transferring funds to a current account.
Payment on an invoice for LLCs and individual entrepreneurs (RF)
Note ! we work “without VAT”
Buy Mirrors Lada Kalina, Granta in a new model case from Lada Priora (“ANS”, electric drive, heating, repeater)
The final cost of some products may differ; it will be announced by the manager when confirming the order. We apologize for any inconvenience caused.
We accept payment
We deliver using
delivery throughout Russia and the CIS
What you need
To make a heater you only need:
- Nichrome wire;
- Double-sided and regular tape;
- Wires;
- Sealant;
- Soldering iron;
- Multimeter;
Having all this, you can start equipping the mirrors with heating. But first, let's deal with nichrome wire.
A wire with a cross section of 0.4-05 mm and a length of 1-1.3 m is suitable for the heater. For normal functioning of the heating system, the resistance of the piece of wire must be 12 Ohms. This is exactly what a multimeter is for. That is, we took a section of 1.5 meters and measured the resistance. If it exceeds the specified value, cut off 10 cm and measure again. Thus, we select the desired segment.
Product delivery options
Note! Below are the shipping methods available specifically for this product. Payment options may vary depending on the shipping method. Detailed information can be found on the “Delivery and Payment” page.
Parcel by Russian Post
Available payment methods:
- Cash on delivery (payment upon receipt)
- Using cards Sberbank, VTB, Post Bank, Tinkoff
- Yandex money
- QIWI
- ROBOKASSA
Shipping throughout Russia. Delivery time is from 5 to 12 days.
Parcel by Russian Post 1st class
Available payment methods:
- Cash on delivery (payment upon receipt)
- Using cards Sberbank, VTB, Post Bank, Tinkoff
- Yandex money
- QIWI
- ROBOKASSA
Shipping throughout Russia. Delivery time is from 2 to 5 days. More expensive than regular delivery by Russian Post, approximately 50%. Parcel weight up to 2.5 kg
Express Parcel EMS
Available payment methods:
- Cash on delivery (payment upon receipt)
- Using cards Sberbank, VTB, Post Bank, Tinkoff
- Yandex money
- QIWI
- ROBOKASSA
Shipping throughout Russia. Delivery time is from 3 to 7 days. More expensive than regular delivery by Russian Post, approximately 100%.
Transport companies
Available payment methods:
- Using cards Sberbank, VTB, Post Bank, Tinkoff
- Yandex money
- QIWI
- ROBOKASSA
Delivery is possible to any locality where there is a representative office of the transport company. Delivery time is from 2 to 10 days. Sending large parcels is approximately 50% more profitable than by Russian Post.
Procedure
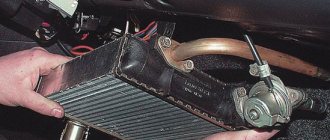
Now you can begin installing the heater. First, remove the holder with the mirror from the case. On most cars, it is enough to pry it with a screwdriver or something flat from below and pull it towards you.
Based on the characteristics of the holder, we choose the method of fastening the wire. If the inner surface of the holder is smooth (as in the photo), then stick double-sided tape on it.
Then we lay a piece of wire on this surface. This can be done arbitrarily, for example, in a zigzag or something else. The main thing is to place it so that the thread covers as much of the surface of the holder as possible. In this case, the wire should not intersect anywhere. Scotch tape will hold the nichrome thread well.
If the inner surface of the holder has any protrusions or fastening elements, then it will not be possible to stick the tape. In this case, a soldering iron will help to secure the wire. Everything is simple here - we apply a nichrome thread to the surface and press it with a heated soldering iron. The plastic will begin to melt and the wire will sink into it. Once cooled, the plastic will become hard and will hold the thread. But here it is important not to overdo it with heating the plastic, so as not to “push” it to the mirror. It is enough just to “drown” the wire in it a little and that’s it.
In this way, we fasten the wire along the accessible surface of the holder without touching the fasteners.
When laying the wire, its ends should be placed towards the side of the holder that is closer to the door, and so that they do not touch each other. To these ends we solder terminals for connecting to the wiring or simply the ends of prepared wires. Then the resulting connections need to be insulated.
All that remains is to provide insulation. If the wire was secured with tape, then to insulate it you can simply stick several more layers of regular adhesive tape on top. This will provide thermal insulation and prevent the wire from peeling off and shorting.
As for the holder where the wire is secured with a soldering iron, you can simply fill the entire surface where the thread passes with sealant and wait until it dries. In this case, the fastening elements will not be affected, which will ensure ease of fastening, and the wire itself will be insulated.
Before installing the holder in place, we pull the wiring through the mirror body into the door, the wiring for powering the heaters. Only after this we assemble the mirror.
Installation
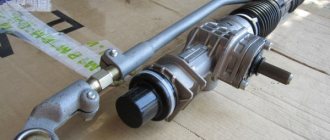
Remove the door trims and dismantle the old exterior mirrors (by removing the mounting screws). Mirrors of the new SE model are installed in place of the old ones without modifications.
To install the joystick, make a hole in the door trim using a file or a utility knife. Sample:
To stretch the wires from the interior to the doors (see connection below), you will need to drill a hole in the door rosette with a drill (or find a suitable female-male connector).
Connection
All that remains is to connect the manufactured device. The best option for this is to insert it into the rear window heating wiring or connect it to the heating switch. It is important to take into account that the load on this section of the wiring will increase after the heaters are turned on, so the fuse responsible for powering the heated rear window should be replaced.
But you can simply make a separate power key and place it in a convenient place. But with such a connection, there is one drawback - you can forget to turn off the heated mirrors after parking the car.
Video - how to make heated mirrors
For all types of mirror heaters, the nominal voltage is 12V
Example of calculating the temperature of heaters
There is such a thing as a temperature gradient. That is, any heater gives ∆T, which depends on the specific power.
With a specific power of 700 W per sq.m. ∆T will be about..., that is, at an ambient temperature of 15 degrees, the surface temperature will be 15+35=50 degrees. Accordingly, at an initial temperature of 0 degrees, the surface is 35 degrees. This is a calculation based on an industrial heater.
For mirrors, heated wiper blades, heated seats, heated steering wheels, etc..., the calculation principle will be the same, but it is necessary to take into account in each specific case: the tightness of the heater to the glass, the thermal conductivity of the adhesive tape, the blowing conditions (depending on the aerodynamics of the car)...
In general, there are many factors that influence the calculation of the heat transfer of thermoelements that the calculation becomes meaningless!
In the most general case, ∆T is calculated as specific power x 0.05.
That is, with a specific power of HENs (or heating elements) ≈ 800 W/m2.
∆T will be 40 degrees. Accordingly, at a temperature of -20 degrees on the surface of the elements it will be about +20.
GEN is a flexible transparent polyester film with a thin current-carrying path applied to it, suitable for both the left and right mirrors. Power wires are attached to the terminal pads.
Along the dotted line, without changing the properties of the element, you can cut off another 5mm on all sides. A further decrease in GEN will lead to stronger heating of the element during operation.
Attention! Installation of the product must be carried out in a service center that has the necessary licenses and certificates for this type of work.
Installation procedure:
1. Disassemble the mirror housing and remove the mirror element. This may require heating the mirror housing in hot water.
Carefully! When lowering the mirror into hot water, it may crack, so perform this operation slowly and carefully.
2. Glue the heating element to the back wall of the mirror using any double-sided tape no thicker than 2 mm.
Attention! Do not stick the heating element directly onto the surface of the mirror. Since, firstly, the glue can dissolve the protection of the mirror coating and chemically affect the mirror element and, secondly, at low temperatures, due to the large temperature difference, cracking of the mirror is possible. In this case, 2-sided tape dissipates heat and reduces temperature differences.
3. Install the mirror into the housing and insert it into the fairing. 4.Lengthen and stretch the wires from the main engine into the car interior. To prevent wires from getting snagged, pass them through standard protective tubes installed between the door and the car interior. If there are no such tubes, it is recommended to purchase and install protective tubes of suitable size. 5. Connect one wire to the vehicle ground. 6. Connect another wire through the switch, relay and fuse to the wire on which “+ 12 Volts” appears when the ignition is turned on. It doesn’t matter which wire coming from the power generator you will connect the “minus” to, and which “plus” to. It is advisable to connect the heated side mirrors in parallel to the heated circuit of the rear window of the car or the heater of the windshield wiper blades, using the standard power button.
It is recommended to turn on the heated mirrors when driving in bad weather conditions (snow, rain, fog, frost, etc.) to prevent snow from sticking or covering the side rear view mirror with a film of water.
The manufacturer guarantees trouble-free operation of the product for 12 months from the date of installation on the vehicle, if the installation was carried out in a service center that has the necessary licenses and certificates for this type of work. Operational life – 5 years.
The heated mirror function is present on most new car models. But on earlier or budget versions this option may not be provided. In this case, owners wonder whether it is possible to assemble heated rear-view mirrors with their own hands. After all, the system allows you to effectively remove ice, snow, and raindrops that impair visibility while driving.
You can install heating on any car, the main thing is to select suitable heating elements and connect the circuit correctly.
Reviews
| № | Positive |
| 1. | Vitaly: There were no problems connecting the reflector. I installed it myself, the scheme is quite simple and intuitive. |
| 2. | Kirill: in winter the mirror on the left side cracked, I replaced it myself with a new one. There were no difficulties with disassembly, the design is quite simple, the connection diagram consists of two blocks. |
| 3. | Vasily: after a side impact, the right side mirror cracked. I had plenty of free time, so I installed the new one myself. At the same time, I replaced the rubber seal; it was deformed and moisture penetrated inside. |
| 4. | Alexander: after two years of operation of the Lada Granta Liftback, the insulation in the doorway on the wiring was worn out. Replaced the entire block with wires. Now the line is completely new. |
| 5. | Konstantin: when the reflector burst, I didn’t contact the experts, I installed a new one myself. The procedure is simple, the case is held on by three screws, the block with wires is connected to the standard connector. |
| 6. | Victor: the housing on the left mirror was cracked, I bought a new one at the car market. I transferred the filling myself, it turned out to be very simple. I didn’t contact the specialists at the service station, I did everything with my own hands and I advise you. |
| 7. | Gennady: the right turn signal suddenly stopped working, so I disassembled the reflector myself. The reason was poor contact at the terminal. I pressed it with pliers and everything works fine. |
| Negative | |
| 1. | Ignat: the design of the side reflectors is not perfect; they do not fit tightly, despite the presence of a rubber seal. I decided to buy a reflector block from Renault Logan, it has an identical mount. |
| 2. | Vasily: the quality of the wire insulation is poor; after two years of use, Granta replaced it with new wiring. Insulation cannot withstand freezing temperatures. |
| 3. | Sergey: I changed the left side mirror adjustment cables for the second time in a year. Low quality components. |
Conclusion The process of independently replacing side-view mirrors on the Lada Grante Liftback is not at all difficult. The design is fixed with three screws, connection to the power circuit is carried out by two blocks with wires. Following the recommendations given in this manual, replacing a new mirror will take no more than 10 minutes. Negative reviews from some owners are unfounded and are caused by violation of the operating conditions of the technical equipment and failure to comply with maintenance schedules.
vote
Article rating
Design of the mirror heating system
Before you begin installation, you need to understand the system design. You can install ready-made heated mirrors on your car. Then it is enough to connect new elements. Or you can do the tuning yourself. The second method is more labor-intensive and takes more time, but is the most attractive in price.
Heating scheme:
- button - usually located on the control panel or on the door on the driver's side, providing starting;
- electrical wiring - required for transmitting current, power;
- heating element - represented by film models, heaters based on wire or printed conductors.
- fuse – required for efficient power supply;
The system is connected to the on-board network via a separate button or connected to the heated rear window. When assembled correctly, the structure ensures rapid heating of the mirrors and removal of moisture from their surface when required.
How to equip a Lada Granta with heated and electrically adjustable mirrors?
This work requires a little more skill than, for example, installing a spoiler. Therefore, having a little skill in handling car electrics, or an assistant with such, is welcome.
Heating improvements
So, if you just need heating, then it is better to use a standard part, replacing the glass with the same one with a thermoelement, or install it yourself.
Precautions before starting work:
- Be sure to turn off the voltage of the vehicle's on-board network! (remove battery terminal)
- To prevent accidental damage to the wires when the door is accidentally closed, install limiters.
Tools and materials you will need:
- Branded mirror elements of heated mirrors;
- Insulating tape;
- Several meters of 0.75-1 mm2 wire;
- 2 terminals “mother small”;
- 2 ring ground screw terminals;
- 1 screw terminal;
- 1 fuse holder;
- Round needle file, soldering iron, set of screwdrivers, heat shrink.
Wiring
The next step is wiring. To install the wiring, you will need to remove the front door trim.
When the door is disassembled, the wires are pushed into the door through the fastening hole, and the interface block is disassembled. Through it and the corrugation, the electrical wiring is pulled into the housing. In order to simplify the task, you can drill an unoccupied contact in the block, and thus thread the plus and minus. To pull the wiring through the door corrugation, it is more convenient to use wire. Important (!) - for your own convenience, it is better to throw in extra wires.
Preparing for work
To design heated mirrors with your own hands, you need to select suitable materials and tools.
What is needed for work:
- heating elements for each mirror;
- hot water, hair dryer for heating the surface;
- scissors or a knife for cutting the heater according to the shape and dimensions of the mirror itself;
- drill with an attachment for making holes;
- to connect the system you will need wiring, bolt terminals, electrical tape;
- a button that allows you to start the device;
- fuse, relay.
When choosing a heater, you should choose the most reliable film models. Here, double-sided adhesive tape is used, where a conductive layer is provided. The advantage of this option is uniform heating and quick cleaning of the surface.
Is it possible to install heated mirrors yourself?
When thinking about how to make heated mirrors with your own hands, you should start by dismantling the existing mirror.
Each driver can remove it himself:
- The adjustment moves downwards, which allows you to pry off the structure with plastic protection. If you need to remove the system assembly, unscrew the fastening screws located under the casing.
- Next, you need to disconnect the mirror element itself. Under the influence of high temperatures, the adhesive base will become softer, making it possible to pry off the protection without damaging the device.
- If the glass is covered with paper tape, remove it. This procedure is not carried out on all machines, but extreme care is required, as it is easy to damage the coating.
- Using a universal heating element, you need to give it the required shape. And, applying it to the plastic part, determine the location of the holes for subsequent connection. Sometimes the plastic has to be cut and additional holes made to route the wires.
- Then the heating element itself is glued to the degreased surface. To do this, the protection is removed and the film is applied to the mirror. Having removed the top protective layer, we apply the plastic part. It is important here to prevent the formation of air bubbles.
- Having glued the heater to one side element, we proceed to the other, after which we insert the structure into the body and proceed to connecting wires and contacts.
It is noteworthy that self-adhesive heating of rear-view mirrors on film is not the only option. It is allowed to use one or two weaker car bulbs that can quickly heat the structure.