What is it for?
Relay regulator 2107 is needed to provide a measured charging current for the battery and equalize voltage drops in the on-board network. Drops would inevitably appear, since the generator rotates at different frequencies and the current at its terminals can be very different from the nominal 12 volts. Relay voltage regulator VAZ 2107 | Lada master. In the tide of the generator. On old VAZ 2107 regulator relays. Replacing the wheel with. If the voltage drops below that, the battery cannot charge and many electrical appliances simply do not work. On VAZ 2106 models, the oil change is carried out on a hot engine, that is, immediately after the trip, if the engine is cold or. Also, at very high voltages the battery can boil and devices can fail.
If the charging current to the battery drops, first inspect the regulator, since the generator itself fails very rarely. You can simply check the charging current at the battery terminals using a tester or multimeter. Purpose and operating principle of the VAZ 2107 generator relay. Replacement regulator relay for VAZ 2107. In normal mode, the system voltage should be between 13-14 volts. If the characteristics are lower than 12 V, then the regulator may need to be replaced.
How to check the generator relay regulator with your own hands
Having examined the device and principle of operation, you can proceed to testing. It is noteworthy that it is quite possible to check the relay regulator in an ordinary garage. To do this, you need to have a regular multimeter with a scale of up to 35 volts, a set of wrenches and screwdrivers.
- A simple method for checking the generator regulator on a VAZ 2106 assumes the following: a well-charged battery is needed for testing. To perform diagnostics, you need to start the internal combustion engine, turn on the headlights and leave the engine running for 10-15 minutes, while the engine speed does not increase above 2 thousand rpm. Next, you need to use a multimeter to measure the voltage between the battery terminals. The norm is no higher than 14 Volts and no lower than 12 Volts.
If the voltage deviates from the norm, this indicates problems with the relay regulator. Considering that this device cannot be repaired, it needs to be replaced. Replacement involves removing (you need to unscrew a couple of bolts) and installing a new regulator.
- The second test method should be used when the problem is “floating” (the voltage at the battery terminals is slightly less than 12 Volts or slightly higher than 14 Volts). In such a situation, the regulator must be checked separately by removing it. To check, use a multimeter and a 12 volt light bulb.
Having examined the regulator of the VAZ 2106 generator, you can find a pair of outputs (on the diagrams often marked with the letters B and C). The indicated contacts must be supplied with power from the battery. Two more relay contacts go to the generator brushes. A lamp is connected to the indicated contacts.
If the voltage at the outputs when power is supplied from the battery is not higher than 14 volts, the light will light brightly. If you use a multimeter to increase the voltage at the power supply outputs to 15 volts or higher, the light should go out. If this does not happen, then the regulator has failed. If the light does not light up initially, both in the first and second cases, then the relay needs to be changed.
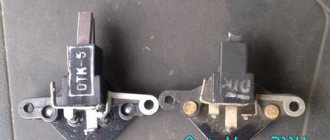
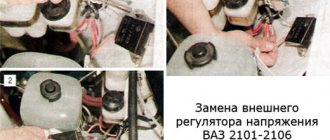
- Replacing the VAZ 2106 generator regulator involves selecting a suitable device. It is important to immediately determine what type of device is on the generator (external regulator, internal regulator). The external regulator is located on the front left arch (in the area of the front wheel). The internal regulator is removed after removing the air filter, since the filter blocks access to the generator.
The external regulator can be easily removed (just unscrew the two 10mm bolts holding the relay with an open-end wrench), after which the wires are disconnected. Assembly is carried out in reverse order. The internal regulator is a little more complicated, since you first need to unscrew three 12 nuts. The internal regulator itself is located on the front cover of the generator, secured with two bolts. The bolts are unscrewed with a screwdriver.
Then the relay is carefully pulled out of the generator cover, after which the wires and contact block are removed. When removing the block, special care must be taken, since the contacts are fragile. Next, a new regulator is installed and reassembled.
We also recommend reading the article about why the battery icon on the instrument panel is lit. In this article, you will learn about the main reasons why the battery lights up on the dashboard, as well as how to detect and fix the problem.
- Please note that external regulators for the VAZ 2106 are almost impossible to find new for sale. We have to pay for used devices. So, the real condition of such a regulator is difficult to visually determine, that is, a check is necessary before purchasing (you can use the methods discussed above).
Regarding internal regulators, the main problem is the wires connected to the relay from the generator. Very often, when replacing, they break in the area of the contact block. If this happens, you will need to cut the block, resolder the wires, make high-quality insulation, and then glue the block back together.
To avoid such problems, when replacing the internal regulator of the VAZ 2106 generator, you need to be extremely careful, do not repair the car in the cold, since the wires break more easily in such conditions, etc.
Types of relay regulators
All regulators that were used on VAZ cars at different times can be of only 2 types:
- External regulator.
- Three-level internal regulator.
Starting with the 2105 and 2107, the factory installed only internal relays on the alternator. How to replace and configure the voltage regulator relay on a VAZ 2107? Detailed instructions, step-by-step photos and videos clearly demonstrate the process. Replacing generator bearings on a VAZ-2110. External ones were used on older models and they were removed from the generator, since they were not particularly compact. On these machines, the relay was installed under the hood on the mudguard on the left.
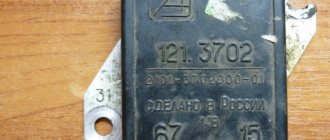
If there was a need to change the external regulator, then this was done simply and simply - it was in an accessible place, attached directly to the body with screws, and was trivially easy to remove. The main thing that had to be taken into account when replacing it was the correspondence of the terminals to pins 67 and 15. It was quite simple to check the correct connection of the new relay using the diagram, start the engine and carry out the freeze again.
Connecting the unit
Before discarding the device, you should make sure that other parts are in good condition. The belt, alternator, battery, and wires are subject to inspection. The lack of charging of the VAZ 2106 may be caused by a loose belt. If the unit was removed before checking, you should make sure that the wires are connected correctly.
Replacing the voltage regulator is done in a garage. Even an inexperienced driver can do this. You will need a tool, skillful hands and a little knowledge.
Open the hood to find the remote relay. In the Zhiguli, the box is attached with lugs to the left wing. We find the object near the brake fluid reservoir. Some relays are built into the generator housing. People call them integrals.
Do not rush to remove the wiring from the terminals. Experienced car enthusiasts are advised to first mark the wires with a marker. There are 2 gray and orange wires suitable for the VAZ voltage regulator. They are attached to terminals numbered 67 and 15. Do not mix up the wires. The gray color corresponds to the number 67, and the orange color corresponds to 15.
At the end, a re-check is carried out. Diagnosing and replacing the voltage regulator does not require much effort. It is not necessary to go to a service station. Save yourself the expense of material costs and repair the car yourself.
Internal regulator VAZ 2107
to replace the internal relay , since it is installed on the back of the generator , and access to it is somewhat complicated. Despite this, replacement is carried out even without removing the generator, directly on the car. It is screwed to the body with two screws. Replacing the timing belt on a VAZ 2112 with your own. Installing a new regulator relay on a VAZ 2107. Replacing the regulator relay with generator ground. By unscrewing these screws with a Phillips screwdriver and disconnecting the terminal, you can remove it and replace it with a new one.
Regulator connection process
Before starting installation work, disconnect the negative terminals from the battery. It is important to completely unscrew it from the battery.
Next, unscrew the generator nut using the appropriate wrench. To gain access to the casing, the block is removed, which is usually secured with three latches. To disconnect, you need to slightly pry the block from the edge. Next, the casing should be easy to remove.
The next step is to unscrew the screws, but first make sure that the plug is completely removed. Next, the nut is removed, the ends of which should be well processed with a file. This is necessary in order to improve the contact of the diode bridge with the bushing. The brush holder is mounted in place of the regulator. It is important to take care of its seal during installation in order to fix the device more securely.
The next step is to reinstall the plastic casing in its place and you can begin laying the regulator wire. Do everything carefully and take into account the placement of the main wiring of the machine.
To prevent the wires from dangling, secure them with plastic clamps.
Only after all the above steps are completed, the device itself is installed. Contact with ground must be reliable. Often, a shunt is used for this, which makes it possible to fasten the regulator and generator housings much better.
Diagnostics
To check the installed relay, simply measure the voltage at the battery terminals, and it will become clear what condition it is in. To check what has been removed and is suspicious, the verification method is slightly different, but in any case it will help to identify:
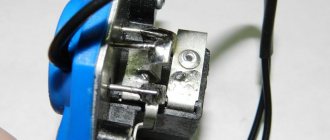
- Absence or poor contact in the brush holder terminals.
- Broken brush conductors.
- The relay itself is faulty.
A multimeter or a 12-volt test lamp, the power of which does not exceed 2 W, is simply connected to the regulator It is enough to apply 10-12 V, the lamp should light up or the multimeter should show the corresponding value. If you do not want to seek help from a qualified specialist, it is better to replace the timing belt on a VAZ 2112 with 16 valves. After this, a voltage greater than the nominal voltage is supplied - 16-20 volts. Replacing the regulator installed on the engine, removing and replacing the VAZ-2107 generator. Voltage regulator relay VAZ 2107 | Lada master. In this case, the relay should operate, but the lamp should not light. If the lamp continues to light when the voltage increases, then the regulator is broken and does not perform its functions. In this case , it must be replaced. Also, when replacing, you should pay attention to the condition of the brushes. They should protrude beyond the brush holder by no more than 5 mm.
This way you can test your regulator and save the battery from premature wear. Replacement of side glass for VAZ 2113, VAZ 2114, VAZ 2115. Monitor the voltage in the network, and have a good trip!
Malfunctions: Tired of installing a 3-level voltage regulator
Hello! After a small problem with the generator https://avtomarket.ru/journal/VAZ/2107/35838/ and replacing the burnt-out voltage regulator with a new one, I seemed to be happy, but after a couple of days it failed again. The voltage began to jump to 16.8-17 Volts, as measured by a multimeter, and a lamp for a problem with the engine lit up on the panel, which threatened to cause the entire electrical system to fail.
I removed the generator again, but now I took it to a mechanic I know to check, he confirmed my guesses that the regulator had burned out again and needed to be changed. This company may just have been defective.
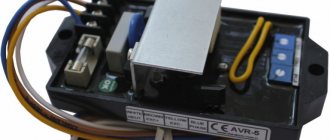
Having thought about disassembling half the machine again next time, I decided to install an external regulator or, as a last resort, remove a standard tablet. But I remembered, having scoured the Internet, people gave advice to buy a three-level regulator from Energomash, so I went to the store and bought it. It is packed in a box, by the way, each generator has its own and has a different brush assembly, as I understand it.
It comes with a 1 year warranty. It differs from the standard “pill” in that the brush assembly is sealed off from the relay, and it is located in a small black box with a switch, and they are connected through wires.
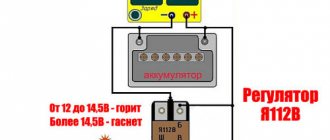
There are 3 voltages on the regulator: low 13.6 V, nominal 14.2 V, and high 14.7 V. Depending on the ambient temperature, the state of the battery and consumers, it is switched manually via a toggle switch.
Without thinking twice, I installed the brush assembly in place; in the rear plastic cover of the generator it is necessary to cut off one edge to bring the wires out.
The regulator itself was screwed to a bolt on the wing to ground.
So, a confusion arises. When I start the car, I check the voltage on the battery - in all three modes at idle with the consumers turned off, it shows the declared values with slight deviations.
But as soon as you turn on all the consumers: heated rear window, low and high beams, fog lights and the stove, the voltage immediately drops and remains around 12 V and even lower, regardless of the mode in which the regulator operates.
I didn’t notice this with the standard regulator; before it burned out, it always held 14 V. I tightened the belt a little, checked the ground, measured the voltage while driving, everything worked out the same way, when a large number of consumers were turned on, the voltage tended to 12 Volts.
Only when reaching 2-3 thousand revolutions in 4th gear was the charging current nominal 14 V.
Is tension supposed to flow like that? What could be the cause of the malfunction, or is this how this regulator works? By the way, the battery has not yet been discharged after several days of such driving.
I think I'll check the battery just in case, and throw some extra ground on the engine.
Good luck on the roads!
- More about this car:
- Logbook
- Breakdowns
- I fell into a hole on the highway, I thought I slipped through, but after... 218,000 km
- The beginning of the story: ... 218,000 km
The generator was never enough for all consumers at xx speed.
And decide on current or voltage.
Charge (discharge) current, and by voltage we indirectly determine charge or discharge.
That's how it should be. Everything works fine. Put the middle option and everything will be fine.
Maybe it should, but why did the old tablet show 14 V at idle under the same conditions, although it lived for a couple of days?
This can't be true. Under heavy load and low rpm, this generator does not have enough power to maintain 14V.
The degree of charge of the battery can also influence; if it is charged and in good condition, it does not consume much. If discharged, it takes on a lot.
The test on Soviet cars is carried out with the headlights on and rpm 2000. Under these conditions, the voltage should be 13.9-14.5V. At XX the power of the genes is not enough.
Thank you, I thought so too, that’s probably why the tablet burned, there was a defect
In general, the tablet simply works on/off and the time for which the generator is turned on is regulated. And the battery averages the voltage. Therefore, the generator cannot be turned on without a load - the electronics will burn out.
it’s possible for a short time)) I rearranged the battery with the engine running, there was no way to light a cigarette. Everything went fine
Not at all. Alternatively, the headlights must be turned on or some other significant load.
Regarding the additional mass, this is the right decision. Surely the mass wire between the engine and the body, which is located below in the dirt, has rotted. You need to throw an additional large section on top (from 16 squares and above).
Already bought it, I'll do it
I think on the contrary, this is not quite the right decision. A much better option, instead of “collective farming” another “ground” wire, would be to revise (or, in extreme cases, replace) the existing one, soldering both ends to the wire, cleaning the contact points and tightening the corresponding nuts. In addition, you are definitely mistaken about the supposedly “rotten” wire at the bottom between the engine and the body. Firstly, if this were actually the case, then the author would have obvious problems when starting the engine, since in this case the voltage drop in this section of the circuit would be an order of magnitude greater. and since he doesn’t say anything about it, it means there’s most likely no problem either. Secondly, and this is the most important thing, the very wire you mentioned is no longer available in the author’s car (judging by the type and year of manufacture), let’s say he moved to another place. Therefore, before advising anything, it would be nice to be at least a little familiar with the topic of the issue being discussed. (sorry for the directness!).
How do I know that a wire might have moved somewhere? I haven’t driven a “classic” for seven or eight years. On my car the wire rotted within three or four years from new. The problem with unreliable engine starting was solved by adding a new wire. I didn't even touch the old one. I sold the car at the age of 15. There were never any starting problems after restyling. Due to the increased mass resistance, the voltage can sag at any consumer.
How do I know that a wire might have moved somewhere?
Then a reasonable counter-question arises, if you don’t know, why are you advising to eliminate something that cannot exist?
The problem with unreliable engine starting was solved by adding a new wire.
Honestly. I'm glad for you that you solved your problem. But what does the author care about this? Did he have problems starting the engine? No. At least he didn't say anything about it here. Then the question arises: why divert the topic?
Purpose of the voltage regulator
The purpose of the voltage regulator is easy to guess from the name of this device. The regulator's task is to maintain the current coming from the generator at such a level that the voltage generated by the same generator is always kept within specified limits.
Moreover, it should not depend on the rotation speed of the generator. And the current consumed by the car should also not affect the voltage created by the car generator. The generator voltage regulator is responsible for performing all these tasks on a VAZ 2107 car.
Benefits of installing a three-level regulator
This equipment is in great demand among owners of VAZ-2107 cars and other models of the same manufacturer. The average age of cars exceeds 10 years. This list also includes “eights”, “sixes”, “nines” and so on.
This device increases the performance of the on-board network. Many drivers note positive changes in the operation of the stove and lighting.
In winter, the car requires additional heating, and this is where the regulators perform at their best.
Most car enthusiasts note the following improvements after installing the TRN:
- The problems with the alarm have disappeared. Previously, I had to use a ruler, especially in cold weather.
- Far and near lighting has been improved. The brightness of all lamps inside the cabin has increased.
- When the heating system was turned to the first position, the air flow noticeably increased.
- The operation of power windows (if available) has been improved.
- The battery always has the required charge level, and in the morning the car starts very easily.
Types and location of voltage regulators
As you know, the VAZ 2107 car began to be produced a very long time ago. And over the years, not only different motors were installed on it, but also different voltage regulators. On the earliest models, the relay regulators were external. On later “sevens” the regulators were internal three-level. Let's take a closer look at these devices.
External voltage regulator VAZ 2107
It is the external voltage regulator that many motorists in the old fashioned way call a “relay-regulator”. Today, external voltage regulators can only be seen on very old “Sevens” produced before 1995. These cars were equipped with an old generator model 37.3701, which was equipped with external relays.
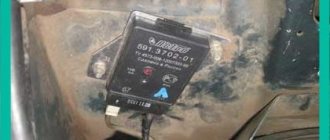
The external regulator was located under the hood of the car; it was mounted on the left front wheel arch of the car. As a rule, external relays were made on the basis of a single semiconductor, although after 1998 on some VAZ 2107 there were external regulators made on a common printed circuit board.
External relays had certain advantages:
- Replacing the external regulator was fairly easy. It was held on by only two bolts, which were not difficult to reach. The only mistake that a beginner could make when replacing this device is to mix up terminals 15 and 67 (they are located next to each other on the regulator);
- the cost of the external regulator was quite affordable, and they were sold in almost all car stores.
Of course, the device also had disadvantages:
- bulky design. Compared to later electronic regulators, the external relay seems very large and takes up too much engine compartment space;
- low reliability. External VAZ regulators have never been of high quality. It is difficult to say what is causing this: the low quality of individual components or the poor build quality of the device itself. But the fact remains a fact.
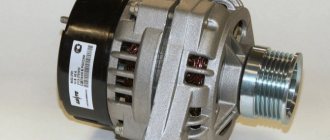
Internal three-level voltage regulator
Internal three-level voltage regulators began to be installed on the VAZ 2107 starting in 1999.
These compact electronic devices were built directly into car generators.
This technical solution had its advantages:
- compact sizes. Semiconductors were replaced by electronics, so now the voltage regulator fits in the palm of your hand;
- reliability. It’s simple: there’s nothing special about electronic devices that breaks. The only reason why a three-level regulator could burn out is a short circuit in the on-board network.
There are also disadvantages:
- difficulty of replacement. If there were no particular problems with external regulators, then to replace the internal relay the car owner first needs to get to the generator. To do this, he will have to remove the air filter and a couple of air ducts, which requires patience and time;
- difficulty of acquisition. As you know, the VAZ 2107 has long been out of production. So getting new components for the “seven” is becoming more and more difficult every year. Of course, this rule does not apply to all details. But internal three-level voltage regulators for the VAZ 2107 are among the parts that are not so easy to find today.
Dismantling and checking voltage regulators on a VAZ 2107
First, let's decide on the tools and devices that will be needed for the job. Here they are:
- household multimeter;
- open-end wrench 10;
- flat screwdriver;
- Phillips screwdriver.
Sequence of work
If the driver suspects that the voltage regulator is broken, then the first thing he should do is check the voltage supplied by the battery.
- The car engine turns off and the hood opens. Using a multimeter, the voltage between the battery terminals is measured. If it drops below 13 volts (or, conversely, rises above 14 volts), then this indicates a breakdown of the regulator.
Video: checking the voltage regulator on a VAZ 2107
Like any other device, the voltage regulator can break down suddenly. And it’s especially difficult for the driver if the breakdown occurs far from home. There is nothing surprising here: drivers who constantly carry spare regulators with them need to look further. But even in such a difficult situation, there is still a way to get home (or to the nearest service center). But you won’t be able to get there quickly, because every hour you’ll have to crawl under the hood and remove the terminals from the voltage regulator. And then, using a suitable piece of insulated wire, connect the positive terminal of the battery and contact “Ш” on the regulator. This is done so that the charging current does not exceed 25 amperes. After this, the regulator terminals return to their place, and the car starts. You can drive it for about 30 minutes, and you should turn on the maximum number of energy consumers - from the headlights to the radio. And after 30 minutes you should stop again and do the entire above procedure again, since without this the battery will simply recharge and boil.
So, even a novice car enthusiast can check the voltage regulator on a VAZ 2107. All that is required is the ability to use a multimeter and a screwdriver. Following the recommendations listed above will allow the car owner to save about 500 rubles. This is how much it costs at a car service center to check and replace the voltage regulator.
Is it worth making the regulator yourself?
If you are new to electronics, then such an undertaking will be quite difficult.
As we mentioned earlier, the main element of the circuit is a certain number of diodes. Finding three-stage switches for them is quite problematic. In addition, you need to correctly calculate and install radiators for cooling. Otherwise, the risk of diode burnout increases significantly.
During the development of the regulator, long wires will be needed, because the connection is made directly to the device through the cover.
Additionally, you will need to make or find a suitable plastic case for such equipment. All internals must be securely fastened inside the device.