4.1/5 — (65 votes)
A three-level voltage regulator VAZ 2114 is required primarily for operating the vehicle in harsh conditions. Unlike conventional devices of this type, which are installed on generators, these have the ability to adjust the output voltage from minimum to maximum. But let's look at the design and device in more detail. But it’s worth starting with a review of the standard voltage regulator. And this is a device that allows you to stabilize the power supply to the excitation winding.
PURPOSE AND TECHNICAL DEVICE
The voltage regulator relay has a specific task - to stabilize the current in the vehicle’s on-board network at the same level. In his work, he takes into account the following factors:
- Load on the network (total electricity consumption of already switched on devices);
- Temperature around the car and in the engine compartment;
- Rotor speed of the generating device.
The voltage regulator of the VAZ 2114 generator is also required to monitor the voltage that comes out of the generator in order to maintain the normal operation of all devices, since disturbances in the electrical network can provoke inaccurate sensor readings, at a minimum. Technically, it works like this: in the event of noticeable disturbances, it constantly monitors the current on the battery, and at the right moment simply turns off or turns on the voltage that is fed into the excitation winding of the generator itself.
Voltage control and stabilization - operation of the regulator
The generator produces low voltage
Unlike overcharging, which is observed infrequently, owners of the “four” often encounter low voltage in the on-board network. It can be determined not only by readings on the dashboard or by measurements with a voltmeter. The most common symptoms of this problem are:
- Constantly lit battery indicator on the dashboard;
- Low voltage on the on-board computer (although it often lies a lot);
- Dim or flickering headlights and dashboard lights;
- Failure of electrical appliances or their unstable operation;
- Intermittent engine operation;
- The engine stalls while driving;
- Difficulty starting the engine or inability to start it.
Most often this occurs due to a failure of the voltage regulator or diode bridge. But the voltage can also be low due to a short circuit in the stator winding, bearing wear and some other generator failures. But, before repairing or replacing it, you need to make sure that the problem is in the generator set. Sometimes similar symptoms are caused by a faulty battery or poor wiring or oxidized terminals. In addition, the car may have powerful additional electrical equipment, such as an expensive radio, amplifier, or subwoofer. You should make sure that it is working and connected correctly. Or perhaps the generator simply does not have enough power for such consumers.
vote
Article rating
POSSIBLE PROBLEMS
If problems arise with the generator, for example, if the on-board voltage of the VAZ 2114 is low, then possible faults should be sorted out in the following sequence:
- Mechanical damage to the relay terminals;
- Oxidation of contacts;
- Complete absence or poor contact between the generator housing and the vehicle’s ground.
Therefore, if you have problems with the regulator, then the first thing you need to pay attention to is this terminal, which goes to ground.
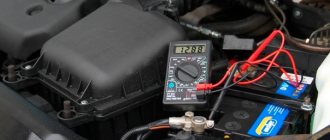
Voltages must only be measured with the ignition on, or you will fail.
To make a correct comparison, you first need to measure the voltage at the positive terminal of the battery; it should be the same as at the regulator ground.
By the way, all electronic regulators that were invented back in Soviet times were free of most of these shortcomings. Their design was somewhat more perfect, but they were forgotten at one time and later moved away from their production.
How to replace a voltage regulator
Before replacing the voltage regulator, be sure to check the generator as a whole (How to check a generator?). The voltage regulator needs to be changed if the voltage under load of the on-board network (high beam, heated mirrors, heater are on) is less than 13V. Also, the voltage regulator can cause high voltage (above 14.7V). But, as stated above, before removing the regulator, you need to check the generator itself, become familiar with other possible faults (for example, the generator belt is loose), and only then proceed to replacing the voltage regulator. You will also need this article to replace the generator brushes, because... brushes and voltage regulator are installed on the generator assembly.
PRICE CATEGORIES
To find out the cost of a voltage regulator for a VAZ 2114, it is advisable to simply go to the nearest car market and ask, the price range may vary. This factor is influenced by the type of components and the region in which the store is located.
Typically, the price of a two-level standard regulator, which is installed at the factory in the VAZ 2114 and their families, can range from 300 to 1200 rubles, here the reason for the fluctuation depends on the quality and the specific manufacturer; more reliable and high-quality options will always be somewhat more expensive than their low-quality counterparts. As for three-level models, their price starts from 1,500 rubles, but their productivity is much greater. During the purchase, it is advisable to immediately ask the seller to check the functionality so that there are no problems in the future.
How to remove the voltage regulator?
- Open the hood, remove the negative terminal of the battery, find the generator, disconnect the wire block “D”.
- Remove the protective rubber cap from the tips of the “+” terminal wires. We unscrew the nut securing these wires and remove them from the generator block.
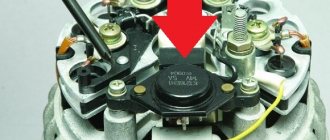
- Next, we need to remove the plastic generator block itself (most often it is black). To do this, you need to disconnect the three spring clips located around the perimeter of the block.
- We find the voltage regulator, and use a Phillips screwdriver to unscrew its fastenings.
Next we need to check the voltage regulator to make sure it is faulty. To do this, read the article “How to check the voltage regulator?”
THREE-LEVEL REGULATOR
Replacing the regulator with a new one in the event of a serious breakdown on your own is quite simple, the main thing is to install the brushes correctly. This option is also very common when drivers deliberately choose a three-level VAZ 2114 voltage regulator for their car. Its installation must be carried out correctly; here it is important to correctly rearrange the generator protective casing and switch the contacts on the terminals. It may be better to initially seek help from specialists so as not to damage the entire generator. Technically, it differs from a typical relay in that it has a more efficient voltage regulator that maintains the voltage at a stable level at all times, even under rapidly changing conditions. The factory has not yet come to install such a regulator, since this option is considered more expensive.
Installation and connection instructions
For Lada cars (except Vesta, XRAY)
, photo author:
1.
Remove the generator.
2.
Remove the plastic casing of the generator. To do this, first disconnect the generator excitation wire. Then unscrew the nut from the stud (10mm wrench) and move the power wire to the side. Next, 3 latches on the plastic casing are unfastened.
3.
Remove the standard voltage regulator from the generator. To do this, unscrew two screws ("8" key) and disconnect the wire.
4.
Install a three-level voltage regulator on the generator instead of the standard one.
5.
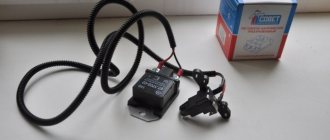
Output 2 wires for the control module. The module itself should be mounted in conditions of reliable contact with the “ground” and as far as possible from the possibility of moisture ingress. For example, on a hairpin near the right headlight.
For Lada Vesta, XRAY cars (with Valeo TG12C209 generator).
This generator is no different from the previous ones, the only difference is in the voltage regulator. It communicates with the engine ECU via a “lin” interface. The task of this “lin” is to avoid loss of throttle response at power modes. By installing the TRN, we cut off the ability to control the regulator using the ECU!
For this generator there is no ready-made solution in the form of a TRN yet, so the design will have to be modified.
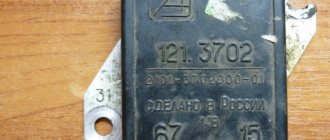
- three-level voltage regulator (article 67.3702-01)
- 2-pin block 904576 NORD YADA
- generator voltage regulator (leave the standard one (if the brushes are live) or ARV1103AD)
- wire for powering the regulator (2 meters)
2.
Remove the voltage regulator, open the cover and clean everything under it. Reinstall the cover.
3.
Isolate the negative brush from ground (for example, drill out the negative outlet, place washers). It is necessary to completely eliminate contact between the regulator and the generator.
4.
Solder the female connector to the brushes.
5.
Solder the male connector to the 3-level regulator. Also, connect an additional wire to the positive output, which is needed to power the regulator and rotor.
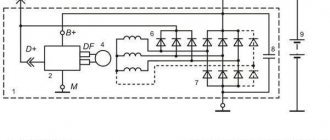
- Output “Ш” on the regulator goes to the negative brush.
- Output “+” - to the positive brush.
The “+” output needs to be supplied with 12V, which appears when the ignition is turned on:
REPLACING THE REGULATOR WITH A NEW OWNER ON YOUR OWN
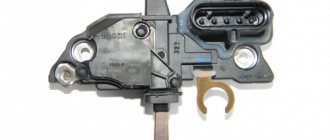
Now we need to figure out how to replace the VAZ 2114 voltage regulator. First, you need to understand that it itself is located inside the generator housing. Mechanically, it consists of a special armature, an electromagnet and a relay. To disassemble the generator and remove the regulator we will need the following necessary tools:
- Set of open-end wrenches;
- Various screwdrivers.
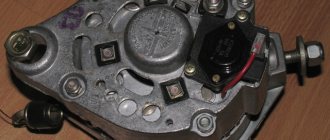
Typically, repairs involve a complete replacement, but the generator itself does not need to be completely removed from the car. However, first you need to remember to remove the terminals from the battery, 12 V is not much, but it will be unpleasant to get hit. After the car has been de-energized, you need to remove the caps from the generator terminals and unscrew them with a screwdriver. Now you need to carefully remove the protective casing from the generator; on the VAZ 2114 it is equipped with spring latches; it is important not to break them right away. Now the voltage regulator of the VAZ 2114 generator will be visible under the casing; you need to unscrew its fastenings and pull it out of the seats along with the brushes.
The next phase of our work will be to check its functionality. Now let’s figure out how to understand that the voltage regulator is not working, for this we will need the following components:
- Accumulator battery;
- Miscellaneous wires;
- An ordinary 12 volt lamp, anything from the car's network will do.
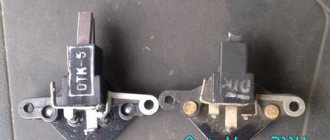
You need to immediately understand that checking the regulator should be carried out only together with the brushes.
The light bulb itself must be connected via wires to the generator brushes; the polarity of the wires does not matter. Now you need to figure out where the negative terminal of the battery is and connect it to the relay body, and the second one must be connected to the regulator terminals. If everything is done correctly, then the bright light from the light bulb will be a sure sign that all elements are working properly. You also need to know that testing the functionality of a new regulator is carried out in exactly the same way. After the repair is completed, everything must be assembled strictly in the reverse order, and it is advisable to charge the battery during the repair so that it does not lose its charge.
HOW TO DISASSEMBLE VAZ 2114 GENERATORS
To complete the work you will need an open-end wrench 10", 19" and a Phillips screwdriver.
Disassembly of the VAZ 2114 generator is carried out in the following order:
- Press out the three latches and remove the plastic protective casing on the body;
- The relative positions of the covers and the stator are marked to facilitate subsequent assembly;
- Using a screwdriver, unscrew the screws securing the brush assembly and remove it from the body;
- Disconnect the wires from the regulator output;
- Unscrew the four screws securing the rectifier unit, disconnect the winding terminals and remove it together with the noise suppression capacitor;
- Unscrew the four tightening screws, which were tightened with great force during assembly, and remove the cover from the side of the generator slip rings;
- The rotor shaft is clamped in a vice so that it cannot turn, and the nut securing the pulley is unscrewed. Now you can remove the generator pulley and thrust washer from the rotor shaft;
- Remove the cover from the generator rotor.
After this, you can carefully inspect all parts for wear or damage.