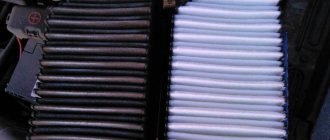
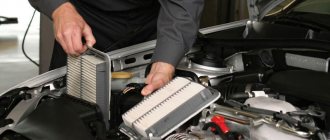
To clean the air entering to form a combustible mixture, a special filter is provided in the design of the VAZ 2115 car. It prevents abrasive particles from entering the combustion chamber. This has a positive effect on the resource of the power plant.
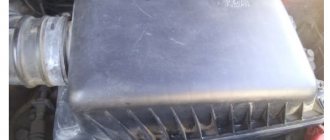
Air filter removed from VAZ 2115
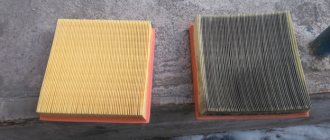
During operation, a gradual decrease in the throughput of the filter element occurs due to its clogging with dirt.
Because of this, the engine loses power, vehicle dynamics deteriorate, and gasoline consumption increases. Therefore, the air filter requires periodic replacement, which is not difficult to do yourself.
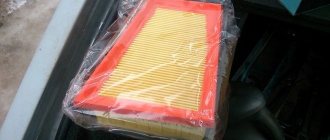
Air filter VAZ 2115
To clean the air entering to form a combustible mixture, a special filter is provided in the design of the VAZ 2115 car. It prevents abrasive particles from entering the combustion chamber. This has a positive effect on the resource of the power plant.
During operation, a gradual decrease in the throughput of the filter element occurs due to its clogging with dirt.
Because of this, the engine loses power, vehicle dynamics deteriorate, and gasoline consumption increases. Therefore, the air filter requires periodic replacement, which is not difficult to do yourself.
Location
Today, most of these components are installed on the inside wall of the glove compartment or under the instrument panel on the driver's side - it all depends on the manufacturer. As for domestically assembled and produced cars, the cabin filter is installed under the windshield or under the hood in a special cassette. To find out where the cabin filter is located in your car, you need to read the operating instructions for the car.
Filter location
What types of filters are there?
The first air cleaning system elements began to be installed on cars in the early 90s. Back then they were almost identical to standard engine air filters. A little later, the structure was improved and they became two-layer. The first layer was intended to prevent dust from entering the interior, and the second layer was intended to eliminate the consequences of the penetration of harmful microscopic particles into the car’s cleaning system. A few more years later, components appeared whose structure contained activated carbon.
Conventionally, these components are divided among themselves according to the method of air purification. They can be:
- Mechanical. In this case, the air passes through a mesh made of special thin fibers.
- Adsorption. The functionality of such components is based on the ability of activated carbon to absorb various harmful substances and unpleasant odors.
New cabin filter
Component arrangement
Using the example of the most complex in its structure - a multilayer air component - let's look at its structure. The top paper layer of the cleaning system element is designed to retain large harmful particles. Under the paper base there is an electrostatic layer, which is needed in order to trap smaller particles. This is followed by a layer based on activated carbon, which prevents exhaust gases from entering the cabin from the outside. The last, fourth layer of the component is an insurance layer that traps all other remaining harmful particles.
What is the price?
Every motorist has asked the question “how to replace the cabin filter?” and how much will it be?". As for the cost of the elements, it all depends on the brand. If you are the owner of a minibus or SUV, then, firstly, the filter will be larger in size, and secondly, it will cost more. If you decide to buy or replace it from an authorized dealer.
Filter location in Audi
If you compare them with prices on the market, they can cost two or even three times more from an official supplier. Note that the purchase of original products in this case is not necessary, since the service life of both the Chinese and the original air purification product is the same. Components made in China may not only be as good as, but even better in quality than the originals.
Article number and cost of the original Volkswagen Polo air filter and its analogues
The original air filter for the VAZ 2115 has article number 2112-1109080. Its price ranges from 240 to 300 rubles. Since the cost of the consumable is very low, most car owners, instead of cleaning the filter element with compressed air, opt for replacement with a new one.
In addition to original air filters, the VAZ 2115 has consumables from third-party brands. Many of them are of good quality at a very attractive price. The best filter elements that perform well on the VAZ 2115 are selected in the table below.
Table - Alternatives to branded air filter 2112-1109080
| Brands of analogues of the original air filter | Article number | Estimated cost, ruble |
| Champion | CAF100505P | 350-450 |
| Japan Cars | B2W004PR | 19-160 |
| Bosch | 1457429061 | 370-410 |
| Starline | SFVF2246 | 150-220 |
| Filtron | AP006 | 200-270 |
RIGHT CHOICE
Retail chains, car markets and service centers offer a large number of such products to choose from. Their difference lies mainly in the price and manufacturer of the products. Various research centers, including the laboratory of the magazine “Behind the Wheel,” conduct tests of air filters. If you look at one of the latest reports, you can see that the products of the following manufacturers performed best:
- “MANN”, produced in Germany, code C22117;
- "HENGST", also made in Germany, its code is E22L;
- The “AF” element is also produced in Russia, code 2112-1109080-02.
- Russian manufacturers produce the “BIG” filter, code BG 9597С;
The filter marking is BIG
All of them do not belong to the category of scarce spare parts; their cost ranges from 80 to 300 rubles per piece.
Replacement frequency
According to official recommendations, replacing the air filter is required every 30 thousand km. For normal car operation, drivers recommend reducing the installation interval of a new consumable to 20 thousand km. This is especially true when operating the machine in areas with dusty dirt roads. Under such conditions, the filter can become clogged within 5-7 thousand km.
For the normal operation of the filter element, its integrity is important. In the presence of through mechanical damage, a large number of abrasive particles enter the combustion chamber, reducing the service life of the cylinder-piston group and related components. Even short-term operation with a broken filter can lead to the need for a major overhaul of the power unit.
A sign that you need to pay attention to the air filter is a drop in the power of the power unit. The deterioration in dynamics is caused by a non-optimal composition of the air-fuel mixture, which is associated with a decrease in the throughput of the consumable. In this case, it is recommended to change it regardless of mileage.
A non-optimal composition of the air-fuel mixture leads to an increase in gasoline consumption. An increase in fuel combustion without changing external factors indicates a clogged filter. In this case, it is also recommended to replace the filter element ahead of schedule.
When purchasing a used car, the driver cannot be sure that the previous owner will comply with the maintenance schedule. Therefore, after purchasing a car, it is advisable to change all consumables, including the air filter. In this case, the new owner can be confident in the stability of air purification.
Floating speeds are the result of many problems, including the need to unscheduledly change the air filter. Instability of the engine may be due to its “suffocation” by a clogged consumable.
Basic mistakes when replacing
It would seem that installing a new filter is one of the simplest car maintenance procedures. Unfortunately, many even here manage to make a number of mistakes. Let's take a look at the most popular ones below.
The first common mistake is not to try to restore the old filter. The owners begin to wash the filter honeycombs, trying to clean them as much as possible from accumulated dirt. This is strictly prohibited. The reason lies in the behavior of the production materials. For effective cleaning, honeycombs are made of paper. It's easy to guess what will happen to it when water hits the surface. By installing such a filter back, the engine will begin to perform significantly worse. A so-called “lean” occurs when too much air enters the combustion chamber. And it definitely won’t be clean.
The second mistake is ignoring traces of oil. There should be no liquid inside the work area; motor - even more so. The presence of oily traces indicates a problem with the engine lubrication system. If you install a new filter in its original place, it will not last long. After a breakdown, the car must be taken to a service station for repairs. Technicians must check the condition of the engine and what exactly needs to be changed in it to avoid further oil entering the filter area.
The third common mistake is using non-original, and what’s worse, uncertified products. The first option is allowed if the filter is produced by a company that does not work directly with the manufacturer. That is, whose products are not used as standard at the factory. If there is a certificate, it means that the car brand has approved the model for use, but the owner assumes all risks regarding its performance. You should not pay the slightest attention to products without a certificate. The reason is obvious - they will not be able to work as well as licensed products. The use of non-original, uncertified filters will result in rapid engine failure. Moreover, this can happen at any mileage, be it 500 or 25,000 kilometers.
Reasons for needing replacement
The air filter is responsible for cleaning the air entering the combustible mixture. Its purpose is to protect fuel systems from dust and dirt, which can subsequently lead to breakdown of more expensive units and components.
signs indicate that replacing the air filter becomes relevant:
- the car's power has decreased;
- the engine became more difficult to start;
- fuel consumption has increased.
The air filter is also replaced for preventive purposes. A simple check allows you to clearly identify the degree of contamination and update the components.
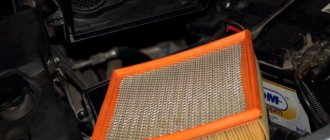
Replacing the air filter on VAZ 2114 and 2115 cars
The basic question that arises among inexperienced drivers is the location of the unit. Replacing the air filter on a VAZ 2114 (injector) or other models with a similar engine type begins with detecting an object.
To do this, open the hood; the required unit is located closer to the center, in a plastic case. It is quite difficult to confuse it; in volume it resembles a small, tightly closed tank, from which a corrugated pipe stretches to the injector.
Preparing for work
Replacing the air filter begins with selecting the appropriate consumables. In this matter, attention is paid to such criteria as service life, resistance to air flow, as well as the quality of the materials used. Taking into account these factors, the following are suitable :
Many car owners install zero-resistance filters, but such units require significant modifications to the system. At the same time, it requires constant maintenance, often disrupts the operation of sensors and negatively affects engine power. It is recommended to install this only by highly qualified specialists.
After purchasing a consumable, prepare tools for replacement:
- a screwdriver or a wrench with a head - the specifics of Russian cars and the independence of car enthusiasts in their repair does not allow focusing on general standards, so the tool is selected based on the available fasteners;
- a vacuum cleaner and a clean rag to clean the box from accumulated dirt.
The procedure for replacing the air filter is straightforward and does not require special equipment. With minimal skills, you should only perform a simple step-by-step procedure.
Step-by-step instruction
The procedure for replacing the air filter involves the following steps:
- the fasteners holding the box lid are unscrewed;
- it rises along with the air filter, the latter is removed;
- the body is vacuumed and cleaned of dust and dirt;
- a new consumable is installed in its proper place, then carefully covered with a lid;
- all fasteners are returned to place and the cover is tightly screwed into its original position.
Often, drivers save money and reduce the replacement process to blowing out the air filter and returning it to its place. This method is relevant as a temporary measure and does not protect the fuel system from contamination. It is recommended to update consumables in accordance with their wear and frequency of maintenance.
Replacement frequency
Many drivers and experts have different opinions about the frequency of replacing the air filter. Technically, they expect 10-15 thousand kilometers. Some experts recommend changing consumables once a year.
To identify periodicity in practice, pay attention to the following factors :
- frequency of trips over short distances;
- frequency and duration of engine idling;
- road surfaces, dust;
- cleanliness of the environment.
Taking these aspects into account, the frequency of replacing the air filter, regardless of the make of the car, depends on its operating conditions. Drivers should individually identify the frequency of contamination through preventive checks and change this type of consumables according to their wear.
Source
Replacing the air filter on a VAZ 2115 injector
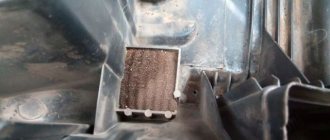
The cabin filter of the VAZ-2115 and other models is designed to purify air coming from the street. In addition, its functions include protection of the heating radiator from contamination. This element can serve for quite a long time, but over time the filter elements become clogged with dust, which is why the quality of cleaning is significantly reduced. That is why it is necessary to install a new cabin filter at least once every 7-8 thousand kilometers (or once every six months). The procedure for replacing it is part of the maintenance and is carried out at a car service center, but you can do it yourself. In this article we will tell you how to do this.
To make the stove heat better...
Many motorists decide to tune the VAZ-2105 heater only because in the cold season, travel becomes uncomfortable, the driver and passengers feel cool, and the heating device cannot heat the interior at a decent level.
Modernizing the VAZ-2105 stove helps solve all of the above problems. First of all, it is necessary to dismantle the standard device by completely disassembling it. Then you should cut off the comb and replace the resistor, through which the rotation speed of the factory fan is adjusted. Any motorist who wants to improve his car and, in particular, its heater, must definitely get rid of the comb; this need can be explained by the size of the power unit, since the existing “chisels” are taller than the classic device. A sawed comb will prevent the heating of the feet from being removed; in addition, a properly carried out manipulation will at least double the volume of incoming air.
Do-it-yourself modification of the VAZ-2105 stove should be continued by drilling a hole on the impeller, the size of which should not exceed 7 mm in diameter. The next step is to resolve the issue of connecting the impeller and the shaft of the “seventh” motor. This procedure will most likely have to be done several times, because the main task of the motorist is to position the unit in such a way that noise and vibration disappear.
It is necessary to replace the resistor to switch speed modes because the volume of incoming air depends on it. At the same time, the switch that controls the rotation of the fan should be replaced. As practice shows, a stationary device is not capable of passing a large air flow, as a result of which it melts and, accordingly, becomes unusable.
As a result, tuning the stove “gives” the car enthusiast a fairly warm and well-heated interior, and control of the converted unit is provided through a 3-speed switch that starts working when the ignition is activated.
Instructions for replacing the cabin filter
The replacement procedure will seem quite simple even to those car enthusiasts who are accustomed to trusting the service center specialists to eliminate even the smallest faults, without trying to understand the design of their car on their own. All you need is a Phillips screwdriver and, in fact, a new filter. Replacement is carried out in several simple steps:
- open the hood and find the cabin filter housing;
- unscrew the fastenings of the protective cover and carefully move it to the side so as not to damage it;
- remove the filter, which is a plastic frame with a filter element stretched over it;
- install the new part, pressing it tightly against the casing. We recommend handling the cabin filter with extreme caution, as it is quite fragile and can break due to excessive mechanical stress;
- tighten the casing fastener and close the hood.
Which brand of oil filter is better to choose?
A number of companies offer good oil filters, these are brands from different countries and domestic manufacturers. To determine which brands are the most successful and reliable, experts read customer reviews, recommendations from craftsmen, and car repair specialists, and then compiled a TOP review. It included:
- BelMag is a Russian company founded in Magnitogorsk in 1996. The research and production association today is one of the most sought-after suppliers of parts for GAZ, VAZ, Chevrolet, and Daewoo cars. Not long ago, BelMag has been producing products specifically for the Renault-Nissan-AvtoVAZ alliance.
- Sakura is a brand owned by the ADR Group plant, which was founded in 1973. Japanese logo offers a huge selection of oil, air, hydraulic, fuel, water separating filters for any type of vehicle. Each product complies with ISO/TS 16949:2002 standards.
- Finwhale is a German company founded in Switzerland in 1991. And in 1997, its range was already presented on the Russian market. The capabilities of the engineering company GRUNNTECH GmbH made it possible to organize the successful production of automotive components.
- Autounit is a domestic manufacturer of automotive parts and elements that appeared on the market in 1994. Auto parts are in great demand, as they are perfect for Russian-made passenger cars, trucks, and buses.
- Goodwill is an English manufacturer and supplier of high-quality spare parts with a long service life. The facilities are located not only in the UK, but also in South Korea, Italy, and Spain. The quality of manufactured auto components is strictly controlled according to ISO9001/9002, ECE R-90 standards.
- Bosch is a famous German brand that has existed since 1886. It is a leading supplier of technologies, services in the industrial, automotive, and consumer goods sectors. The international concern supplies products to all countries of the world.
- SCT is a well-known German company that cooperates with partners from Africa and Europe. In addition to this name, the company has several other brands. Supplies auto chemicals, cosmetics, oils, car care products and auto parts.
- Fram is a trademark owned by the Italian company Sogefi since 1984. Under this name, you can see mainly filters on the market. The range is produced in factories located in more than 27 countries around the world.
- Hyundai/KIA is a South Korean automobile concern, one of the world's largest manufacturers of automobiles, auto components, and spare parts. All original products under the Hyundai/KIA name belong to the Hyundai Motor Group.
- Mann is another well-known filter manufacturer in Europe, a supplier to large automotive companies. The company managed to achieve success thanks to the use of modern innovations and the sale of premium goods. The total assortment includes over 2000 items.
- Purflux is a French company that has been producing auto filters since the advent of a technology called “Curve Pleat” in 1956. Today the manufacturer is part of the Sogefi Group, which develops SogefiPro, Fram, CoopersFiaam filters.
- Mahle is a whole group of Mahle GmbH from Germany, which unites several companies, namely MWP Mahle, Pleuco GmbH, J.Wizemann, Knecht Filter Group. Founded in 1920. Not long ago, a representative office of the brand appeared in Russia. Mahle's developments have radically influenced the automotive industry.
Is it possible to install a cabin filter on a VAZ-2115 from another car model?
Cabin filters VAZ-2114 and 2115 are identical and are located in the same place. These parts are interchangeable, but they have an important drawback - increased fragility. Therefore, many car enthusiasts perform the following procedure:
- remove the old filter;
- install a special adapter;
- install a cabin filter from the VAZ-2110 model. It provides more effective cleaning of air coming from the street, and is also more durable in comparison with the “original” part.
Diagram and order of air movement in the VAZ 2114 injection engine
In an injection car engine, the air movement pattern is somewhat different from that of a carburetor internal combustion engine. Since the injection is controlled electronically, the system has built-in sensors connected to the on-board computer.
- The air driven through the cooling system fan enters a panel-type air filter, unlike the round, large-sized one that was on carburetor engines; this filter is small-sized, but effective in terms of cleaning and creating normal air flow. The fact is that injection engines are very responsive to the quality of the air entering the intake pipe.
- At the outlet of the air filter, between the filter and the corrugated hose of the intake pipe, there is a mass air flow sensor. The mass air flow sensor is designed to measure the amount of air that the engine sucks in, in kg/hour. If it overestimates the readings at low throttle, then the engine operates unstably at idle, stalls after a sharp application of gas, and even problems with starting are possible. If it underestimates the readings at high speeds, then traction drops and fuel consumption increases.
- After the sensor, the air enters the corrugated hose of the intake pipe and is supplied to the receiver. There are several more sensors in front of the receiver, such as the idle speed control and the throttle position sensor. The receiver itself is a mandatory accessory of an injection engine and is designed to accumulate air and compensate for fluctuations in the air mass. There are different receiver designs, including sports ones. It is believed that with the installation of such a design it is possible to achieve a significant increase in engine power. Air is taken from the receiver through a hose to the fuel pressure regulator located on the fuel rail.
The main air mass from the receiver enters the intake pipe of the engine intake manifold.
Illusory repair possibilities
It should be said right away that repairing throttle position sensors is extremely rare. Firstly, the part itself, even the most expensive one, costs only a few dollars, and it makes sense to spend the money. Secondly, in most cases it is simply impossible to make repairs, for example, to restore a worn-out base layer. However, in some models you can slightly shift the resistive tracks relative to the slider and thereby extend the life of the device.
So, there is a special screw on the sensors. With its help, the position of the tracks is fixed. If they are already worn out, then you should loosen this same screw, this will change the location of the slider a little, and you can be a little patient with replacing the device. But don't count on long-term respite. Naturally, we remember that the contactless sensor cannot be repaired. This completes the adjustment, repair and replacement of the throttle position sensor, now you can operate the car for several more years and not even think about such issues.
To check the supply voltage, disconnect the wire block from the sensor. Turn on the ignition and use a tester to measure the voltage between terminals “A” and “B” of the wire block. The supply voltage should be about 5V. To check the sensor, we connect the block of wires to it and, with the ignition on, measure the voltage (the wires of the block can be pierced with thin needles connected to the terminals of a voltmeter) between the sensor terminals “B” (“ground”) and “C” (slider) - it should not be more than 0.7V. Turning the plastic sector of the drive by hand, fully open the throttle valve and measure the voltage again - it should be more than 4V. Turning off the ignition, disconnect the wire block and connect an ohmmeter between terminals “C” and “A” (or “B”) of the sensor. Slowly turning the drive sector, we monitor the readings of the tester arrow. There should be no jumps in the needle throughout the entire working range. To replace the sensor, remove the throttle body from the receiver studs without disconnecting the coolant inlet and outlet hoses from it (see Removing the throttle body).
Using a Phillips screwdriver, unscrew the two screws securing the sensor to the throttle body...
...and remove the sensor.
The sensor is marked 2112-1148200
Remove the sealing foam ring installed under the sensor.
Install the sensor on the throttle body in reverse order. In this case, the damper must be in the closed position. The tightening torque for the sensor mounting screws is 2 N•m.
The VAZ 2107 throttle sensor, together with a mass air flow sensor and oxygen concentration control, acts as an element that controls the supply of fuel to the combustion chamber depending on the position of the throttle valve. As with any repair to replace electronic fuel injection sensors, they must be checked for functionality. To check, you will need a regular multimeter with the function of measuring resistance in the power circuit and a set of standard tools.
To check the throttle sensor:
- Disconnect the package with wires from the sensor.
- The connector body will be marked. Connect the ohmmeter leads to terminals “B” and “C”. We open the throttle valve; for a working sensor, the resistance will increase from 2.7 to 8.2 kOhm.
- Next, we switch the multimeter to voltmeter mode and connect its negative terminal to engine ground, turn on the ignition in the circuit, and the positive probe will turn on. For a working sensor, the voltage should be approximately equal to 5V, if absent or significantly different from the norm, there is a malfunction in the power circuit or in the computer. After measuring the voltage, turn off the ignition.
After confirming that the throttle sensor is not working and deciding to replace it, you must:
- To remove the sensor, use a Phillips screwdriver to unscrew the two screws securing it to the throttle body and remove it.
- There will be a foam gasket between the sensor and the housing.
At this point, the repair work to check and remove the VAZ 2107 throttle sensor is completed. The installation must be carried out with the damper closed, aligning the protrusion of the damper axis with the groove on the sensor body.
Sources
- https://carnovato.ru/proverka-regulirovka-datchika-polozhenija-drosselnoj-zaslonki/
- https://www.autofizik.ru/VAZ/VAZ-210721047/features-of-repair-of-a-VAZ-2107-20-with-engine-VAZ-2104/checking-and-replacing-position-sensor-d
- https://remont-vaz2106.ru/datchik-drosselnoj-zaslonki-vaz-2107
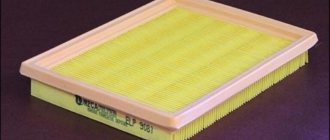
Design and purpose of the VAZ 2114 air filter
The main purpose of an internal combustion engine air filter is to most effectively clean the incoming air mass from dust, moisture and dirt. In addition to trapping harmful particles, the filter must provide as much air flow as possible. These are two main requirements for the VF, which are reflected in the form of specific parameters in the product data sheet.
The panel-type VF housing is made of plastic; rows of paper filter elements are placed in it. They are sealed using special polymer rings. When air enters the filter, it is heavily contaminated, foreign particles settle on the walls of the filter elements, and over time they accumulate so much that air begins to flow in limited quantities and engine power decreases.
Automotive publications, such as the magazine “Behind the Wheel,” periodically analyze the effectiveness of air filters offered by manufacturers and car dealerships. For the main indicators they take the longest operating time and the lowest resistance to air flow. Based on the results of one of these analyses, you can pay attention to several foreign and domestic brands and find out, among other things, how much an air filter for a VAZ 2114 costs:
- “MANN” made in Germany, its code is C 22117, the average price is 250 rubles.
- “HENGST” made in Germany, its code is E 22 L, the average price is 200 rubles.
- “BIG” made in Russia, its code is GB 9597 C, the average price is 100 rubles.
- “AF” made in Russia, its code is 2112-1109080-02, the average price is 80 rubles.
About the manufacturers
A domestic motorist choosing a filter for his VAZ 2114 has two options: buy a domestic “original” or a foreign analogue.
It is important to take into account that Russian filters have three weaknesses:
- bad filter element;
- weak bypass valve;
- the price is higher than that of foreign analogues (190 rubles).
MANN oil filter
If a motorist decides to choose a foreign-made filter (which is cheaper due to the RRP policy), he should pay attention to:
- Mann W914/2 – price 170 rub. A high-quality German product that does not cause any complaints from motorists. It won’t let you down even after 10 thousand km. aggressive exploitation.
- Sakura TC-25011K – price 150 rub. A Japanese filter that surpasses the domestic one in terms of its characteristics, but is not worth saving 20 rubles on Mann. The main weakness is the violation of the integrity of the filter elements.
- FRAM PH5660 – price 230 rub. It has an increased filtration area and general reliability, but is too often counterfeited by domestic craftsmen, so it is extremely difficult to find the original.
MAHLE oil filter
The procedure for replacing the air filter of a VAZ 2114 engine
On a VAZ 2114, the air filter needs to be replaced after a mileage of 10-15 thousand kilometers, but not more than 30 thousand kilometers. Moreover, replacing the air filter on a VAZ 2114 should be done regardless of the visual condition in which it is. Some experts recommend blowing out the VF with a stream of compressed air instead of replacing it. As a temporary measure, this measure can be taken into account. But only as a temporary one. It is necessary to change the VF, because the performance of the car depends on its condition. The car's operating instructions will tell you how to replace the air filter on your car.
To increase engine power, some experts recommend installing a so-called zero-resistance filter instead of a conventional filter. Before deciding on such a replacement, you need to weigh the pros and cons. The fact is that in this case it is necessary to carry out some modifications to the intake system, carry out chip tuning and a number of other measures. You need to know how to properly install the air filter on a VAZ 2114.
In addition, a zero-resistance filter requires additional care and a lot of time can be spent on this. It needs to be impregnated with a special composition, and very carefully so that the impregnation does not get on the mass air flow sensor, otherwise it will produce incorrect data and this will lead to engine malfunctions.
Nulevik should be regularly cleaned and washed in a bucket.
So, how to install an air filter on a VAZ 2114.
- Before you start replacing the VF, you need to prepare. Buy a filter and prepare the necessary tools, as well as a rag for wiping the filter housing and its insides. The price of a VAZ 2114 air filter ranges from 80 to 250 rubles.
- Open the hood and disconnect the battery.
- Disable mass air flow sensor.
- Wipe the air filter housing with a rag.
- Unscrew the four screws with a Phillips screwdriver and lift the cover.
- Pull out the air filter and wipe the inside of the housing.
- Place a new air filter to replace the old one and close the cover, not forgetting to check the presence of a rubber gasket that ensures a tight fit of the cover to the body.
- Tighten the four screws and connect the mass air flow sensor.
The installation of the VAZ 2114 air filter has been completed and, according to established experience, this procedure takes from 10 to 15 minutes.
The air filter housing on the VAZ 2113, 2114 and 2115 is a part that is practically not subject to wear, even with time of use. But there are cases when, in a frontal impact, with damage to optics, bumpers and radiator, it even reaches the air filter housing.
If for one reason or another it was necessary to change this part, then for this repair you will need a minimum of tools, namely:
- 8 mm head
- 10 mm head
- ratchet handle or crank
How to remove the Niva Chevrolet starter with your own hands
Has your Chevrolet Niva stopped starting or is running intermittently? The reason for this could be a faulty starter. In such a situation, it should be removed, disassembled and possibly partially replaced. Removing the Niva Chevrolet starter with your own hands will not be any problem.
Preliminary diagnosis
Before dismantling the starter, you must make sure that this device is the cause of the malfunction. This can be done visually or by replacing the battery with a working one.
It is also worth checking whether current passes from the battery to the starter: if current passes, then the cause of the malfunction is the starter, but if current does not pass, then the starter relay should be checked. If the latter malfunctions, it must be replaced.
If everything works, then the next step is to remove the starter.
Step-by-step replacement of the Chevrolet Niva cooling radiator
How to remove the Niva Chevrolet starter
To remove the starter, you need to do the following:
- Disconnect the wires from the battery and starter (you can use a wrench of the required size).
- We unscrew the starter, which is attached with three bolts to the box body. You can remove it through the top or bottom, however, motorists believe that it is more convenient to remove it through the bottom. It's difficult to do this without a pit. Air conditioning can be another obstacle. If it is present, you will also need to remove the warm air intake hose. The clamp that secures it to the engine can be loosened using a flathead screwdriver.
Now you need to determine the cause of the failure. There may be several of them:
- Faulty brushes. If they are worn out and do not reach the anchor, they should be replaced.
- Faulty retractor. In this case, replacement is necessary.
- Knocked out guide bushings also require replacement.
- The cause of the breakdown may be a burnt-out winding or a burnt-out armature. It is difficult to repair such a malfunction at home; it is better to contact a specialist.
The wires leading to the starter need to be cleaned and lubricated, and also checked to see if current is flowing through them. If necessary, it is better to replace the power cord, because it can cause poor operation of the device.
If the cause of the breakdown is identified and eliminated, then the next step is to install the starter. You need to do this in reverse order:
- Connect the wires first, then mount the starter and tighten the three bolts;
- screw back the rod that covered the starter outlet and the engine protection;
- connect the battery and check if everything works.
Recommendations for using the starter
To make your starter last longer, you need to follow a few simple recommendations:
- If you turn on the engine, then this should be done no longer than 15-20 seconds, and repeated no earlier than after 25-30 seconds. If after three times the engine does not start, you need to check the ignition and power system. If such faults are detected, they must be corrected.
- Do not use the starter to move the vehicle. This puts a lot of stress on the trigger mechanism.
- If you have successfully started the engine, turn off the starter, as the overrunning clutch may jam due to frequent rotation of the starter drive gear by the flywheel.
Anyone who has already removed and installed the starter at least once is unlikely to want to do it a second time. Although this work is not difficult, it requires a lot of effort and sometimes money. Follow these simple rules to avoid such breakdowns.
Where is the Niva Chevrolet hydraulic chain tensioner located and its malfunctions
Removing and installing the air filter housing on VAZ 2113, 2114 and 2115
So, the first step is to unscrew the two bolts securing the mass air flow sensor to the filter housing from the rear. You can even move the mass air flow sensor to the side completely so that it does not interfere in the future.
In the front part, the housing is attached to the radiator frame using two bolts, which you will need to unscrew:
In one more place you will have to release the rubber cushion from its attachment to the battery platform. In this case, this last mount was not on the car, but the photo below will show its location.
And now you can easily remove the housing from the engine compartment, since nothing else prevents its removal.
Installation occurs in the reverse order of removal. The price of a new air filter housing for VAZ 2113, 2114 and 2115 is about 600 rubles, although the cheapest analogues can be purchased somewhat cheaper.
The air filter housing on the VAZ 2113, 2114 and 2115 is a part that is practically not subject to wear, even with time of use. But there are cases when, in a frontal impact, with damage to optics, bumpers and radiator, it even reaches the air filter housing.
If for one reason or another it was necessary to change this part, then for this repair you will need a minimum of tools, namely:
- 8 mm head
- 10 mm head
- ratchet handle or crank
Compression check
After checking the compression, you can breathe a sigh of relief or worry, since the cost of the repair depends on the result.
Impaired compression often causes the presence of oil in the VF, and also causes a number of other problems.
Compression check
To work you will need:
- Compressometer;
- A rag in oil, which you will use to determine the compression stroke;
- Adapter for spark plug holes. It is used when checking the combustion chamber for leaks;
- Compressor.
Now let's start checking.
- Warm up the engine to operating temperature, then turn off the fuel supply.
- In the case of a carburetor, you need to remove the hose, clamp or squeeze it with something, or lower it into a container.
- If you have an injector, remove the fuel pump fuse, start the engine and let it run. As soon as the fuel in the fuel rail runs out, it will stall on its own.
- Disconnect the ignition system by removing the center wire from the distributor (on the carburetor). The crankshaft position sensor at the injector must be disconnected.
- Remove all debris from the spark plug wells so that it does not end up inside the cylinders. Unscrew the spark plugs.
- Insert the compression gauge fitting while an assistant starts the engine. The starter should rotate the engine until the pressure gauge needle stops in one position.
- By analogy, measurements are carried out on each cylinder, the results are recorded on paper.
- To calculate ideal compression, use the formula - 1.2 * Compression ratio.
See your owner's manual for the compression ratio of your engine. Please also note that measurements may have some error.
What you need to know about verification
- If the indicator is 12 atmospheres, this indicates that your engine is almost in perfect condition.
- When checking the compression on a cold engine, the compression readings will be significantly lower. Perform the test only on the engine at operating temperature.
- If the battery is partially discharged, the test data will also not be accurate.
- The increase in compression occurs due to the combustion of oil in the cylinders.
What the results say
We take the paper where you wrote down the data of the check, carried out according to all the rules, and study what is wrong with the motor.
- Indicators in the range of 0-4 atm indicate a high probability of burnout of the piston, head gasket or valve.
- Compression of 4-6 atmospheres indicates that the piston rings or the partition between them have broken.
- If you get about 8-10 atm in each cylinder, the cylinder-piston group is worn out. Major repairs will soon have to be carried out.
- 12-12.5 atm - these are the indicators that occur in a new, run-in power unit.
- If the car has serious mileage, and the check data shows numbers equal to or exceeding the norm, oil has probably entered the cylinders due to wear of the cylinder-piston group or valve liners.
Obviously, the presence of oil in the filter does not bode well. But the problem can still be prevented if measures are taken in time.
Loading …
Removing and installing the air filter housing on VAZ 2113, 2114 and 2115
So, the first step is to unscrew the two bolts securing the mass air flow sensor to the filter housing from the rear. You can even move the mass air flow sensor to the side completely so that it does not interfere in the future.
In the front part, the housing is attached to the radiator frame using two bolts, which you will need to unscrew:
In one more place you will have to release the rubber cushion from its attachment to the battery platform. In this case, this last mount was not on the car, but the photo below will show its location.
And now you can easily remove the housing from the engine compartment, since nothing else prevents its removal.
Installation occurs in the reverse order of removal. The price of a new air filter housing for VAZ 2113, 2114 and 2115 is about 600 rubles, although the cheapest analogues can be purchased somewhat cheaper.
Replacing the air filter is not difficult, regardless of the make and model of the car. This procedure is considered one of the easiest to maintain and requires only 15-20 minutes, most of which is spent on cleaning the box.
Thermostat repair
And if it comes to complete disassembly, then you should take into account that the antifreeze will begin to pour out. To prevent leakage, we close the pipe in every possible way and disassemble it. After repairing the thermostat, it is still strongly recommended to replace it as soon as possible.
After repairing the thermostat, it is still strongly recommended to replace it as soon as possible.
- Inlet pipe (from the radiator).
- Rubber insert.
- Solid heat-sensitive filler.
- Bypass valve spring.
- Inlet pipe (from the engine).
- Bypass valve.
- Outlet pipe (to the pump).
- Main valve spring.
- Main valve.
- Branch pipe (from the expansion tank).
- Piston.
Recently the thermostat on my VAZ 2114 swallow failed. There were no chisel thermostats in the store, but the seller said: “This one will do!” and put a thermostat from a VAZ 2111 on the table.
- The thermostat itself.
- Tee with an outer diameter of “19”.
- A hose 40-60cm long from the Moskvich 2141 stove.
- A couple of clamps.
- Take the "8" key and unscrew the screws securing the air filter.
- Take a screwdriver and loosen the clamps of the crankcase cooling system and the throttle pipe air duct.
- Unscrew the screw of the throttle valve cable bracket.
- Disconnect the electrical connector.
- We remove the rubber cushion of the filter housing from the hole in the bracket and remove the air filter.
- Using a 13mm wrench, unscrew the bolt securing it to the clutch housing and the bolt securing it to the block.
- We only loosen the lower fastening bolt with a 17 key, since the hole in the bracket is made in the form of a fork.
- move the module to the side.
- Using the “13” key, unscrew the plug on the block.
- Unscrew the radiator drain plug by hand.
- pour the “Antifreeze” into the prepared container.
- loosen the four clamps of the thermostat pipes.
- remove the thermostat.
- disconnect the connector.
- Use a 19mm key to unscrew the temperature sensor.
- Using a 13mm wrench, unscrew the nut securing the ground wire of the controller.
- unscrew two more nuts.
- remove the pipe block.
Such a replacement is quite possible on a carburetor engine. In this case, the hole for the temperature sensor in the new thermostat must be securely plugged.
Reasons for needing replacement
The air filter is responsible for cleaning the air entering the combustible mixture. Its purpose is to protect fuel systems from dust and dirt, which can subsequently lead to breakdown of more expensive units and components.
signs indicate that replacing the air filter becomes relevant:
- the car's power has decreased;
- the engine became more difficult to start;
- fuel consumption has increased.
The air filter is also replaced for preventive purposes. A simple check allows you to clearly identify the degree of contamination and update the components.
Replacing the air filter on VAZ 2114 and 2115 cars
The basic question that arises among inexperienced drivers is the location of the unit. Replacing the air filter on a VAZ 2114 (injector) or other models with a similar engine type begins with detecting an object.
To do this, open the hood; the required unit is located closer to the center, in a plastic case. It is quite difficult to confuse it; in volume it resembles a small, tightly closed tank, from which a corrugated pipe stretches to the injector.
Preparing for work
Replacing the air filter begins with selecting the appropriate consumables. In this matter, attention is paid to such criteria as service life, resistance to air flow, as well as the quality of the materials used. Taking into account these factors, the following are suitable :
- MANN C22117, Germany;
- HENGST E 22 L, Germany;
- BIG GB 9597 C, Russia;
- AF 2112-1109080-02, Russia.
Many car owners install zero-resistance filters, but such units require significant modifications to the system. At the same time, it requires constant maintenance, often disrupts the operation of sensors and negatively affects engine power. It is recommended to install this only by highly qualified specialists.
After purchasing a consumable, prepare tools for replacement:
- a screwdriver or a wrench with a head - the specifics of Russian cars and the independence of car enthusiasts in their repair does not allow focusing on general standards, so the tool is selected based on the available fasteners;
- a vacuum cleaner and a clean rag to clean the box from accumulated dirt.
The procedure for replacing the air filter is straightforward and does not require special equipment. With minimal skills, you should only perform a simple step-by-step procedure.
Step-by-step instruction
The procedure for replacing the air filter involves the following steps:
- the fasteners holding the box lid are unscrewed;
- it rises along with the air filter, the latter is removed;
- the body is vacuumed and cleaned of dust and dirt;
- a new consumable is installed in its proper place, then carefully covered with a lid;
- all fasteners are returned to place and the cover is tightly screwed into its original position.
Often, drivers save money and reduce the replacement process to blowing out the air filter and returning it to its place. This method is relevant as a temporary measure and does not protect the fuel system from contamination. It is recommended to update consumables in accordance with their wear and frequency of maintenance.
Replacement frequency
Many drivers and experts have different opinions about the frequency of replacing the air filter. Technically, they expect 10-15 thousand kilometers. Some experts recommend changing consumables once a year.
To identify periodicity in practice, pay attention to the following factors :
- frequency of trips over short distances;
- frequency and duration of engine idling;
- road surfaces, dust;
- cleanliness of the environment.
Taking these aspects into account, the frequency of replacing the air filter, regardless of the make of the car, depends on its operating conditions. Drivers should individually identify the frequency of contamination through preventive checks and change this type of consumables according to their wear.
Source