01/24/2022 1,647 Air and cabin filters
Author: Victor
The air filter device is designed to clean the air entering the cylinders of the power unit. Thanks to this, the correct operation of the motor is ensured and its “triple” is eliminated. We will talk about replacing the Ford Fusion air filter and the service life of this part below.
[Hide]
Where is the air filter located?
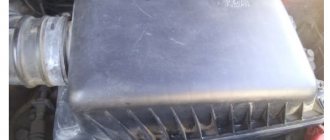
In the Ford Fusion, the device, which is supposed to filter the air entering the internal combustion engine cylinders, is located in a special plastic housing, which is located in the engine compartment. You will see this container next to the cylinder block. The filter element itself consists of a plastic base and paper that performs the cleaning function. The device is sealed with polymer rings, which ensures a tight fit to the walls. The air that passes through the filter device is cleaned of contaminants and dust particles. Thanks to this, dirt does not enter the power unit and does not interfere with its operation.
HCS engines
The check is carried out on a cold engine. Remove the air filter. Examine the position of the control valve within the tube. When the air temperature is below 28°C, the valve must be open to allow hot air to enter the filter (see Fig. 1.28).
Connect the inlet hole with a pipe. Start the engine and warm it up to normal operating temperature, then stop the engine, remove the pipe from the inlet and check that the valve has closed the heated air duct and opened the cold air duct directly from the engine compartment.
If the flap does not work, check that it is not jammed. If there is any defect, the valve must be replaced.
CVH engines.
The check is carried out on a cold engine. Disconnect the inlet pipe and check that the flap is open to allow cold air to flow.
Start the engine and warm it up to normal operating temperature, the valve should open to supply warm air from the exhaust manifold area (see Fig. 1.29).
How often should it be changed?
During operation, the filter device begins to become clogged and is no longer able to pass the required volume of air. Because of this, oxygen starvation occurs in the machine engine. Such problems lead to serious consequences. The power unit begins to lose power, the car becomes less playful and dynamic. The need for replacement can be indicated by the Check Engine indicator on the dashboard, made in the form of an engine. But the icon does not always appear, so first of all you need to monitor the operating condition of the engine. It is recommended to replace the air filter every year after 10-15 thousand kilometers. If you actively use the machine throughout the year, then the filter element is changed twice - in spring and autumn. The device must be replaced earlier if condensation accumulates inside the housing due to temperature changes.
Buy or clean?
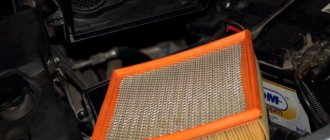
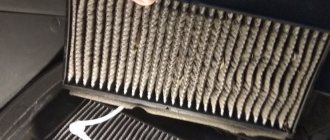
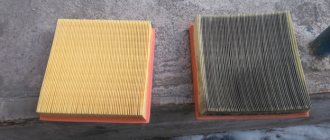
There is a misconception among craftsmen that the air filter can be blown out, washed and put back. Water or a strong stream of air will not clean out the pores of the paper filter. Such dubious savings lead to disruption of the normal operation of the engine. If the filter is clogged, it needs to be changed.
Do not saturate the filter element with additional oil - this will not improve filtration. Oil will clog the pores of the paper web and increase resistance to air suction. The mixture in the engine combustion chamber will become richer, fuel consumption will increase.
When purchasing an air filter for your car, examine the packaging. On the box, the manufacturer of a quality filter must indicate the barcode, make and model of the car. An original consumable is preferable, but a licensed auto part will do just as well. When choosing, be guided by the “price-quality” criterion.
Selecting a filter
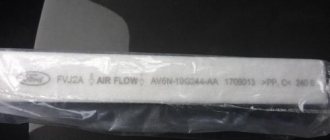
To replace the air filter in a Ford Fusion, the manufacturer recommends using only original devices, part numbers: 1729857, 1338536.
According to the technical regulations, the installation of similar devices is allowed:
- Blue Print AMD, item 52247;
- Alco MD-8020;
- Bosch, article number 1457433593;
- Mann S.
Our compatriots trust the last two analogues, since the products of these brands have proven themselves to be positive. When purchasing, you may be offered an Alco MS 6259 filter. It is not recommended to buy such a product, since it is thicker and will not fit into the seat.
We make Ford Fusion breathe in a new way: clean air at the inlet air tract
- How to keep your car in its original condition for many years?
- Pedantry when choosing consumables is the key to the successful functioning of vehicle systems
- How to replace the air filter on a Ford Fusion in a few minutes?
However, compact Americans appear quite often on the roads. The product has earned wide recognition among car enthusiasts due to its unpretentiousness. Operations for changing consumables do not require large financial costs and time to carry them out. So, replacing the air filter or brake pads on a Ford Fusion
you can do it in a matter of minutes even on a long journey.
How to keep your car in its original condition for many years?
Maintenance is the most important component of the operation of any vehicle. It is necessary to monitor not only the appearance, but also the technical part. Modern machines do not require frequent routine maintenance. However, it is still necessary to carry them out at certain intervals. From the category of simple tips
should be remembered:
- Oil changes in urban conditions should be carried out more often - after 8-10 thousand km (factory shelf - 15 thousand km);
- simultaneously with the previous point, it is necessary to change the oil cleaning unit;
- the fuel filter also does not last long - it is advisable to dispose of it every tenth of a thousand mileage;
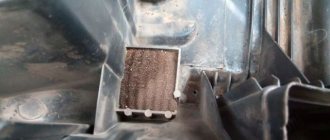
- The cabin filter element should be replaced once a year so that only fresh portions of a mixture of oxygen molecules and other gases enter the cabin;
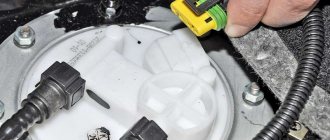
- the mesh, a cheap part in the fuel pump module, is recommended to be restored after 30 thousand km.
These are the most common tips regarding simple routine maintenance described in the service manual of any vehicle. Naturally, the specified boundaries of the parameters are not rigidly fixed. In extreme conditions, premature replacement of consumables is encouraged.
The air supply system to the internal combustion engine deserves special attention.
.
Don't forget about the breathing of the machine's heart. Its long and unprecedented operation is facilitated by timely replacement of the filter element. You should also take into account the manufacturer’s recommendation that replacing the air filter on a Ford Fusion
in dusty regions is required twice as often.
Pedantry when choosing consumables is the key to the successful functioning of vehicle systems
It's no secret that high-quality oil ensures long engine life. Moreover, for the most part, the service life depends not on the manufacturer’s engineers, but on the use of high-quality lubricant. Various additives, like molybdenum, reduce the coefficient of friction in the piston-cylinder pair, reducing wear.
Owners of budget Americans should take a more careful approach to the process of purchasing cleaning units for various systems. The range of products sold includes items of unknown quality.
Quite often you can see the replacement of the original air filter on a Ford Fusion with a component from an otherworldly company
.
At first glance, there is nothing wrong with this. Digging deeper, there is a possibility of finding a lot of problems after a certain time
, because:
- the standard gas distribution system is designed to use a purifier with a certain density;
- insufficient thickness of the filter material increases the risk of reducing cleaning efficiency after 1 – 2 thousand km;
- If the degree of protection from dust is insufficient, the mass air flow sensor may fail.
How to replace the air filter on a Ford Fusion in a few minutes?
The operation has a simple level of complexity, which means it is subject to everyone. To carry out you just need to arm yourself
:
- a screwdriver with a Torx 20 tip;
- special pliers;
- wrench with socket heads for 10.
.
The process of changing the cleaning element involves a set of transitions
:
- Disconnect the two thick pipes that go to the plastic plate with the large “Ford” inscription using special pliers.
- Unscrew the two nuts on the surface of the cover using a 10 mm socket and a wrench.
- Pull the decorative trim off the rubber cushions and turn them over.
- Remove 10 screws using a screwdriver.
- Separate the plate and the lower air filter housing.
- Remove the old filter, install a new one and repeat everything in reverse order.
Changing consumables is a very important component of car care. By choosing and replacing them correctly, you can avoid problems in the future.
Replacing the filter yourself
You can change the device yourself; this is one of the simplest car repair tasks.
Tools and materials
Before you begin the changeover process, prepare everything you may need:
- filter device;
- a Phillips head screwdriver;
- set of wrenches;
- star key 25;
- pliers;
- rags.
If possible, prepare a compressor to blow air through the system.
Removed housing for device installation
Stages of work
The following instructions will help you remove and replace the part:
- Turn off the engine. Wait until it cools down and open the hood.
- Two corrugated hoses are connected to the filter housing, through which air flow is supplied to the cleaning system. The pipes are disconnected. It is also necessary to dismantle the clamp securing the hose, which comes from the line located on the body of the device.
- Move the disconnected pipe to the side. Visually assess the condition of the fixing clamps. If these elements are damaged or defective, they must be replaced.
- Disconnect the crankcase ventilation pipe.
- To dismantle the case, you need to unscrew two 10mm screws located in the front part. Then grab the plastic container by the back part that is closest to the windshield and pull it up. There are two lugs on the body, they contain pins that secure it. Dismantling requires effort. If it doesn't work, try removing the left side first and then the right.
- After removing the container from its installation location, turn the case over and unscrew the ten screws securing its cover. If you have a screwdriver, this will speed up the procedure.
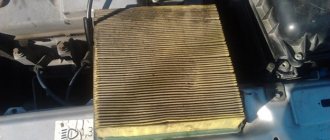
- When the cover is removed, the filter device is removed from its seat. Some car owners blow out the part if there is no serious contamination on it. We recommend doing this if there is not enough dirt. When paper cassettes become covered with a layer of dust and become heavily soiled, the device must be replaced.
- Before installation, wash the inside of the plastic housing. Dry the container and wipe with a rag. Install the new part into the housing and secure it. The crankcase gas filter element is also located here; it is designed to clean and collect oil fumes and other types of contaminants that enter here from the power unit sump. This filter is made in the form of a small sponge. The seat must be cleaned using a special product. If you do not have the original filter, you can install a simple dishwashing sponge instead. Only first it should be cut in accordance with the dimensions of the installation site.
- The assembly procedure is carried out in reverse order. You need to replace the filter housing cover and screw it in place. The container itself is mounted on guides; to fix it, you need to press on its edges. Tighten the two previously unscrewed screws and connect the corrugated hoses, as well as the crankcase gas system pipe. Secure the clamp with pliers; if the part is damaged, it must be replaced.
1. Unscrew the bolts and disconnect the corrugated hose clamps
2. Remove the screws on the air filter housing
3. At the top is an air filter device, at the bottom is a crankcase gas filter
Ford Fusion Connoisseurs Site
Everything you wanted to know about the Ford Fusion but didn't know where to ask
- · FAQ
- · Literature
- · Gallery
- · Forum
- · Search
- · About the project
You too can become our partner
Changing spark plugs and air filter
The process of replacing spark plugs and the process of replacing the air filter (AF) are interconnected, so there is no point in describing them separately. By the way, there is no point in changing spark plugs without changing the air filter. On the one hand, what is the connection? Yes, nothing, except for doing the same work twice. With a properly operated car, the VF changes after 20 thousand km. Those who “really love” their car change it after 15 or even 10 t/km. And the mileage of candles, as a rule, is a multiple of 20. On Fuge, candles run safely for 40-60 thousand. Therefore, my recommendation is to replace the spark plugs by the time the VF is replaced. Moreover, there is another reason not to do this work again, but more on that later.
SO. We will need the following tools
- Wrench (or socket with knob) 10
- Spark plug wrench 16
- Screwdriver TORX20
Raise the hood. Unfasten the inlet and outlet air pipes from the VF housing. Simply pull out the ventilation pipe.
Take the key and unscrew the two bolts in front of the VF box.
Now the most difficult thing, both physically (inconvenient) and morally (and fdruh slamaezza!) is to pull the box off the pins. The back of the box is mounted on these pins through rubber seals. First we pull off one side, then the other. When the VF box is in your hands and the pins are visible, fears of possible breakage disappear by themselves
Now you can work on either the air filter or the spark plugs. Using a TORX20 screwdriver, we unscrew the “millions” of bolts from the back of the box, open it and are horrified - “and the motor was breathing through THIS. »
We change the element and assemble the box in reverse order.
Candles
We take out (not tear out, but take out!) the spark plug tips from the spark plug wells, shaking them and turning them a little from side to side. If you have pneumatics, I recommend blowing out the wells for prevention. Take the spark plug wrench and unscrew the spark plugs. We take new ones and screw them in (without foolishness and screws.) with maximum force of the hand (and not the mighty biceps). We put on the tips. The VF box is installed in place. CAREFULLY screw in by hand, getting two screws into the “old” thread. Otherwise (this is another reason why I would not remove the VF box again):
We dock THREE pipes into place. Close the hood, wash your hands and go! *
PS: Additions on the instrument and some photos are mine, but later.
Consequences of untimely replacement
What are the consequences of failure to comply with device change intervals:
- If the filter is damaged or missing altogether, this can lead to failure of the mass air flow sensor.
- Injection engine clogged. The car owner will have to clean the power unit.
- Increased fuel consumption.
- The appearance of scoring in the cylinders of the power unit.
- The engine will start to run rough. The revolutions will begin to fluctuate, the power of the internal combustion engine will decrease, and the unit will begin to “triple”.
Purifier for apartments with dry air
Assembling such a setup is very simple. For this you will need:
- deep container with lid;
- a small low-power fan, a computer cooler is quite suitable;
- water, preferably purified, filtered or distilled;
- fan/cooler mount;
- power source, such as batteries;
- sharp knife or other cutting object.
Step-by-step production of an air purifier
Work progress:
- You need to cut a hole in the lid for the container to fit the size of the cooler. The fan must be firmly in place.
- Secure the cooler. You can use screws of the appropriate size or special glue. The fan must be carefully secured, otherwise it may fall into the water, which will lead to a short circuit and failure.
- Pour water into the container so that it does not reach the cooler. For safety reasons, there should be 3–5 cm left to the fan. This will eliminate the risk of water getting on the contacts of the device.
- Close the container with a lid with a fan.
- Connect the cooler to a power source. When choosing, you need to consider what voltage it is designed for: a 12-volt fan cannot be directly connected to a home outlet.
- A properly assembled purifier will work immediately when turned on. You can also make a device that automatically regulates the operating time of the fan. But this is at the request of users.
USEFUL INFORMATION: Waterproofing a bathroom under tiles: which is better?
To enhance the cleaning properties of the device, you can use a carbon filter that is attached to the fan. And if you put a silver object in water, the air will be saturated with silver ions.
Video “Visual guide to changing devices”
User Dmitry Malashkevich published a video in which he clearly showed how to change the filter element in a Ford Fusion.
Do you have any questions? Specialists and readers of the AUTODVIG website will help you ask a question
Was this article helpful?
Thank you for your opinion!
The article was useful. Please share the information with your friends.
Yes (100.00%)
No
X
Please write what is wrong and leave recommendations on the article
Cancel reply
Rate this article: ( 4 votes, average: 4.00 out of 5)
Discuss the article: