Before completely replacing the electrical wire, you first need to figure out in what cases it needs to be replaced. Wires wear out and age over time. Oxidation appears in the contacts, moisture creates rust and, as a result, the fuses of the electrical circuit constantly burn. Moreover, many car owners attach a large number of different additional devices to the factory wiring and all this turns into an ordinary noodle, where some wires are simply tied together with insulating tape. If all the wiring was done by an electrician with low qualifications, then there is a possibility of some breakdowns or incorrect actions.
In some car wiring malfunctions and most often this happens while driving. In this case, there is no way to get by with a regular wire replacement. In principle, this solves the problem for a short time, but after a while breakdowns are created again and all the electronics begin to malfunction. In this case, you need to consider three ways to solve these problems: completely replacing the old and installing new electrical wiring on the VAZ 2107, installing do-it-yourself wiring, which in some cases may have modifications from the VAZ 2109 wiring, or completely installing a luxury kit from the VAZ 2109. To work you need a regular tape measure and many different electrical circuits. If you decided to do everything yourself, then you need to delve into all the processes yourself.
We go to any car store and buy the following things there: a fuse box from a new type of VAZ 2109, a dashboard, a combination of wires - everything from a VAZ 2107, a heating system housing from a VAZ 2105, air duct hoses, brake and coolant level sensors from a VAZ 2109 included 'luxury' and terminals, various wiring, insulating tape. We completely remove the front panel of the car to the base and at the same time you can install sound insulation, but this is a completely different topic. It is necessary to note problem areas where there is a possibility that the VAZ 2107 will not accept the circuits from the VAZ 2109. There are not very many of them, but they are: on the VAZ 2107 the light switch is under the steering wheel, and on the VAZ 2109 you need to turn everything on with a button, in the nine there is the wiring of the windshield wiper motor made in a slightly different way, on the VAZ 2109 there are a little more heater modes, on the VAZ 2109 there is a separate relay for the ignition system, on the VAZ 2107 there is no such thing. This issue definitely needs to be resolved. The rest of the problems can be solved very simply - building up the wires. The fuse box is very difficult to install because there is virtually no room for it, and the wires will not reach it. To solve this issue, you need to make a bracket where the fuse box will be attached and hang it in place of the standard unit. The button for the emergency signal has been moved closer to the clock on the instrument panel, and you can also find the button to turn on the light right there. The heater will need to be disassembled and the radiator removed. The standard electric fan must be removed from its housing. Now the design needs to be brought to its logical conclusion and the installation with the prefabricated assembly must be carried out in the reverse order.
Click to enlarge (168 KB)
Electrical diagram of the VAZ 2105: 1. Block headlight (headlight combined with the front light) of the VAZ 2105. 2. Side direction indicators. 3. Rechargeable battery. 4. Relay for turning on the VAZ 2105 starter. 5. Pneumatic valve for the idle speed system of the VAZ 2105 carburetor. 6. Sensor for the top dead center of the piston in the first cylinder. 7. VAZ 2105 starter. 8. Carburetor microswitch. 9. Electric motors for headlight cleaners VAZ 2105. 10. Generator VAZ 2105. 11. Sound signals. 12. Spark plugs VAZ 2105. 13. Engine compartment lamp. 14. Coolant temperature indicator sensor. 15. Oil pressure warning lamp sensor. 16. Ignition distributor for VAZ 2105. 17. Electric motor for windshield washer. 18. Ignition coil of VAZ 2105. 19. Insufficient brake fluid level sensor. 20. Headlight washer motor. 21. VAZ 2105 pneumatic valve control unit. 22. Diagnostic block. 23. Windshield wiper relay. 24. Relay-breaker for direction indicators and hazard warning lights. 25. Wiper motor. 26. Socket for a portable lamp. 27. Brake light switch. 28. Electric heater motor for VAZ 2105. 29. Additional resistor for the heater electric motor. 30. Parking brake warning lamp switch. 31. Reversing light switch. 32. VAZ 2105 mounting block. 33. Relay for low beam headlights. 34. Relay for turning on the high beam headlights of the VAZ 2105. 35. Jumper in place of the relay for turning on the sound signals. 36. Relay for turning on the headlight washers and cleaners. 37. Relay for turning on the heated rear window. 38. Glove box lighting lamp. 39. Cigarette lighter. 40. Lamp switches located in the door pillars. 41. Interior lighting of the body. 42. Hazard switch. 43. Turn signal switch. 44. Headlight switch for VAZ 2105. 45. Horn switch. 46. Windshield washer and wiper switch. 47. Warning lamp block for VAZ 2105. 48. Ignition switch. 49. Switch-controller for lighting devices of VAZ 2105. 50. Rear window heating element. 51. Level indicator and fuel reserve sensor. 52 Rear window heating switch with switch-on indicator lamp. 53. Heater motor switch. 54. Speedometer VAZ 2105. 55. Instrument lighting lamp. 56. Indicator lamp for high beam headlights. 57. Turn signal indicator lamp. 58. Indicator lamp for external lighting. 59. Parking brake warning lamp. 60. Indicator lamp for turning on the rear fog light of the VAZ 2105. 61. Indicator lamp for the brake fluid level. 62. Voltmeter. 63. Instrument cluster. 64. Battery charge indicator lamp. 65. Fuel level and reserve indicator. 66. Oil pressure warning lamp. 67. Coolant temperature gauge. 68. Parking brake warning lamp relay. 69. External lighting switch. 70. Fog light switch in the rear lights. 71. Tail lights. 72. License plate lights. 73. Ignition relay for VAZ 2105.
It cannot be said that the VAZ 2105 has an overly complex electrical part, but diagnosing many breakdowns often leads the owner to a dead end. In order to quickly understand the interweaving of wires, you will need a VAZ 21053 electrical diagram, which is best printed on a large sheet of paper using a color printer.
How to Remove the Dashboard of a VAZ 2105
How can I update the VAZ 2105, give it rotation and functionality through the instrument panel?
The dashboard informs the driver about the current state of the car. The article discusses the VAZ 2105 dashboard, its common faults, notes on removal and repair, as well as neat settings.
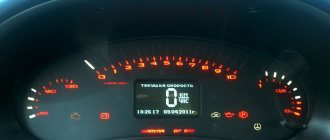
Description and location of indicators and instruments on the panel
In order to fully use the information provided by the dashboard, you need to know the location and purpose of its devices and indicators, and their characteristics. The description instruction describes neatness. The standard panel consists of a set of measuring and control devices, as well as signaling devices.
Panel of VAZ 2105 devices
Typically the toolbar contains the following components:
- speedometer. speed indicator with odometer;
- coolant and fuel level thermometers;
- indicator lamps for battery charging, oil level, fuel reserve;
- warning lamps, side lights, high beams, direction indicators;
- voltmeter;
- alarm unit;
- rear window heating switches, rear fog lights;
- switches for outdoor lighting and electric fan heater.
When installed, the on-board computer becomes possible to monitor more than 20 characteristics that allow you to monitor the operation of machine components and systems. The information is displayed on the screen ( video author RusLan 404).
Cleaning removal and repair may be required for the following defects:
- The backlight does not blink on the control panel . Wiring, contacts and fuses must be checked.
- The sensor does not work, the pointer works, the indicator lamps do not light up. First of all, check the fuse in the mounting block and replace it if it is blown.
- If the arrows point in different directions, the most common cause is poor contact with the ground.
- Malfunctions may be related to the operation of the dashboard . We need to remove the shield and make a diagnosis.
- Sometimes a neat presentation is caused by a lighter. The instrument panel does not work or does not work properly.
- Control panel performance sometimes disappears after setup.
Replacing lamps on a VAZ 2105. 2104 panel
MY TASK AND THE TASK OF THE AFFILIATE PROGRAM.
Replacement of torpedo vases 2105. 02/21/17 part 1.
Hi, I'm tired of promoting videos on YouTube and do you know why they have ads for this ad.
Adjusting the LED backlight
Installation and repair instructions
Removing the control panel may be necessary for repairs, panel adjustments, sensor replacement, and more. The procedure is simple and can be done at home.
Tools and materials
To disassemble and repair the dashboard, you need to prepare the following tools and materials:
- a set of keys;
- Screwdriver Set;
- diagnostic tester;
- new sensors and spare parts;
- items to customize.
When buying originals, it is better to avoid fakes.
Action algorithm
To disassemble neatly, follow these steps:
- Disconnect power from the machine by disconnecting the negative terminal from the battery.
- Remove the cover from the steering column by unscrewing the mounting bolts.
- After removing the plug and unscrewing the two screws, the instrument panel is removed.
- The plugs are then disconnected.
- After opening the glove, unscrew the mounting bolts. We unscrew the bolts in the same way to secure the shelves for things.
- It is necessary to pull the handle of the hydraulic light corrector to take off . Then use a wrench to unscrew the lock nut and tighten it.
- Disconnect the backlight power cable while wearing the glove.
- After unscrewing the two bolts, the Insulation Control Unit must be replaced.
- Next, clean up the spill.
- Next step. Unscrew all console equipment.
- While unscrewing the last two mounting nuts in the center, carefully remove the panel from the studs and remove it from the cab.
Next, repairs, adjustments, replacement of the sensor are required, backlighting is installed. After completing all the manipulations, assembly is performed in the reverse order.
To make assembly easier, disassemble the wires and disassemble the devices and sensors during disassembly.
Disabling wired connectors
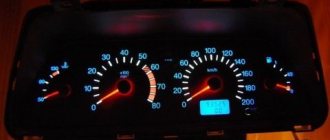
Customization Ideas
The VAZ 2105 was slightly modernized, mainly the engine. Five-wheelers, like UAZ cars, often go into tuning the dashboard to give it a modern look and expand functionality.
Setting up the VAZ 2105 is possible in the following ways:
- purchase a ready-made kit, which includes dials for sensors, instrument panels, lighting parts, wiring and connection terminals;
- a budget option. instrument lighting with LEDs of different colors;
- More technically challenging is the texture and color change of the console.
Using LED backlight, you can change the design of your control panel to make it stylish and personal.
Photo gallery
The VAZ is presented in a photo gallery with 2105 photos of different options for customizing the control panel.
Video “LED lighting for VAZ 2105”
This video demonstrates how to make a speedometer LED (made by Roldugin TV).
Possible faults
Dismantling and repair of the device may be required for the following malfunctions:
- The control panel backlight does not light up. You should check the condition of the wiring, contacts, and the serviceability of fuses.
- Not a single sensor or indicator works, and the warning lights do not light up. First of all, you should check the fuse in the mounting block and replace it if it is burned out.
- If the indicator arrows jerk in different directions, the cause is most often poor ground contact.
- Malfunctions may be related to the operation of the dashboard itself. It is necessary to dismantle the shield and carry out diagnostics.
- Sometimes the functionality of the device is caused by a malfunction of the cigarette lighter. The instrument panel does not work or does not function correctly.
- The functionality of the control panel sometimes disappears after tuning.
Tuning with LED lighting
Removing the dashboard of a VAZ 2107
“Tidy” VAZ 2107 is a set of indicators and instruments that help the driver monitor the condition of the car, performance of systems and speed. The dashboard also includes the heating and ventilation control panel of the “seven”.
Before removing the dashboard, be sure to disconnect the battery ground terminal.
Further operations are performed in the following sequence:
- remove the plastic handles from the heating and ventilation control levers;
- pull out the handle of the daily mileage reset button;
- remove the decorative trim of the self-tapping screw securing the instrument panel;
- Unscrew the fastening screw using a Phillips screwdriver and pull out the panel;
- unscrew the knurled nut securing the speedometer cable and uncouple it;
- disconnect the vacuum air supply hose;
- unplug the wire connectors from the devices;
- pull out the dashboard.
Diagnostics using third-party devices
For a more detailed check of the vehicle's performance, scanners and computers are used. They are connected to the diagnostic electrical connector (socket) located on the standard panel. Malfunctions are issued in the form of a standard set of alphanumeric codes, consisting of one letter and four numeric designations. The letter indicates specific nodes in which the malfunction occurred.
B - detects problems with electronics inside the cabin;
C - indicates defects in the chassis design;
P - errors in the engine control module or transmission;
U - loss of communication between electronic modules.
The letter designation is followed by four characters:
- the first character indicates a standard code established by engineers at the Automobile Association;
- the second character records personal codes set by manufacturers;
- the third character indicates which system the malfunction occurred in:
1-2 - in the fuel and air system;
- in the ignition system;
- in a secondary emission control system;
- in the speed control controls or when the load is off (XX);
- on-board computer system and wiring;
7-8 - errors in the operation of the gearbox;
9.0 - reserve;
the fourth and fifth symbols are considered together to more accurately locate the point of failure.
Replacing a VAZ 2105 torpedo with a VAZ 2107
This alteration had been planned for a long time, all the parts were lying around and waiting in the wings. The installation of the torpedo was accelerated by a leaking heater radiator.
To replace you will need:
Torpedo VAZ 2107
(used 800 RUR)
Beard 2107
(200 RUR)
Wiring 2107 injector: from the fuse box to the dashboard
(used 800 RUR)
Dashboard, VAZ 2107 injector
(2900 RUR)
The whole job took me 2 days, I did everything slowly. The first day was spent disassembling the old torpedo and replacing the heater radiator (it’s still a mess)
I worked with a friend, more than half of the time was spent talking.
I was very pleased with the work done, all that remained was to set the clock and deal with the ESP buttons (I plan to move them to the armrests of doors with a kalina block)
The appearance will change a lot, 07 torpedo in my opinion
AutoNews / Reviews / Tests
How to Remove the Instrument Panel on a VAZ 2105
Nuance for replacing the device panel of the VAZ 2104-2105-2107
Disconnect the ground wire from the battery.
Unscrew the fastening screws and remove the facing casing of the VAZ 2107 control shaft.
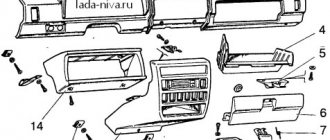
- panel and its accessories
- 1 - ashtray body
- 2 — bracket for securing the glove box lid lock
- 3 - ashtray
- 4 - glove box lid lock
- 5 — decorative insert for radio mounting panel
- 6 — radio mounting panel
- 7 — insert of the lower panel of the radio receiver mounting
- 8 — facing of the radio mounting
- 9 — liner of the upper panel for mounting the radio receiver
- 10 – plug for the windshield heating symbol display
- 11 — instrument panel
- 12 — loudspeaker trim
- 13 - instrument panel
- 14 — instrument panel insert
- 15 — glove box body
- 16 — glove box cover
- 17 — hinge link of the glove box lid
- 18 — instrument panel shelf
Using a narrow sharp tool, remove the side window heating nozzles from the device panel, the body ventilation nozzles of the VAZ 2105 and the plug 10 of the windshield heating sign board from the device panel 11.
Replacing lamps on the panel of a VAZ 2105 - 2104
Hello, I'm tired of advertising on video clips on YouTube, and you understand why their advertising, for this advertising...
Replacing the VAZ 2105 torpedo. 02/21/17. - part 1.
MY AFFILIATE PROGRAM Log in and EARN.
- — Unscrew the screw (located under the plug) securing the shield of 11 devices, remove the shield, disconnect the plugs and wires from the devices.
- — Remove the facings 12 from the left and right loudspeakers, overcoming the resistance of the two holders located along the upper edge of the facings.
- — Unscrew the four screws that secure the speakers, pull them out of the device panel and disconnect the wires.
- — Remove shelf 18 and body 15 of the glove box by unscrewing the screws securing them.
- — Unscrew the nut of the speedometer day counter and pull out the counter cable from the instrument panel of the VAZ 2104.
- — Remove the electronic clock, cigarette lighter and light switches and heated rear window from panel 6 of the VAZ 2107 radio mount. Disconnect from their wires.
- — After unscrewing the fastening screws, remove the radio and disconnect the wires of the VAZ 2105.
- — Pull out the lower insert 7 of the radio mounting panel by the upper part.
- — By pressing on the left and right sides of the edge of the panel 6 for fastening the radio receiver, release the hooks of the upper insert 9 and pull it out of the panel.
- — Remove the decorative insert 5 mounting panel by pressing out the two hooks in the upper part of the insert from the inside.
- — Unscrew the 6 screws of panel 6 securing the radio receiver (including two screws that immediately secure the device panel) and remove panel 6.
- Instrument panel mounting points. Arrows indicate attachment points
Through the gaps in the panel 11 of devices and the glove box, unscrew the four nuts of the upper fastening of the device panel, as well as the two remaining screws of the lower fastening, remove the panel and the panel insert
Install the device panel in reverse order.
Location of lamps on the instrument panel: 1 – speedometer illumination lamp (AMH 12-3-1 (T3W); 2 – indicator unit (A 12-1.2 (W1.2W); 3 – battery charge indicator lamp (AMH 12- 3-1 (T3W); 4 – instrument cluster illumination lamp (AMH 12-3-1 (T3W); 5 – insufficient oil pressure warning lamp (AMH 12-3-1 (T3W); 6 – fuel reserve warning lamp (AMH 12-3-1 (T3W); 7 – voltmeter backlight lamp (AMH 12-3-1 (T3W); 8 – indicator lamp for turning on the external lighting (AMH 12-3-1 (T3W); 9 – indicator lamp for turning on the direction indicators (AMH 12-3-1 (T3W); 10 – high beam indicator lamp (AMH 12-3-1 (T3W)
Interior tuning
Replacing a VAZ 2101 torpedo with a VAZ 2105
Currently, the VAZ 2101 car is more than 30 years old.
This model was the first produced by the Volzhsky Automobile Plant, and at that time impressed many car enthusiasts with its ultra-modern design. And now 2101 remains a relevant model, which still travels along Russian roads. And numerous “clones” of 2101 (three rubles, fives, sixes and sevens) provide enormous opportunities for tuning. First of all, let's pay attention to the instrument panel 2101. To the modern eye, it is somewhat outdated and is only suitable for retro cars. However, if you replace it with a panel of younger car models, the 2101 will look quite modern. Now in stores you can find panels 2106, 2105, 2107, each of them has its own advantages and disadvantages.
Panel 2106 looks just as archaic and, moreover, does not have a particularly high-quality heating system. Its only advantage is the presence of a tachometer. But in panel 2105 there is no tachometer, but it has a modern heater that allows you to blow on the windshield and side windows. The shape of this panel is the most successful of all the others. The 2107 panel has the best heating system, as it has a central air duct. It also has a tachometer.
Of the listed panels, you can install any one of your choice in 2101, but the most convenient is still 2105. Almost no one uses the heating system: most people install a radio there. The lack of a tachometer is compensated by its excellent tuning shape. Devices 2106 allow a person with imagination to assemble anything.
Before proceeding directly to tuning, cover the seats with something to prevent them from getting dirty. To remove the instrument panel, first remove the dashboard and glove compartment shelf, then unscrew the 4 nuts securing it to the engine compartment. After this, remove the steering column. To do this, you need to unscrew it from the pedal assembly and steering gear. Lastly, remove the pedal assembly and the lower heater casing.
Assemble the heater as indicated in its instructions. If you can’t purchase an air damper 2105 (it is not sold separately, and not everyone wants to buy a complete heater), leave the “penny” one.
Assembling the heater housing should not cause you any difficulties. The only difficulty may be an excessively sharp bend in the control cables, which will arise due to the use of the 01 upper housing. In order to solve this problem, you need to change the order of controlling the heater as follows: the top handle is the heater faucet, the middle handle is the air flow, the bottom handle is the heater air damper. Drill holes in the windshield heated air duct and pass the heater choke cable through them. Use cable seal to seal.
Installing a legal air vent will not cause any difficulties. And in order to install the left one you will need to remove the steering column and pedal assembly.
Remove all unnecessary parts from the instrument panel so that they do not interfere with your installation. Please note that you will have to attach the center panel fasteners to the U-shaped bracket and not to the usual fastening points. The right mount can be attached to the engine shield.
Before you start working with electrical wiring, decide where in the cabin the radio receiver will be located, as well as the control keys. You may have to extend the wires in some cases. It will be much easier for you to work if you draw up a connection diagram in advance.
Possible reasons for dismantling the shield
In what cases is it necessary to remove the dashboard of a VAZ 2107 car? There may be several reasons for this:
- panel tuning;
- replacing burnt out light bulbs;
- repair of individual devices that have failed.
VAZ 2107 is a legendary car, which hundreds of thousands of car enthusiasts have repaired independently.
Malfunction of the electronic engine control unit (ECU, ECM, controller)
An electronic engine control unit, abbreviated as ECU, ECM, controller, is an electronic device that, using various signals from engine sensors, controls the composition and amount of fuel supplied to the engine. Having a built-in diagnostic system, it can recognize problems in the system, warning the driver about them through a warning lamp (Check engine). It also stores diagnostic codes that indicate areas of trouble to help technicians make repairs.
Symptoms of a malfunction of the electronic engine control unit:
— Lack of control signals for injectors, ignition, fuel pump, valve or idle mechanism, and other actuators. - No response to Lambda - regulation, temperature sensor, throttle position sensor, etc. - No communication with the diagnostic tool. — Physical damage (burnt radio elements, conductors).
You can purchase an electronic engine control unit (ECU, ECM, controller) from us!
DON'T STROKE - BUY CHEAPER! ! !
Causes of malfunction of the electronic engine control unit:
1. Unqualified intervention in the car’s electrical system when installing alarms and carrying out repairs. 2. “Lighting up” from a car with the engine running. 3. “Reversal of polarity” when connecting the battery. 4. Removing the battery terminal with the engine running. 5. Turning on the starter with the power bus disconnected; 6. Contact of the electrode during welding work with the sensors or wiring of the vehicle. 7. Water entering the ECM. 8. Broken or shorted wiring. 9. Malfunction of the high-voltage part of the ignition system: coils, wires, distributor
ECU diagnostics involves reading errors recorded in the controller’s memory. Reading is performed using special equipment: PC, cable, etc. via diagnostic K-line. You can also get by with an on-board computer that has the function of reading ECM errors.
The ECU stores diagnostic codes that indicate areas of trouble to assist technicians in making repairs.
If the ECM fails due to a problem in the wiring or actuator, a simple replacement may not give anything other than two, three, etc. burnt blocks.
To find out which controller is on your car, you will have to remove the side frame of the car's instrument panel console. Remember the number of your ECU and find it among the tables presented.
You can purchase an electronic engine control unit (ECU, ECM, controller) from us!
DON'T STROKE - BUY CHEAPER! ! !
The information will also be useful to you: Varieties of electronic engine control systems (ECM, controllers), which are installed on different models of the VAZ family car.
If you haven't found the answer you are looking for, then ask your question! We will respond shortly.
Don’t forget to share the information you find with your friends and acquaintances, as they may also need it - just click one of the social networking buttons.
Replacing the instrument panel VAZ 2110 - 2112 step by step instructions
In order to remove and replace the instrument panel of a VAZ 2110, perform the following steps:
- So, the first thing you need to do is use a screwdriver to unscrew the two screws located at the top of the tidy.
- Next, use the same screwdriver to unscrew the two bolts that are located at the bottom of the dashboard.
- Carefully pull the plastic cover towards you and move it to the side so that it does not interfere.
- We unscrew the two screws that secure the tidy directly.
- Now we turn off first the first and then the second dashboard power supply.
- Pull the panel towards you; it should slide off the brackets.
- When the dashboard is completely dismantled, you can begin further work, in our case this is replacing faulty light bulbs.
- Attaching light bulbs couldn't be simpler - we take the body of the light bulb, turn it and take it out of the socket. We install a new one in its place.
- Further assembly is carried out in reverse order according to the same principle.
Video: Replacing the instrument panel VAZ 2110 – 2112 (instructions)
Removal
1. We prepare the car for operations (see “Preparing the car for maintenance and repair”).
2. Disconnect the wire from the negative terminal of the battery (see “Battery - removal and installation”).
3. Remove the upper steering shaft casing (see “Steering shaft casings - removal and installation”).
5. Using a Phillips screwdriver, unscrew the self-tapping screw of the front fastening of the storage shelf.
6. Using the same tool, unscrew the self-tapping screw securing the shelf on the left side.
7. Unscrew the two self-tapping screws securing the shelf on the right side.
9. Using the same tool, unscrew one screw at the bottom fastening of the radio panel on the left and right sides.
10. Unscrew the two screws of the upper panel fastening.
11. Remove the radio panel.
12. Having opened the cover, use a Phillips screwdriver to unscrew the two self-tapping screws securing the glove box body.
13. Remove the glove box body from the instrument panel.
14. Using a short Phillips screwdriver, unscrew the three screws securing the instrument panel insert (the photo shows two screws).
15. Use a slotted screwdriver to pry up and remove the handles of the heater control levers.
16. Using the same tool, pry up the instrument panel trim and remove it.
17. Using a Phillips screwdriver, unscrew the two self-tapping screws securing the interior ventilation and heating control unit.
18. Disconnect wire block A from the glove compartment lamp and disconnect the “mass” wire B.
19. By pulling, remove the handle from the headlight hydraulic adjustment.
21 mm socket wrench
Unscrew the nut securing the hydraulic corrector and push it inside the instrument panel.
How to dismantle the instrument panel: step-by-step instructions
First of all, you need to open the hood of the car and remove the negative terminal from the battery in order to de-energize our dashboard. After this, the work is performed in the following sequence:
- unscrew the dashboard shelf and the glove compartment body using a special screwdriver;
- turn off the power to the light bulbs that illuminate the interior of the glove compartment in your car;
- We very carefully remove the additional dashboard along with the clock and other devices. To do this, you will need to pry the part with a screwdriver and pull it out of the special grooves;
- turn off the cigarette lighter and warning lamps by removing the corresponding wires located behind the additional panel;
- we remove the switches located in the immediate vicinity of the gearbox lever and disconnect them from the on-board network;
- We unscrew the screws that you will immediately see under the switches and the bolts intended for fixing the main console of the torpedo. After this, you can freely remove it without fear of damaging the wires;
- remove the steering column cover;
- remove the heating system cover together with the air duct deflectors;
- dismantle the heater control unit;
- unscrew the last nuts holding the torpedo. For this purpose you need to use a key of 10.
After this, you can dismantle the instrument panel in the car without any problems. Using this approach, you do not have to worry about accidentally breaking any parts or breaking wires, since they are all removed before unscrewing the fixing nuts. Assembling the torpedo is carried out in the reverse order and can be done even without experience. The most important thing is to carry out all the work as carefully as possible and not skip any of the steps described above.
Installation and repair instructions
Dismantling the control panel may be required for repairs, tuning the panel, replacing sensors, etc. The procedure is simple and can be performed at home.
Tools and materials
To disassemble and repair the dashboard, you must prepare the following tools and materials:
- a set of keys;
- Screwdriver Set;
- diagnostic tester;
- new sensors and parts needed for replacement;
- elements for tuning.
It is better to buy originals to avoid fakes.
Algorithm of actions
To dismantle the tidy, you need to perform the following steps:
- Turn off the power supply to the machine by disconnecting the negative terminal from the battery.
- After unscrewing the mounting bolts, you need to remove the casing from the steering column.
- By removing the plugs and unscrewing two screws, the instrument panel is removed.
- Next, the wire plugs are disconnected.
- After opening the glove compartment, you need to unscrew the mounting bolts. The bolts securing the shelf for things are unscrewed in the same way.
- By pulling the handle of the hydraulic light corrector, you need to remove it. Then, using a socket wrench, unscrew the mounting nut and push it in.
- In the glove compartment, disconnect the power cord for the backlight lamp.
- After unscrewing the two bolts, you need to move the heater control unit.
- Next, you should dismantle the air duct.
- The next step is to unscrew all the console fasteners.
- When the last two fastening nuts in the center are unscrewed, you need to carefully remove the panel from the studs and remove it from the interior.
Next, the necessary repairs, tuning, replacement of sensors are performed, and backlighting is installed. After completing all the manipulations, the assembly of the device is carried out in the reverse order of disassembly.
To make assembly easier, during disassembly you should mark the wires and sort the devices and sensors.
The most common reasons for dismantling
There are a lot of reasons for removing the tidy on a VAZ 2107, and some of them can be called banal, but nothing can be done. The most common reason when you need to remove the instrument panel is a burnt-out backlight bulb. Replacing light bulbs in the dashboard of a VAZ 2107 is carried out only when dismantling the device, and this procedure is simply impossible to perform otherwise.
The dashboard on the VAZ 2107 must also be removed for a number of the following reasons:
- Malfunction of pointer indicators.
- Failure of the instrument lighting, as well as lack of functionality of the arrow indicators.
- Replacing the device with a new one, for example, if a digital panel is installed instead of the factory instrument panel.
- Tuning or upgrading the device.
As practice shows, most often the need to dismantle the dashboard arises precisely because the backlight bulb burns out. If the device is dismantled for this reason, it is recommended to immediately replace conventional light bulbs with LED ones.
Required Tools
Before starting work, you will need to prepare the necessary tools so that you do not have to be distracted during the process. Despite the fact that the work of removing the device in question is quite labor-intensive, to implement it you will need a small set of tools, including:
- Phillips and slotted screwdriver.
- Electrical tape to indicate chips that are disconnected from the device.
- Work gloves for unscrewing the speedometer cable.
When all the tools are prepared, it remains to make sure that the parts and elements that are planned to be installed or replaced on the dismantled device are available. After this, we proceed to perform the main part of the work.
What is included in the electrical circuit?
The VAZ electrical circuit consists of many components. We are talking about the generator, battery, optics, fuse blocks, warning lamps, as well as the instrument panel and other components. We are talking about both injector and carburetor engines. The system wires are marked in different colors, they correspond to those marked on the diagrams, this allows the car owner not to get confused during circuit diagnostics and repairs.
Complete wiring diagram for the domestic “five”
The wiring diagram of a VAZ 21053 carburetor or injector as a whole gives a complete picture of the circuit, without any specifics or explanations. Accordingly, the service manual for the vehicle should contain additional appendices explaining the purpose of electrical devices. In any case, one of the main components of the circuit is the ignition system. In general, there is nothing complicated about it, but during repairs it is easy to get confused in the wiring that goes from the relay to the fuse block and from to the block.
The wiring system also includes the electrical circuit for the instrument panel and engine start. Almost all equipment of the “five” is indicated by separate applications in the service manual, which greatly facilitates the repair and diagnostic procedure. For example, car owners often face the problem of direction indicators and fog lights not working correctly.
It is quite possible that devices refuse to function normally if the generator is not working correctly. Of course, if you have a diagram, it will be much easier to detect a malfunction. It should be noted that injection versions, unlike carburetor versions, are more complex due to the presence of additional sensors and regulators, injectors and other components.
A little history
- Predictable behavior of the motor controlled by an electronic system.
- Higher power density.
- Quick response when pressing the gas pedal.
- Low toxicity.
- Quick diagnosis of engine problems.
- No need for frequent system adjustments.
At the same time, during operation, certain weak points of such an engine were identified, which caused certain inconvenience to car owners.
It should be noted that similar problems arise in the Lada Niva car, because the engine of this car with a slightly larger volume also received electronic injection.
16.12.2. Headlight adjustment
We check the correct adjustment of the headlights by the location of the light spots on the screen (see figure). We check and adjust the headlights on a flat horizontal platform. The screen can be a sheet of plywood (approximately 1.0 m high and 1.7–2.0 m long), a light building wall, a gate, etc. We place a fully fueled car with a jack, tools and a spare wheel secured in their regular places perpendicular to the screen at a distance of 5 m between it and the headlights. We check and, if necessary, adjust the tire pressure to normal. We put the assistant in the driver's seat. To ensure that the body takes the correct position relative to the wheels, we swing the car by the wing. We begin the adjustment with the external headlights. We mark the screen with chalk, as shown in Figure a. The distance between the marks on the screen corresponding to the centers of the external headlights should be 1180 mm. We cover one of the external headlights with a piece of cardboard or fabric and turn on the low beam.
| Using a Phillips screwdriver, rotating the adjusting screw located above the headlight, align the horizontal border of the light beam with the bottom line on the screen. |
The headlight frames have special recesses for access to the adjustment screws. If one of the screws is closed, remove the frame (see Replacing the radiator grille).
| By rotating the second adjusting screw, located, when looking along the car, to the right of the right headlight (to the left of the left), we align the point where the light beam breaks (the intersection of the horizontal and inclined boundaries) with the vertical line of the center of the headlight on the screen. |
We also adjust the outer headlight on the other side of the car. We mark the screen as shown in Figure b. The distance between the marks on the screen corresponding to the centers of the internal headlights is 840 mm. Cover the outside headlights with cardboard or cloth and turn on the high beam headlights. By alternately closing the internal headlights and rotating the adjusting screws, we set the center of the light beams, as shown in the figure. The screw above the headlight changes the vertical position of the beam...
| ...and on the left - horizontally. |
It is better to adjust the headlights at night or in cloudy weather.
Expansion of functionality
The VAZ-2107 is equipped with a minimum of instruments, and therefore installing new ones will significantly increase the information content of the panel. Most often they add:
- light and temperature sensors;
- fuel consumption indicator per kilometer;
- ECU;
- TV, etc.
Additional holes are cut for them. It is also necessary to install wiring and make changes to the design of the machine (in particular, to provide it with missing sensors).
Instrument panel diagrams
Electrical diagram of the operation of devices in combination with working elements
So, the operating diagram of the instruments located on the main panel in the cabin includes the following elements and combinations:
- indicator of the presence of engine oil in the engine;
- coolant temperature sensor;
- mounting switching block;
- fuel sensor;
- combinations of turns;
- indicator of the amount of fuel in the tank;
- tachometer;
- coolant temperature indicator;
- turning off the ignition;
- ignition relay;
The diagram shows the relationship of the sensors on the instrument panel with the main elements that directly perform the main work. Pointers only read information from operating devices and display it in an understandable form for human perception.
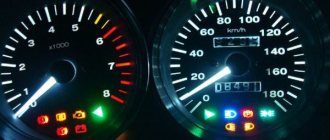
Diagram of the instrument panel of a VAZ-2107 car
The above diagram makes it clear about the exact location of the instruments on the dashboard, which are important elements in driving the VAZ 2107.
| 1 | Lever designed to switch wiper and washer modes |
| 2 | Buzzer button |
| 3 | Turn signal control lever |
| 4 | Headlight switch (high, low) |
| 5 | Elements for supplying fresh or warm air to the cabin |
| 6 | Hydraulic adjustment of headlights |
| 7 | Lever designed to open the hood |
| 8 | 12V power socket |
| 9 | Turning off the ignition |
| 10 | Turning on the hazard warning lights |
| 11 | Clutch |
| 12 | Brake |
| 13 | Heater switch |
| 14 | Instrument panel lighting switch button |
| 15 | Gas/accelerator |
| 16 | Head unit |
| 17 | Switch panel (outside light, heater fan, heated rear window) |
| 18 | Hand or parking brake |
| 19 | Lamp indicating that seat belts are not fastened |
| 20 | Reserve |
| 21 | Transfer speed switch |
| 22 | Built-in mechanical clock |
| 23 | Cigarette lighter with additional 12V socket |
| 24 | Lamp indicating the operation of the rear window heating |
| 25 | Warning light indicating the presence of brake fluid |
| 26 | Built-in ashtray |
| 27 | Storage box |
| 28 | Shelf for tools and things |
| 30 | Choke or manual gas |
| 35 | Instrument clusters |
Based on the above information, we can say that the VAZ 2107 car has in its set almost all the elements necessary to control the movement of the vehicle
It is important to monitor the operation of each device; if any of them does not function, then operation of the car is prohibited until the problem is corrected
- https://avtoyoutubb.ru/kak-snyat-panel-priborov-na-vaz-2107.php
- https://7vaz.ru/tjuning/tjuning-paneli-priborov-vaz-2107.html
- https://vagflash.ru/lada/kak-snyat-torpedu-na-vaz-2107-inzhektor-karbyurator-svoimi-rukami.html
- https://ladafakt.ru/kakuyu-torpedu-mozhno-postavit-na-vaz-2107.html
- https://expertVAZ.ru/2107/kakuyu-panel-postavit.html
- https://AutoFlit.ru/1673-kakaya-torpeda-podoydet-na-vaz-2107-kogda-hochetsya-komforta.html
- https://avto-idea.ru/remont/kakaya-torpeda-podoydet-na-vaz-2107-kogda-hochetsya-komforta/
- https://tnvd-auto.ru/zapchasti/kakaya-torpeda-podhodit-na-vaz-2107.html
- https://bumper.guru/klassicheskie-modeli-vaz/tyuning/tyuning-salona-vaz-2107.html
- https://semerkavaz.ru/tyunig/tyuning-pribornojj-paneli-vaz-2107/
- https://remam.ru/tune/tyuning-torpedo-paneli-priborov-vaz-2107.html
- https://ladaautos.ru/vaz-2107/kak-sdelat-tyuning-paneli-priborov-vaz-2107-svoimi-rukami.html
- https://scart-avto.ru/avtogarazh/tyuning-torpedo-i-paneli-priborov-vaz-2107-svoimi/
Photo gallery
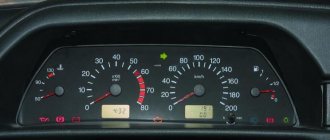
The photo gallery shows the VAZ 2105 - photos of various options for tuning the control panel.
1. Illumination of the VAZ 2105 tidy
2. Red console trim
3. Five shield with tachometer
Loading …