Causes of a squeaking clutch pedal
The causes of squeaks are different for everyone, but you can identify the most common and common ones that are found everywhere.
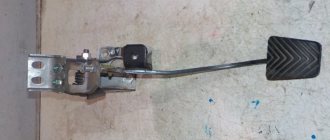
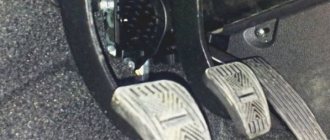
- The first and main reason why a pedal squeaks is wear on the pedal pad . Cars with high mileage often suffer from this disease. The pedals have a rubber pad that has convex shapes and a pattern; with high mileage, this pad wears off and when you press the pedal, the sole slides over the pedal and makes a creaking sound.
- When you press the pedal there is a squeaking sound, no matter what shoes you are wearing. Most likely, the mechanism that makes the pedal a pedal—the spring—has worn out. A pedal may have two springs, one below it and one above it. Some cars only have one spring above or below it. The appearance of a squeak is associated with wear of this mechanism.
- It is worth noting that the clutch pedal mechanism is not complicated and is heavily loaded. Dirty shoes and moisture on the soles get into the pedal assembly. Therefore, pedals often squeak, moisture and dirt get into the pedal mount and displace the lubricant.
- Not an obvious reason. For example, it happens that after soundproofing a car, the floor level has risen. The clutch pedal may touch the rubber mat and make strange sounds, as well as squeaking.
How is the cable constructed?
You can see the condition of the cable through the hood. Despite the simplicity of the element, in fact it is a whole structure consisting of several elements. Moreover, it is equipped with automation. We need to bypass it in order to adjust the cable ourselves.
What do we see? There is a coupling from which the shell comes out on one side and the leash on the other. A thin end of the cable, enclosed in a corrugated tube, is stretched to the leash. The tip going into the fork is hidden under it. We need to tighten it up or change it completely. It is the source of those very extraneous sounds.
By rotating the leash, you twist or twist it, correcting the gap. This is how manual length adjustment occurs. Note that the shorter the cable, the sharper the pedal will respond to pressure. Ideally, it should rise exactly to the level of the brake pedal. At the same time, we check whether it clicks when pressed.
Solution
In almost all cases, the problem of a squeaking clutch pedal can be eliminated with the help of lubricant. To do this, you need to lubricate all intensively rubbing parts.
Experts recommend using thick grease (CV joint or something like that) as a lubricant. If the car was designed in such a way that it is impossible to get to the pedal elements or spring, do not despair - there is a way out. Use a slotted screwdriver for this. Apply a little lubricant to its metal part, after which you can reach the necessary places with a screwdriver.
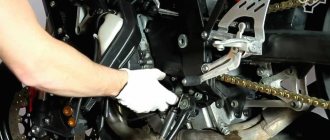
There is also a possibility that the squeak does not come from the pedal, but from the clutch fork. During operation, it serves as a place for dirt and used lubricant to accumulate. Because of this, this unpleasant sound appears.
In order to eliminate squeaking in the clutch fork, it must be washed from dirt. Naturally, it is very difficult to reach it, so this must be done through the engine compartment. To clean, you can use carburetor cleaner - it will do the job perfectly. Once you have removed all the accumulated dirt, apply a coat of thick lubricant to the fork.
Other possible squeaks
In addition to the clutch pedal, the reasons for the appearance of squeaks we have already figured out, the reason may lie elsewhere. For example, if the clutch mechanism uses a cable drive, then it is often the cause of unpleasant sounds. If this is the case, simply changing the lubricant will not help solve the problem. To do this, it is necessary to replace the clutch cable.
If you hear a squeak somewhere from the engine, this indicates a faulty release bearing. To fix this problem, you will most likely need to replace the release bearing.
The clutch pedal may make peculiar noises due to the clutch actuator. This is due to the fact that all the work of the clutch is mechanical friction of the working parts. Naturally, the appearance of noise cannot be avoided. In order to get rid of annoying sounds, you will need to periodically lubricate the rubbing parts. Because you will not be able to control a constant level of lubrication - everything is washed off during operation.
There is a more difficult way out of this situation. Using a skilled turner, turn the bushing between the rubbing parts from a softer metal or polycarbonate. In this case, the occurrence of unpleasant sounds will stop, because the friction of different materials will not create such noise as two materials of the same density and structure create.
Published: August 25, 2015
To watch online, click on the video ⤵
Lada Granta FL clutch pedal clicks More details
Solution to the problem of the clutch pedal crunching on the Lada Kalina Granta Read more
Clutch pedal clicking PROBLEM SOLVED Read more
Eliminating clutch pedal clicks. Part 2 Read more
Lada Granta – eliminating noise (crackling/creaking) from the clutch pedal. More details
We remove the creaking and clicking of the clutch on the Grant frets Read more
Eliminating squeaking clutch pedal on a grant Read more
LADA GRANTA LIFTBACK (creaking from the clutch pedal) More details
Solving the problem with the clutch tensioner for VAZ Priora, Granta, Kalina. More details
Soft and non-squeaky clutch pedal for Lada Granta Sport Leash AGATE STAGE#3 More details
The clutch pedal creaks on the viburnum fret Read more
The first and easiest way to check the condition of the clutch Read more
We make Grant more comfortable for 400 rubles - PCV valve. More details
Priora clutch kit, Basket, Disc, Release bearing More details
Adjusting the clutch cable. LADA PRIORA. More details
Clutch cable, Lada Kalina, replacement. More details
The clutch pedal clicks on the grant Read more
A simple METHOD FOR CLEANING car plastic that EVERYONE SHOULD KNOW! More details
Replacing the VAZ clutch cable (why is the clutch tight) More details
Symptoms of malfunction, diagnostics, solutions
| Sign | Cause and remedy |
| Short pedal stroke | Adjust the length of the cable. Check the integrity of metal fibers. Most likely delamination or bending. |
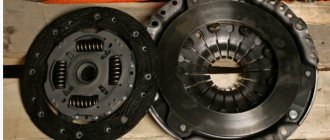
| The clutch drags at speed, it is difficult to shift into higher gears. | The flywheel is bent or damaged. The gripper teeth are worn. Replacing the flywheel and related consumables. |
| Slipping when activating first gear and increasing speed with the accelerator pedal. | Replace friction linings, disk, clean the drive from old grease |
| Sharp jerks when turning on / changing gears. | The pressure plate is damaged, replace the basket. |
| Whistle when activating first and subsequent speeds | Install a new release bearing |
| Crackling, knocking, crunching noise when shifting into up/down gears | Wear out the damper spring, replace it with a new one, lubricate the entire drive mechanism. |
| The lever falls, falls, rattles | Excessive stretch of tensioner. Replace with a new one, install bushings. |
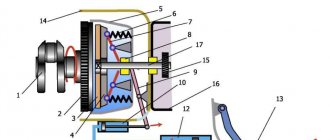
Diagram and principle of operation of the clutch on the Lada Grant
During the systematic operation of the equipment, the friction linings of the driven disk wear out, as a result of which the clutch fork moves forward. The free play of the cable increases. A length compensator is pre-installed for automatic cable tensioning.
A pressure spring installed in the plastic housing of the compensator automatically tightens the cable, eliminating free play of the pedal.
To maintain the clutch in good condition, periodically lubricate the pedal rolling mechanism, cable, and shaft drive lever. It is best to use graphite lubricant, gear oil. Any car owner who is familiar with the principle of operation of the clutch on the VAZ 2109, 21099, 2108 will not experience any difficulties with the Granta.
Transmission cable: replacement
When using a manual transmission correctly, it is necessary not only to monitor the technical condition of this unit, but also to competently handle the gear shift lever directly. Since the main malfunctions in a manual transmission occur when the driver operates the shift lever incorrectly (sharp engagement or “jerking”).
In this case, switching mechanisms, synchronizers, shafts, gears, cables, etc. may fail. We must not forget that over time, the gear shift system, subjected to heavy loads, can also fail. As a result, there is unstable gear shifting, difficulty with shifting, etc.
So, let's look at how to change the manual transmission cable. By the way, replacing manual transmission cables is practically no different from replacing automatic transmission cables. The only difference is the number of cables. The sequence of actions when removing manual transmission control cables is as follows:
- disconnect the wire from the negative terminal on the battery;
- remove the floor tunnel lining, then use special pliers to grab the bent edge of the cable sheath fastening bracket and remove the bracket;
- disconnect the gear shift cable end from the rocker lever pin;
- Grab the spring cotter pin securing the cable tip with pliers and remove it from the hole in the rocker arm;
- remove the battery mounting shelf;
- Squeeze the cable end clamps with pliers and disconnect it from the lever on the manual transmission;
- Remove the end of the cable sheath from the groove of the bracket on the mechanical box;
- Disconnect the end of the gearshift cable from the manual transmission lever and remove the end of the cable sheath from the bracket;
- Remove the “thermal shield” of the additional muffler and remove the cable holder from the hole in the base of the car body;
- Remove the cables under the car;
Read more: How to remove a box on a Matiz
Installation of new cables is carried out in the reverse order of removal. Also, upon completion, it is necessary to adjust the gearbox control drive. Please note that adjustments to the rocker and other mechanisms must be performed as efficiently as possible in order to achieve clear and easy gear engagement.
Advertisements on NN.RU – Auto
Extend the chassis (frame) on Gazelle Next, Gazelle peasant under a body of 4.2 m, 5.1 m and 6.2 m. Extend the frame on Gazelle Next, Gazelle Gas 3302. Cost: 25,000 rubles.
A wide selection of hydraulic pumps and hydraulic motors of all series: spline hydraulic pump of right rotation. It is used in road construction and... Cost: 1,000 rub.
A special enterprise for the conversion of cargo vehicles produces extensions of the man man, iveco iveco truck tractor.
A special enterprise for converting cargo vehicles into a tow truck invites you to install a tow platform on.
Source: www.nn.ru
Creaks in the clutch mechanism
In cars of the VAZ family, the creaking of the clutch pedal can be caused by the clutch fork on the bushings in the crankcase
If everything is more or less clear with squeaks in the pedal block, then with squeaks and rattles in the clutch mechanism everything can be somewhat more complicated. On Grant, Kalina and similar cars, as well as VAZ 2108, 2109-2114, the clutch fork itself on the bushings in the crankcase can creak. The problem is that it is quite difficult to lubricate it without removing the clutch. And for this purpose, many people have WD in their trunk. But we are adults, and we don’t solve problems with half measures. Therefore, you need to try to lubricate it with oil, without removing the gearbox. Otherwise, such a lubricant is worthless. Although if you are not sure that it is the fork on the crankcase that is creaking, then disassembling the entire mechanism may well be required. Creaks don’t just appear and indicate either increased wear, a lack of lubrication, or both.
To lubricate the fork in front-wheel drive cars, you need to remove the rubber plug, if any, and use a syringe to apply lubricant to the clutch fork axle. Sometimes it may be necessary to drill out the housing where the axle is mounted. This way the lubricant will work more efficiently and accurately reach the fork axis.
https://youtube.com/watch?v=1YbOGBZgu1w
In the same mechanisms where the fork does not have an axle, but simply rests against the rod, as in the VAZ 2107, you just need to use a strong screwdriver or pry bar to move the fork to the side, and then lubricate the contact point of the fork with the rod with Litol. It's a two-minute job, but you'll have to crawl under the car. But nerves are more expensive. Therefore, do not be lazy, and your nerves will be stronger and the car will be quieter.
Number of guests with me:
How to check the clutch on a car
For detailed diagnostics of clutch system elements, additional equipment and often their dismantling are required. However, before moving on to these complex procedures, you can simply and quite effectively check the clutch and make sure that it has failed or not without removing the box. four simple ways to do this .
Check at 4 speed
For cars with a manual transmission, there is one simple method by which you can verify that the manual transmission clutch has partially failed. The readings from the car's standard speedometer and tachometer located on the dashboard are sufficient.
Before checking, you need to find a flat section of the road with a smooth surface about one kilometer long. You will need to drive along it by car. The algorithm for checking whether the clutch is slipping is as follows:
- accelerate the car to fourth gear and a speed of about 60 km/h;
- then stop accelerating, take your foot off the gas pedal and let the car slow down;
- when the car starts to “choke”, or at a speed of approximately 40 km/h, sharply give the gas;
- During acceleration, you must carefully monitor the speedometer and tachometer readings.
If the clutch is working properly, the arrows of the two indicated instruments will move to the right synchronously. That is, with an increase in engine speed, the speed of the car will also increase, inertia will be minimal and is determined only by the technical characteristics of the engine (its power and the weight of the car).
If the clutch discs are significantly worn , then at the moment you press the gas pedal there will be a sharp increase in engine speed and power, which, however, will not be transmitted to the wheels. This means that the speed will increase very slowly. This will be expressed in the fact that the speedometer and tachometer needles do not move to the right synchronously . In addition, at the moment of a sharp increase in engine speed, a whistle will be heard .
Checking the handbrake
The presented test method can only be performed if the hand (parking) brake is properly adjusted. It should be well adjusted and clearly fix the rear wheels. The algorithm for checking the clutch condition will be as follows:
- set the car to the handbrake;
- start the engine;
- press the clutch pedal and engage third or fourth gear;
- try to start, that is, press the gas pedal and release the clutch pedal.
If at the same time the engine jerks and stalls, then everything is in order with the clutch. If the engine runs, then the clutch discs are worn out. The disks cannot be restored and either adjustment of their position or complete replacement of the entire set is necessary.
External signs
The serviceability of the clutch can also be indirectly judged simply when the car is moving, in particular uphill or under load. If the clutch slips, then there is a high probability of a burning smell in the cabin , which will come from the clutch basket. Another indirect sign is the loss of dynamic characteristics of the car during acceleration and/or when driving uphill.
The clutch "drives"
As stated above, the expression “drives” means that the driving and driven clutch discs do not move completely apart when the pedal is depressed. As a rule, this is accompanied by problems when engaging/shifting gears in a manual transmission. At the same time, unpleasant creaking and grinding sounds are heard from the gearbox. The clutch check in this case will be performed according to the following algorithm:
- start the engine and let it idle;
- fully depress the clutch pedal;
- engage first gear.
If the gear lever is installed in the appropriate seat without any problems, the procedure does not take much effort and is not accompanied by a grinding noise - this means that the clutch does not “drive”. Otherwise, a situation occurs when the disc does not disengage from the flywheel, which leads to the problems described above. Please note that such a breakdown can lead to complete failure of not only the clutch, but also lead to a malfunction of the gearbox. The described breakdown can be eliminated by bleeding the hydraulics or adjusting the clutch pedal.
( 1 rating, average 4 out of 5 )
Squeaks when using the clutch pedal
As mentioned above, the Lada Granta clutch cable drive has a circuit that provides for the presence of a wear compensator (automatic tensioner). Its participation in the work process significantly simplifies the operation of the vehicle, since it eliminates the need to independently adjust the clutch fork gap or adjust the pedal. However, shortcomings in the production assembly (some of which we mentioned above) reduce the functioning of the wear compensator to nothing.
The solution to the problem involves a complex that includes several, not technically complex, measures:
The initial step is to adjust the clutch fork clearance. This process involves two options:
a) With removal of the air filter housing. We dismantle the (cold) air intake pipe, the air supply pipe to the receiver, and the wiring of the (mass) air flow sensor one by one. We disconnect the electrical harnesses attached to the filter housing, release the housing from the grip of the rubber stops, and then remove it.b) Without removing the air filter. This method is less common because it requires quite a lot of effort to perform manipulations in the limited space of the engine compartment.
To set the clutch fork gap to 27 millimeters, we perform the following manipulations. Pull the clutch cable all the way (in the direction of vehicle movement) and by twisting (unscrewing) the plastic “lamb”, set the required gap (L) between it and the fork.
The next stage (after setting the working gap on the fork) of a set of measures to eliminate the causes of extraneous noise during operation of the clutch pedal will be lubrication of the elements of the pedal assembly. As a lubricant, experts recommend using a substance that is extremely popular among car enthusiasts - WD-40. Lubricant is supplied not only to the clutch bushing, but also to the plastic ratchet that compensates for wear. Applying lubricant to the cable sheath won't hurt either.
In addition to the information presented above, let's look at a few more reasons that cause squeaking clutch pedals.
One of these reasons may be the friction of the plastic bushing, which is one of the parts of the pedal mechanism, on the bracket. This happens when the pedal is pressed on the microswitch of the mechanism that automatically tensions the clutch cable.
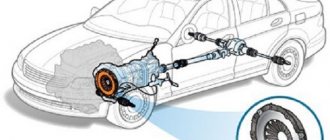
Sachs clutch
The production of clutches for various car brands also has its own innovations. The clutch, like all other mechanisms, wears out quickly, and every driver wonders how to choose the right mechanism. Driving style and operating conditions are directly proportional to service life. Therefore, Sachs specialists, taking into account all the wishes of drivers, have released completely new, environmentally tested flywheels, release bearings, clutch discs and slave cylinders, compact clutch units and other equally interesting design solutions. These new products include:
- MZ type clutch basket with pull-out action.
- XTend with automatic wear compensation.
- Dual-mass flywheel ZMS.
- Release bearing type CSC.
- Ultra-compact clutch unit (for sports cars).
Which clutch to install is up to you, but if the driver takes good care of his car, replacement can be done after 100,000 km. The clutch pedal is a kind of indicator of the technical condition of the engine and transmission.
It signals various malfunctions and requires prevention and constant monitoring. Competent and correct replacement of the clutch, using all the capabilities of these designs will extend the life of your car.
Step-by-step instruction
Now we will analyze the whole process step by step. Stock up on a caliper or at least a ruler in advance.
- Open the hood and disconnect the negative terminal on the battery. Now we need to remove the air filter, which hides the components we need
- We remove the mass air flow sensor connector, the adsorber coupler, the rubber supports and tilt the VF housing to the side
- Our clutch fork is located next to the crankcase. On some cars on the secondary market you can also find a sensor moved there by the driver
- Using a tool, say, pliers, we pull the tip towards ourselves in order to free up more space for work
- We take a caliper and measure the distance from the leash to the fork. According to Grant's technical documentation, it should be exactly 27 millimeters
- We adjust the leash according to the thread if the distance does not match
- Then we press the pedal a couple of times, look at the result, and repeat the setting
- Next is the travel of the pedal itself. It should be 14.6 centimeters (+ - centimeter). As already said, it is better if it is flush with the brake
- If even after several adjustments the pedal does not fall into place, then it would be logical to deal with the unit itself
Daewoo Nexia 2008, engine Gasoline 1.5 liter., 85 hp, Front drive, Manual — observation
Comments 16
There was a time when it also creaked. It just passed. doesn't bother me anymore.
It’s useless to lubricate, the release valve is dying, it may be time to change the clutch, but the release valve is definitely there, unless of course the clutch fluid is in place
I put some oil on the clutch, everything is great now it doesn’t squeak!))
this is the same as putting oil into a dead tip, it helps, but not for long
Well, I don’t know, God forbid it doesn’t creak!)) I just wash the motor often!)) apparently because of this!))
It’s just that maybe one day the clutch will disengage and you’ll turn off the engine and put it in gear, turn on the engine and drive, and so on until you get home. although you may be right, I’m not a master of everything;)
What do you think about changing the clutch?)))
Yes, for now, if he drives, then drive, if around the city, then it’s no big deal. and so only the release lever and the fork, and since you still need to remove the box to replace it, that’s why the masters also advise changing the clutch basket and clutch disc, this is the second time I’ve changed it, the first time at 90 thousand, the second at 160
Well, I haven’t reached 90 yet!))
Clutch pedal creaking - causes
The main reason in the vast majority of cases is the drive, which can be either mechanical or hydraulic. The force you exert on the pedals is transmitted to the clutch fork via a cable or hydraulic system. Despite the fact that hydraulic and mechanical drives have different designs, they have the same squeaking noise. On models such as: VAZ 2110, 2112, 2114, 2115, a mechanical cable clutch is installed. In some models, in order to compensate for friction lining wear, the manufacturer installs a mechanism that does not require adjustment. This clutch is equipped with: Priora, Granta, and also Kalina.
When the driver notices that the clutch pedal is creaking, this already indicates that the problem has reached a certain point. Creaking is associated with increased wear of working parts (for example, the fastening mechanism), moisture on the rubbing surfaces, as well as with other reasons for which increased friction occurs. Often pedal squeaking occurs due to the return mechanism.
Such sounds most often occur not when pressing, but when releasing the pedal, just at the moment when the clutch mechanism is released from the load. If we talk about the pedal assembly, then only the mechanical connections, as well as the return spring, can creak there. The problem of squeaking itself is unpleasant because it is extremely difficult to get to the pedal unit. Working in a confined space is not easy, so the work requires a lot of strength and patience.
The clutch pedal squeaks due to wear on the mounting mechanism. For most VAZ models, the pedals are mounted on suspension brackets and axles. Either a plastic bushing or lubricant is responsible for the pedal sliding on the axle. By and large, plastic bushings do not provide for the presence of lubricant, but if you add it, it will not be worse. A squeaking clutch pedal can occur even on new cars in which everything is working properly. You can remove squeaking and grinding noises by applying lubricant or replacing the bushing and spring; the most important thing is to find out exactly where the creaking is coming from. The lubrication itself is carried out after complete dismantling of the pedal block along with all mechanisms. The work is complicated by the fact that the dismantling process takes a lot of time and is considered very labor-intensive. If you don't want to remove all the pedals, you can try lubrication using a syringe. Apply oil to the rubbing parts, inside the bushings, and also where you think it is necessary. We remove the remaining lubricant with a rag, after which we check whether the clutch pedal squeaks or not.
If nothing has changed after lubrication, we can assume that the reason is the return spring. The spring may hit something or squeak on its own. We lubricate the spring, if necessary, with silicone grease or WD-40, but the effect will most likely be short-lived. Therefore, it is better to use more serious lubricants such as graphite or CV joint lubricant.
The cable creaks. In some cases, creaking, grinding and clicking noises are associated with malfunctions of the mechanical drive. The trouble in this case is that the cable can creak both outside and inside the cabin. Full lubrication of the cable along its entire length will help correct this situation. The procedure is not complicated and does not take much time, so if this is the reason, then you can consider yourself lucky. For convenience, the cable is disconnected from the clutch fork, after which it is lubricated from the engine compartment. If the cable is old and shows signs of wear, lubrication is hardly advisable, it would be better if you completely replace the clutch cable. Unprotected working surfaces of the cable that are outside the protective casing should be lubricated with waterproof grease.
The creaking of the compensating mechanism. If your car has such a mechanism (it is located under the hood or near the pedal), the new cable may make unpleasant sounds and clicks, similar to squeaking or grinding. The problem in this situation is due to the fact that the mechanism is not worn in and requires lubrication of the compensation mechanism.
If the creaking of the VAZ clutch pedal is not associated with any of the above problems, there is a suspicion that unpleasant sounds are generated in the crankcase area. Such a squeak can be produced, for example, by the clutch fork. The difficulty in this situation is that you can check whether the problem is or not only after completely dismantling the clutch. There are indeed some tricks, such as lubrication without removal, but they require certain skills and accuracy. The trick and dexterity lies in the ability to lubricate the fork with oil without removing the gearbox. However, if it is not the fork that is creaking, but another mechanism, most likely you cannot do without removal.
The fork is lubricated as follows. We take out the rubber plug, then fill the syringe with lubricant and carefully apply a few drops to the clutch fork axle. For cars whose forks do not have an axle, lubrication occurs a little differently. Using a powerful screwdriver or mounting tool, the fork is moved to the side, after which it is lubricated with a thick Litol-type lubricant at the point of contact of the fork with the rod.
Clutch adjustment on Lada Priora -
The main signs of a clutch malfunction are a decrease in travel and sticking of the clutch pedal, extraneous clicks, poor vehicle traction, or unclear gear shifting due to incomplete disengagement of the clutch. All these malfunctions indicate that periodic clutch adjustment is necessary. Priora, like all VAZ cars, needs such maintenance.
Lada Priora belongs to the VAZ family of cars, and was first released in 2007. Now there are several modifications of the Priora. The model continues to improve and acquire new qualities that make life easier behind the wheel. However, there are shortcomings both in the initial assembly and during operation.
Video of clutch adjustment on Priora.
Components of domestically produced cars quickly become unusable, and many motorists of our cars have long become accustomed to this idea. In addition, it is worth taking into account your driving style, as well as the quality of the roads you most often drive on. However, the parts still do not last forever, and some of them have to be changed or the elements of the mechanisms must be adjusted. One of the “unreliable” and “capricious” elements of the Lada Priora car is the engine clutch mechanism with the gearbox. The main signs of a clutch malfunction are a decrease in travel and sticking of the clutch pedal, extraneous clicks, poor vehicle traction, or unclear gear shifting due to incomplete disengagement of the clutch. All these malfunctions indicate that periodic clutch adjustment is necessary. Priora, like all VAZ cars, needs such maintenance. It's no secret that it is important to have a working clutch on your car: safety and predictability on the roads depend on it. Incorrect cable tension will cause the pedal to dangle idle, and the device itself will experience increased wear on the friction linings of the driven disc due to additional friction on the crankshaft flywheel. The speed will decrease significantly due to the loss of torque; changing gears will also be problematic with a sticking pedal and the clutch not completely disengaged. Adjusting the mechanism may include either adjusting the clutch cable or completely replacing it along with the sensor and bushing. The following will be discussed below: How to adjust the clutch on a Priora by changing the gap from the cable to the adjusting screw.
Replacing the clutch cable.
Drive cable adjustment
The clutch device in the so-called loose state causes a number of problems: clicks and loosening of the pedal, insufficient coupling of the driven disk with the crankshaft flywheel and other troubles, as mentioned above. The work of adjusting the clutch on a Priora will not take much time, plus it is quite simple, and every car enthusiast can do it in his own garage. We drive the car into the pit. To prevent it from dangling back and forth, we fix it with wheel chocks. We open the hood of the car, look at the space to the left of the battery, where the clutch fork along with the cable is located. It is this cable that needs to be adjusted. Using a regular ruler, you need to measure the distance from the base of the clutch cable to the adjusting screw. For the machine in question, this segment should be equal to 27 mm. The main condition that must be met is 100% measurement accuracy. Deviations up or down (25 or 28 mm) will not lead to positive results. So, the cable is put back into the clutch release fork, then the clutch pedal is depressed several times. It’s better to work with a partner, this way things will go much faster. If the pedal continues to click, the adjustment can be made again. The main thing you should achieve is that the pedal moves smoothly, without sticking or clicking. However, it is not always possible to correct the situation with the clutch only by adjusting the cable. If there is a break in the spare part or there is a tight action in the casing, then it is necessary to replace the clutch cable and, if necessary, other components of the mechanism.
Replacing and adjusting the clutch cable on Lada Priora
The work is divided into three stages: dismantling, installation and adjustment. Tools required for work: 17 mm and 8 mm wrench, or universal wrench. Hexagon for fixing the part and a screwdriver.
Dismantling the cable
First of all, you need to remove the air filter from the engine. Next, the clutch mechanism cable is tensioned in order to remove the cable guide from the lever. Removal is carried out as follows: using a wrench 17, loosen the fixing nut of the cable end. The part is secured with a hex key. The tip is removed from the bracket, located in the interior of the Lada Priora car. For a more visual representation of where everything is located, here is a diagram of the clutch mechanism on the Priora:
The clutch consists of a tip driver (1), a release fork lever system (2), a pressure plate (5), a pressure spring (11), a driven disk (7), a clutch release bearing (12), and a clutch housing (10). The entire mechanism is located in the clutch housing - 3. Nearby there are such parts as the gearbox input shaft (8) and the flywheel (6), secured to the clutch with bolt 4. Helpful advice: adjusting the clutch on a Lada Priora and replacing components can be complicated by the fact that the mechanism located in a rather inconvenient place. To do the job faster, you need to push and remove the pedal. This can be done using a screwdriver; just carefully pry off the pedal. The cable is pulled out of the seal case, after which the cable guide is removed. You also need to inspect the clutch sensor and plastic bushing. If the sensor has become unusable (and this can be seen when operating the car when the clutch is not completely disengaged), it is removed and replaced with a new one. We do the same with the bushing. The new pin and bushing must be lubricated with a special product before replacement.
Installing a new clutch cable
The clutch cable is installed through a special shield hole into the channel from the car interior to the engine space. Initially, a sealing cover is installed, after which the coupling mechanism is mounted on the cable pin. First the cable pin is fixed, and then the sheath is attached. Adjusting the clutch cable on a Priora is carried out as described above. The cable is mounted on the end all the way, and the gap between it and the lever should be no less and no more than 27 mm. Adjustment of the clutch drive is achieved by turning the tip of the cable and leveling it with the leash. Adjusting the drive allows you to eliminate unnecessary gaps, as well as relieve the load and obtain a tight fit to the lever system. A properly tensioned cable and oriented drive will allow the clutch to automatically adjust while the vehicle is in use. The optimal full travel of the clutch pedal should be 146 mm. It is better to measure the distance with a hard ruler; it is not recommended to use a soft centimeter to avoid errors. What else should you consider? Definitely, the operation of replacing the cable should not be carried out if it is not possible to adjust the cable for a long time or the entire coupling device has extensive damage. In some cases, comprehensive diagnostics using professional equipment is required, as well as a complete replacement of the transmission unit. The best solution would be to contact a specialized automotive workshop, where they will quickly identify the problem and eliminate all negative consequences.
Why does a squeak occur when the clutch is released?
Very often, along with a squeak, other problems associated with the clutch pedal may arise. Basically, the pedal can be hard to move and is pressed jerkily.
Why does a squeak occur when releasing the clutch:
- In this case, it is necessary to urgently undergo diagnostics, since with further operation of the car, the fork or the cable that connects the clutch pedal to the car parts under the hood may break.
- Most often, the squeak appears when the clutch pedal is released, that is, at moments when there is no pressure on it. When all the mechanisms are under pressure, they work more smoothly. As soon as the pressure decreases, a squeak occurs.
- There are several options to solve the problem. Of course, it is best to remove the pedal, disassemble it and lubricate all the components. However, this manipulation takes a lot of time; even experienced car enthusiasts can do the job for half a day.
Consequences
This operation does not cause any negative consequences. As the clutch discs wear, the rod will gradually come back out. However, when new clicks begin, the time will come to change the clutch itself.
The design of the Priora clutch drive cable can be seen in the video:
- Vehicle track width: determine correctly
- Homemade strobe for setting the ignition
- How to make a car strobe light with your own hands
- Vehicle understeer and oversteer
Elimination methods
Diagnosing and correcting this problem involves performing some rather complex actions and operations. The first thing that needs to be done is to adjust the clearance on the fork, the second is to apply lubricant to the elements that are the direct source of the squeak.
Adjustment can be done in two ways: with removal of the air filter and without removal.
- A method that involves removing the filter. Sequentially disconnect the pipe that shuts off the air supply, then disconnect the pipe that supplies air to the receiver and the air flow sensor. After this, disconnect the filter itself, electrical harnesses and rubber stops.
The second method is not particularly popular, as it is very complex and takes a lot of time to execute.
To adjust the fork clearance, perform the following steps. We find the clutch cable and take it out. It needs to be pulled out all the way, in the direction of movement of the car, and by twisting a special plastic wing, we set the required gap between the fork and it. You can find out information about the required clearance from the manual for your car, since this indicator is not the same for different models and types of cars.
After setting the required gap on the fork, you need to perform lubrication work. In this case, you need to know the exact places where the lubricant should be applied. A VD (Vedashka) can be used as a lubricant. Not only is it a versatile material, but it is also ideal for dealing with such problems. There is no need to lubricate the clutch thoughtlessly and everything in a row, since it is enough to do this in several places. This way, you won’t have to overuse the material, as this will not bring the required result, and perhaps the pedal will still squeak after this operation.
The first place that needs to be treated with lubricant is the pedal and its assembly from inside the car.
Next, remove the rubber washer from the clutch, and then remove the edge of the cable from the slot and clean it. First of all, it needs to be cleaned of dirt and other unnecessary substances. After this, the cable and fluoroplastic bushing must be treated with lubricant. Using a medical syringe, you need to lubricate the cable in the corrugation area. After this, disconnect the boot and thoroughly lubricate the bushings and shaft. For this, a special aerosol molybdenum mixture is used.
Now you can remove the creaking clutch pedal yourself, while saving on work.